Frequently Asked Questions About Robotics
Is Arduino safe for children to use?
Yes, Arduino is generally a safe and highly educational tool for children, typically recommended for ages 10 and up. An Arduino is a small, user-friendly microcontroller—essentially a mini-computer—that can be programmed to control electronics. It's the heart of many hands-on STEM projects, from building simple blinking lights to creating complex robots. For younger children, especially those under 12, it's best to work alongside a parent or supervisor to help guide their learning and ensure a safe experience.
While the low voltage of Arduino projects makes them relatively safe, it's still important to practice basic electronic safety. The primary risks are not from electric shock but from the possibility of short-circuiting components, which can cause wires to get hot or damage the parts. With proper supervision, children can learn to handle these components correctly, for instance, by ensuring connections are right before powering up their project. This supervised exploration is a fantastic way for them to learn valuable, real-world skills in both electronics and programming in a controlled environment.
How much do robotics classes cost, and do we need special equipment or software?
The cost of robotics classes can vary depending on the format and subject. To get a feel for what robotics is all about, we offer free introductory events like our Fun with Snap Circuits session, which provides a great entry point into the world of circuits and electronics. For more structured learning, there are many high-quality, live online classes available that are designed to be both fun and educational.
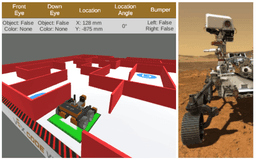
One of the great things about modern online robotics education is that you often don't need to buy expensive equipment to get started. Many of our foundational courses, such as Junior Robotics, use powerful virtual environments and simulators where students can build and program robots entirely online. This approach makes learning accessible and allows children to explore complex concepts in coding and engineering without the need for physical devices.
What will my child actually learn in a robotics class?
A robotics class is a fantastic playground where technology meets creativity. Your child will learn how to design, build, and program robots to perform specific tasks, translating abstract ideas into tangible results. They'll start with the basics of coding, often using fun, block-based platforms that make programming concepts easy to grasp before moving on to languages like Python. This process goes beyond just technical skills; it teaches children analytical thinking as they break down complex problems into smaller steps and fosters valuable teamwork and communication skills.
Beyond the core mechanics and coding, robotics lessons show kids how technology is used to solve real-world problems. From navigating virtual mazes to understanding how sensors help a robot interact with its environment, students gain a practical understanding of everything from mechanical engineering to artificial intelligence. These classes nurture critical thinking and problem-solving, equipping your child with essential tools for the future, all while they're having a blast bringing their own robotic creations to life.
What are the career opportunities in robotics and coding?
A background in robotics and coding opens up a world of exciting and diverse career opportunities for your child. The robotics industry is growing quickly, with robots being used in many fields like manufacturing, transportation, healthcare, and agriculture. Learning about robotics doesn't just prepare a child for a tech career; it also builds crucial 21st-century skills like problem-solving, creativity, and critical thinking that are valuable in any profession.
As technology continues to advance, a wide variety of specific roles are becoming available. These include careers like Robotics Engineer, where professionals design and build robots, and Robotics Software Engineer, where they create the code that makes robots work. Other paths include Robotics Technician, a hands-on role focused on maintaining and repairing robots, and even fields that combine robotics with other passions, such as developing surgical robots for medicine or autonomous rovers for space exploration. By exploring STEM robotics, your child can build a strong foundation for these future careers.
What’s the difference between automation and robotics, and how does artificial intelligence integrate with robotics?
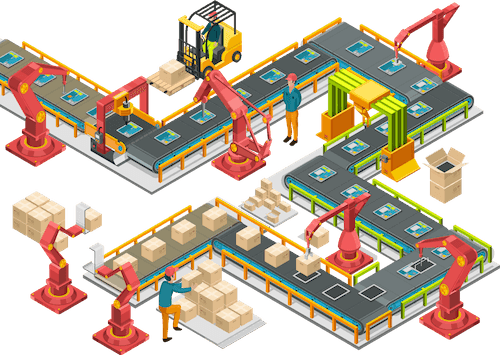
It's great that you're exploring the building blocks of technology for your child! Understanding these terms can feel tricky, but the distinction is quite straightforward. Think of automation as any technology that allows a task to be done without human help, like a factory assembly line. Robotics is a specific field of technology focused on designing, building, and programming physical robots—the machines that often perform those automated tasks. So, while a robot is a form of automation, not all automation involves a physical robot.
Artificial intelligence (AI) takes robotics to the next level by giving robots a "brain" to think and learn. Instead of just following a strict set of pre-programmed instructions, AI allows a robot to use sensors and data to perceive its surroundings, make decisions, and even learn from its experiences. This is what enables a robot to navigate a room it has never seen before or understand spoken commands. This exciting blend of robotics and coding is what powers everything from smart vacuums in our homes to rovers exploring other planets.
What are some real-world applications of robotics and coding?
Robotics and coding are transforming the world around us in amazing ways, and their applications are expanding every day. In manufacturing, robots perform tasks with incredible precision, from assembling cars to packing products on a production line. The impact of robotics is also growing in healthcare, where they assist with surgeries, help with elder care, and deliver supplies in hospitals. You can even find robots in agriculture, where drones help monitor crops, and in our own homes with devices like the Roomba vacuum cleaner.
These real-world applications are powered by coding, which acts as the brain of the robot, telling it exactly what to do. From self-driving cars that use sensors and AI to navigate safely, to robotic arms that need precise instructions, coding is the essential skill that brings these machines to life. By learning about robotics and coding, kids are not just preparing for future careers in fields like engineering and software development; they are also developing critical thinking and problem-solving skills that are valuable in any path they choose.
Is robotics coding hard to learn?
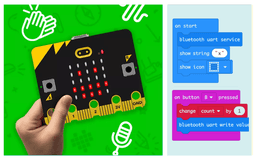
Learning to code for robotics can be surprisingly approachable and fun for students of all ages. For younger children and beginners, many programs start with block-based coding, which uses a simple drag-and-drop interface to teach the fundamentals of programming without the frustration of complex syntax. This method helps kids grasp core concepts and see the results of their work quickly, building excitement and confidence.
As students grow and their skills develop, they can transition to text-based programming languages like Python, which are used by professionals in the field. This scaffolded approach ensures that children can start at a level that is right for them and gradually build up to more advanced concepts. To see how this works in practice, you can explore this beginner's guide to robotics and coding.
What essential math skills do I need for robotics programming?
A strong foundation in math is definitely helpful for robotics, as robotics is a key part of a STEM education, which includes Science, Technology, Engineering, and Mathematics. Instead of requiring advanced math topics, robotics for kids focuses on bringing math concepts to life in a fun, hands-on way. Through building and programming robots, children can see abstract ideas from science and math applied in a practical and exciting manner.
Engaging in robotics helps children develop crucial skills that are at the heart of mathematical thinking, such as logical reasoning, critical thinking, and problem-solving. When a robot doesn't work as expected, your child will learn to troubleshoot and figure out a solution, which strengthens their analytical abilities. To get a better sense of how these skills are integrated, you can explore more about robotics and coding and its connection to a broader STEM robotics education.
What programming language is best for robotics?
For younger children and beginners, block-based coding platforms like Scratch are an excellent starting point. These platforms use a simple drag-and-drop interface with visual blocks, which helps kids grasp fundamental coding concepts without needing to worry about complex syntax. As they build this foundation, they can progress to platforms like VEXcode VR, which allows them to program virtual robots and see their code come to life in a 3D environment. This visual and interactive approach is not only fun but also highly effective for learning the logic behind robotics.
For older or more experienced teens, text-based programming languages are the next step and are essential for more advanced robotics. Python is a popular choice because it is considered one of the easiest text-based languages to learn and is widely used in the fields of artificial intelligence and machine learning, which are increasingly important in robotics. Other powerful languages used in professional robotics include C++ and Java. Platforms like Arduino, which uses a simplified version of C++, offer a great hands-on way for teens to build and program their own smart devices and robots.
What programming languages are used in robotics (for kids/students)?
For young students just beginning their robotics journey, the most common starting point is block-based coding. Think of it like digital building blocks; instead of writing out complex code, kids can drag and drop visual blocks of commands to program their robots. This approach is intuitive and fun, using platforms like Scratch or VEXcode VR to help children learn the fundamentals of programming logic without needing to worry about syntax errors. This method builds a strong foundation in computational thinking and problem-solving in an engaging, hands-on way.
As students get older and more experienced, they often transition to text-based programming languages, which are the same languages used by professionals in the field. Python and C++ are two of the most popular and powerful languages for robotics. Python is widely used because of its applications in artificial intelligence and machine learning, while platforms like Arduino introduce students to coding that is similar to C++ to control electronics and build smart devices. You can learn more about this learning path in this beginner's guide to robotics and coding.
How can I teach my child robotics at home?
Teaching your child robotics at home is more accessible than ever, and you don't even need a physical robot to begin. A great way to start is by introducing the basics of coding, which is the language used to control robots. For beginners, block-based coding is an excellent approach because it's visual and intuitive. Your child can apply these skills in fun, virtual environments, programming a digital robot to navigate mazes, draw, or transport objects. These activities build a strong foundation in problem-solving and computational thinking while feeling just like play.
Once your child is comfortable with basic coding, they can explore more complex projects like designing simple electronic systems for alarms or home sensing. There are many exciting, age-appropriate ways to learn, from virtual circuit building with Snap Circuits to engineering with Redstone in Minecraft. To help guide their learning journey, you might consider structured online robotics courses that provide expert instruction and a clear curriculum. These programs offer a fantastic way for kids to build confidence and see how their coding skills can bring creative ideas to life in both the digital and physical worlds.
How can a beginner get started with robotics and coding?
Getting started with robotics and coding is more accessible than ever, even without buying a physical robot. A great first step for beginners is to explore virtual robotics platforms where they can program a digital robot through various challenges and environments. Many of these tools use block-based coding, a beginner-friendly, drag-and-drop method that makes it easy to give the robot instructions and see instant results. This approach removes the intimidation of complex programming syntax and allows kids to focus on creative problem-solving from day one.
To build a strong foundation, it's helpful for children to first get comfortable with basic coding concepts. Programs like Scratch are an excellent starting point before moving into specific robotics and coding lessons. Once they have the basics down, they can apply those skills to make virtual robots navigate mazes, transport objects, and more, all while developing critical thinking and creativity. With many age-appropriate pathways available, your child can begin their journey with fun, hands-on projects that bring technology to life.
What is the best/appropriate age to start learning robotics or take robotics classes?
Sleuthing the sources...
The user wants to know the best age for a child to start learning robotics. I need to find the specific age recommendations in the provided articles.
robotics-for-kids mentions learning pathways for different age groups: K-2, 2-4, 4-6, 6-9, and 9-12. It also has a table with specific robotics platforms and the grades they're best for. For instance, Snap Circuits are for grades 2-8, VexVR for 2-4, and Arduino for 4-9. This suggests that children can start as early as kindergarten or 1st grade.robotics-lessons provides lesson plans for elementary (Grades 3-5) and middle school (Grades 6-8), and lists classes for grades 2-4 and 4-8, and 4-9. This reinforces that elementary school is a great time to start.robotics-courses-online mentions a "Junior Robotics" class for grades 2-4. This points to early elementary as a starting point.robotics-for-teens focuses on older kids but mentions some kits, like Makeblock mBot and Sphero BOLT, are suitable for ages 8+. This is around 3rd grade.
Synthesizing this information:
- Children can start learning robotics concepts as early as elementary school, with some programs and tools available for children in grades K-2.
- A common starting point for more structured robotics classes, especially virtual ones, seems to be around 2nd grade (age 7-8).
- Different tools are recommended for different age groups. Younger kids (grades 2-4) might start with block-based coding and virtual robots like VEX VR, while older elementary and middle school students (grades 4-9) can move on to platforms like Arduino.
- The key takeaway is that there isn't one "best" age, but rather different, age-appropriate pathways. The journey can begin in early elementary school.
I will structure the answer to reflect this. The first paragraph will state that children can start in elementary school and that the approach changes with age. The second paragraph will give specific examples of how younger kids might start versus older kids, and I'll include a link to the "Robotics for Kids" article as it provides a comprehensive overview and pathways.The great news is that children can begin exploring the world of robotics as early as elementary school, with age-appropriate activities available for students in grades K-2. There isn’t a single “best” age to start; instead, the focus is on matching the complexity of the concepts with the child's developmental stage. For younger learners, robotics can be introduced through hands-on, playful tools that teach foundational concepts of electronics and logic.
As children get older, their robotics journey can evolve with them. Students in early elementary (grades 2-4) can start with virtual robotics and block-based coding, which are great for learning programming fundamentals without needing physical robots. Older students in upper elementary and middle school (grades 4-9) can advance to more complex topics like designing smart devices and working with platforms like Arduino. To discover more about the different learning pathways and find the right starting point for your child, explore our guide to Robotics for Kids.
What is STEM robotics and why is robotics important in STEM education?
STEM robotics is a hands-on field of study that brings together Science, Technology, Engineering, and Mathematics in a fun and interactive way. It involves designing, building, and programming robots, which allows students to see abstract STEM concepts in action. Rather than just learning about technology or coding in theory, kids get to apply these principles to create something tangible, making it a powerful and engaging educational tool. This approach helps demystify complex topics and sparks curiosity in how the world around them works.
The study of robotics is a cornerstone of a well-rounded STEM education because it builds essential skills for the future. While creating robots, children develop their creativity, critical thinking, and problem-solving abilities as they work through challenges. This process isn't just about building a machine; it teaches valuable life skills like perseverance, teamwork, and even leadership. By seeing their code come to life, students gain confidence and a deeper understanding of technology, preparing them for a future where robotics and automation are increasingly important.
What is the difference between coding and robotics, and how do they work together?
It’s helpful to think of robotics as creating the physical body of a robot and coding as creating its brain. Robotics involves designing and building the actual machine with all its mechanical and electrical parts, like motors, sensors, and circuits. On its own, a robot is just a machine; it needs coding to tell it what to do. Coding is the process of writing instructions in a language a computer understands, which directs the robot’s actions.
Coding and robotics are intertwined because the code is what brings the robot to life. The software programs created through coding act as the essential instructions that allow a robot to perform specific jobs, from simple movements to complex tasks. Whether using block-based languages for beginners or text-based languages like Python for more advanced functions, coding enables a robot to process information from its sensors and interact with the world. You can learn more about how they work together in this guide to robotics and coding.
What is the best/appropriate age for a child to start learning Arduino?
There is no definitive "best" age to start learning Arduino, as readiness can vary from child to child, but a common recommendation is around 10-12 years old. At this age, many children have developed the logical thinking and problem-solving skills necessary to grasp the basics of both the C++ based programming language and the electronics concepts involved in building circuits. This hands-on approach to technology allows them to see their code come to life in the real world, which can be a powerful motivator and confidence-booster.
For younger children, typically in the 8-10 year old range, Arduino can still be a fantastic and engaging introduction to STEM, though it often requires more direct parental supervision and support. Starting with simpler, pre-existing projects and focusing on the fun of building can lay a great foundation for more independent exploration as they grow older. The key at any age is to encourage curiosity and celebrate the learning that comes from experimentation, turning every project into a rewarding experience.
What is Arduino and what can I do with it?
What is Arduino and what can I do with it?
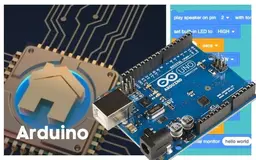
Arduino is a popular open-source electronics platform that acts as the "brain" for creating a wide variety of interactive projects. Think of it as a mini-computer that you can program to control physical objects using sensors, lights, and motors. It's a fantastic hands-on tool for teens to dive into the worlds of electronics and coding, making it a great stepping stone from block-based coding to more advanced languages like Python or C++.
With an Arduino, the project possibilities are vast and incredibly fun. Beginners can start with simple yet rewarding projects like building a small weather station, designing alarms, or controlling LED lights. As they gain confidence, they can move on to engineering more complex systems. For example, Arduino is one of the most popular systems for building robots and smart home devices. To get started, you can explore beginner-friendly robotics projects or even use an Arduino starter kit.
What are the most common errors in Arduino programming and how can I fix them?
When your child starts learning Arduino, they'll discover that troubleshooting is a normal and valuable part of the coding process. Many common issues aren't with the code itself, but with the hardware setup. For example, a frequent error is the computer not recognizing the Arduino board, which can often be fixed by selecting the correct board and COM port in the software settings or simply using a different USB cable. Sometimes, the program or "sketch" is too large for the Arduino's memory, or the wrong board is selected in the programming environment, leading to an error message.
On the programming side, small syntax mistakes are very common for beginners. These can be as simple as a forgotten semicolon at the end of a line or a misspelled variable name, which can prevent the code from running. Another typical challenge is creating an accidental infinite loop that makes the program unresponsive. Learning to spot these bugs is a fantastic problem-solving skill, and with a little practice, your child will learn to identify and fix these common errors, building resilience and confidence along the way.
What are the best Arduino starter kits for kids/beginners?
Choosing the right Arduino starter kit is a fantastic step to introduce your child to the exciting worlds of coding and electronics. Arduino is a small, easy-to-use "microcontroller" that acts as the brain for all sorts of fun, hands-on projects, from building a small robot to creating a weather station. It's a wonderful way for kids to see their code come to life in the physical world, turning abstract concepts into tangible creations and sparking an interest in how technology works.
When selecting a kit for a beginner, look for one that includes a wide variety of components like colorful LEDs, sensors, buttons, and motors, as this will give your child more creative freedom. The most important feature, however, is clear, step-by-step instructions or a project guide designed specifically for kids. The best kit will match your child's age and interests, ensuring the projects are engaging and build confidence. Many kits are designed as all-in-one packages, making it easy for young creators to get started right out of the box.
Which Arduino board is best for beginners?
An excellent question! Choosing the right starting point is key to fostering a love for electronics and coding. For teens just beginning their journey into the world of robotics and custom electronics, the ELEGOO UNO Project Super Starter Kit is a fantastic choice. This kit is built around the Arduino UNO, a popular and user-friendly microcontroller board, which acts as the "brain" for their projects. It's specifically recommended for beginners because it includes detailed tutorials and a wide variety of components like sensors and motors, allowing teens to build everything from simple light controls to a small weather station.
Arduino is one of the most popular systems for building robots and smart devices, making it a great skill for aspiring engineers to learn. While our online classes use a simulator so you don't need to purchase a physical device, the code your child writes can work on a real Arduino without any changes. This provides a seamless transition from learning the concepts in a class like our Arduino for Kids course to bringing their own creative robotics projects to life.
Can you suggest useful Arduino projects for home automation beginners?
For families new to electronics and coding, Arduino offers a wonderfully hands-on way to learn about home automation. Simple, fun projects can introduce your child to the basics of building circuits and programming, showing them how technology can solve real-world problems. For instance, you can start with an automated plant watering system that uses a sensor to detect when the soil is dry and then turns on a small pump. Another great beginner project is creating voice-controlled lighting for a room.
As your child gains confidence, they can explore other exciting projects like building a smart thermostat that adjusts the room's temperature or an automated pet feeder that dispenses food at scheduled times. These projects not only build valuable STEM skills but also empower kids to see themselves as creators and innovators. You can find many free tutorials and guides online to help you get started with the necessary components, such as an Arduino board, sensors, and small motors.
Where can I find beginner-friendly Arduino project ideas and step-by-step tutorials?
Starting your child's journey with electronics can be exciting, and Arduino offers a fantastic, hands-on way to learn the basics of coding and circuits. For beginners, a great first project is learning to blink an LED light, which is the "Hello, World!" of the hardware world. This simple exercise teaches fundamental concepts about circuits and programming the Arduino board. From there, kids can move on to fun challenges like controlling the LED with a switch or creating a traffic light sequence with multiple LEDs.
As your child grows more confident, they can explore more complex and creative projects like building a line-following robot car, designing a safety alarm, or even making an Arduino stopwatch. These projects help solidify their understanding of how hardware and software work together to solve real-world problems. To explore these ideas and find guided tutorials, you can check out our list of fun Arduino projects for kids, which are designed to be engaging and educational for young creators.
Are there fun Arduino projects that don’t require soldering?
Yes, absolutely! There are many engaging Arduino projects perfect for kids that don’t require any soldering, making them a safe and accessible way to introduce electronics and coding. These projects often use a breadboard, a convenient tool with small holes that lets you plug in and connect wires and components to build a circuit without any permanent connections. This setup is ideal for beginners, as it allows for easy experimentation and reuse of parts.
For example, many introductory robotics projects for kids focus on solderless activities like coding lights or building a simple alarm system using a simulator. These activities help children grasp the fundamentals of circuits and programming in a fun, hands-on way. As they grow more confident, they can explore building things like a robot car or a smart home device, many of which can be assembled using beginner-friendly kits with pre-built, plug-in components.
What are the easiest/simple Arduino projects for complete beginners?
For parents and kids completely new to electronics, starting with Arduino can be very exciting. A great first project is learning to control LED lights. This teaches the basics of how to write simple code to make an LED blink on and off, which is a classic and rewarding first step. Another easy and fun project is coding a simple alarm system using a simulator, which introduces how to use sensors and create responses, like a sound or light, when a sensor is triggered. These projects don't require you to buy a physical Arduino board right away, as you can start with online simulators that behave just like the real thing.
These introductory projects are fantastic for building a foundational understanding of circuits, sensors, and coding. They are designed to be engaging and help kids grasp the core concepts of how hardware and software work together, which is the basis for all robotics and smart devices. As your child gains confidence, they can move on to more complex creations and even explore building their own robots. To get started, you can explore beginner-friendly robotics projects for kids that use simulators to make learning easy and accessible.
How do I connect and control an LED, sensor, or other components with Arduino?
Connecting electronics like LEDs and sensors to an Arduino is a fantastic way for kids to bring their creative ideas to life. The process involves two key steps: wiring and coding. First, you physically connect the components to the Arduino board using a breadboard (a board for prototyping circuits) and jumper wires. For example, an LED has a long leg (positive) and a short leg (negative) that would be connected to specific pins on the Arduino, often with a resistor to protect it. Similarly, a sensor will have pins for power, ground, and for sending its data to the Arduino.
Once everything is wired, the real magic happens through coding. Using the Arduino's programming language, which is based on C++, your child can write simple commands to control the components. A command might tell an LED to turn on, blink, or change brightness. When a sensor is involved, the code can read data from the sensor—like light levels or motion—and use that information to make decisions. For instance, you can program an LED to automatically turn on when a light sensor detects that the room has gone dark, creating a simple nightlight. This combination of hands-on building and coding is at the heart of countless fun and educational projects in robotics and electronics.
Where can I find good Arduino programming tutorials and examples?
Finding the right tutorials for Arduino is a great step into the exciting world of robotics and coding. For teens, a fantastic way to get started is with a hands-on robotics kit. For example, the ELEGOO UNO Project Super Starter Kit uses Arduino, a popular open-source electronics platform, to introduce the fundamentals of programming and electronics through engaging, hands-on experiments. This approach helps teens build and program their own creations, turning abstract concepts into tangible results. You can find more ideas in this guide to robotics for teens.
Another excellent way to learn is through guided online projects, which often use simulators so you don't need to buy a physical device right away. In a structured class, your child can learn how to design and code simple electronic systems for things like alarms and sensors using an Arduino simulator. Exploring different robotics projects for kids can provide a variety of examples and help your child discover how to bring their inventive ideas to life. This method makes learning about circuits and coding accessible and fun.
What is the basic structure of an Arduino sketch, including setup() and loop()?
An Arduino sketch is the name for a program that runs on an Arduino board. Think of it as a set of instructions that tells your robot or smart device what to do. Every sketch has two essential parts: setup() and loop(). The setup() function runs just one time when you first power on or reset the board. It's used for initial configurations, like setting up communication with a sensor or activating a motor.
Following the setup, the loop() function runs over and over again, allowing your project to perform actions continuously. This is the core of the program where you would write the code for the main tasks you want your creation to perform, such as reading sensor data or blinking an LED light. Understanding this basic structure is the first step into the exciting world of creating with circuits and code. You can learn more about building smart devices in our Arduino for Kids courses.
What programming language does Arduino use?
Arduino uses its own programming language, which is a simplified version of C++, a powerful text-based coding language used by many professionals in the tech industry. This makes Arduino an excellent platform for beginners to learn the fundamentals of programming and electronics simultaneously. The language is designed to be user-friendly, allowing kids and teens to write code that controls hardware like sensors, motors, and lights in their robotics projects.
By starting with Arduino, your child can get a hands-on introduction to how software and hardware work together. As they build and program their own robots, they develop a solid foundation in languages commonly used in robotics, such as C++. This experience helps build critical thinking and problem-solving skills, preparing them for more advanced explorations in technology. To see how Arduino kits fit into the learning journey, you can explore our guide on robotics for teens.
How do I power my Arduino project?
Powering your child's Arduino project is straightforward, and you have several safe and easy options depending on your needs. For beginners and projects that will stay near a computer, the simplest method is to use the USB cable that comes with the Arduino, which connects it directly to a laptop for power. If you want the project to be portable, a 9V battery is a popular choice for getting started and allows your child's creation to move around freely. You can also use a simple power bank, just like the one you might use for a phone, to provide portable power.
As your young creator builds more complex projects with multiple motors or sensors, you might need to provide more power. This can be done by using a dedicated battery pack or a wall adapter that plugs into an outlet, which is great for stationary projects like a desk lamp or a bedroom alarm. It's important to use a power source within the recommended 7 to 12-volt range to keep the Arduino board safe and stable. No matter which method you choose, providing the right power is a key step in bringing your child's innovative ideas to life.
How do I upload code (sketches) to an Arduino board?
Uploading code to an Arduino board is the magical step where your child's digital creation comes to life in the physical world. The process uses the free Arduino software (called an IDE) on a computer to write a program, which is known as a "sketch." You then connect the Arduino board to the computer using a standard USB cable, which also powers the board. Inside the software, a simple click of the "upload" button sends the sketch to the board, telling it exactly what to do.
This fundamental step is at the heart of countless fun and educational activities that blend creativity with technology. It's a powerful and rewarding way for kids to see their code have an immediate, tangible effect, whether they are blinking a light for the first time or designing more complex creations. Learning this process is a cornerstone of exploring the exciting worlds of robotics and coding and building amazing robotics projects for kids.
How do I get started with the Arduino board and software (IDE)?
Getting started with Arduino is a fantastic way to introduce your teen to the hands-on world of coding and electronics. The Arduino board is a popular open-source electronics platform that acts as a mini-computer, which you can program to control things like lights, motors, and sensors. It’s one of the most popular systems for building introductory robotics and smart home projects, making it a great tool for learning how to bring digital code into the physical world.
The best way for a teen to begin is with a starter kit, which includes an Arduino board and all the necessary components for a variety of projects. You can find starter kits online for around $40. Once you have the kit, your child can download the free Arduino software (IDE) to start programming. For guided learning, you can explore beginner-friendly robotics for teens programs, some of which use an Arduino simulator, allowing your child to start coding and designing electronic systems even without a physical device.
What is the difference between Arduino and Raspberry Pi for projects?
When choosing between Arduino and Raspberry Pi for your child's projects, it's helpful to think of their core strengths. Arduino is an excellent starting point for beginners diving into the world of electronics and robotics. It functions as a simple "brain" for projects, perfect for teaching kids how to build circuits and control physical hardware like lights, sensors, and motors through code. This makes it ideal for creating interactive smart devices, alarms, and basic robots, providing a hands-on introduction to how hardware and software work together.
Raspberry Pi, on the other hand, is essentially a mini-computer that can run its own operating system and more complex programs. While our resources focus more on Arduino, Raspberry Pi is a powerful tool that can be used for a wide range of everyday tasks and more advanced coding projects. It's a great option for teens who are ready to tackle more complex challenges, such as building a sophisticated robot buggy or learning a versatile programming language like Python.