
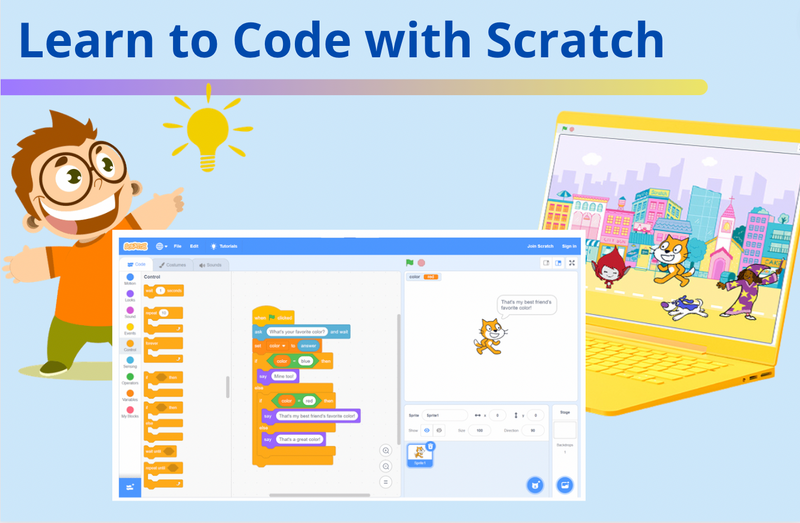
Have you been hearing about how fun and valuable Scratch coding is for kids & teens, and want to know how to use Scratch? This guide is the perfect place for you to start.
Today, we're going to walk you through the basics of beginning Scratch coding, starting from how to set up your free Scratch account. We'll also share what the different types of blocks are, how to put them together to create something great, such as fun projects with Scratch, even how to partner with AI for Scratch coding.
You can also start Scratch coding by joining a live Scratch free class with our experienced instructors. Explore further with our award-winning Scratch classes: Scratch Ninja (grades 2-5); Scratch Junior (grades K-2); Accelerated Scratch (grades 5-9) - designed by professionals from Google, Stanford, and MIT.
Learn How to Use Scratch
First we'll answer a few common questions about Scratch coding. Later we'll reveal some fun projects to try!
What is Scratch coding?
Scratch is a free block-based coding platform that allows you to create your own games, stories, and animations. On Scratch, you can program many different types of projects, such as a Magic Pen, Wizard Tag Game, Geometry Dash, Basketball Game, Pacman, or Snake. Scratch is designed for students age 8-16, but can be used by everyone.
Learn Scratch Programming - A video introduction
Check out the simple steps below to get started on Scratch. You can also follow along with this YouTube video.
Part 1: Getting ready to learn Scratch
Before we dive into how to ou need a workspace. The beauty of this platform is that you can learn Scratch online free without downloading anything, though an offline version is available if you have unstable internet.
- Go to the Website: Visit scratch.mit.edu
- Create an Account: While you can code anonymously, we highly recommend clicking Join Scratch. This allows you to save your work, share projects with the community, and use advanced features.
- Click Create to jump straight into the editor, which we will describe more in the next section
Part 2: The Scratch editor interface - Know your way around
The coding space
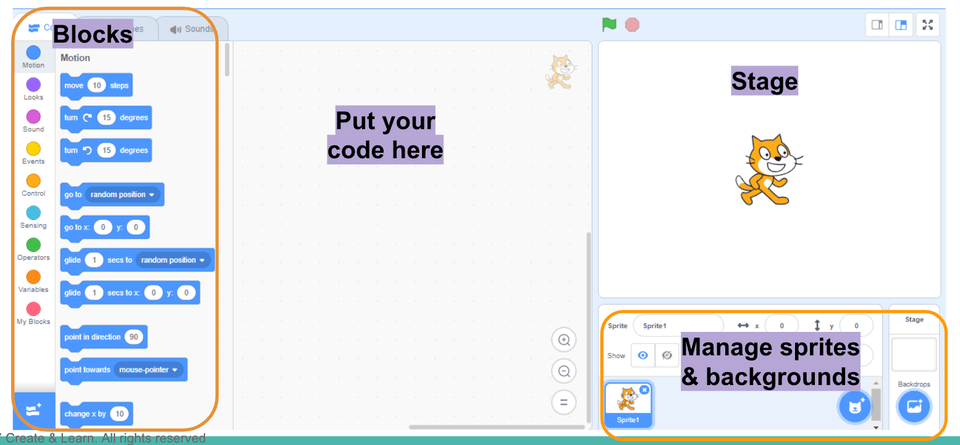
Right in the middle of the workspace is the coding area, where you put your code (building blocks).
The Scratch coding block palette
The left side of the screen have all the blocks. In Scratch, blocks are your lines of code. They are color-coded not just for decoration, but to tell you what they control. We will go into these blocks more later on.
| Color | Category | What It Does |
|---|---|---|
| Blue | Motion | Controls movement. Use blocks like Move 10 Steps and Go to x: y: to move sprites around the screen. |
| Purple | Looks | Changes how a sprite looks. Use this to switch costumes, change size, or make the sprite say something. |
| Yellow | Events | The most important blocks. These start your code, like When Green Flag Clicked. If you don’t use one, your code won’t run. |
| Orange | Control | The brain of your code. This is where you find Forever loops and If…Then blocks that make decisions. |
| Teal | Sensing | The eyes and ears of the sprite. These blocks check if the sprite is touching the mouse, a color, or another sprite. |
| Dark Orange | Variables | Stores information like Score, Lives, or a Timer that changes while the game runs. |
The Scratch sprite and background pane
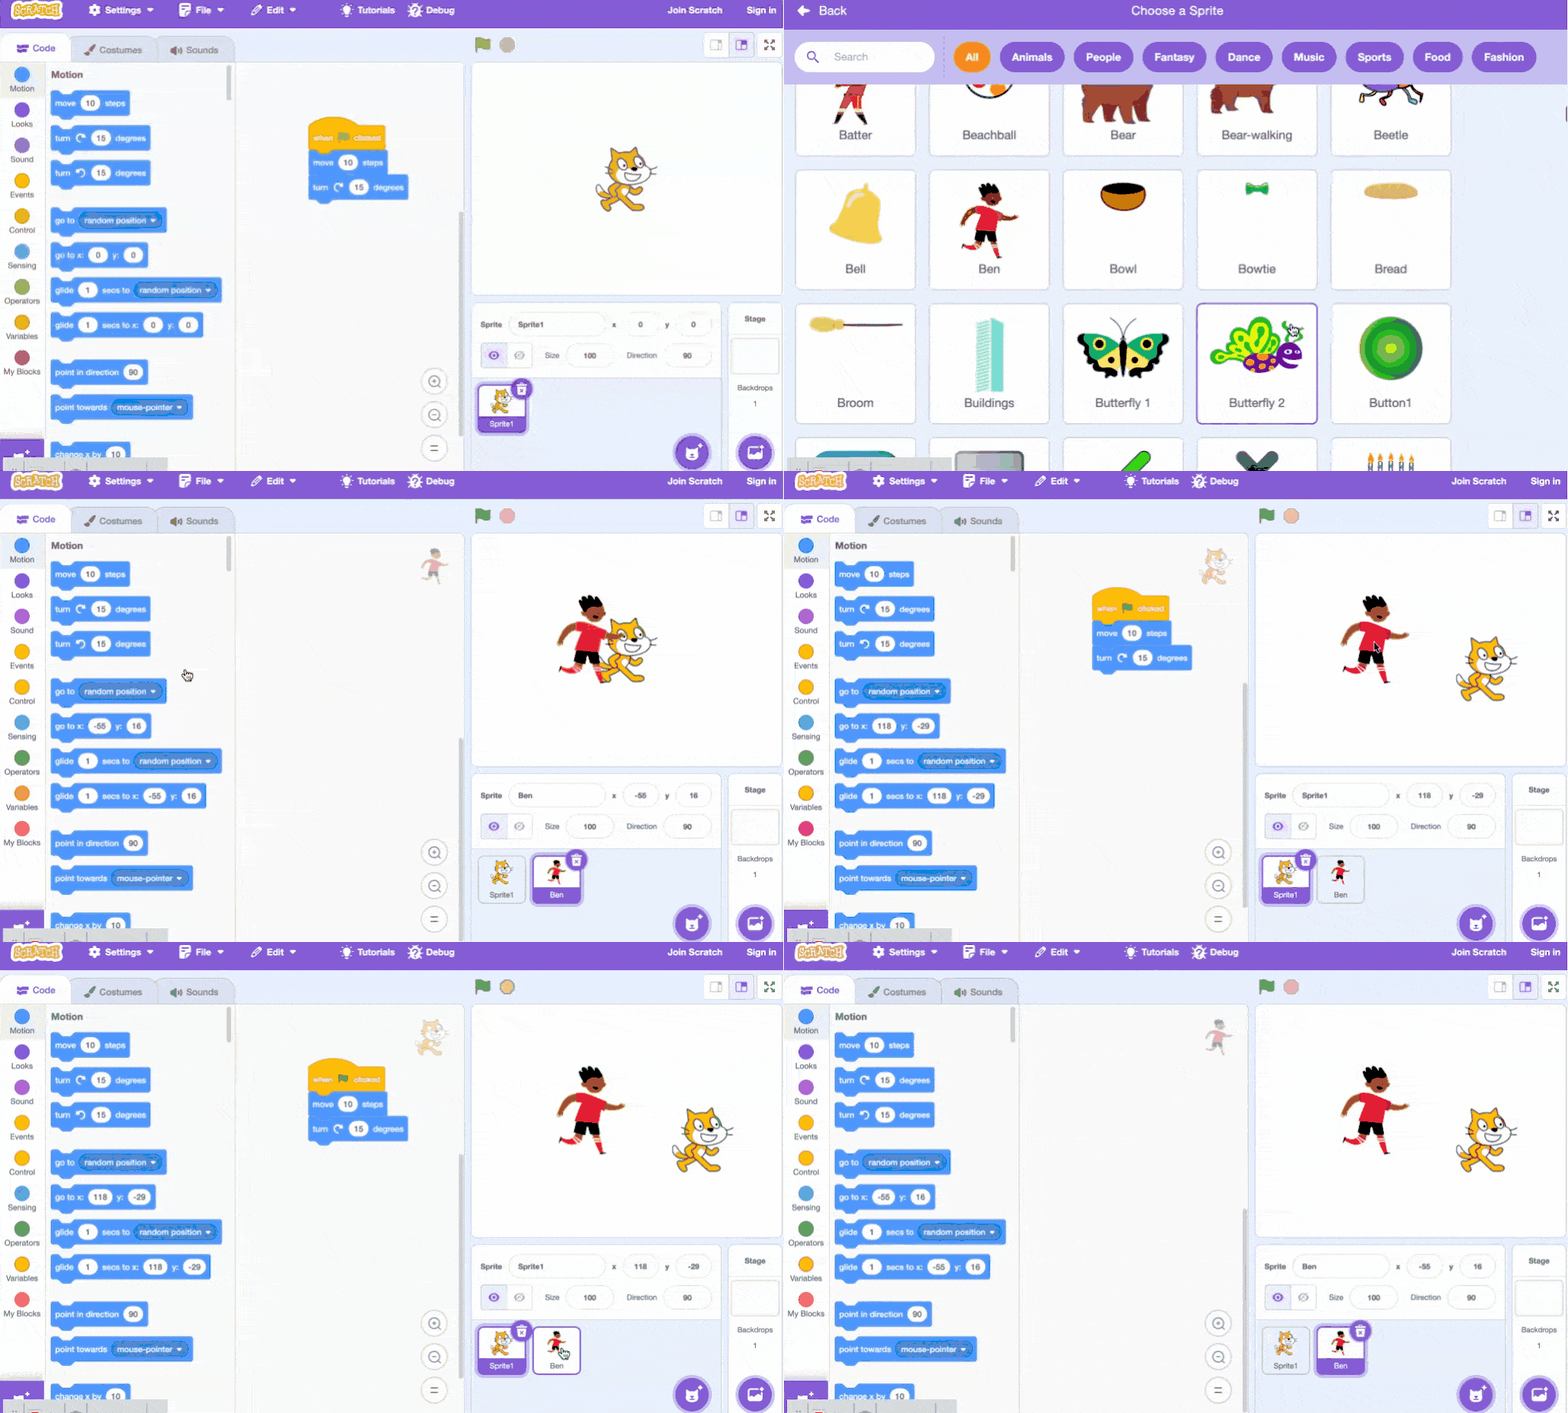
Located at the bottom right, this is where you manage your characters (Sprites) and backgrounds (Backdrops). On scratch, the characters and objects are called “sprites.” You can add sprites by clicking the Cat icon to choose from the library chat. You can add or delete as many sprites as you want. Each time you add a sprite, it will appear on the stage.
The Scratch stage
The top right stage is where the fun happens. It is like a playground with invisible grid, and your sprite is standing somewhere on it. The center of the grid is position (X=0,Y=0). Going right and up, makes X and Y go up respectively, and going left and down make them go down.
Part 3: Scratch programming overview - Key steps with screen captures
Start a new project
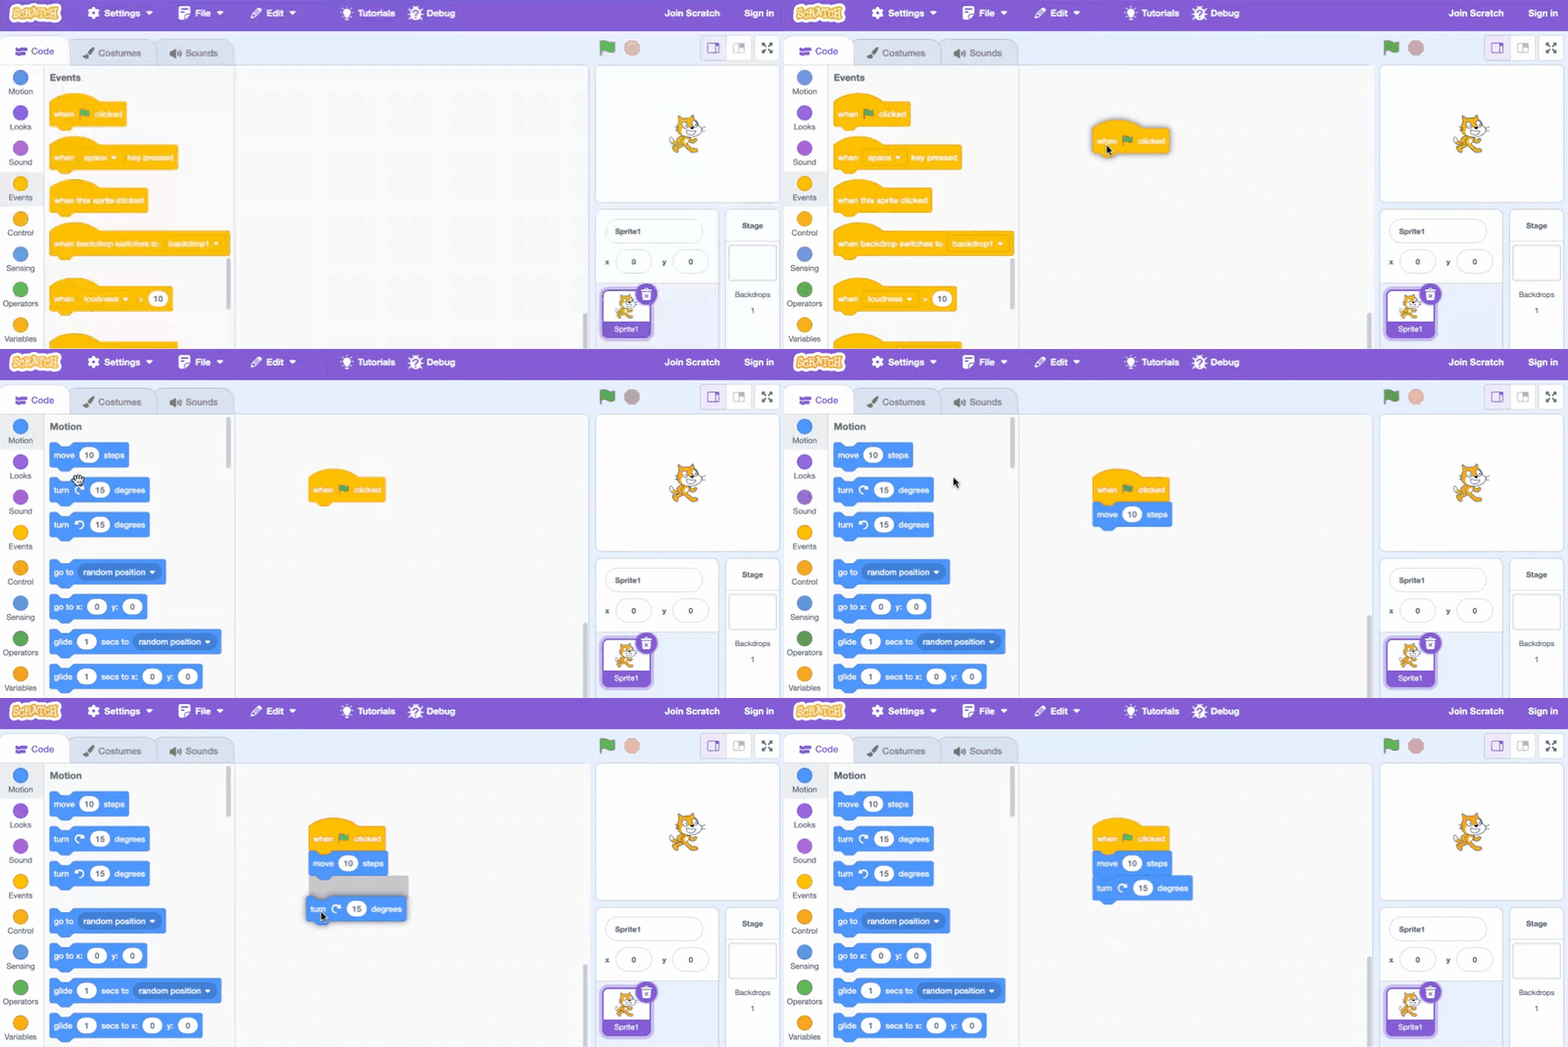
To code in Scratch, first open the page on Scratch at MIT. Next, click on the “create” button to make a new project. You should have a screen that looks like this:
Drag the code blocks
The code blocks are on the left hand side of the screen. To code, click and drag the blocks to the large center space. On scratch, the characters and objects are called “sprites.” You can add or delete as many sprites as you want. Each time you add a sprite, it will appear on the stage.
Click on sprites to code for them
Click on each sprite to code for that particular sprite. There are hundreds of fun sprites to choose from. Whether it’s a soccer player, a butterfly, or a ballerina, our students in our Scratch Ninja course never cease to amaze us with their creative choices and story lines.
To code, you can drag blocks of code from the left hand side and connect them together. These blocks can make sprites move, make sounds, and change color. And when connected together form a series of actions to build your games, animations, and other projects.
Run your code
After you’ve coded your project, you can click on the Green Flag to see your code run on the Stage. If you want to save or share your project, make sure it’s saved under your account.
Want to make it even easier to learn Scratch coding? Join us in a free Scratch intro session to learn with a great teacher and other enthused students.
Part 4: Scratch coding blocks explained
There are many different types of blocks on Scratch and each type has a differnet color as show earlier. Notice how most of the blocks are shaped with a special notch at the top and the bottom; this is so that they can connect together! Here are some of the most important blocks:
Events blocks in Scratch programming
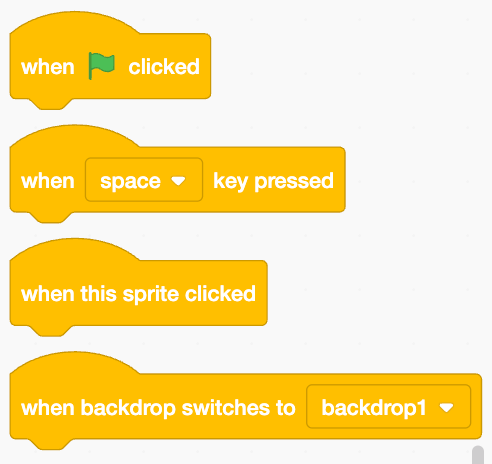
These yellow colored blocks have a special shape, with the bump at the top. These blocks are “starting blocks,” meaning they must go at the top of any chunk of code we create. They tell us when the code will be run.
| Scratch Event Blocks | What Scratch Event Blocks Do |
|---|---|
|
Run the code when the green flag is clicked (when the program begins). Most of the time, we use this block. |
| Run the code when a key is pressed. Use the dropdown menu to choose which key you want! | |
| Triggers a script when the sprite itself is clicked, mapping mouse interaction to behaviors like talking and changing costumes. | |
| Starts a script when the Stage switches to a specific backdrop, mapping scene or level changes to new behaviors and game logic. |
Scratch motion blocks
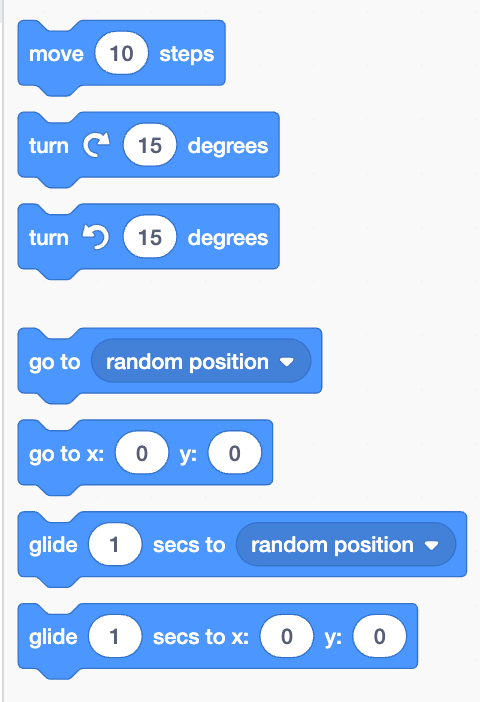
These blue colored blocks allow your sprite to move, rotate, glide, or go directly to a specific position.
| Scratch Motion Blocks | What Scratch Motion Blocks Do |
|---|---|
|
Moves the sprite forward in the direction it is currently facing by 10 units (relative movement). |
| Rotates the sprite clockwise by 15 degrees from its current direction. | |
| Rotates the sprite counterclockwise by 15 degrees from its current direction. | |
| Instantly teleports the sprite to a random X/Y location on the Stage. | |
| Instantly moves the sprite to a specific coordinate (absolute positioning). | |
| Smoothly moves the sprite to a random location over 1 second. | |
| Smoothly moves the sprite to a specific coordinate over 1 second. |
Try combining a motion block with an event block to see what happens!
Scratch Looks blocks
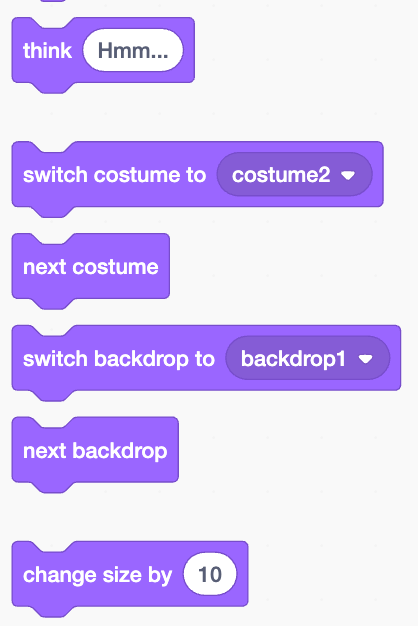
These purple colored blocks change the appearance of your sprite, e.g. size, color, costume, backdrops, and more.
| Scratch Look Blocks | What Scratch Look Blocks Do |
|---|---|
|
Makes the sprite display a thought bubble with text. This maps internal ideas or emotions to visual feedback for the player. |
| Changes the sprite’s appearance to a specific costume. Often used for character animation or power-ups. | |
| Switches the sprite to the next costume in its list. | |
| Changes the Stage backdrop to a specific image. This is for scene changes to new locations or levels. | |
| Switches to the next backdrop in the list. | |
| Changes the sprite’s size by a set amount, either grow (positive numbers) or shink (negative numbers). |
Control blocks in Scratch
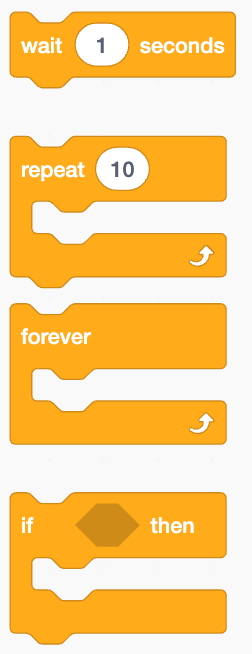
These blocks are found in the “control” section, colored in orange. Like the events blocks, they also have a special shape. Loops enable the continually run and repeat.
| Scratch Control Blocks | What Scratch Control Blocks Do |
|---|---|
|
Pauses the script for a set amount of time, for instance to make sprite animate slower. |
| The repeat loop allows you to specify how many times you want to run the code. | |
| Continuously repeats the blocks inside forever. Notice that the forever loop doesn't have a notch at the bottom. This is because the loop will keep running forever, so nothing added under it will run! | |
| Runs the blocks inside only if a condition is true. This controls decision-making, allowing sprites to react to situations. |
Code with Scratch sensing blocks
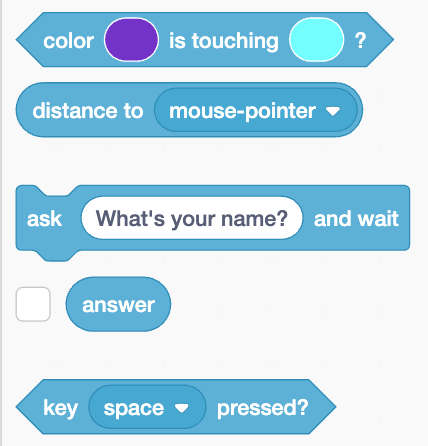
Sensing blocks check what's happening on the screen, which often trigger other actions.
| Scratch Sensing Blocks | What Scratch Sensing Blocks Do |
|---|---|
|
Checks whether one color is touching another color. This allows sprites to detect collisions or interactions based on color. |
| Reports the distance from the sprite to a target, such as the mouse pointer, so sprites can react based on how close something is. | |
| Asks the user a question and pauses the script until an answer is given. This allows user input to control what happens next. | |
| Stores and reports the user’s most recent answer. | |
| Checks whether a specific key (such as the Space key) is currently being pressed. This allows sprites to respond to keyboard input. |
How to use Scratch variable blocks
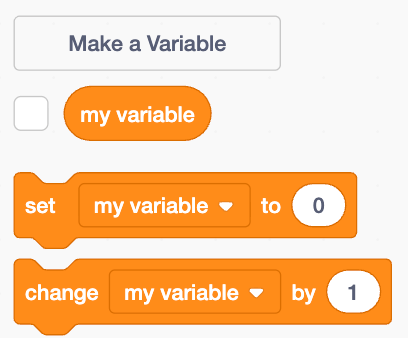
Variable is a very important coding concept. It is a place that you can hold values. You might have a variable for score, another variable for the speed of the sprite, etc.
| Scratch Variable Blocks | What Scratch Variable Blocks Do |
|---|---|
|
Creates a new variable that can store information like scores, lives, time, or levels. |
| Displays the current value of a variable on the Stage. | |
| Sets a variable to a specific value, such as setting the score to zero at the start of a game. | |
| Changes a variable by a set amount, such as adding points or counting steps. |
Troubleshooting common Scratch programming issues
“My sprite moves upside down.”→ Change Rotation Style to Left‑Right.
“My script won’t start.”→ Make sure it begins with a yellow Event (Hat) block.
“My sprite walks through walls.”→ Use collision detection inside a Forever loop.
“My animation only changes once.”→ Put next costume inside a repeat or forever loop.
"The sensing blocks do not work" →This is often because you need to put the sensing blocks inside a forever loop, otherwise, the system will check only once, instead of checking it continuously.
Learn how to use Scratch with examples & tutorials
Scratch is an incredible program from MIT that can help kids learn how to code. However, the program can be a bit confusing at first, so it is helpful for kids to have simple projects to complete as they learn the ins and outs of the platform. For that reason, we’ve compiled some fun Scratch code examples and tutorials for kids that will help them to master Scratch and be equipped to tackle more advanced projects in the future.
1. Fun beginner Scratch exercises
Find fun challenges that involve flying, changing colors, noises, and more! Solve them with step-by-step guidance.
2. Beginner Scratch challenges
Try your hand at five beginner Scratch challenges that include more sophisticated concepts such as loops, variables, and Scratch extensions. Read on to find fun challenges including a translator and a story-based game!
3. Make a Mario game on Scratch
In this tutorial, you'll learn how to make a Mario game in Scratch. Super Mario Bros, released in 1985, is arguably one of the most popular video games of all time, and the poster child of not only the entire Mario franchise, but, to a degree, Nintendo as a whole. Super Mario Bros belongs to an extremely popular genre of arcade games: the Side-Scrolling Platformer.
4. How to make a cross the road game in Scratch
Find out how to make an easy Cross the Road game on Scratch. In this game, the objective is to get your character across a busy road without getting hit. If you make it to the other side unscathed, you win!
5. Make a maze in Scratch
See how to make a maze in Scratch with this free tutorial. We’ll start from the beginning and demonstrate how to create your own maze, control the character’s escape from the maze with arrow keys, and even customize the maze with different themes.
Try even more Scratch coding projects.
How to learn Scratch with AI assistance
One of the biggest challenges for children who enjoy Scratch coding is turning their high-level creative ideas into actual projects, as this process requires not only advanced coding knowledge but also problem-solving and executive planning skills. Our Scratch Project Generator, powered by advanced AI, is an exciting tool designed to help students bring their ideas to life. It assists with refining project ideas, providing step-by-step guidance, offering sample code, and even creating custom images to enhance their projects. Whether your child is developing games, animations, or interactive stories, the generator supports them every step of the way. It’s a great way to develop problem-solving skills, build confidence in coding, and enjoy a hands-on, creative learning experience.
Check out these sample project outlines created by other students, and then partner with AI to create brand new Scratch projects built on your very own ideas!
That's how you learn to code with Scratch
And that’s it! Scratch coding is fun and easy. There are infinite possibilities for your child to create with Scratch. Your child can learn beyond the basics in our award-winning Scratch coding courses. There's even a free introduction course so there's no risk in trying.
Up next, learn how to make a ball bounce in Scratch and how to make a clicker game.
Frequently Asked Questions
What is Scratch and who is it designed for?
Scratch is a free, block-based coding platform developed by MIT that allows kids and beginners to create interactive games, stories, and animations—such as maze games, Geometry Dash, or Pacman. While Scratch is primarily designed for students ages 8 to 16, anyone of any age can use it to learn programming fundamentals without worrying about typing syntax.
Do I need to download Scratch, or can I use it in a web browser?
You do not need to download software to code in Scratch. You can use it online for free directly in your web browser by visiting scratch.mit.edu and clicking Create. An offline version is also available for desktop computers if you have an unstable internet connection. Creating a free account is recommended so you can save projects, share your work, and access community features.
What are the main components of the Scratch user interface?
The Scratch editor is organized into four core workspaces:
- Block Palette (Left): Displays all color-coded coding blocks sorted by functional category.
- Coding Area (Center): The main canvas where you drag, snap together, and arrange blocks of code.
- Stage (Top Right): The preview screen where your project runs on an invisible coordinate grid centered at (X=0, Y=0).
- Sprite and Backdrop Pane (Bottom Right): The area where you add, view, and manage your characters (sprites) and stage backgrounds.
What is a sprite and how do I add one to a project?
In Scratch, characters and objects are called sprites. You can add sprites by clicking the Cat icon in the bottom-right pane to choose from a built-in library featuring characters like soccer players, animals, and fantasy figures. Once a sprite is added, clicking its icon lets you write and attach unique scripts that control its movement, looks, and sound.
What do the different block colors mean in Scratch?
Scratch organizes code blocks into color-coded categories based on function:
- Blue (Motion): Controls movement, coordinates, and rotation (e.g., Move 10 Steps, Go to x: y:).
- Purple (Looks): Controls appearance, costumes, speech bubbles, and sizing.
- Yellow (Events): Serves as starting blocks that trigger code when an event happens (e.g., When Green Flag Clicked).
- Orange (Control): Manages program logic, pauses, repeat loops, and conditional If...Then decisions.
- Teal (Sensing): Detects interactions like touching colors, distance to mouse pointers, and key presses.
- Dark Orange (Variables): Stores changing information such as scores, timers, and lives.
What are Events blocks, and why is 'When Green Flag Clicked' important?
Yellow Events blocks are "hat" blocks with a rounded top edge that must sit at the very beginning of a script. They tell Scratch when to execute that specific chunk of code. The When Green Flag Clicked block is the most common starting block because clicking the green flag above the stage starts your program. Other Event blocks trigger code when a key is pressed, when a sprite is clicked, or when a backdrop changes.
How do Repeat and Forever loops work in Scratch?
Loops are located in the orange Control section and repeat actions without writing redundant code:
- Repeat Loop: Runs the enclosed blocks a specific number of times before moving on to the next command.
- Forever Loop: Continuously repeats the enclosed blocks indefinitely. It has a flat bottom without a connection notch, meaning no blocks placed beneath it will execute.
What are variables, and how do I create a score counter?
A variable is a container that stores values that can change during a program. To create a score counter, go to the dark orange Variables category, click Make a Variable, and name it "Score". You can then use blocks to set the score to zero when the green flag is clicked, show the score display on the stage, and change the score value whenever a player scores a point or completes an objective.
How do I detect collisions between sprites or specific colors in Scratch?
Collisions are detected using teal Sensing blocks, such as the touching color? or touching [sprite]? blocks. To ensure collision detection works continuously throughout gameplay, nest these sensing blocks inside an If...Then block, and place that condition inside a Forever loop so the program repeatedly checks for contact.
How do I troubleshoot common Scratch programming errors?
If your Scratch project is not behaving as expected, check these common fixes:
- Script will not start: Make sure the code stack begins with a yellow Event hat block (such as When Green Flag Clicked).
- Sprite moves upside down: Change the sprite's rotation style setting to Left-Right.
- Sprite walks through walls: Place your collision detection condition inside a Forever loop so it checks constantly.
- Animation only changes once: Ensure the Next Costume block is inside a Repeat or Forever loop.
- Sensing blocks do not respond: Wrap sensing and condition blocks inside a Forever loop to prevent them from executing only once at project launch.
Brought to you by Carolyn Qu, Instructor at Create & Learn.

