

One of the coolest features of Scratch is its ability to play sounds from a vast sound library. To take a dive into this functionality, in this tutorial, we will be learning how to make a keyboard-controlled piano in Scratch that can play the song “Twinkle Twinkle Little Star.” Once you have mastered the basics, you will be able to create more complex programs to play more advanced songs. For reference, here is the project we will be creating today.
For live expert guidance learning Scratch coding, enroll your child in an award-winning Scratch class designed by experts from Google, Stanford, and MIT.
How To Make A Piano In Scratch Coding
We've covered how to create music in Scratch before. Today, creating a piano in Scratch will be a relatively simple project that you can eventually scale up to create more complicated works. Let’s get coding!
1. Create A New Project And Add Backdrop
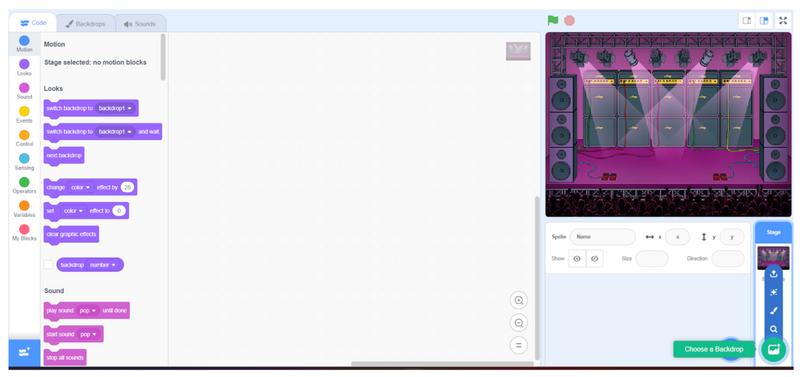
As with any other Scratch project, the first step is to create a new project. Navigate to Scratch and click “Create” to create a new project. Delete the cat sprite that will load in by default and then select a fitting backdrop by clicking the “Choose a Backdrop” button in the bottom right corner (shown in green in the image above). Since this is a music-based project, we chose “Concert,” but you can choose any background you like.
2. Load in the Piano

To play the piano in Scratch, we will have to load in a piano sprite. We have included a piano sprite below for you to use; right click on the sprite and save it to your computer. Then, in Scratch, click “Choose a Sprite” in the bottom right and then click the “Upload Sprite” button. Finally, find the downloaded piano file and load it into Scratch.

3. Resize and Move the Piano
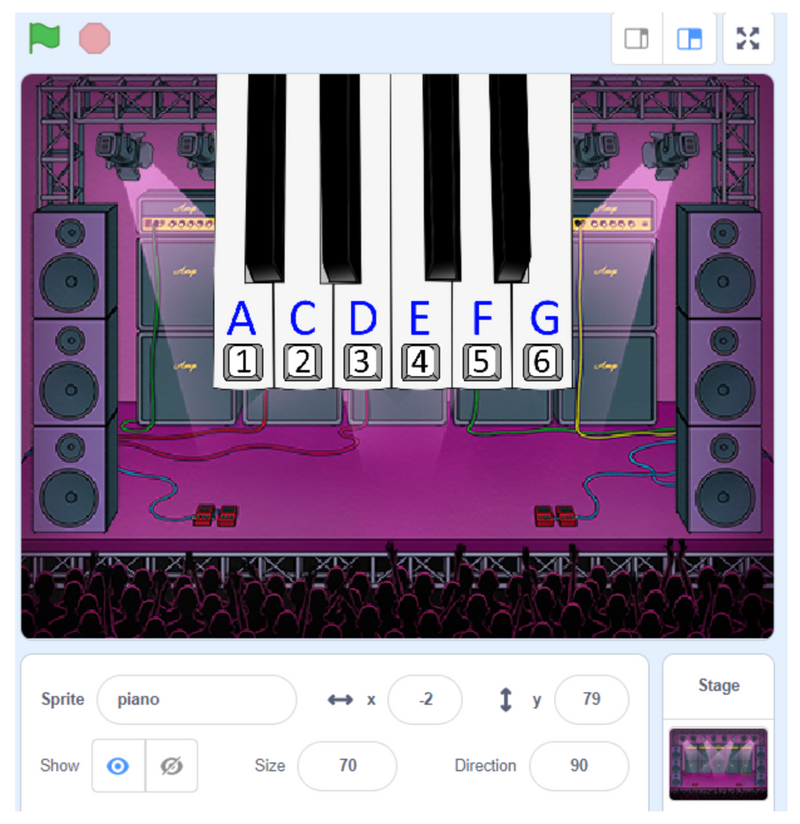
When the piano image loads in, it will be quite large, and probably not in the exact spot we would like it to be. Resize the piano by changing the “size” field to 70, and click and drag the piano to put it in the top center of your screen. Refer to the image above to know what the end product should look like.
4. Load in the Notes
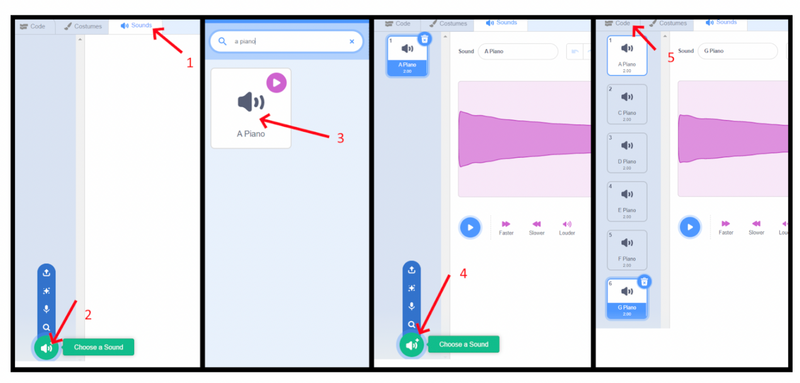
The song that our program will be playing is “Twinkle Twinkle Little Star,” and the notes used to play this song are A, C, D, E, F, and G. For our piano to work, we will need to load these notes into our program. In the top left of the window, click “sounds.” Then, click “Choose a Sound,” which will open the Scratch sound library. In the search bar, type in “A Piano” and click on the sound that appears. The sound will load in, but you don’t need to do anything with it just yet. Instead, click on the “Choose a sound” button again and repeat this process for “C piano,” “D piano,” “E piano,” “F piano,” and “G piano.” When you are finished, your sound panel should have all 6 notes loaded in. Finally, click “Code” to return to the coding screen.
5. Program the Notes
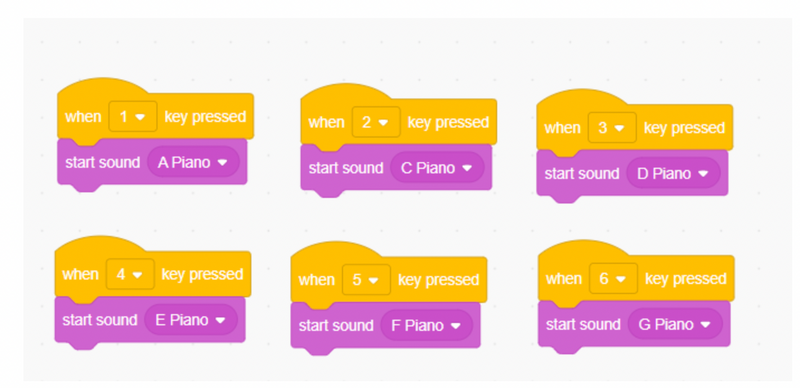
Now that these 6 notes are imported, we can code them into our program. To be able to play the piano in Scratch, we need to write our program so that these notes will play when certain keys are pressed. We can accomplish this with two different types of blocks:
- When key pressed: This block makes is to that, when the designated key is pressed, the block below will activate
- Start sound: This block, when activated, will play the specified sound.
When you are ready, go ahead and add the code in the image above to your program, mapping 1 to A, 2 to C, 3 to D, 4 to E, 5 to F, and 6 to G. When you are finished, you should be able to press these numbers on your keyboard and hear the associated notes.
6. Download the Music Guide
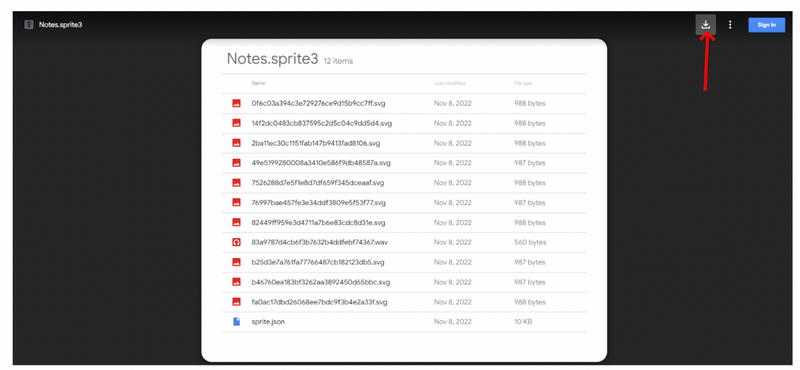
At this point, if someone had all of the notes to “Twinkle Twinkle Little Star” memorized, they could open our program and play the song. However, it is unlikely that someone has the notes to this song memorized, so our program can be improved by adding a guide that will tell the user which notes to play. We have created a sprite that, when added to your program, will display the notes to “Twinkle Twinkle Little Star” in order. Click the link below to download, and click the “Download” button to save the sprite on your computer. Then, just as before with the piano sprite, click “Choose a Sprite” and “Upload a Sprite.” Find the sprite on your computer, upload it, and it will appear in your Scratch project.
7. Program the Notes Sprite
If you take a closer look at the “Notes” sprite, you will notice that it has 42 costumes which, in order, tell the keys you need to press in order to play “Twinkle Twinkle Little Star.” There are two blocks of code we need to add so that this music guide functions correctly:
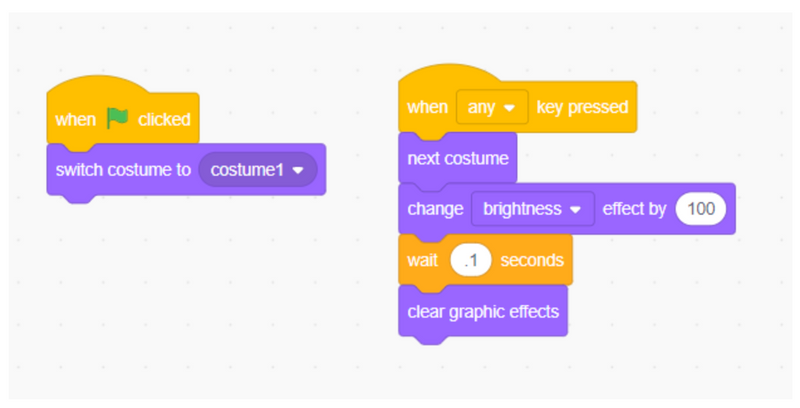
- Firstly, when the green flag is clicked, we want this sprite to reset to its first costume, or the first note. This allows the user to reset the program whenever they wish.
- In addition, when any key is pressed, we want the sprite to go to its next costume to display the next note. It would be great if the notes would flash when they are played to show that the button has been pressed. We can accomplish this by changing the brightness to 100, waiting .1 seconds, and then clearing the effect. Once you understand the code in the image above, add it to your program.
Play Your Piano In Scratch
If you have followed along up until this point, you should now have a functional piano in Scratch with a guide to play “Twinkle Twinkle Little Star.” Now that the basics are complete, feel free to continue to improve the program! Perhaps you could add a celebration at the end of the song if the user plays it correctly, or maybe you could add a red indicator to show when the wrong note is played. You also may make an option at the beginning to decide which type of instrument the user wants to play, and update the program accordingly. Whatever you decide to do, the program is now yours to improve!
Enjoy Making Music With Your Scratch Piano
We hope you enjoyed this tutorial and were able to create a functioning piano in Scratch. If you’re ready for another Scratch tutorial, check out How To Make Falling Snow in Scratch. If your student would like to learn more about Scratch coding with a live teacher and other students, check out our online Scratch classes, including our popular Game Building class. They can even earn a certificate. Thanks for reading, and happy coding!
Written by Matt Schofield, an educator and avid coder. After studying Spanish at the University of Pennsylvania, Matt began teaching English as a second language to elementary students in Baltimore. In addition to his full-time teaching position, Matt enjoys teaching computer science in the evenings and weekends with Create & Learn.

