

Today, you and your child are going to learn how to make an easy Cross the Road game using Scratch coding. In this game, the objective is to get your character across a busy road without getting hit. If you make it to the other side unscathed, you win!
This is a fairly popular game, and a fairly popular iteration of this game places you in control of a chicken trying to avoid getting hit by a car. You've probably heard the joke a thousand times, "Why did the chicken cross the road?" You know who else has heard that joke a thousand times? The chicken, and it's pretty sick of it, if not in fact just a little angry.
So for our game today, we'll be trying to get a car across to the other side of the road, and avoid being caught by angry chickens.
Empower your student to make even more cool games when you enroll them in our award-winning live online Scratch classes designed by Google and MIT experts.
Check out upcoming free computer science events for kids, led by tech experts: past events have featured guests from Pixar, NASA, Intel, and more.
Discover How to Make an Easy Cross the Road Game on Scratch
In order to build our game today, we're going to draw our own backdrop, and use a lot of 'if-then' conditional blocks to make various rules in our code. Some of these include checking if our sprites are touching and allowing us to control a sprite using the keys on the keyboard. Here's a link to the Finished Project.
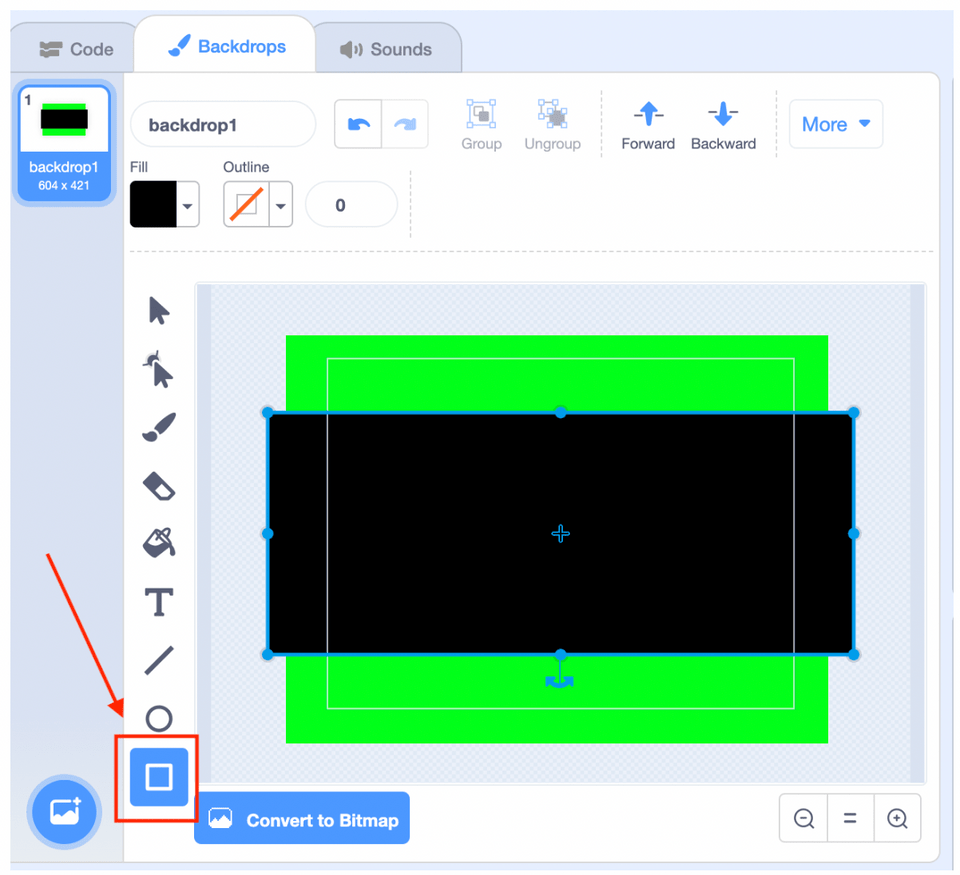
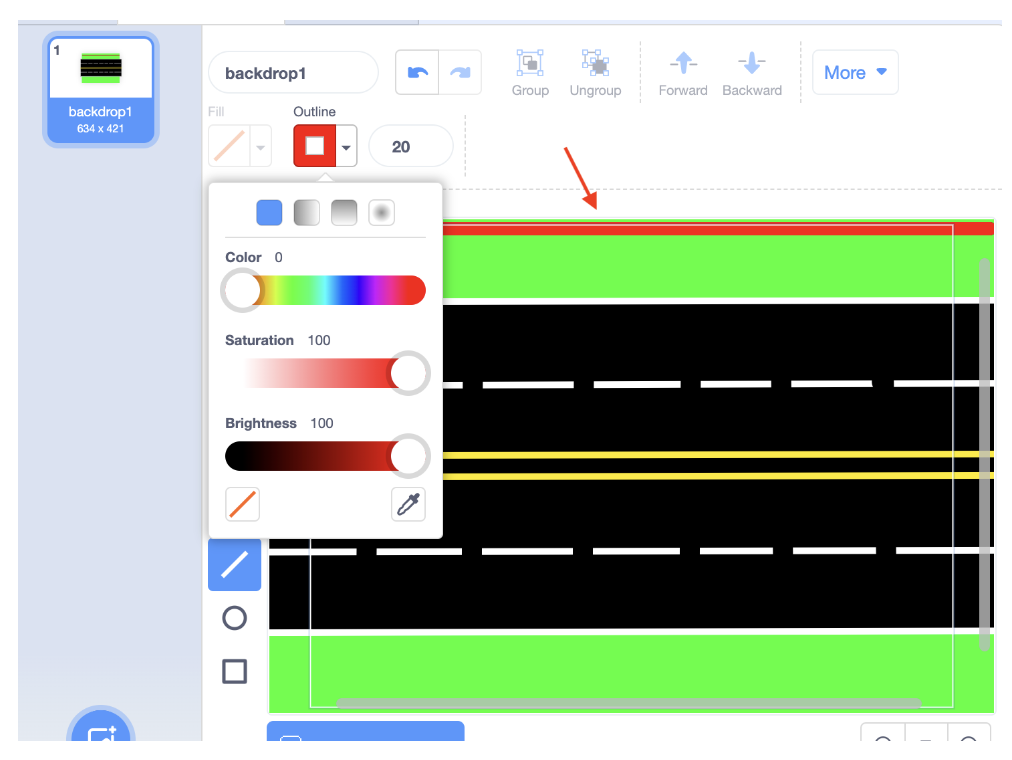
1. Draw your backdrop
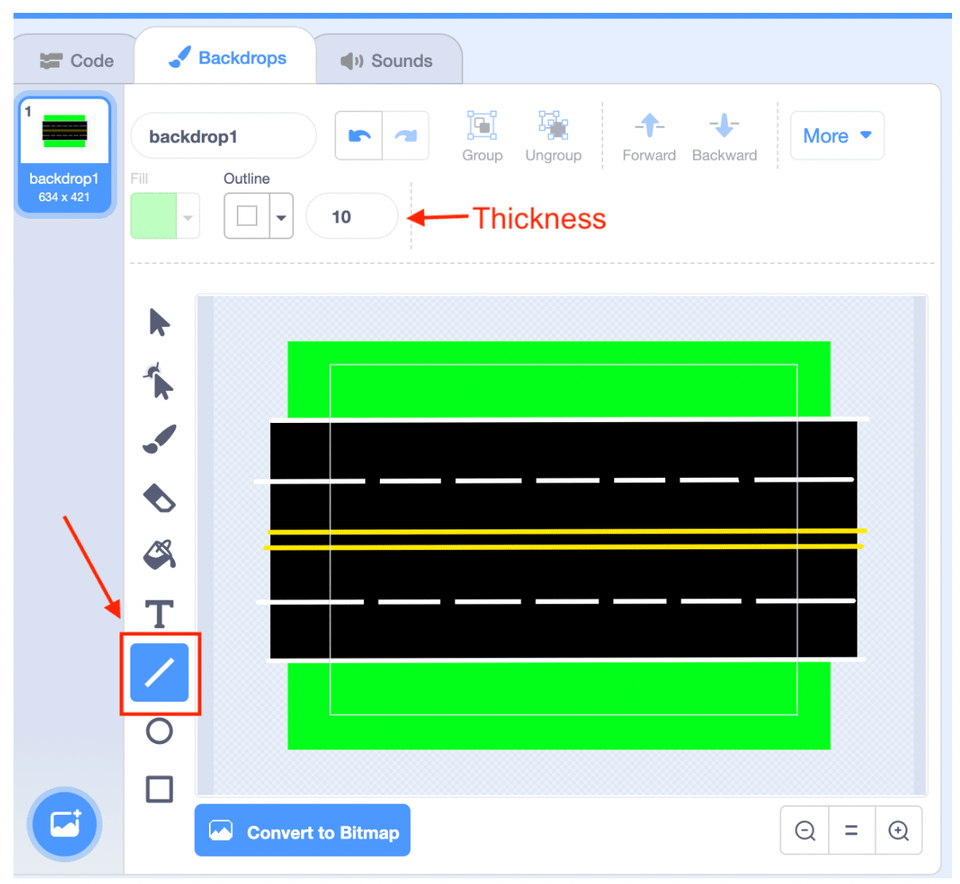
Under ‘choose a backdrop’, we’ll select ‘paint’. Select the rectangle tool from the tools menu. We can start by drawing one big green rectangle over our entire backdrop, then draw a smaller black rectangle for our actual road. Now we need to give our road lines. Select the line tool from the tools menu. Let's give our lines a thickness of ten; once you draw one line, you can just copy and paste for the rest. Use the select tool from the tools menu to select and move the lines around. We want 4 white lines, and 2 yellow ones.
Pro Tip: You can also make one large white line instead of multiple copies and draw black lines to create the spaces instead!
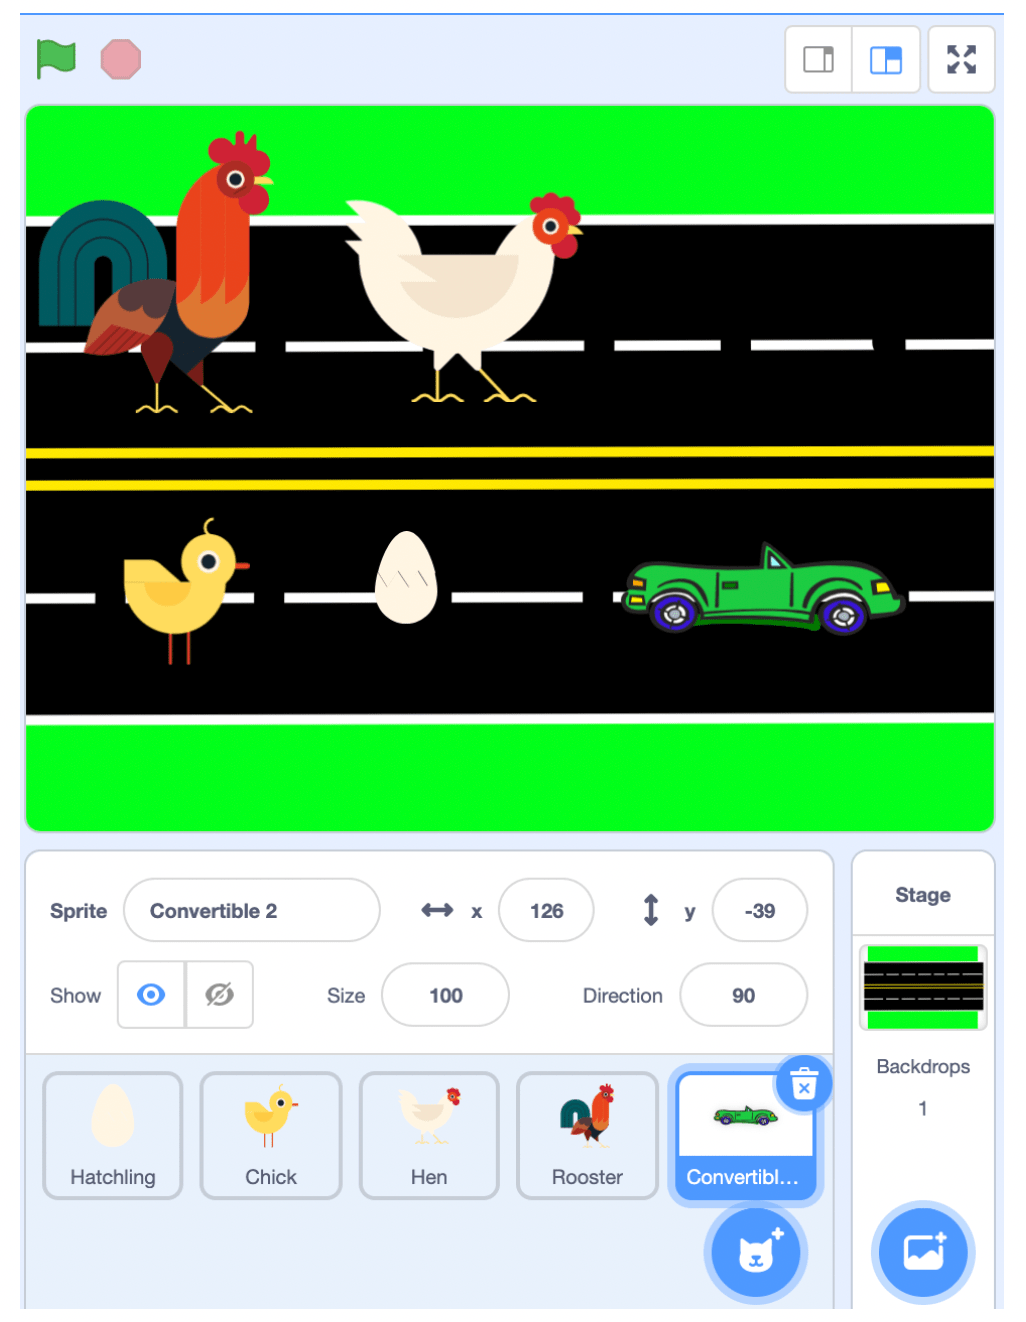
2. Pick your sprites
Now we will move to selecting Sprites. We'll have 4 chickens in our game (one to run in each lane), and a car to cross the road. Scratch conveniently offers us 4 types of chicken sprites to choose from. You can also choose to draw or upload your own custom sprites! If you are using the sprites from the sprite library, the "Hatchling" sprite has one costume with a baby chick popping out of the egg. Go to the costumes tab and then you can delete the egg parts to isolate the chick.
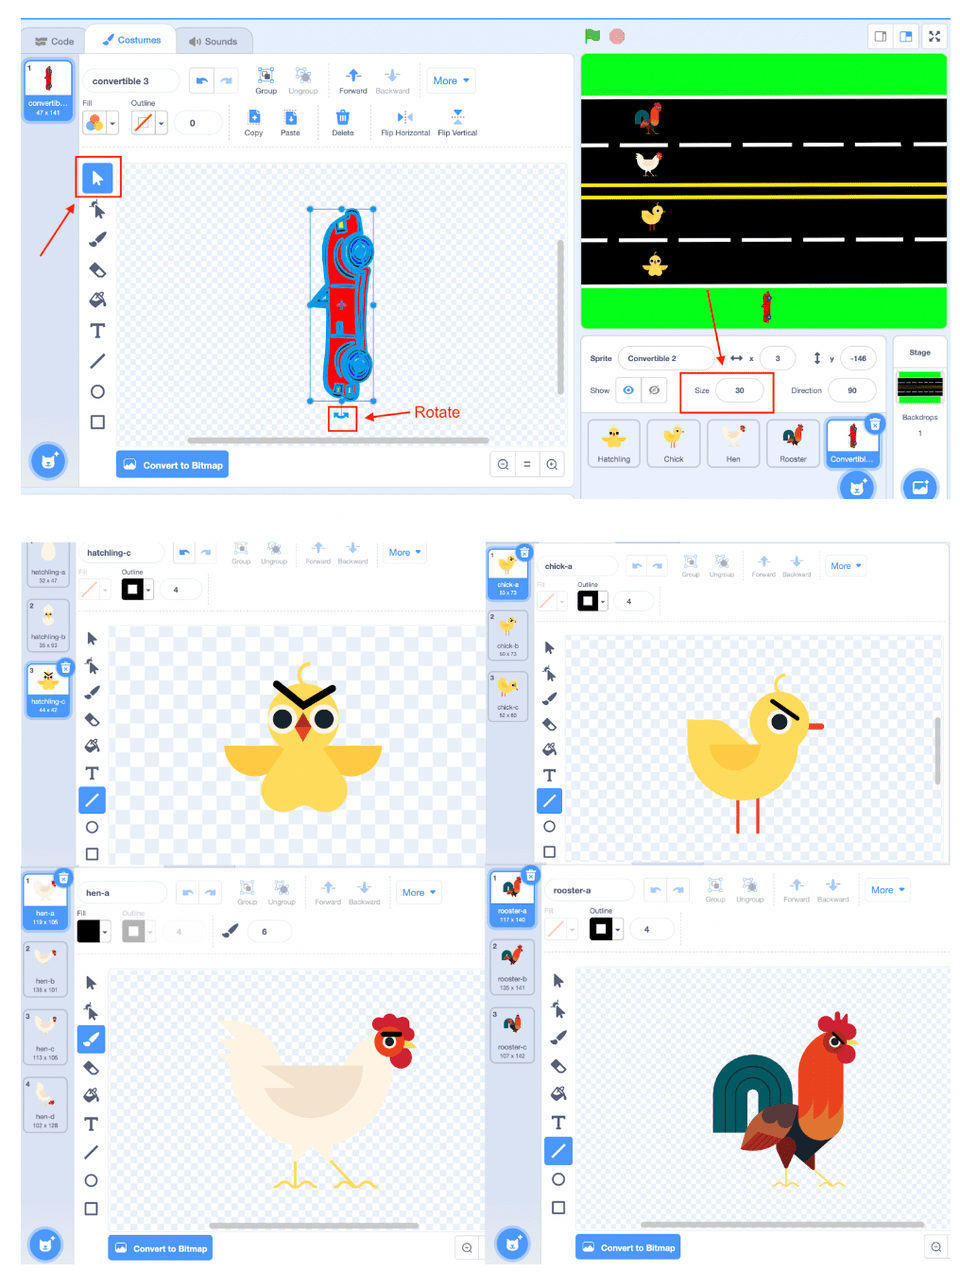
3. Customize your sprites
Now we need to do some work to get all of our sprites to match our background. We have to resize all of the chickens to fit within the lines, make the car smaller, and rotate the car so it faces the right direction. You can change the color of the car too, if you like. You can use the paint bucket tool to change the colors. We chose red! Also, we can't forget, these chickens mean serious business. Let's draw eyebrows on them to indicate this. Use the line tool from your tools menu to draw the eyebrows, just like you drew the lines on your background!
Now that we have our game properly set up, it's time to start writing code!
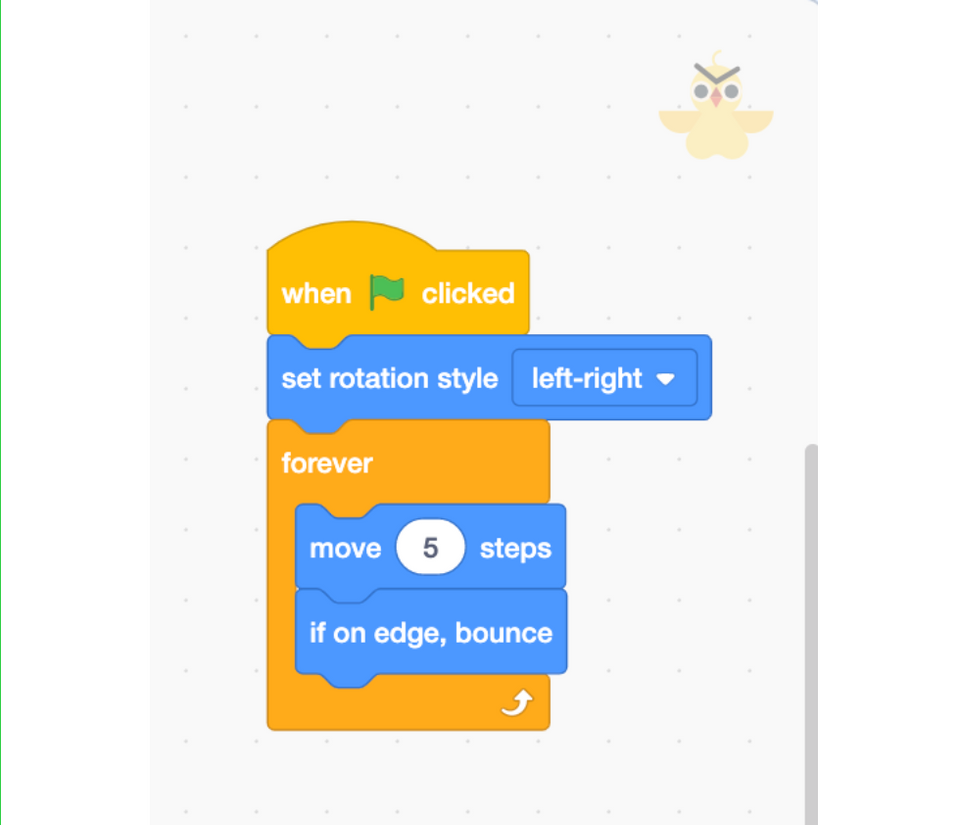
4. Make a chicken move
Let's start with the Hatchling. When we click the green flag, we just want it to move side-to-side, by itself. A 'move 10 steps' motion block, 'if on edge bounce' motion block, and a 'forever' loop from the control category will achieve this for us. Let's set its rotation style to 'left-right' as well, or else our Hatchling will turn upside down when it bounces off an edge. You can do this with the set rotation style block from the motion blocks category.
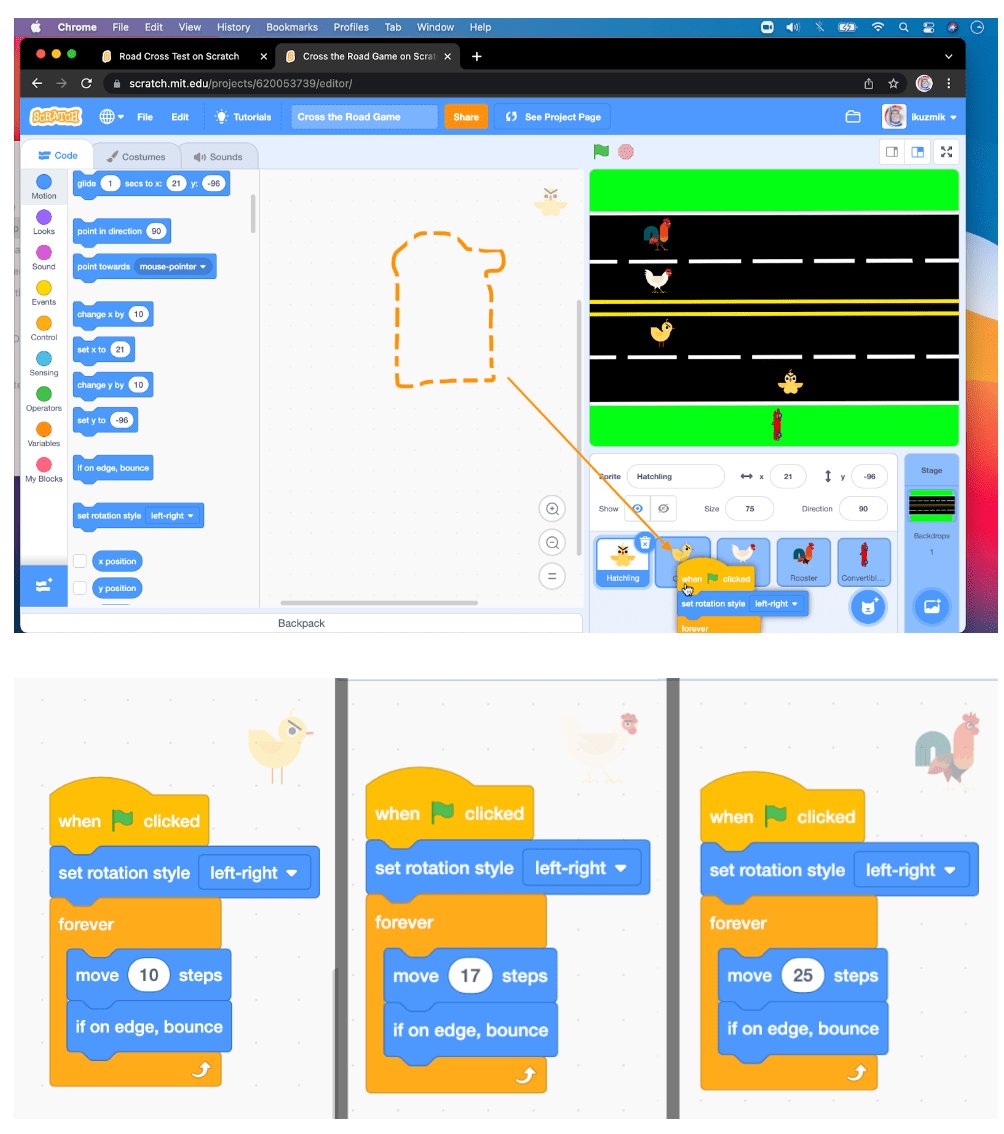
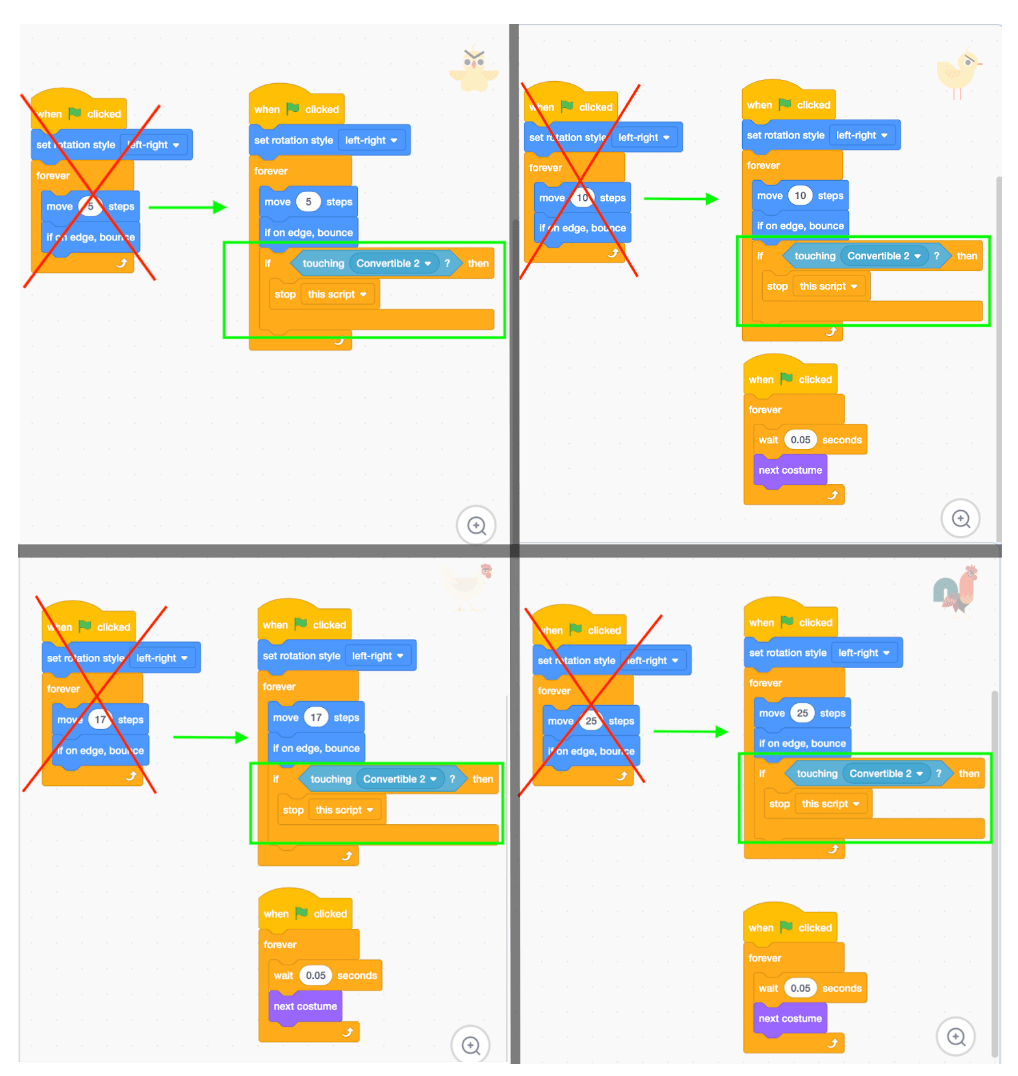
5. Make all the chickens move
All of our chickens pretty much do the same thing. We can copy code between sprites by clicking and dragging the code we want to copy over the picture of the sprite we want to copy it to. The sprite will wiggle when you have the code in the right spot. We'll give all of our chickens the same code, except each chicken will move just a little quicker than the last. The more steps we tell our chickens to move, the faster they'll go, and the harder our game will be!
Make sure to run your code and see how fast each of the chickens are moving. You can always adjust the speeds if the game doesn’t look right when you run the code. You should make sure to run your code often to catch bugs (glitches/mistakes in your code) as soon as they happen!
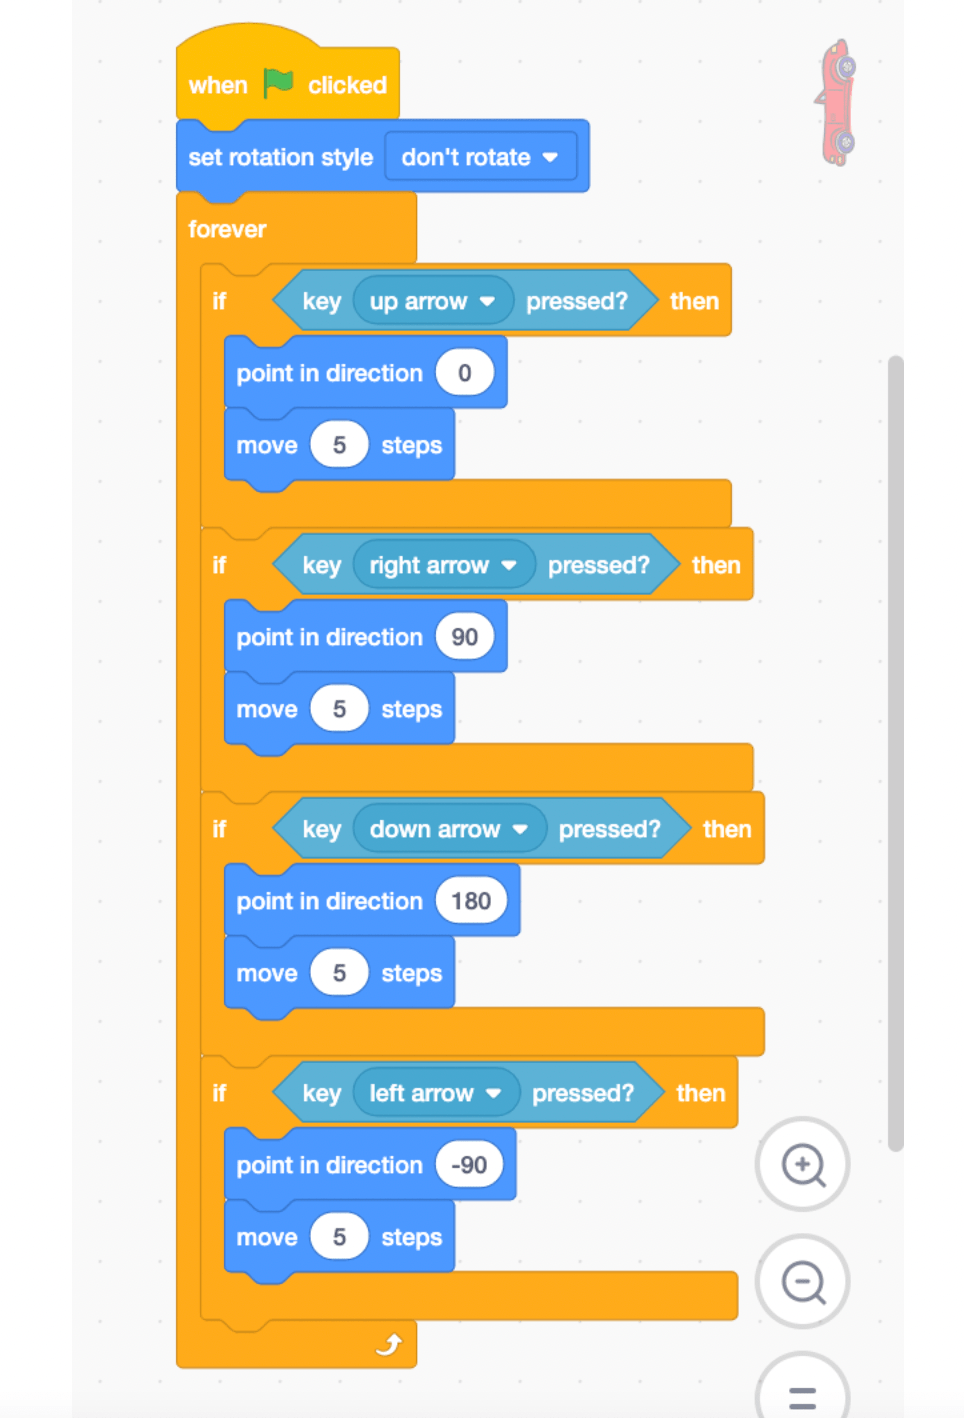
6. Control the car with the arrow keys
In order to control the car, we can use an 'if-then' block to check and see if an arrow key is pressed. If it is, we'll tell the car to point in the direction of that arrow key, and move a few steps. We have to make sure to put our 'if-then' blocks inside a 'forever' loop, so Scratch knows to always be checking if these keys are pressed. If we want our car facing the same way no matter where it moves, we can set its rotation style to 'don't rotate'.
Make sure to run your game and see if your car can move in all directions. If your car won’t move in a direction, double check that your code matches what is written below. For example, your car is trying to go up when you press the down arrow, you might have forgotten to write -180!
Pro Tip: If you are more advanced with Scratch, you can use the motion blocks that change the x and y positions of the car instead of having the car point in direction then move 5 steps.
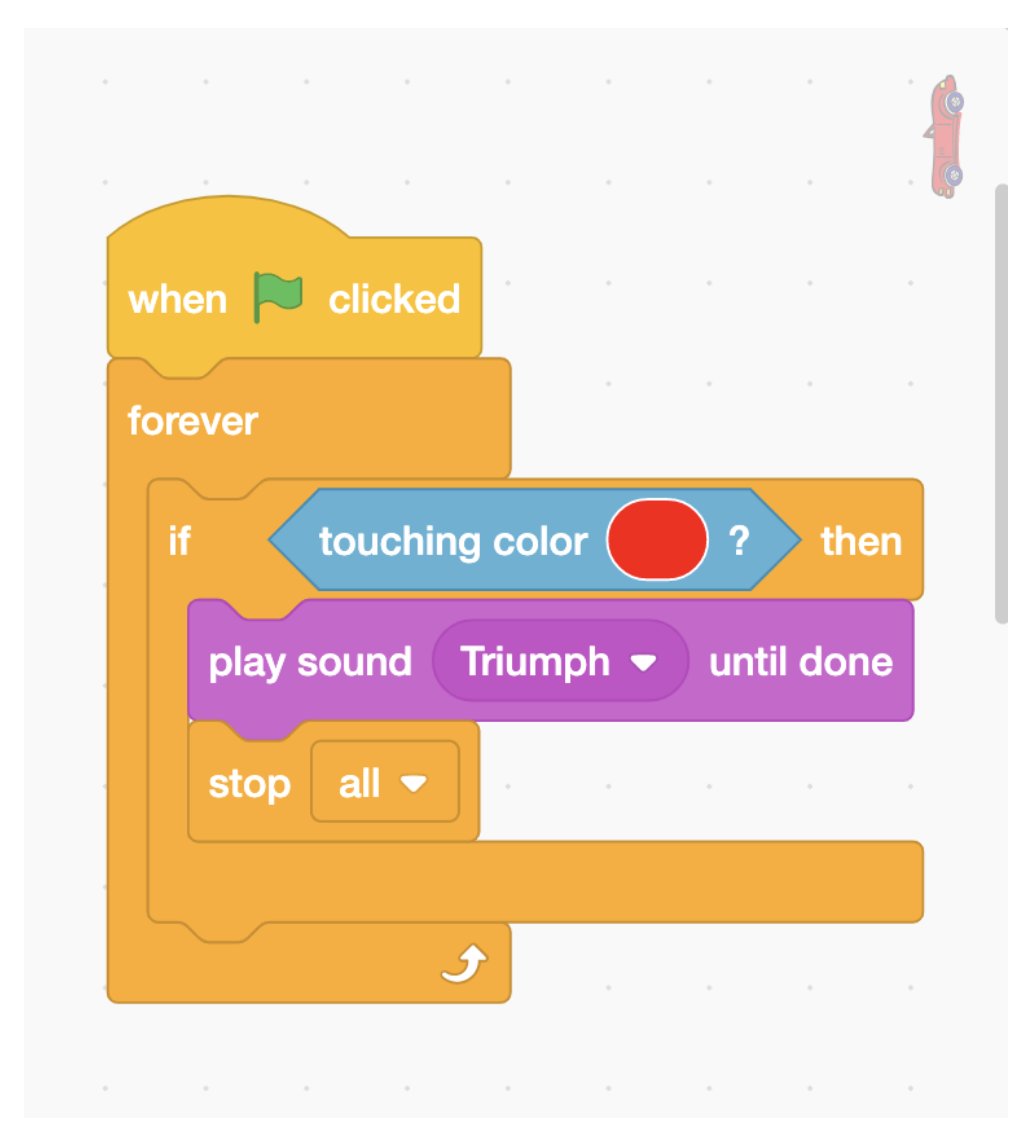
7. Lose condition
Our game should end if one of the chickens catches our car. Let's write the code in our car to check and see if it's touching any of the chickens. We can use some 'touching' sensing blocks and some 'or' operator blocks to check this. If our car is touching a chicken, we'll stop the car from moving, play some sounds, and stop the game. The chickens will keep moving while the sounds are playing but the car will not. The 'stop other scripts in the sprite' block is responsible for stopping the car from moving. 'Scripts' is just a fancy word for code blocks.
To continue to test your code after losing, make sure to move the car back to the starting position by clicking and dragging it.

8. Win condition
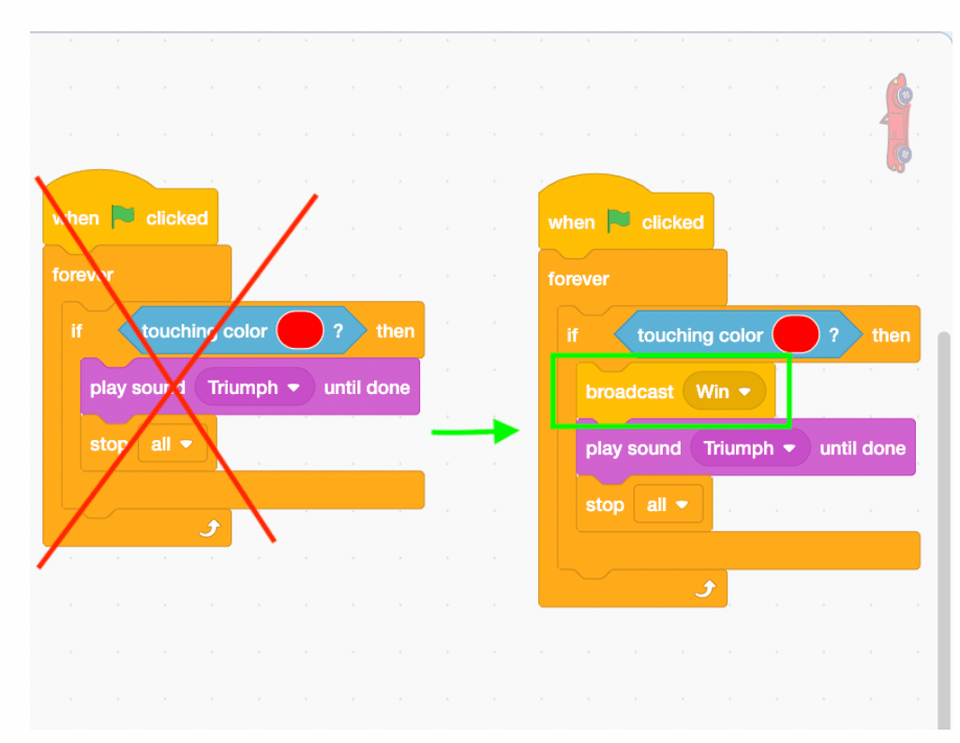
Now that we can lose, we must also be able to win! Let's edit our backdrop and draw a big red line on the other side of our road. In our car sprite, we'll check to see if it's touching the color of that line, and if it is, we know we've safely made it to the other side of the road. We can relish in our triumph with a positive sound effect, and then stop the game.
Now our game should be functioning, so this is a good time to add some finishing touches! Now that we have the code all working, we're going to animate our chickens, make our game easier to replay, and add some background music.
9. Animate chickens
We can animate any sprite using the 'next costume' block, but only if the sprite has multiple costumes, and only if those costumes make sense to animate with. You can check the costumes under the costumes tab. This is also where you can add new costumes or draw your own! Don’t forget to add eyebrows to the animations too! Our Chick, Hen, and Rooster sprites all have animations built in by default. We'll have them cycle through their costumes, and use a 'wait' block to control how fast we do it. We're also going to have our chickens stop moving if they catch the car; this code will go in all four chickens.
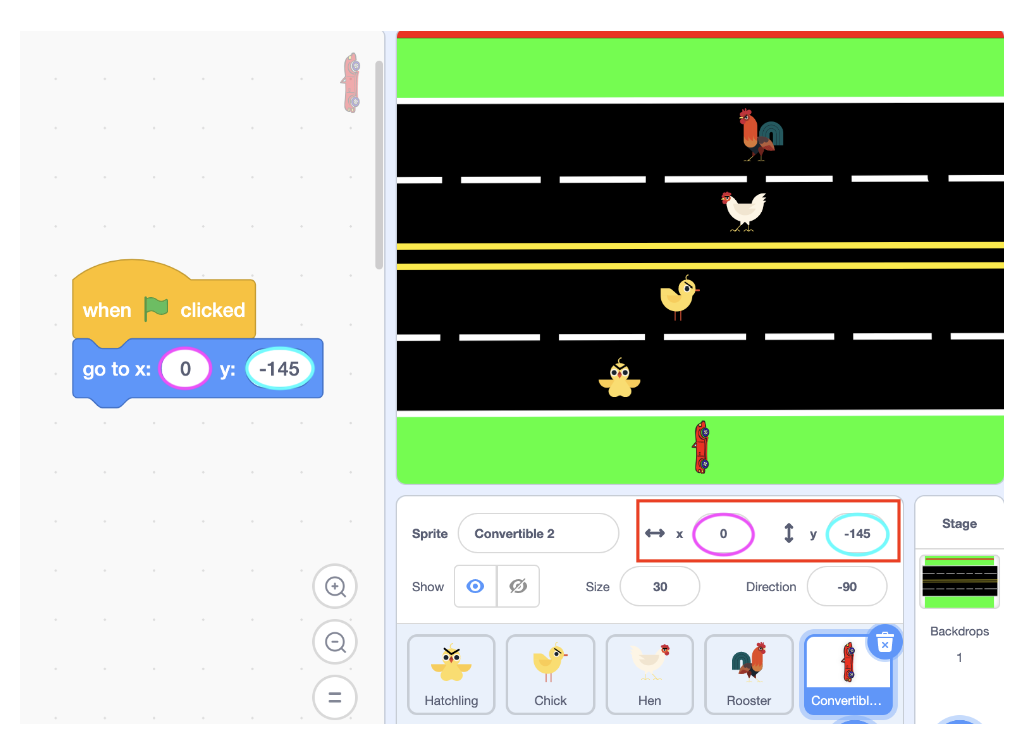
10. Move car to a start position
Since you are the coder, you are able to click and drag your sprites when you are testing your code, but if you share your game with a friend, they won’t be able to replay your game!
If we lose the game, and try to play again by clicking the green flag, we'll likely lose immediately, because our car is still on the road. We can tell our car where to move when we click the green flag using its X and Y position. X and Y tell us where our sprite is in the project space. If you move your sprite, notice how the X and Y change. We'll move the car to where we want it to start, check the X and Y position, and tell it to go to that same position when we click the green flag.
11. Add background music
An essential part of any game: a catchy tune to fit the mood. We can add this code in the Backdrop, since it doesn't really relate to any particular sprite. Make sure to click on your Backdrop. You will know you are in the right place because Backdrops do not have the motion block category. If we use a 'play sound until done' block inside of a 'forever' loop, it will keep playing our music over and over again.
As an optional final touch, we can stop the music when the player wins by using broadcasting. When we broadcast a message, we can send a signal from one sprite to another sprite in order to trigger code. We'll create a new message, 'Win', and broadcast it when our car gets to the other side of the road. When our Backdrop receives the message, 'Win', it will stop playing the music.

Remixes for Your Chicken Crossing the Road Game
We've built a pretty cool game today, but it doesn't have to stop here! There are lots of ways to improve this game and make it even more fun with Scratch coding.
1. Add more chickens
If you didn't think 4 lanes was hard enough, you can always draw another backdrop with more lanes, and add sprites. What other sorts of sprites could we avoid when trying to cross the road?
2. Add levels
To make our game more interesting, we can add levels. At level one, maybe the chickens move more slowly, and our game can get extra hard as we increase in level. This is a good use case for Variables in Scratch. We could create one to say what level we're on, and another to determine how fast our chickens move.
3. Add lives
This is another great use for a Variable. These chickens can be pretty relentless; maybe the game would be more fun if we got a second chance, or even a third. You can create a Variable, 'Lives', set it to 3 when the green flag is clicked, and decrease it by 1 every time the car touches a chicken.
4. Add a ‘Game Over’ screen
Game Over screens are a great way to indicate to the player that they have in fact lost the game. You can create one by drawing another backdrop, or by painting your own sprite. In order to give the player a little hope, you can also encourage them to ‘Try Again’ on your Game Over screen.
Looking for more ideas? This page of projects on Scratch is full of Cross the Road Games, and many of them have implemented some of the ideas above. You can always remix a project in Scratch to not only look at, but also change the code. This is a great way to learn how other people build their games!
Code a Cross the Road Game on Scratch
Today we built an easy Cross the Road game in Scratch. We used 'forever' loops, and learned about 'if-then' blocks and how to control a sprite with the arrow keys. This game also involved us drawing our own backdrop, and editing our sprite costumes. Great job!
If your student thought building this game was fun, encourage them to try remixing some other peoples’ projects too. And if they want to build more games like this, take a look at our beginner-friendly Accelerated Scratch class (Grades 5-9) or Scratch Ninja class (Grades 2-5), which will teach your child how to take their games to the next level!
Next, check out how to create a clicker game on Scratch for another fun tutorial.
Review Key Programming Concepts We Used Today
- Sprites and Costumes:
- Sprites: These are the characters or objects in the game. Each sprite can have multiple costumes, which are different appearances that a sprite can switch between to create animations.
- Costumes: Different visual states for a sprite. Costumes are used to change how a sprite looks, often to show movement or different conditions.
- Events:
- When Green Flag Clicked: This is a common event block that starts the program when the green flag is clicked. It initializes the game and sets up the initial conditions for sprites.
- Broadcast and When I Receive: This mechanism allows sprites to communicate with each other. A broadcast sends a message that other sprites can listen for and respond to with specific actions.
- Motion and Positioning:
- Move Steps: This block moves the sprite a specified number of steps in the direction it is facing. It's used to control the movement of the characters in the game.
- Go to X: Y: This block places the sprite at a specific coordinate on the stage. It’s essential for setting initial positions or moving sprites to specific locations.
- Control Structures:
- Forever Loop: This loop runs the enclosed blocks continuously until the program stops. It’s used to keep certain actions, like checking for collisions, running throughout the game.
- If Then: This conditional statement runs the blocks inside it only if the specified condition is true. It’s crucial for decision-making, like checking if a sprite has reached a certain position.
- Sensing:
- Touching?: This block checks if a sprite is touching another sprite or color. It's used for detecting collisions, such as when the player sprite touches obstacles.
- Key Pressed?: This block detects if a specific key on the keyboard is being pressed, allowing for user input to control the game, such as moving the player sprite.
- Variables:
- Variables: These are used to store information that can change, such as the player's score or the level number. Variables are essential for keeping track of game states and updating them as needed.
- Sound:
- Play Sound Until Done: This block plays a sound clip and waits until it finishes before continuing. It's used to add audio effects, enhancing the gaming experience.
Written by Ian Kuzmik, a Create & Learn instructor with a Bachelor's Degree in English from Tulane University. He's been teaching grades K-8 since 2019, with a focus in the subjects of ESL and Computer Science.

