

Scratch is an incredible program from MIT that can help kids in grades 2-5 learn how to code. It's often the first coding language students learn, because of it's simplistic blocks that allow students to focus on logic instead of syntax. However, it be can difficult to know where to start, so it is helpful for kids to have simple projects to complete as they learn the ins and outs of the platform. For that reason, we’ve compiled some fun Scratch exercises for kids that will help them to master Scratch and be equipped to tackle more advanced projects in the future. Read on to find fun activities that involve flying, changing colors, noises, and more!
To jump right into learning and making fun projects with guidance from an expert live, join award-winning free coding classes designed by professionals from Google, Stanford, and MIT - such as Scratch Ninja, our most popular beginner course:
Try Scratch Exercises for Kids in Grades 2-5
Below, you will find Scratch exercises perfect for beginners to use to begin to learn the Scratch platform. Challenge your kid or student to complete all of the exercises!
1. Make the cat sprite fly towards your mouse pointer
- Difficulty: Beginner (Introductory)
- Target Grades: 2-5
- Estimated Time: 10-15 minutes
- Core Concept: Coordinates & loops
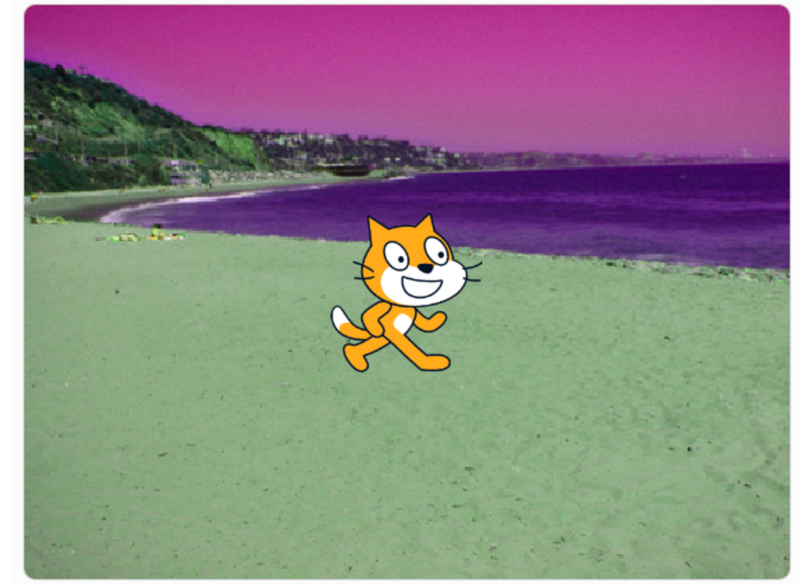
Our first fun, simple Scratch project is to make a cat sprite fly around the screen, following your pointer. Let’s begin! (You can see the model project here.)
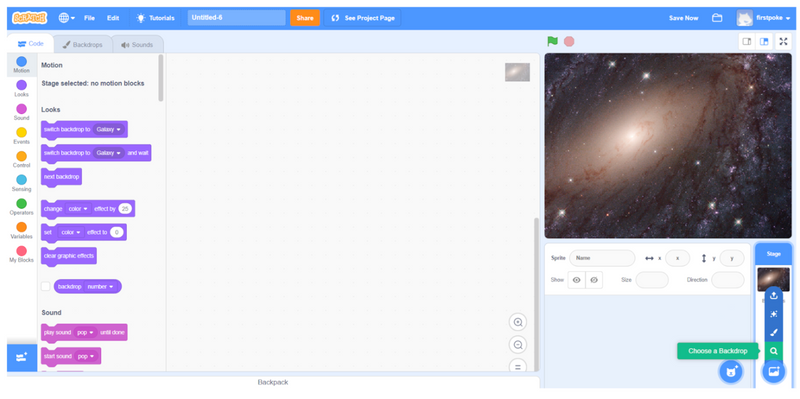
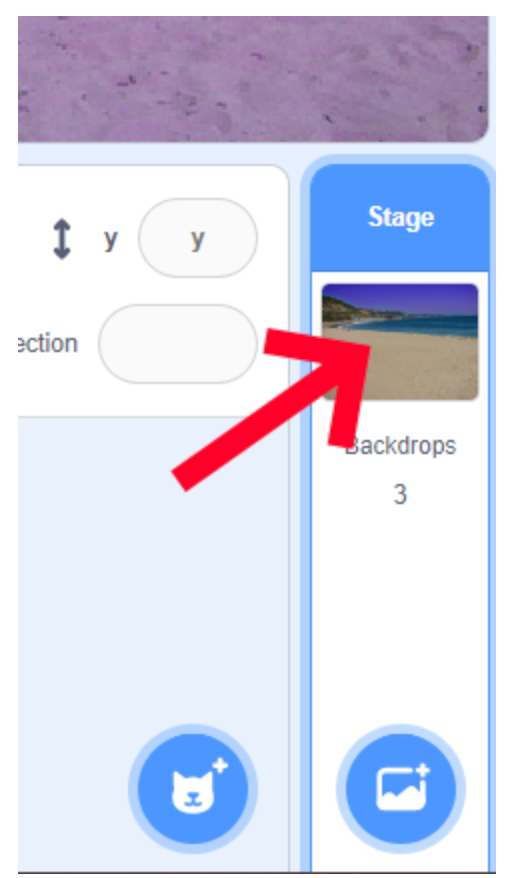
The first step, of course, will be to create a new project. Navigate to Scratch and click “Create” to create a new project. Delete the cat sprite that will load in by default (click the trash can icon) and then select a fitting backdrop by clicking the “Choose a Backdrop” button in the bottom right corner (shown in green in the image above). For our project, we chose “Galaxy.”
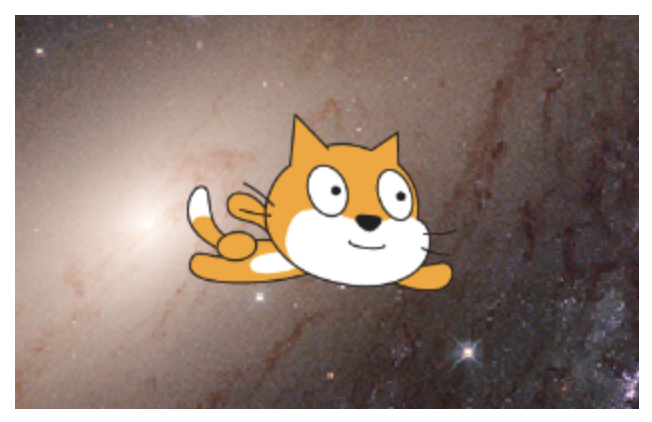
Once you have chosen a backdrop, the next step is to add in the flying cat sprite. Click the “Choose a Sprite” button in the bottom right, search for “cat flying,” and click the cat sprite that appears. You can see in the image below what you are looking for!

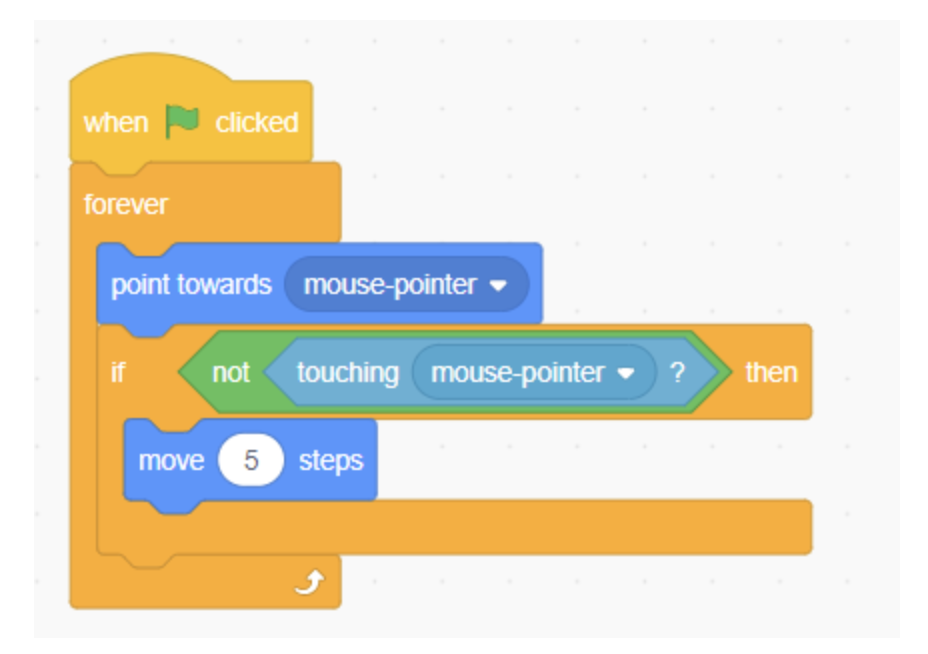
The final step is to add the code above to your program. Let’s take a look at what each block does!
- When green flag clicked: The code below this block will run when the green flag is clicked. It's almost like a start button!
- Forever: The code inside this loop will run forever (until the stop sign is clicked to end the program)
- Point towards (mouse pointer): Since we want our sprite to fly towards our mouse pointer, we can use this block to make the sprite always point towards the pointer.
- If (not touching mouse pointer): If our sprite catches up to our pointer, we want it to stop moving. Otherwise, if it’s not touching the pointer, we will run the code below.
- Move (5) steps: This block of code makes our sprite move 5 steps each time it is run. If you want to make your sprite fly faster or slower, you can increase or decrease this value.
2. Make a sprite jump
- Difficulty: Beginner
- Target Grades: 2-5
- Estimated Time: 15 minutes
- Core Concept: Y-axis movement & animations
Another useful and simple Scratch technique is to make a sprite jump. You can do so with the code below. Let’s get started! (See the model project here.)
Create a new project with a sprite, following the instructions in the flying cat exercise. You can chose any sprite or backdrop you want! It's important to allow your student to be creative with what story they want to tell.
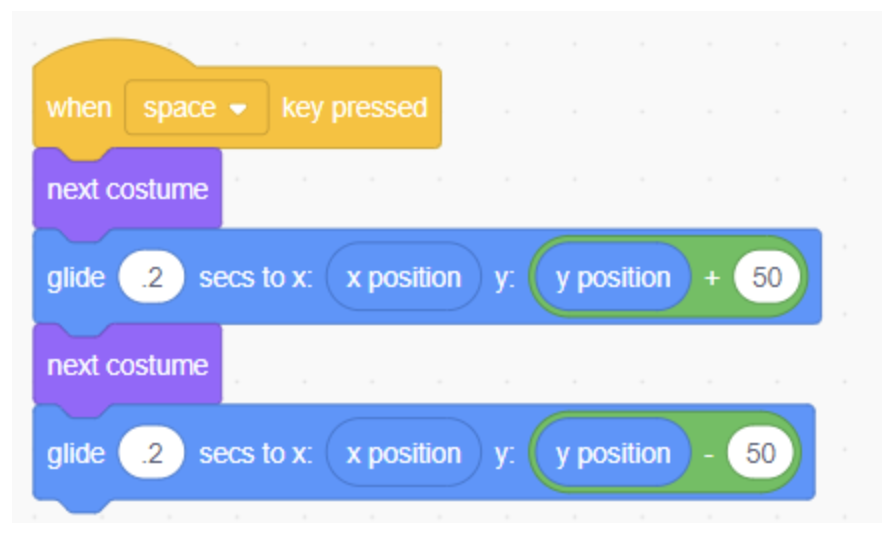
Add the code in the image above to your project, and be sure to read below to understand what each block of code does.
- When (space) key pressed: The code below this block will run every time the space key is pressed. If you would like to run your program with a different key, you can customize that here. This is called an event block, and every section of code needs to start with one!
- Next costume: Our sprite will look more realistic when it’s jumping if its animation changes. We can change to the next animation of the sprite with this block. Costumes are just the term used to describe different outfits or movement of the sprites legs.
- Glide (.2) secs to x: (x position) y: (y position + 50): To understand this block of code, we will first need to understand x and y coordinates. Sprite movement in the Scratch canvas is controlled by an invisible grid, and you can move things around the grid by giving them an x value and a y value. The x value controls placement left to right, and the y value controls placement up and down. With this block of code, we tell our sprite to not change its left to right location, and to go up 50 units. If you want your character to jump more slowly or more quickly, you can adjust the .2 value up or down.
- Next costume: Same as before, we will have our sprite animation change again as it comes back down.
- Glide (.2) secs to x: (x position) y: (y position - 50): This block is the opposite of our previous glide block; it will have our sprite return to its original position.
Pro-Tip to avoid the continuous-jump bug: If your child mashes the spacebar during the jump sequence, the sprite might glide from its mid-air position and fly off the screen. To prevent this, you can replace the "when space key pressed" trigger block with a forever loop containing an if key space pressed? block and a temporary wait until not key space pressed? block at the end, or program a simple state variable to lock jumping until the landing glide finishes.
3. Make a color changing background
- Difficulty: Very Easy
- Target Grades: 2-5
- Estimated Time: 5-10 minutes
- Core Concept: Visual effects loops
A cool, simple project in Scratch is to create a background that changes color over time. Follow the 2 steps below to complete this fun project! (Model project here).
Following the steps in the flying cat project above, pick a background for your project. Then, click on the background in the “Stage” section to code it. Chose whatever backdrop you want! You can also include sprites, but the focus for this project is the backgrounds.
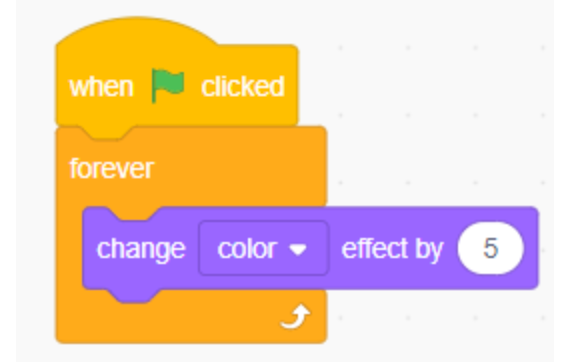
Add the 3 blocks of code shown above. Let’s look at what each one does! You can add the same code to a sprite - and see what happens!
- When green flag clicked: When the green flag is clicked, the code below will run.
- Forever: The code inside this block will run forever
- Change (color) effect by (5): Every time this block is run, it will change the color effect of our background by 5. If you would like the colors to change more slowly, decrease the value; if you would like them to change more quickly, increase the value. Colors are represented by numbers in computers, so this is how you can alter them.
4. Make a sprite make noise when clicked
- Difficulty: Easy
- Target Grades: 2-4
- Estimated Time: 10 minutes
- Core Concept: Event handling & audio playback
Our fourth Scratch exercise is to make a sprite make a sound when clicked. Follow the steps below to complete this unique project. (Model project here).
Follow the steps from the flying cat project to add a sprite of your choice to your project.
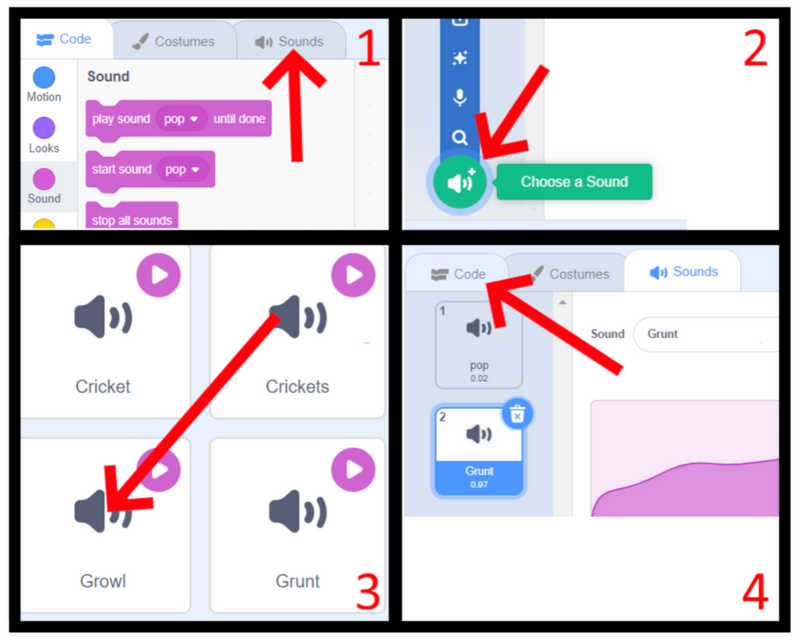
To add a sound to your project, click the “sounds” tab and click the “choose a sound” button. Find a sound that will work well for your project and click it. As you hover over them, they will preview what the sound will be! Then, click the “code” tab to return to the coding screen.
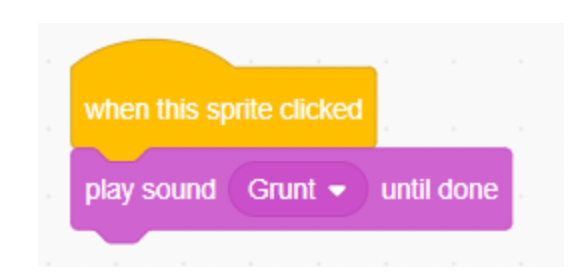
The coding for this project is just two blocks. Let’s take a look at what they do!
- When this sprite clicked: The code below this block will run every time your sprite is clicked. Your mouse needs to click the sprite!
- Play sound (grunt) until done: This block will play the sound of your choice. We used “grunt,” but you can use whatever sound you like!
Play around with adding different sprites that all have different sounds! You will need to add sounds for each one.
5. Change the size of your sprite with the arrow keys
- Difficulty: Easy
- Target Grades: 2-5
- Estimated Time: 10 minutes
- Core Concept: Key presses & sizing attributes
Our final project is to control the size of our sprite with the arrow keys. Let’s see how this is done! (Model project here).
Add a sprite to your project following the steps in the flying cat project.
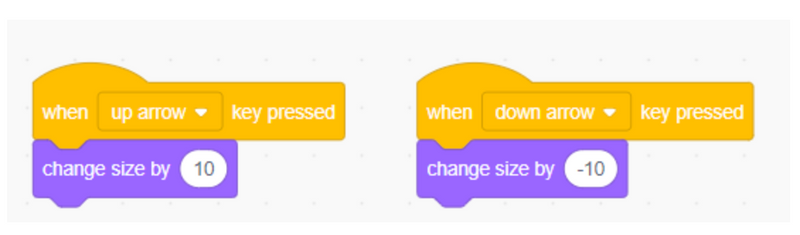
Add the four blocks of code above to your project. Let’s see what they do!
- When (up arrow) key pressed: The code below this block will run whenever the up arrow is pressed
- Change size by (10): When this code runs, it will increase the size of the sprite by 10
- When (down arrow) key pressed: The code below this block will run whenever the down arrow is pressed
- Change size by (-10): When this code runs, it will decrease the size of the sprite by 10
Get Started with Scratch Exercises for Kids in Grades 2-5
By now, your child or student has completed five Scratch exercises and is equipped with the skills they will need to build more complex projects! We recommend combining the techniques above into a single project to create a more interesting final creation. or try adding on to each one and making it your own!
If your child or student thought this was fun and would like to take Scratch classes with a live teacher and other students, check out our incredible library of live online Scratch courses for kids, designed by experts from Google, Stanford, and MIT. Or, if they’d like to follow another Scratch guide to keep learning explore some fun beginner Scratch challenges. Thanks for reading, and happy coding!

