

Making a Maze in Scratch is a great beginner level project. The end game is also a lot of fun because you can easily upload or design different mazes and use the same code to play them. In this tutorial, we'll show you how to make a Scratch maze game. We’ll demonstrate how to create your own maze, control your character’s escape from the maze with arrow keys, and even customize your maze with different themes. Let's get started!
Enroll your student in our free Scratch class, designed by pros from Google, Stanford, and MIT for live expert guidance as they make cool games (or for those with previous coding experience, our intermediate Game Building class):
How to Make a Maze in Scratch
Check out the maze game we’re building here, so you can see where we're headed! Follow the steps below to see how to do this with Scratch coding. Or watch our helpful video to hear instructions.
1. Set up the maze and character
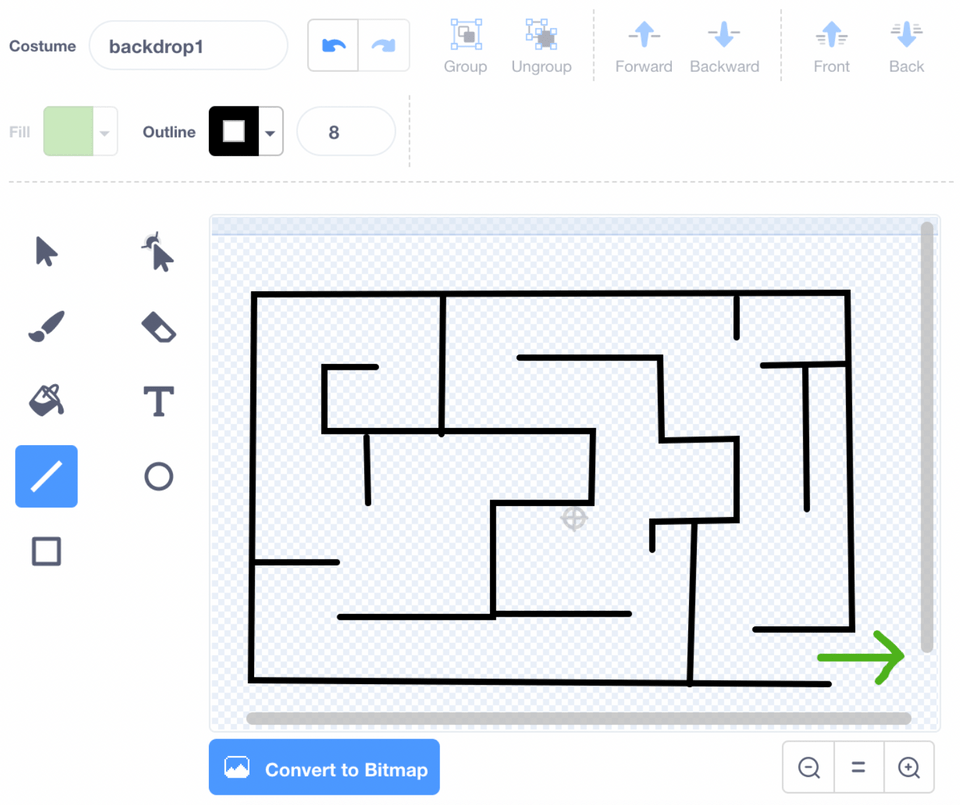
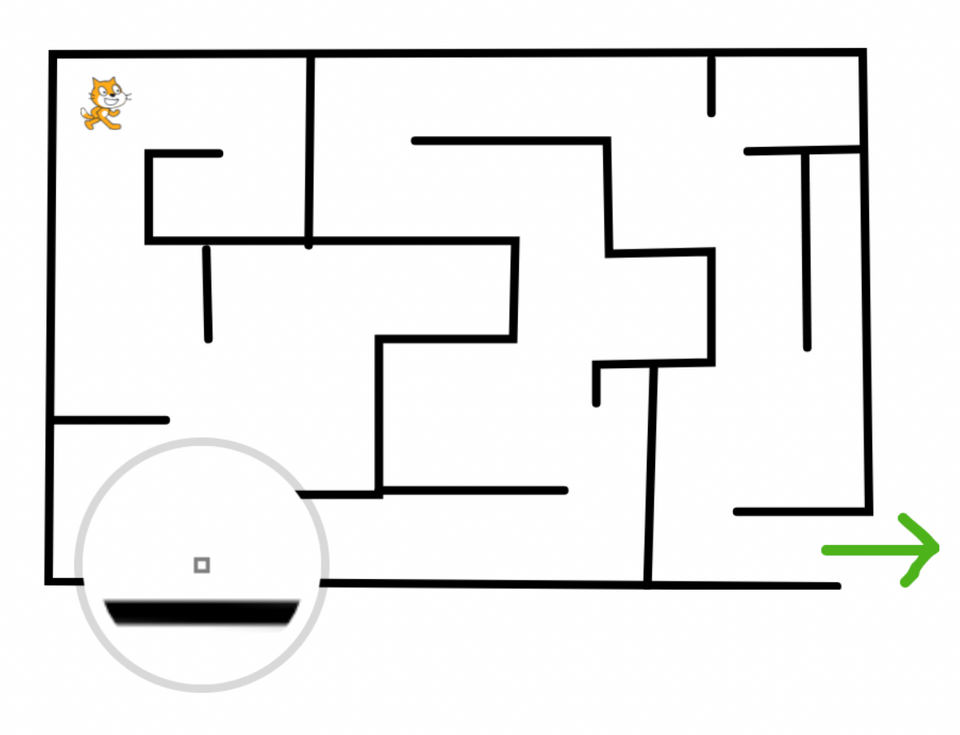
The first thing to do is create the maze. New Scratch projects come loaded with a default blank white backdrop. Click on the backdrop in the bottom right, which will put you in an edit backdrop mode. Then in the top left horizontal menu, click on “Backdrops”.
Use the line drawing feature (fourth one down in the left column) to create whatever maze pattern you want. Then use the brush feature (second one down in the left column), and draw a green arrow at the exit point of the maze. This is important as it will let us detect when the player has solved the maze and display a win message.
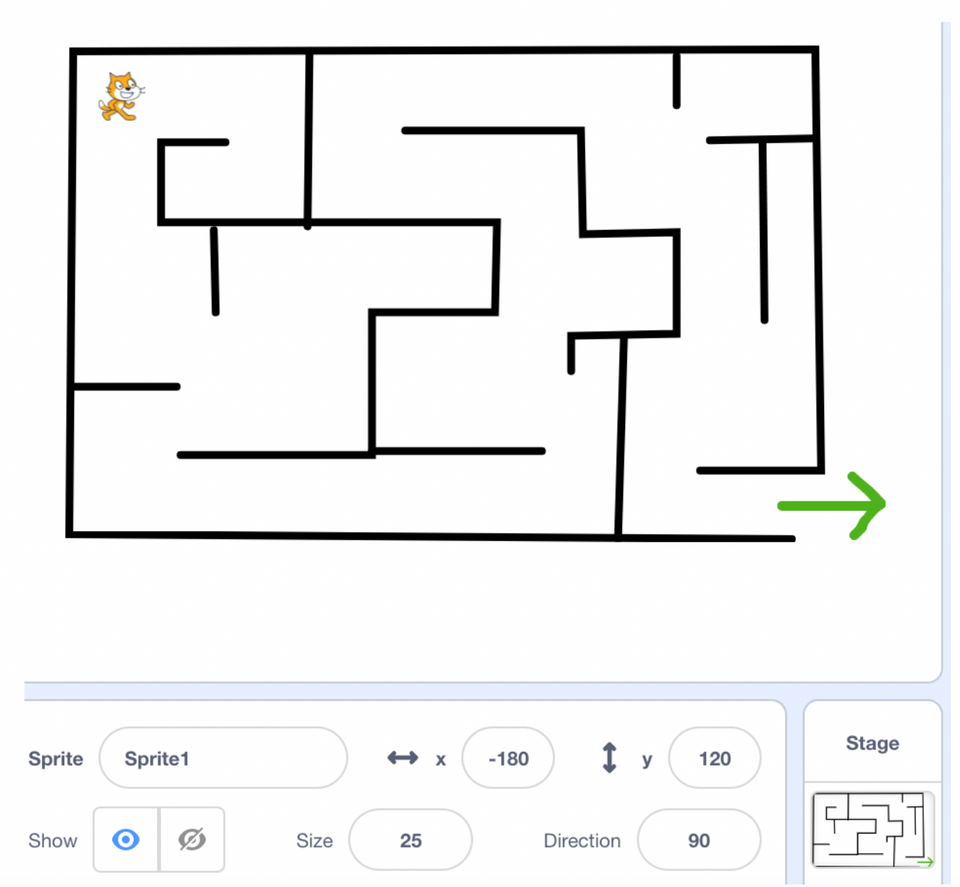
Click on the code button in the top left corner. Then click on the sprite in the lower right corner to get back to sprite editing mode. I’m using the cat, but feel free to use whatever you want! We want to make sure our cat is small enough to travel through the maze. Set the “Size” feature in the lower right panel to 20 (this can be adjusted at any time!).
Then drag the cat to the top left corner of the map as the starting location. Pay attention to the x and y values of the location. In our example, x is -180 and y is 120. This information allows us to always move the cat to the top left location every time we start the game.
2. Write the code for the start of the game
Now it’s time to code! Make sure you have clicked the sprite so we are adding code only for the character. You can also code when the backdrop is selected, but there will be no motion blocks. Check for motion blocks to make sure you selected the sprite.
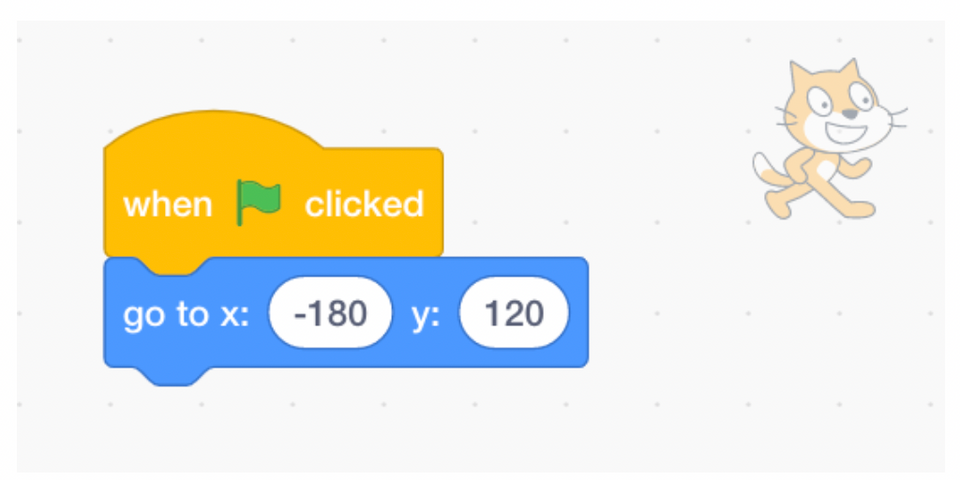
The first block we want is “when green flag clicked” from Events. Underneath, we want the “go to x, y” Motion block. We can fill in the blanks with the values for the top left position. For us, x is -180 and 120. This allows us to reset the game every time we hit the green flag.
3. Write the code to control the character with arrow keys
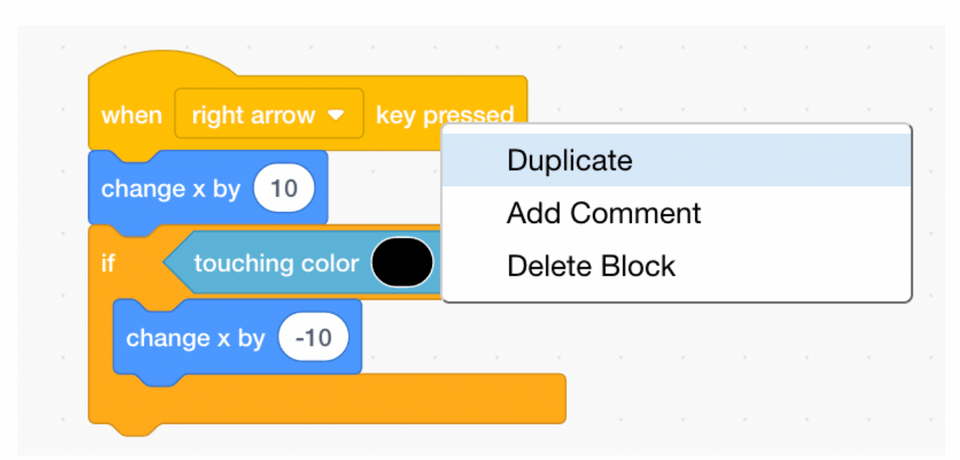
Most of our code will allow us to control the cat with our arrow keys. In Events, we want the “when space key pressed” block, and we need to change “space” to “right arrow” from the drop down.
We want to connect this to the “change x by 10” Motion block. This will allow us to move to the right every time we press the right arrow.
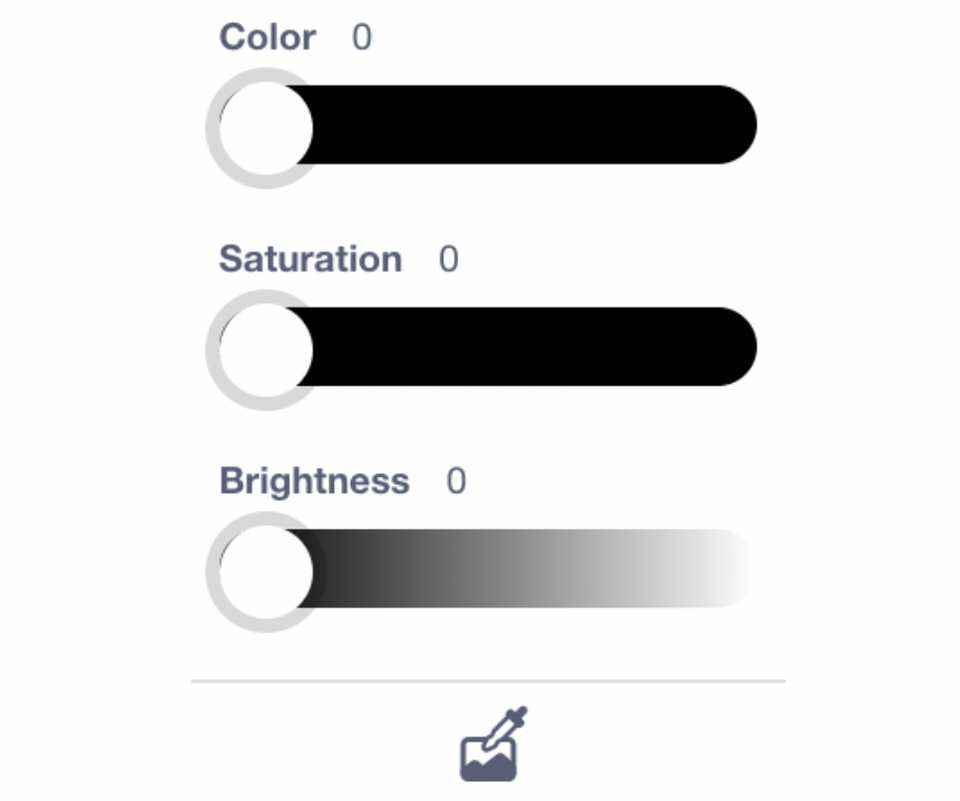
Now, our cat can move, but we also want to prevent the cat from walking through our maze walls. To do this, we want to add the if/then block from Control. The if condition is the “touching color” block from Sensing. The color will be the color of the line. Scratch has a really cool feature to get the exact color of the line. When you click the color circle in the sensing block to change it, you will see that you can change the color with three sliders.
But to ensure the color is a perfect match with the colors of the maze, you can click the symbol that looks like a background with a dropper on top of it. This will now open us a view where you can hover over parts of the background and select a color. In this hover view, click on a line on the edge of the maze, and this will get the maze color for you.
When we touch the edge of the maze, we want to undo the motion we just did. To do this, we want a “change x” Motion block inside the if statement, but we want to change the number to -10. This way, when the code runs, the x position is changed by 0 when running into the wall.

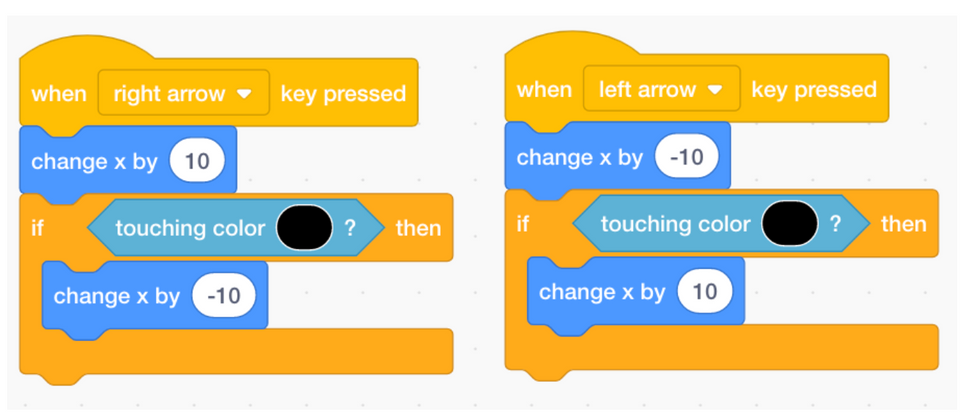
When we hit the left arrow, we want a similar horizontal movement to happen, but in the leftward direction. Since this code will look similar to the right movement, we can click on the “when right arrow clicked” block and select “duplicate”.
The only changes we need to make in this duplicated block are to change 10 to -10 and change -10 to 10 (this reverses the motion). We also want to switch “right arrow” to “left arrow”.
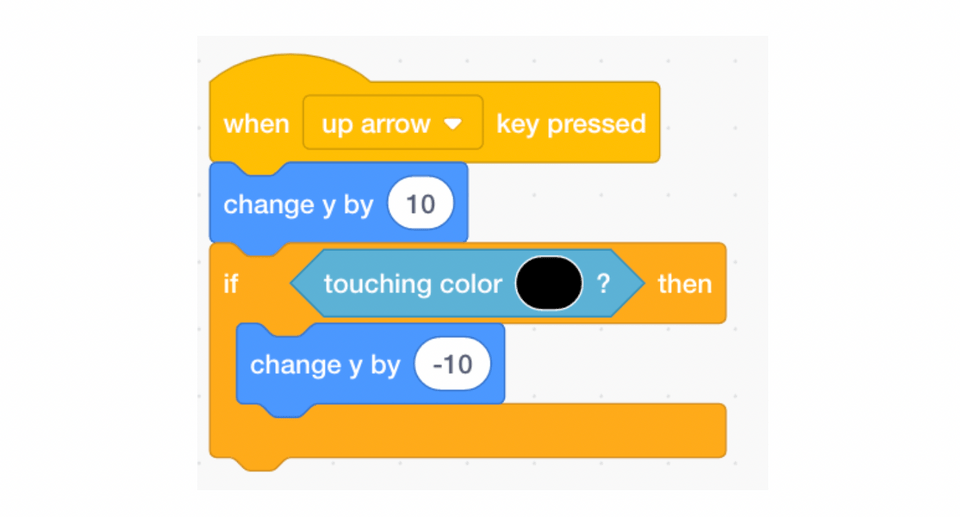
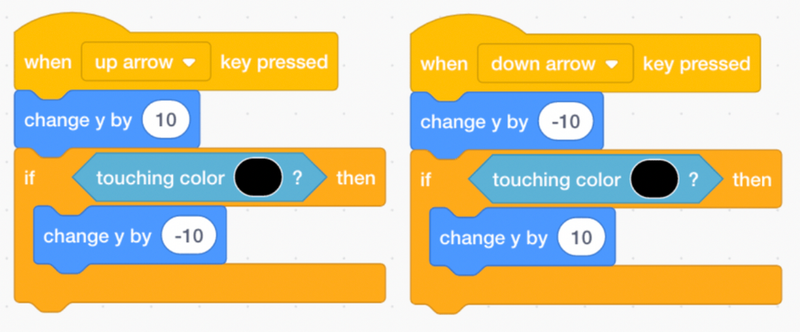
Now we need to handle vertical movement. From Events get the “when space key pressed” block and change the key to “up arrow”. Since this is vertical movement, we want to add the “change y by 10” Motion block.
Like before, we need an if/then block. The condition remains the same as before: we need a Sensing block of touching color and we can use the same trick to get the exact color of the maze lines. Inside this if block, we need to undo the upwards motion, and we can do that by putting a “change y” Motion block inside while making sure the number is -10.
We can duplicate this code for down arrow movement through right clicking the “when up arrow key pressed” block and selecting duplicate. Then we need to make the following small changes: switch “up arrow” to “down arrow”, change 10 to -10, and change -10 to 10. This reverses the motion, which is expected given that up motion and down motion are opposites of each other.
Before moving to the next step, make sure to test out your maze.
- Are there any holes where the sprite can escape?
- Make sure to go back to the backdrop and edit the maze so there are no holes!
- Does the sprite walk through the walls?
- Double check which color you chose for your sensing blocks!
- Is the sprite too big or too small for your maze?
- Change the size of the sprite to fit your game!
It is good coding practice to test out your code early and often. This allows you to fix bugs as they happen. Don’t forget to run your code while working on your Scratch Projects!
4. Display a win message once the character escapes
We’re almost done. The last thing we need to take care of is displaying a win message.
To do this, let’s make a new backdrop that represents the win screen. Go to the round “backdrop add” button in the very bottom right corner of the screen. Hover over this button, and select the “paint” icon that is third from the top. Then go to the backdrop editor, and on this blank screen, type a win message like “Yay you win!!”. The text editor is third down in the second column.

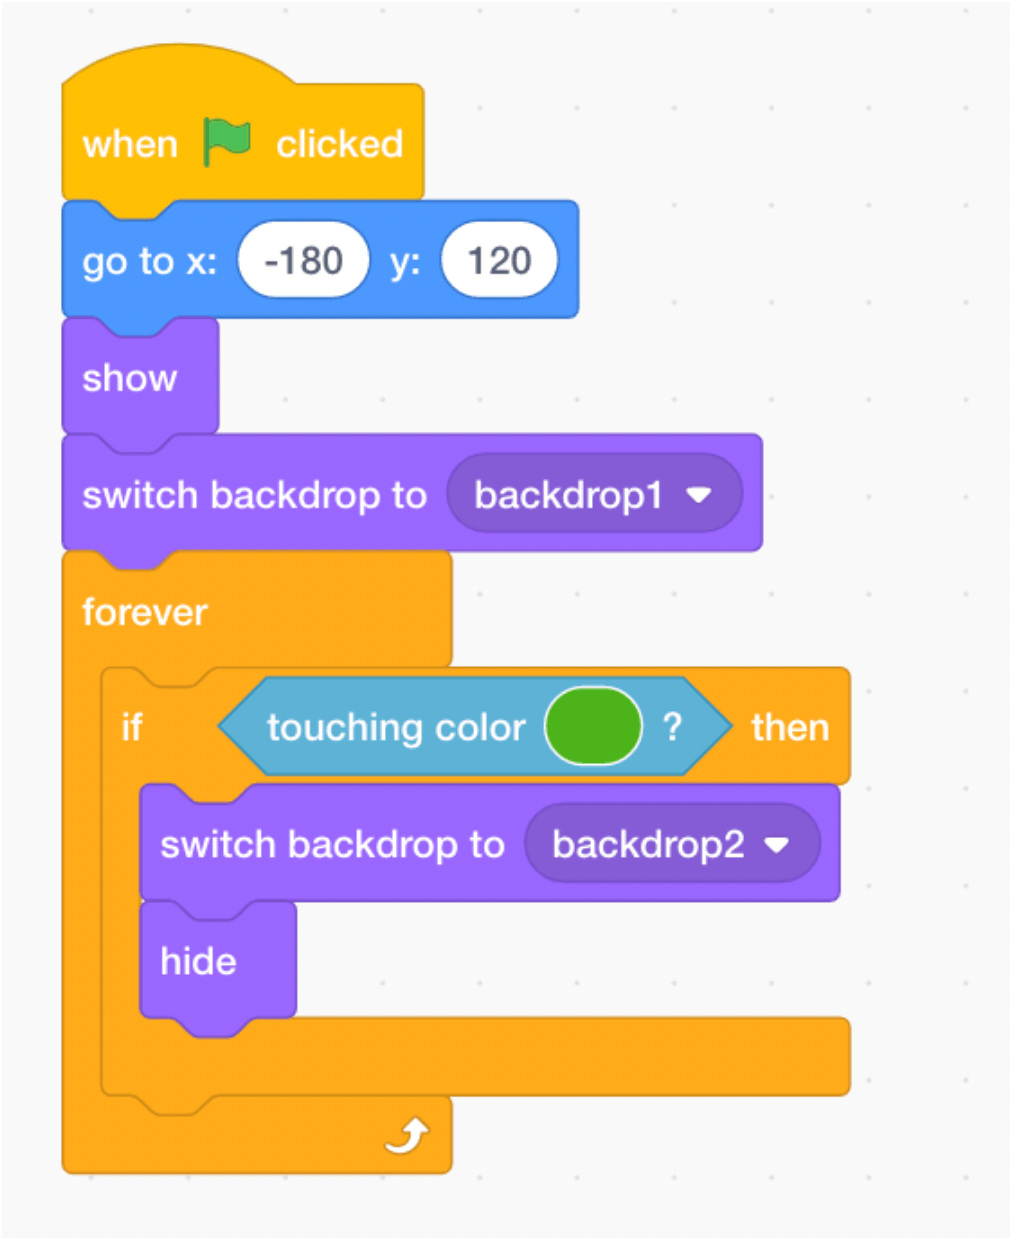
Now we need to update our code to change backdrops at the correct time. Return to the code tab using the top left horizontal menu. You will then click on the sprite to access the code. After the “go to x, y” block that we already have under the “when green flag clicked”, we want to add the two Looks blocks of “show” and “switch backdrop to backdrop1”. The “switch backdrop” block has a drop down menu so make sure backdrop1 (or the name of your backdrop that contains the maze) is selected. This allows us to reset to the maze whenever we start the game after switching to the win screen.
After this, we need to add a “forever” block from Control since we always want to detect if we have reached the green arrow, signaling the end of the game. Inside “forever”, we want an if/then Conditional block similar to the one we built for detecting if the character walked into a wall.
We can use the Sensing “touching color” block to detect when we have reached the arrow and solved the maze. This time, change the color in this sensing block to the color of the arrow using the same hover technique we used to get the color of the maze.
Inside the “if/then” block, we want two Looks blocks. We first want “switch backdrop to backdrop2”, and make sure to change the backdrop to the one with your win message. We also want the “hide” block to make the character disappear from the screen so we only have a win screen. Great job! You have just built a maze in Scratch!
5. Customize the maze
You can also create mazes with themes! We drew our maze on the default white background, but you can first load in one of Scratch’s backgrounds, and then draw the maze on top of it. Then you can pick a character that matches your theme. For example, you might make a crab under the sea or a monkey in the jungle.
Here are five ways to customize your maze game:
- Custom Characters: Create unique characters by drawing sprites or importing images. Use the "Costumes" tab to design and animate them.
- Level Design: Add multiple levels with increasing difficulty. Use different backdrops for each level and create unique obstacles.
- Power-Ups and Hazards: Introduce power-ups like speed boosts or invincibility, and hazards like moving obstacles or enemies.
- Sound Effects and Music: Enhance the game experience with background music and sound effects triggered by player actions.
- Score and Timer: Implement a scoring system and a timer to challenge players to complete the maze quickly and earn points.
These customizations can make the maze game more engaging and personalized.
Key Programming Concepts in the Scratch Maze Game Tutorial
- Sprites: In Scratch, sprites are the characters or objects that perform actions. For this tutorial, we use a ball sprite that we can program to move and interact with the environment.
- Events: Events are triggers that start a sequence of actions. For example, using "when this sprite clicked" triggers the ball's movement.
- Motion: Motion blocks control the movement of sprites. By using blocks like "move 10 steps" and "if on edge, bounce," we can make the ball move and bounce.
- Conditionals: Conditionals check if certain conditions are true. For instance, "if on edge, bounce" checks if the ball hits the screen edge and then makes it bounce.
- Loops: Loops repeat a sequence of instructions. A forever loop can keep the ball moving indefinitely, bouncing whenever it hits the edges or other sprites.
Sensing: Sensing blocks detect different conditions, such as touching a sprite or the edge of the screen. This is essential for making the ball bounce off the paddle or another sprite.
Have Fun Making a Maze Project in Scratch
We hope your student had fun making their maze game! Check out award-winning Scratch coding classes for kids to learn how to make other games and animations. Up next, learn how to make a Pacman game in Scratch with a simple tutorial.
Written by Sophie Andrews, a Create & Learn instructor. Sophie Andrews is a student at Stanford University studying Math and Computational Sciences. She loves teaching and is a teaching assistant for Stanford's introductory computer science classes. Her work focuses on data science. Last year she built the online National Vote Trackers for The Cook Political Report, and she currently leads the Data Team at The Stanford Daily. She's also interned with the FCC and the National Renewable Energy Lab. Updated by Madeline P.

