
Wondering how to make a clicker game on Scratch? Well, making a clicker game is pretty easy! So today, we will help you and your child make a simple cookie clicker game using Scratch coding.
The cookie clicker game is an incremental game, first created by the French programmer Julien “Orteil” Thiennot in 2013. In fact, the first version was coded in just one night!
This game is quite popular because it is suitable for all ages. Basically, in order to play the game, the user clicks on a big cookie to earn a point per click.
If your child enjoys creating games, enroll them in our award-winning, live online Scratch coding classes and our game design class. Each small-group class is led by an expert, and designed by professionals from Google, Stanford, and MIT. There's no risk in trying with our free intro session!
What Is a Clicker Game on Scratch?
Clicker games are also known as incremental games. Clicker games are video games in which the player performs simple actions like clicking on the screen, and that clicking rewards the player with in-game currency.
After earning a certain number of cookies, the player can unlock another cookie-type or the player can buy new assets such as cursors, farms, mines, factories, and banks that automatically make cookies.
How to Code a Clicker Game on Scratch
The most basic clicker game can be easily made in a few simple steps by using just one value. The idea is to program the game so that when your sprite gets clicked, the value changes by one. So let's go through all the steps to create a basic clicker game on Scratch. Check out the project we're going to make here.
Here's a quick overview of what you'll learn today:
- How to Set Up Basic Clicker Mechanics:Learn how to create the core functionality of the game, which includes making a sprite that can be clicked to increase a score or count. This involves understanding how to use Scratch blocks to detect clicks and update the score accordingly.
- How to Add Upgrades and Rewards:Learn how to make your clicker game more engaging by adding upgrades or rewards that players can buy with their in-game currency. This includes learning how to create buttons for upgrades, how to increase the click value, and how to implement automatic or passive earning features.
- How to Customize the Game’s Appearance:Learn how to make your game visually appealing by customizing sprites, backgrounds, and adding animations. This involves using Scratch’s costume and backdrop editors, and learning how to switch between different costumes and backdrops based on game events.
Let's get started!
1. Choose a backdrop
The very first thing you need to do is to get your backdrop ready. By default you can see a blank backdrop when you log into Scratch. To choose your own backdrop, on the right side of the screen, find the round mountain icon and click on it.
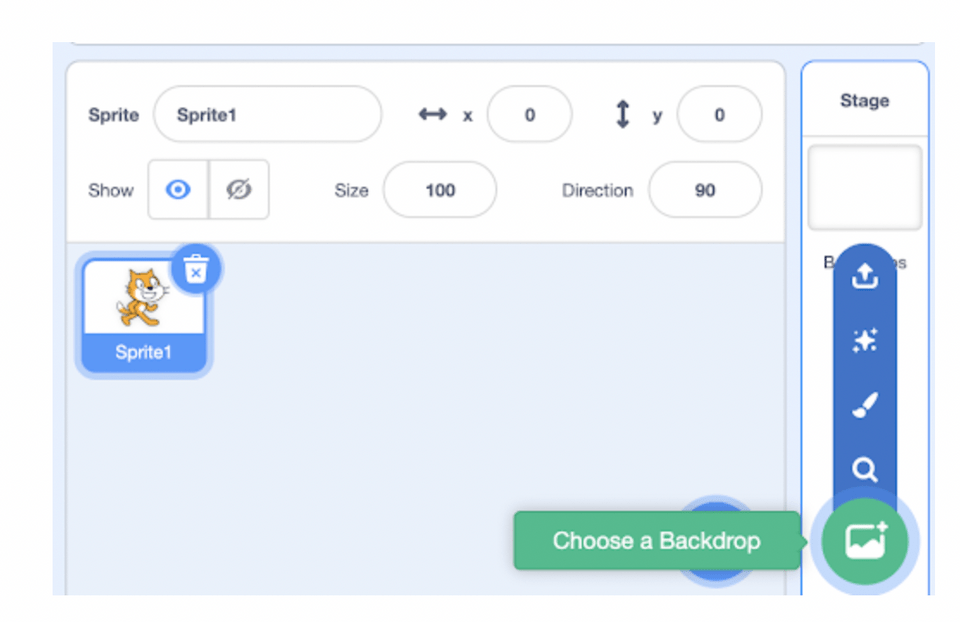
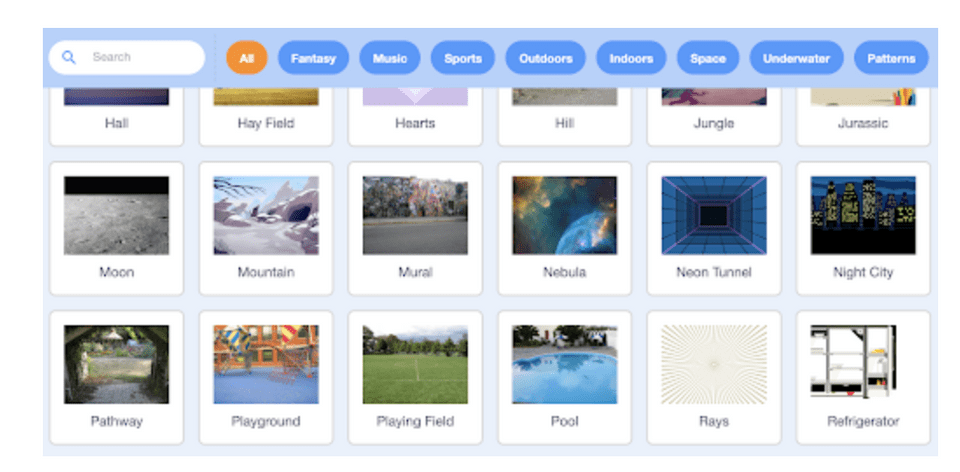
Go ahead and choose a backdrop.
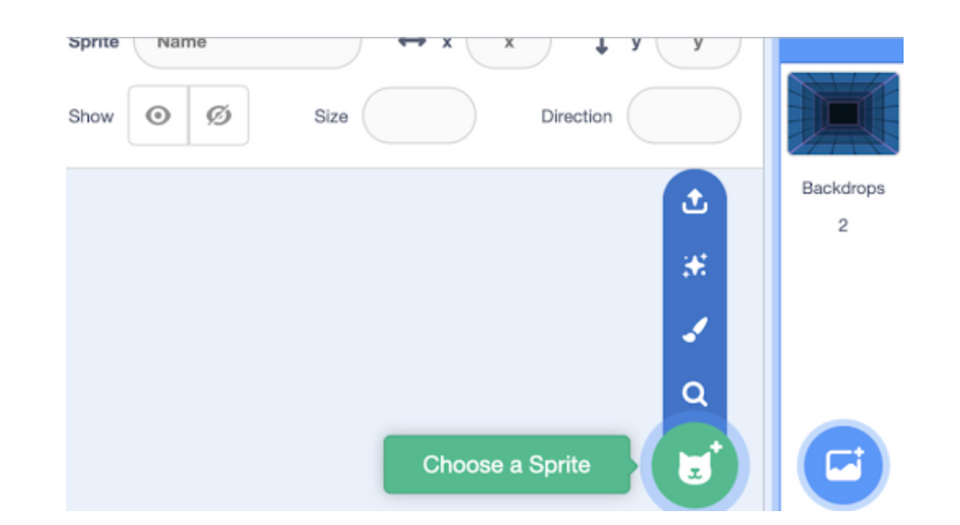
2. Choose a sprite
Now that we have a backdrop ready, we need to select or draw one sprite to resemble a cookie. The round blue color cat icon on the right bottom corner of your screen allows you to choose a new sprite. Go ahead and select one sprite of your choice. Here we have selected a paintbrush to draw the sprite.

Be sure to draw 3-4 costumes, as well, with minor changes so that we can use them later.
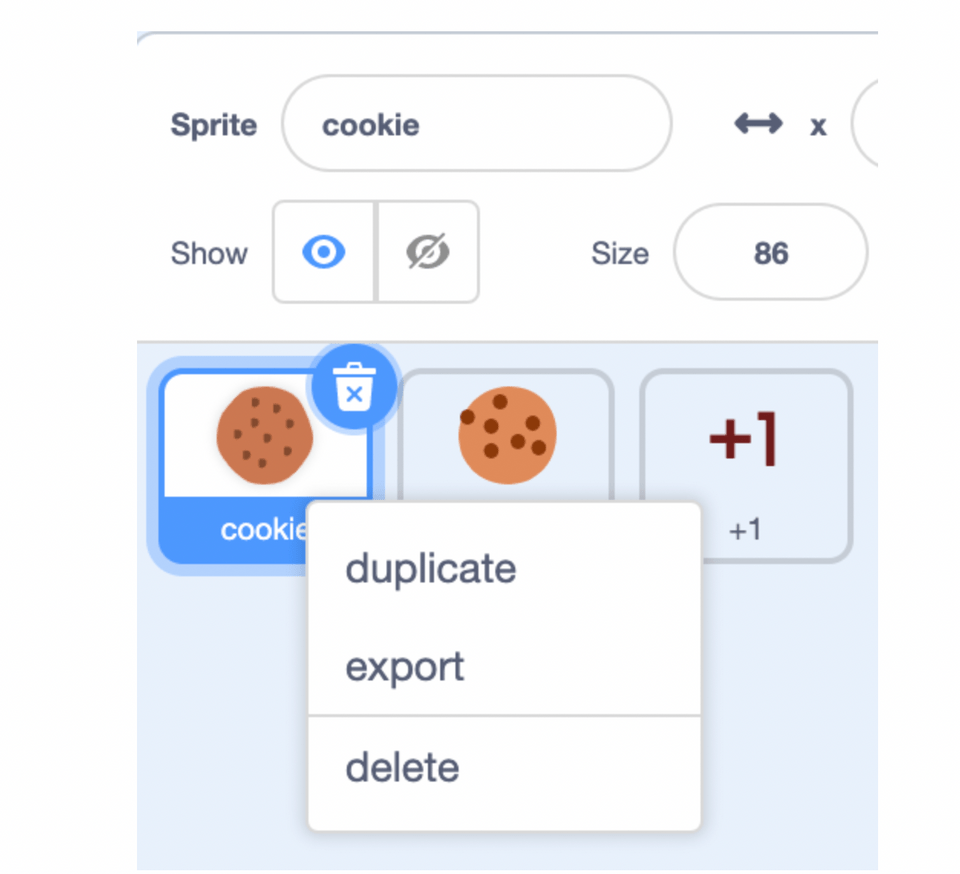
3. Duplicate a sprite and resize it
Right click on your sprite and duplicate it. Once you duplicate the sprite, click on the duplicated sprite and reduce its size. Rename it as cookie-rain.
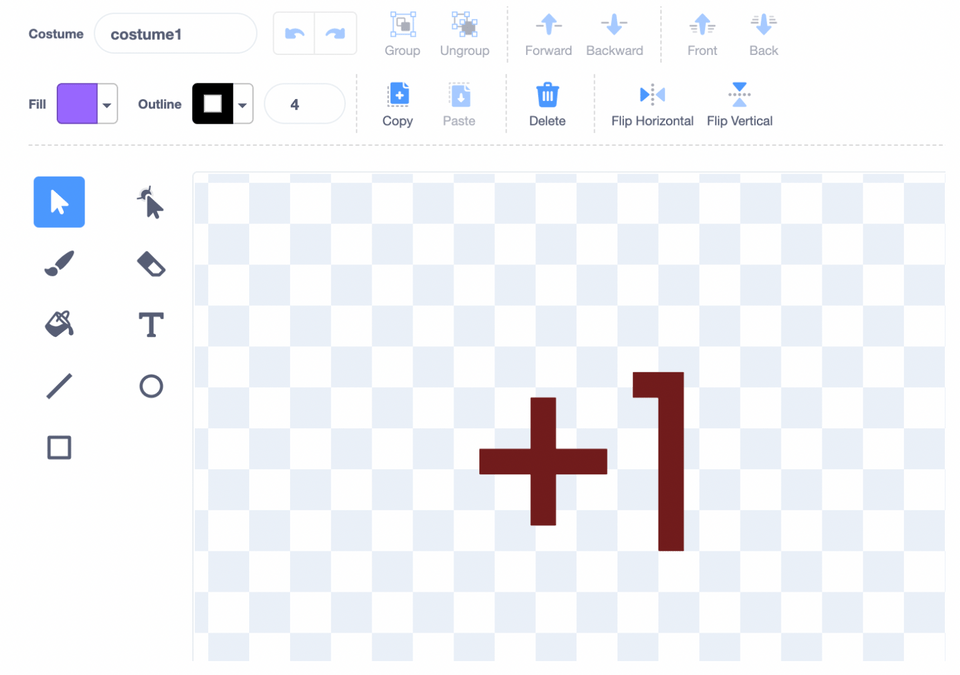
4. Draw another sprite(+1) to show the background effects
Hover on the choose a sprite icon and click the paint new sprite icon. Select the T option (for text) and write +1 and change the color of the text.
Now that you have all three of your sprites ready. So we'll move onto creating variables.
5. Create the two variable score and cookie-button
Go to Variable Block on the left, and make one variable named "score" to save the score of the clicker game. And make another one named "cookie-button" to save the state of the cookie.
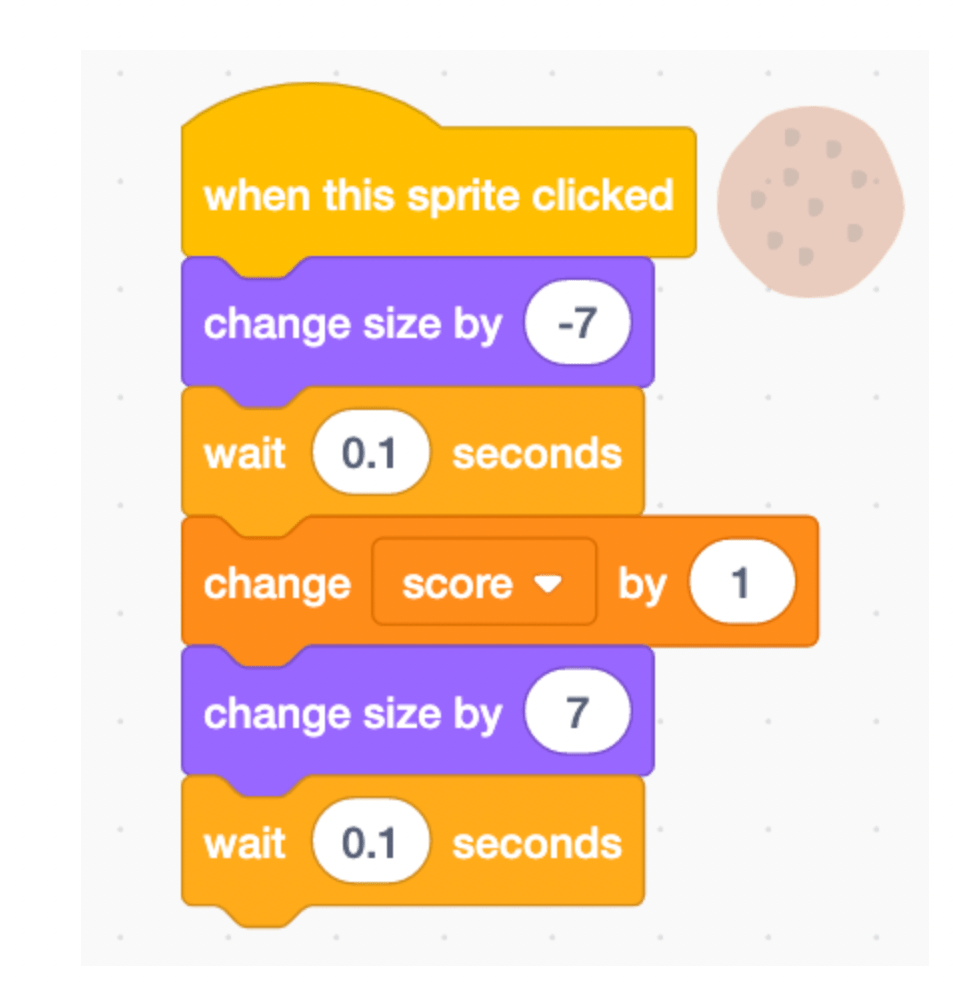
6. Show the clicking effect and add the score after each click
Let's start to code! We want our main sprite (cookie) to change the score by one when we click on it, and at the same time we want to show a clicking effect.
Let’s start from Events blocks. Drag a when this sprite clicked into the code area. Underneath, add a change size by -7 block from Looks blocks and a wait 0.1 seconds from Control blocks. To change the score, get change score by 1 from Variable blocks. Now to get the cookie back to its original size, add another block which is change size by 7 from Control blocks and add another wait 0.1 second block from Control blocks.
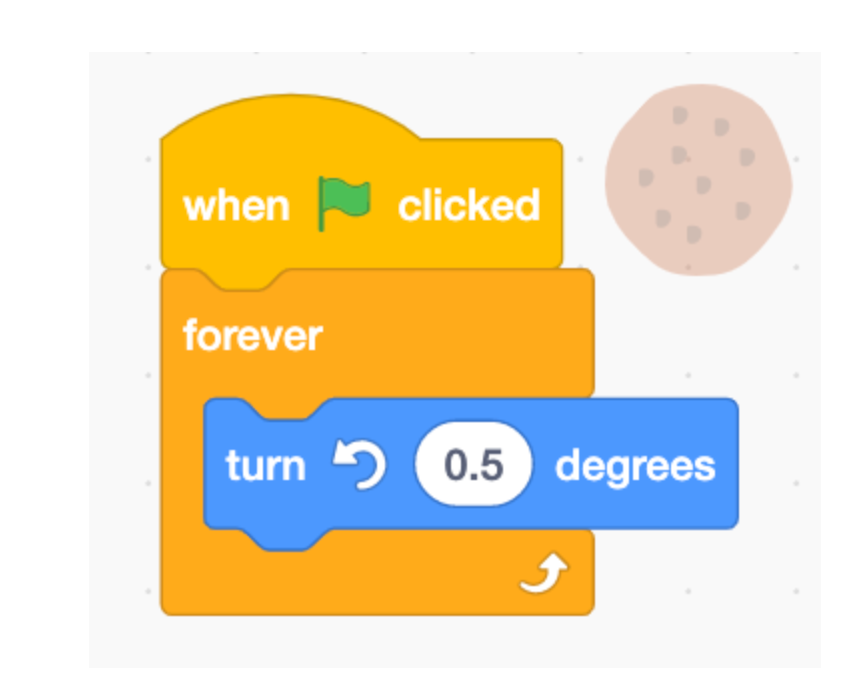
7. Add extra effect on the sprite (not mandatory)
Just to add an extra effect, we rotated the cookie sprite repeatedly. If you'd like to do this for your game too, start with when flag clicked from Event blocks. And to repeat this unlimited times, add the forever block from Control blocks and Inside forever, add turn .5 degrees from Motion blocks.
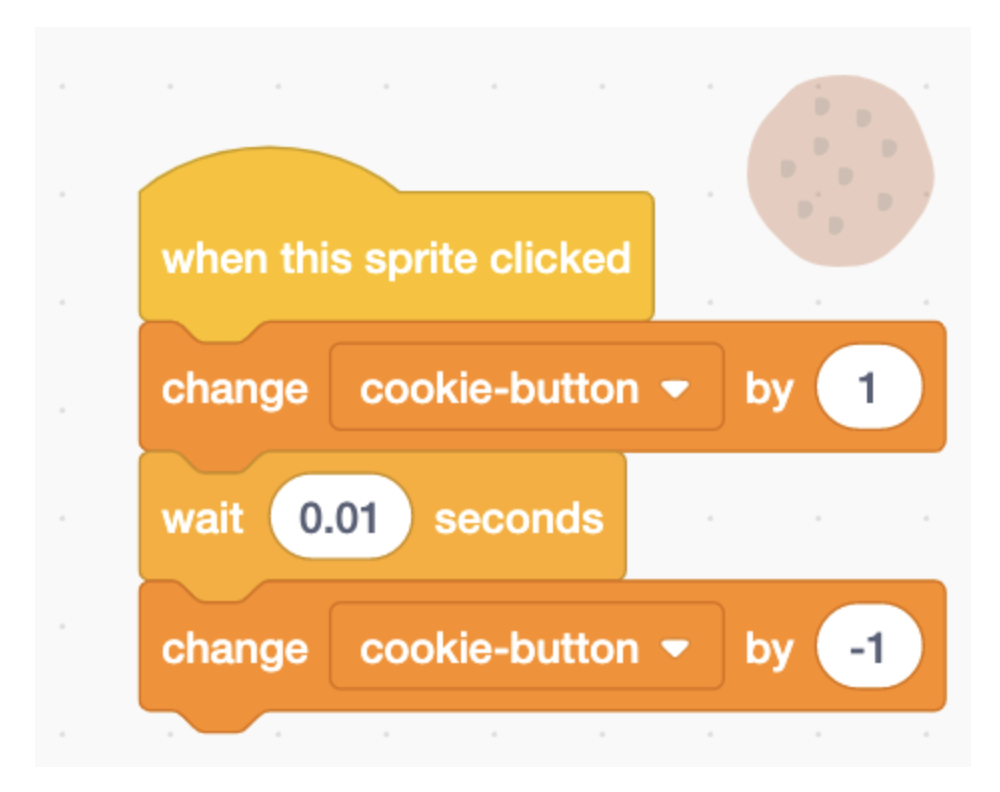
8. Change “cookie-button” variable state
This code will help to change the state of cookie sprite just for 0.01 second.
Start your code stack with when this sprite clicked from Event blocks. Add change cookie-button by 1 and change cookie-button by -1 from Variable blocks. In between these two blocks add one wait 0.01 seconds block from Control blocks.
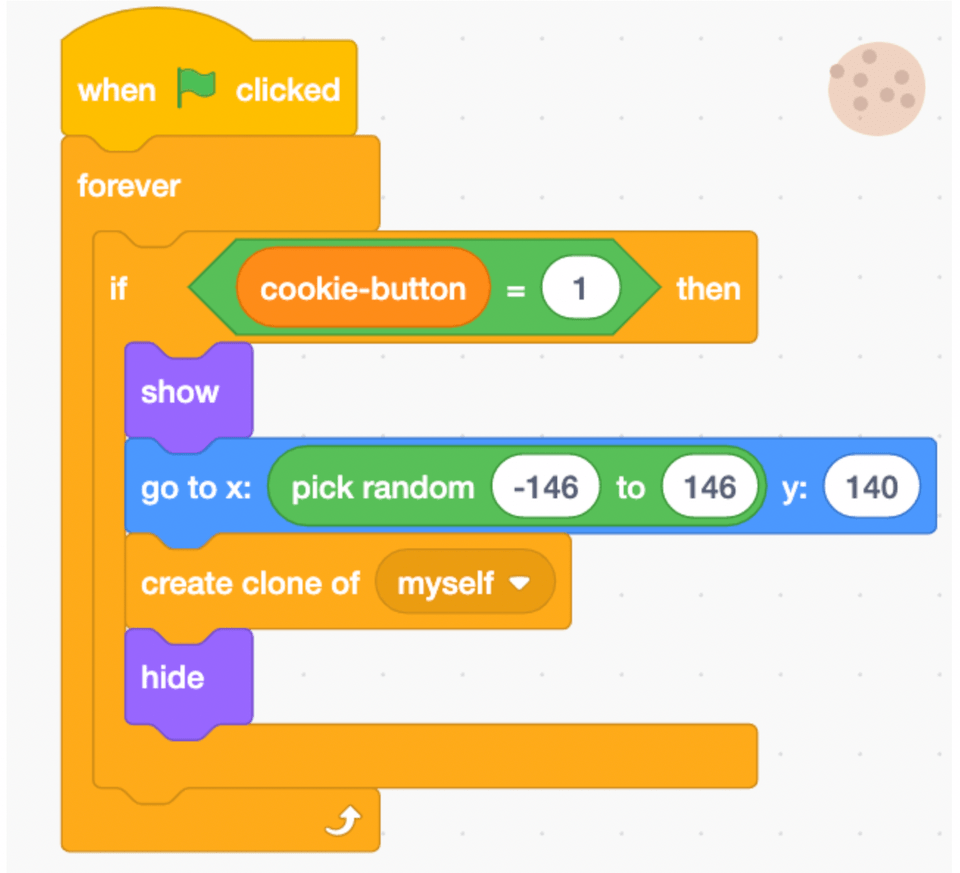
9. Make the duplicated sprite show up
To get a cookie-rain sprite to appear and move from top to bottom here's what you do.
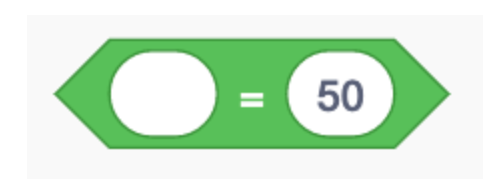
We will start from Events blocks. Drag a when green flag clicked into the code area. Add a forever block and IF block from Control blocks. Then, go to Operator blocks and get one __ = ___ block.
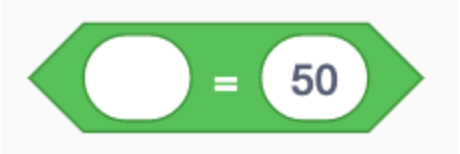
Put it inside the IF block condition block. In place of the 50, change the number to 1. And on the other side get one cookie-button block from Variable blocks. Inside the IF block, add the Show block from Looks blocks.
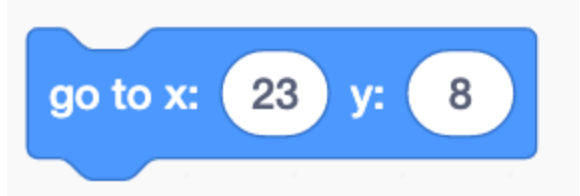
To set the starting position of cookie-rain sprite add the go to x: y: block from Motion blocks:
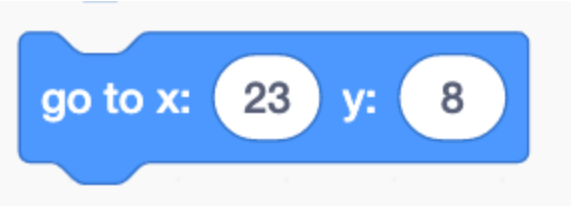
Inside y just change the number to 140. And inside x, add another block pick random -146 to 146 from Operator blocks. Underneath add the create clone of myself block from Control blocks and the hide block from Looks blocks.
10. Disappear duplicated sprite
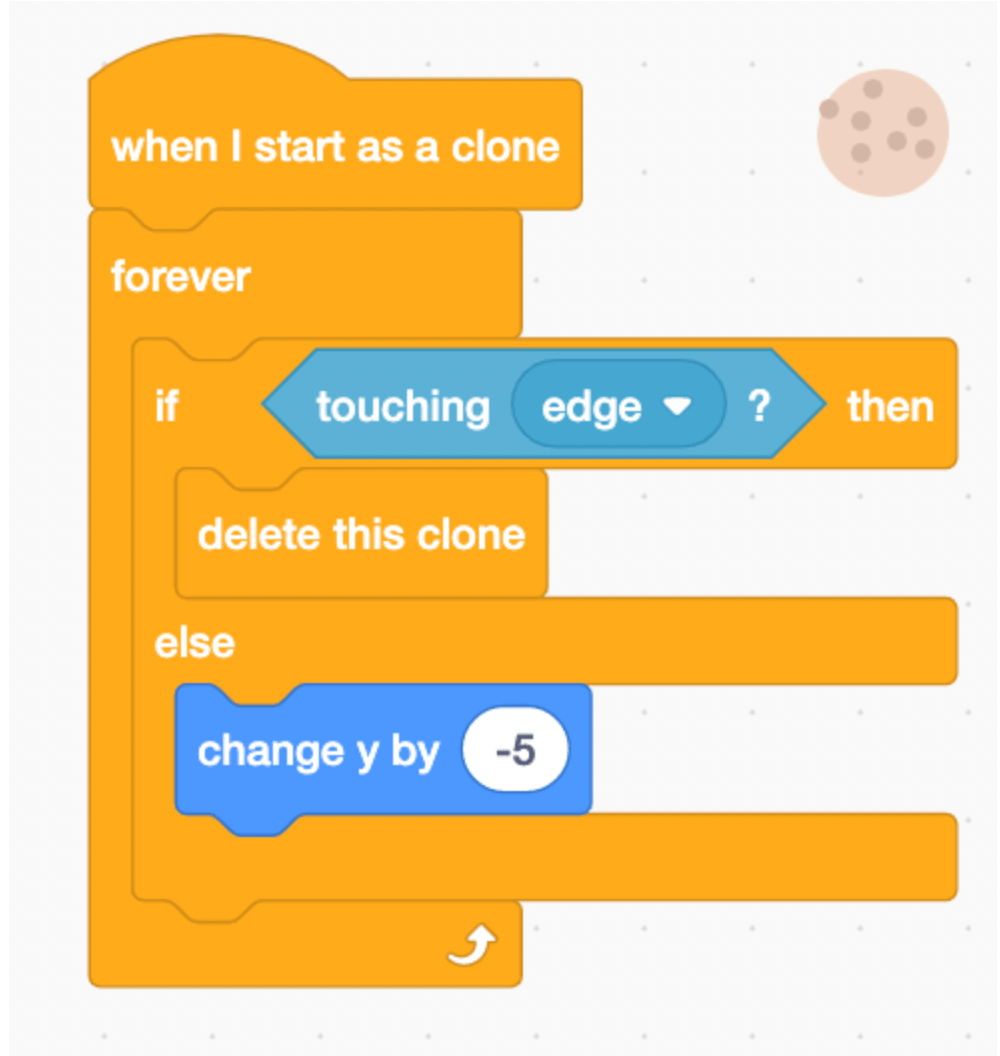
Every time a cookie-rain sprite touches the edge, it will disappear.
Start your stack with a when I start as a clone block from Control blocks. Then add a forever block and if-then-else block from Control blocks. Inside the IF condition, add a touching edge block from Sensing blocks. And Inside IF, add delete this clone from Control blocks. Inside the else add change y by -5 from Motion blocks.
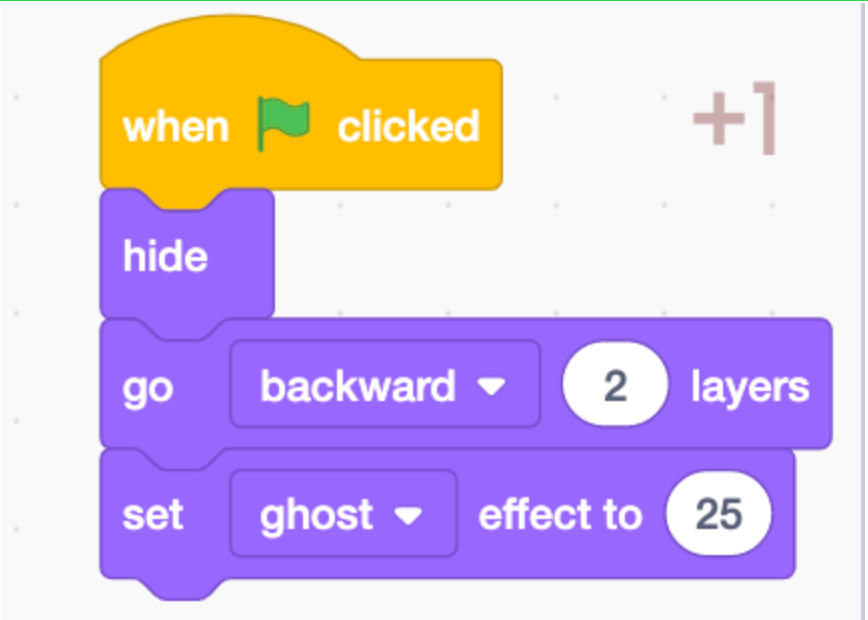
11. Send the cookie-rain sprite and +1 sprite to back layer
For sending the sprites to the back layer, add a when flag clicked block from Event blocks. And add a hide block, a go backward 2 layers block and set ghost effect to 25 block from Looks blocks.

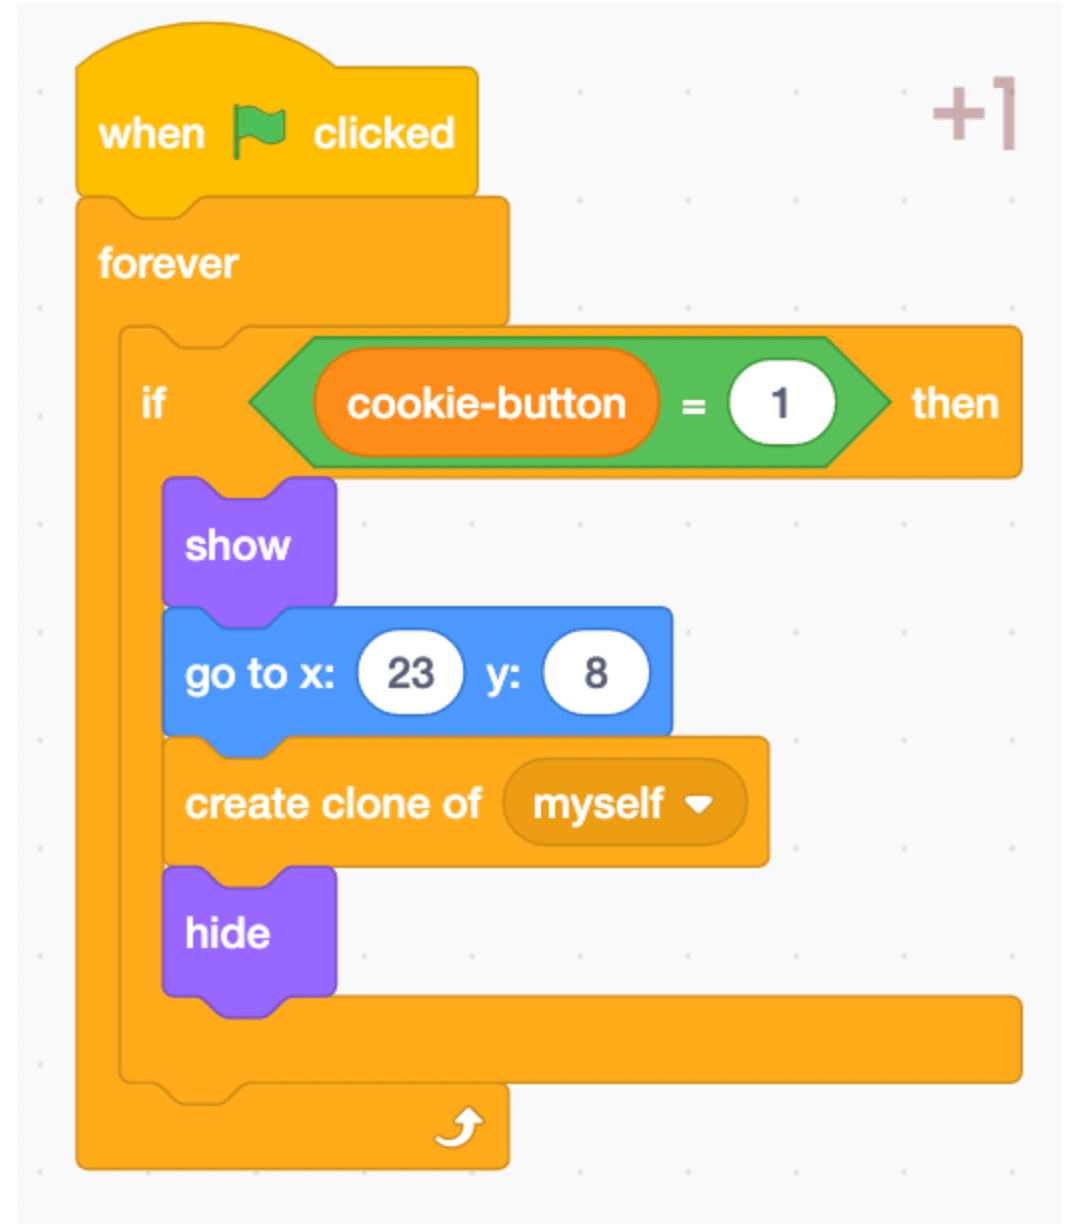
12. Show the background “+1” sprite
To get the +1 sprite to appear and start creating clones from a specific position we will start your code from Events blocks. Just drag a when green flag clicked block into the code area. Then, add a forever block and an IF block from Control blocks. Up next, go to Operator blocks and get one __ = __ block.
Put it inside the IF block condition. In place of 50, change the number to 1 and on the other side get one cookie-button block from Variable blocks. Inside the IF block, add a show block from Looks blocks.
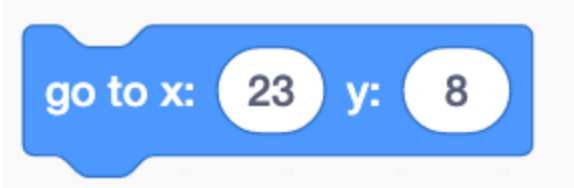
To start making the clones from a random position add a go to x: y: block with the exact same numbers.
Add a start clone of myself block from Control blocks and add a hide block from Looks blocks.
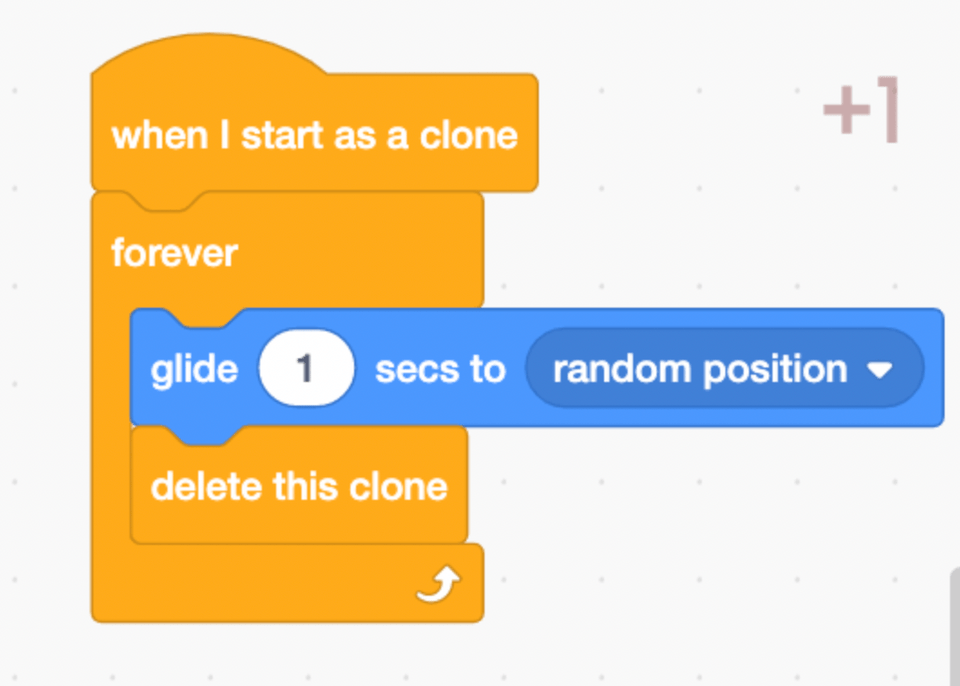
13. Disappear “+1” sprite
After setting the starting position, let the +1 sprite glide to a random position. To do that, start your code stack with the when I start as a clone block from Event blocks. Then, underneath add a forever block from Control blocks. Inside forever, add a glide 1 secs to random position block from Motion blocks, and a delete this clone from Control blocks.
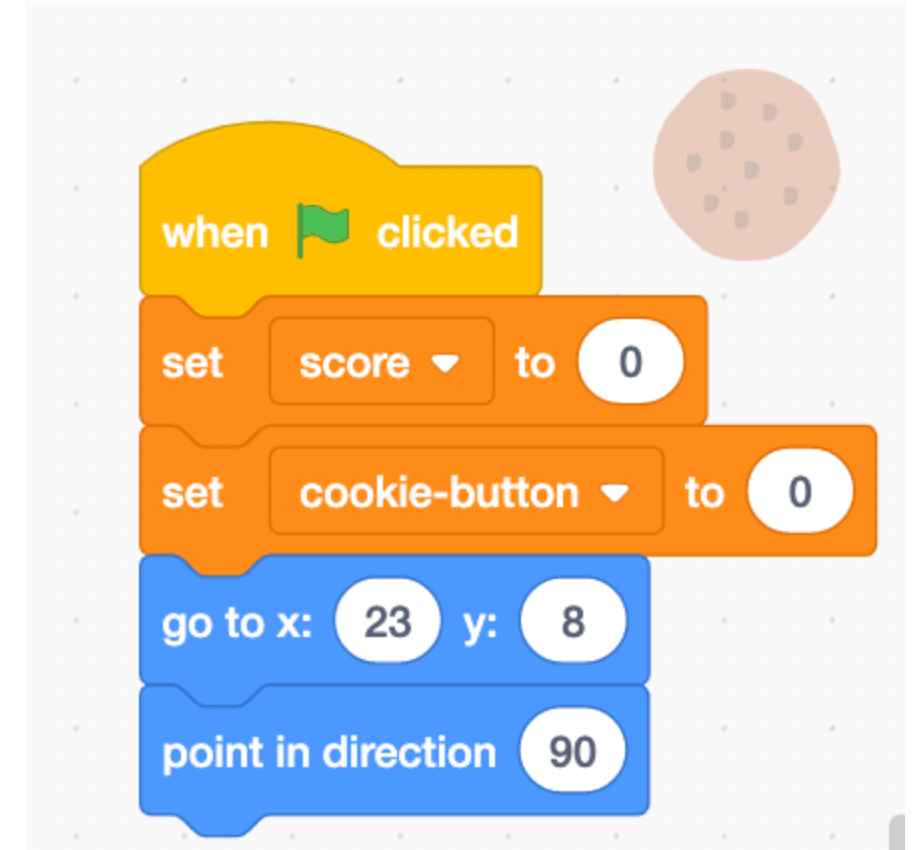
13. Disappear “+1” sprite
To reset the playground, start with the when flag clicked block from Event blocks. Add a set score to 0 block and add a set the cookie-button to 0 block from Variable blocks. Underneath add go to x: y: block and a point in direction 90 block from Motion blocks.
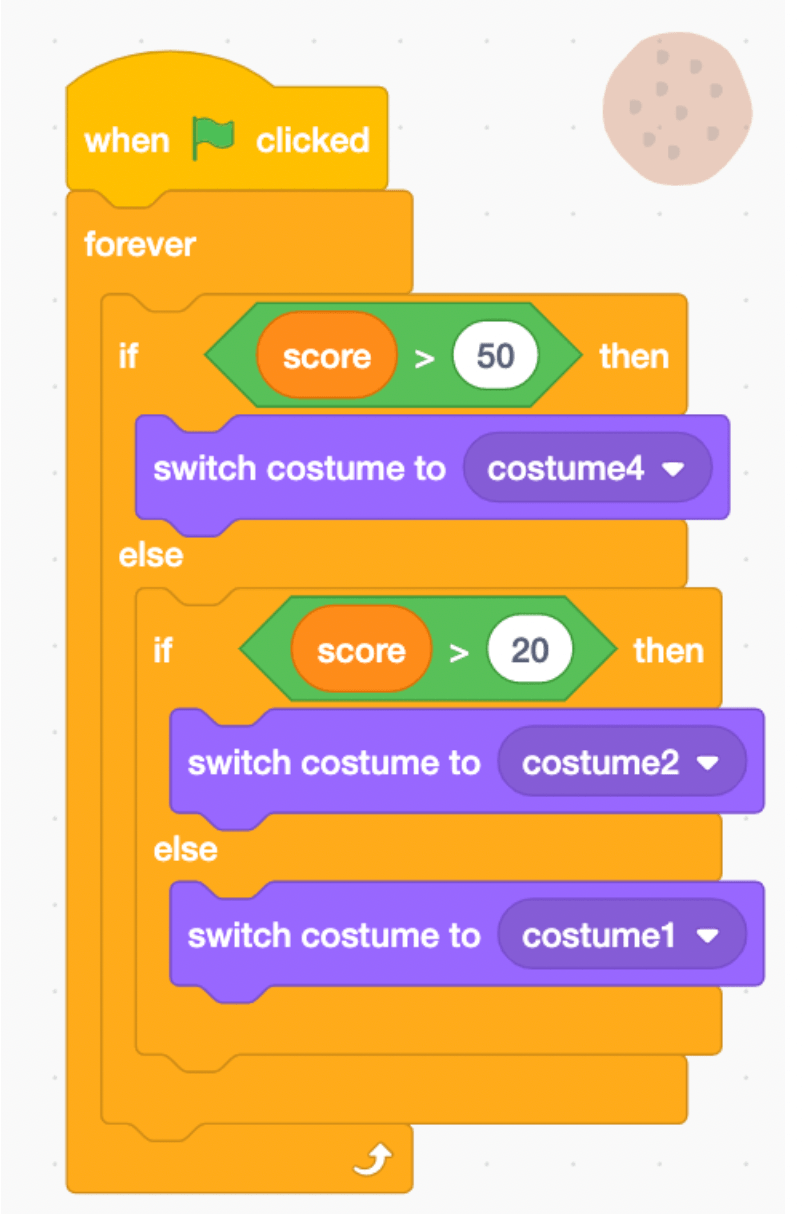
15. Unlock costumes of the sprite
To unlock the costumes we need to select the score ranges. For a 1-20 score we have a different costume, and a 20-50 score will have different costume. Similarly, above 50 will have a different costume too.
To make this happen, start by add a when flag clicked block from Event blocks and add an IF-then-else block from Control blocks. Inside the If condition add a ‘>’ block from Operator blocks. On the left side, add a score block from Variable blocks and on the right side, just change the number to 50. Inside the IF block just add a switch costume to costume-4 block from Looks blocks.
In the Else part, add another IF-then-else block from Control blocks. Inside the If condition add a ‘>’ block from Operator blocks. On the left side, add a score block from Variable blocks, and on the right side, just change the number to 20. Inside the IF block add a switch costume to costume-2 block from Looks blocks, and inside the else part just add a switch costume to costume-1 block from Looks blocks.
16. Additional tasks for fun!
The Scratch click game we made here is a very basic cookie-clicker game. This game is a never ending game. To make it more interesting you can even add all sorts of other components such as:
- Sound and music
- Timely power boosters
- More upgrades based on score
- Different world backgrounds
- More sprite costumes
- Achievements and leaderboards
You might also enjoy following along with the below video. With this tutorial, you can make a clicker game with cute effects, and items that the player can buy.
Common Issues and Bugs in Scratch Clicker Game Tutorial and How to Solve Them
Creating a clicker game in Scratch is fun, but you might encounter some common issues along the way. Here are solutions to help you troubleshoot:
- Sprite Not Responding to Clicks:
- Issue: When you click on the main sprite, the score does not increase.
- Solution: Ensure you have added the "when this sprite clicked" block from Events. Double-check that the "change score by 1" block from Variables is correctly placed under it. Verify that the sprite is not hidden or behind other elements.
- Clicking Effects Not Visible:
- Issue: The sprite doesn't show the clicking effect or the size change isn't noticeable.
- Solution: Make sure the "change size by -7" and "change size by 7" blocks from Looks are placed correctly with "wait 0.1 seconds" blocks from Control. If the size change is too small to notice, try using larger values to make the effect more visible.
- Duplicated Sprite Not Appearing:
- Issue: The "cookie-rain" sprite does not appear or fall from the top.
- Solution: Ensure the "when green flag clicked" block is correctly set up with the "forever" and "if" blocks from Control. Check that the "cookie-button" variable changes correctly and that the "show" block is inside the IF condition. Verify the starting position with "go to x: y:" block and that the "create clone of myself" and "hide" blocks are in place.
- Sprites Not Disappearing When Touching the Edge:
- Issue: The duplicated "cookie-rain" sprites don't disappear when they touch the edge.
- Solution: Ensure the "when I start as a clone" block is used, followed by a "forever" block and an "if-then-else" block. Inside the IF condition, use "touching edge?" from Sensing and "delete this clone" from Control. Check for any typos or misplaced blocks.
- +1 Sprite Not Showing or Cloning:
- Issue: The "+1" sprite does not appear when clicking or does not clone.
- Solution: Ensure the "+1" sprite has the "when green flag clicked" block with a "forever" and "if" block from Control. Verify that the "cookie-button" variable is used correctly in the IF condition. Make sure the "show" block, "go to x: y:", "start clone of myself", and "hide" blocks are correctly placed.
- Costume Changes Not Working:
- Issue: The sprite costumes do not change based on the score.
- Solution: Verify the "when flag clicked" block is used, followed by the IF-then-else blocks from Control. Ensure the ">" blocks from Operators are set with the correct score variables and numbers. Check that the "switch costume to" blocks from Looks are correctly placed inside the IF and ELSE conditions.
- Variables Not Resetting:
- Issue: The score and cookie-button variables do not reset when starting the game.
- Solution: Ensure the "when flag clicked" block is used at the beginning of the game. Verify that the "set score to 0" and "set cookie-button to 0" blocks from Variables are correctly placed underneath.
By following these solutions, you should be able to troubleshoot common issues and ensure your clicker game runs smoothly. Happy coding!
Key Programming Concepts in the Clicker Game Tutorial
1. Variables
- What Are They?: Variables are like containers that store information your program can use. They can hold numbers, text, or other data types.
- Usage in the Tutorial: In the clicker game, variables such as "score" and "cookie-button" are used to keep track of the player’s score and the state of the cookie sprite. Each time the cookie is clicked, the "score" variable increases.
2. Loops
- What Are They?: Loops allow you to repeat a set of instructions multiple times. There are different types of loops, such as "forever" loops that continue indefinitely, and "repeat" loops that run a specific number of times.
- Usage in the Tutorial: Loops are used to continuously check for conditions, such as in the "forever" loop that makes the "cookie-rain" sprite appear and fall from the top repeatedly. They are also used to create animations, like rotating the cookie sprite.
3. Events
- What Are They?: Events are actions that trigger certain parts of your code to run. Examples include clicking on a sprite, pressing a key, or starting the game.
- Usage in the Tutorial: Events are crucial in the clicker game. The "when this sprite clicked" event is used to detect when the main cookie sprite is clicked, which then triggers the increase in score and the clicking effect. The "when green flag clicked" event starts the game and initiates various actions like sprite movement and variable resetting.
By understanding these key programming concepts, you'll have a solid foundation to build more complex and interactive games. Variables help manage and track data, loops allow for repetitive actions, and events make your game responsive to user interactions.
Discover Fun Clicker Games on Scratch for Inspiration
Clicker games have a lot of variants. There are so many clicker games on Scratch to choose from, but here are a few to try.
In this game, when you click on a cookie sprite, the number of cookies will go up. You use the cookies to buy things that will make your number of cookies go up faster, so you can buy more things to make more cookies.
In this project, you will click on a burger to increase the number. Click on the burger 50 times, then click on the worker, and your burger count will be decreased by 50. But now every time you click on the burger, the burger count goes up by 2. Do another 50 clicks, click on the worker again, and then each burger click increases the count by 3!
For this game, you need to click on the candy, which you can see on the screen. The candy score will help you buy upgrades for click power and candy per second from the shop. The goal of this game is to get as many candies as possible to beat the record.
You can also explore some of the best Scratch games in general here.
Create a Scratch Clicker Game
Yay! You have created a fun clicker game in Scratch. There are so many games you can create with the help of Scratch. Next, find out how to make a fun Scratch Pacman game.
To start making more of these games, check out Create & Learn's award-winning online Scratch for kids classes, led live by an expert and designed by professionals from Google, Stanford, and MIT. You might particularly enjoy our Scratch Game Building class or beginning with our free Scratch intro class:
Written by Apoorva Rastogi, a Create & Learn instructor who has worked as a coding instructor for more than 6 years. Apoorva has a Bachelor's Degree in Mathematics and a Master's Degree in Computer Applications.

