

Are you excited about Roblox games and eager to create your own? If so, Roblox Studio is the essential tool for making Roblox games and virtual worlds for Roblox. Once your game is created, you can easily publish it and invite friends and family to play together—even make it public for the entire Roblox community to enjoy.
Creating Roblox games is a great way for kids and teens to learn coding, develop creativity, and bring their imagination to life. With Roblox Studio, anyone can design their own characters, build environments and landscapes, design gameplay mechanics, and even add music and sound effects. It’s a fun and powerful tool for kids who want to learn Roblox coding and enjoy making games.
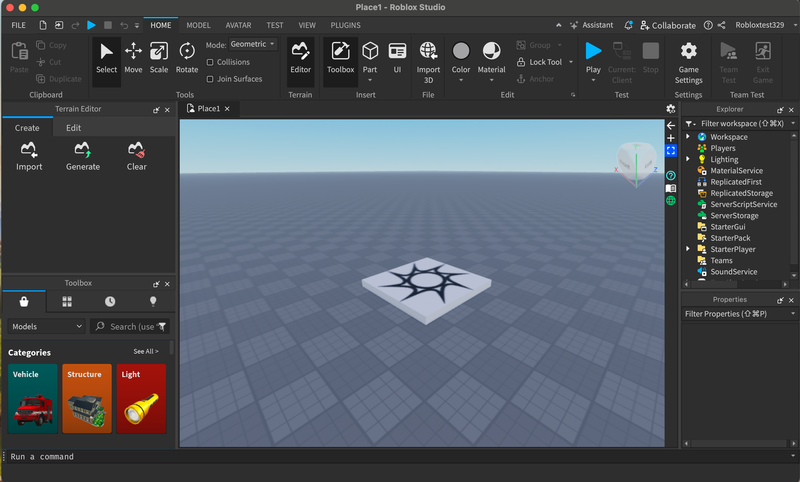
Roblox Studio is a tool built for game development professionals. The image below shows what it looks like when you opens it up. Many beginners who start using Roblox Studio are kids and teens who have learned Scratch, Python, and perhaps even Java. In all cases, you might find the Roblox Studio interface to be a bit overwhelming. But don't worry, we will walk you through everything you need to know to get started with confidence.
Another great option to get started is to join a Free Roblox Coding Class, where an experienced instructor will guide you step by step on how to use Roblox Studio and even work with you to build your first game in just one hour!
You might also consider these two in-depth Roblox coding classes: Beginner Roblox Game Making (grades 3-8) and Coding with Roblox Studio in Lua (grades 6-12). These courses cover the core principles of Roblox game coding while guiding students through making a variety of fun and interactive games.
For learners new to coding, we highly recommend starting with Scratch Coding for a smoother and more enjoyable learning experience before diving into Roblox game development.
What Is Roblox Studio?
There are countless fun games on Roblox, and they are all made on Roblox Studio—a powerful game development software created by Roblox Corporation. Game developers around the world use Roblox Studio to build and publish their own interactive Roblox experiences. It is also very popular with kids and teens for learning coding and computer science because of the popularity of Roblox. Roblox Studio is the ultimate gateway to game development, combining creativity, logic, and coding in a fun and engaging environment.
Roblox Studio has four key areas of functionality:
- Design - Build simple 3D models or upload assets from external sources. Create game environments using terrain, parts, and models.
- Scripting & Coding - Lua is the coding language used in Roblox Studio. You can script/code game logic, interactions, NPC behavior, events, player actions, data storage, ... —everything your game needs.
- Creator Marketplace – This free marketplace is where you can models, scripts, plugins, textures, animations, and audio created by other game developer. You can then import them to your own games.
- Publishing – You can publish and update your games easily, and even add paid features to earn Robux with your games! It is all supported by Roblox Studio.
As you can see, Roblox Studio is incredibly powerful, and mastering all its features takes time, learning, and a lot of practices. However, getting started is easy, and you can build a cool game quickly!
How Roblox Studio Works
Let’s get started with Roblox Studio. Today we’ll guide you and your child through downloading Roblox Studio and setting it up. Then, we’ll help you navigate the interface to use some of its most useful features and tools. And finally we’ll reveal a few fun ways to keep learning with Roblox Creator Hub and how to make your own games in Roblox.
Unlike Scratch, Python, or Java, which can often be coded in a browser, Roblox Studio is a standalone software that must be downloaded and installed. It is only compatible with Mac and Windows. Chromebooks are not supported.
How To Get Roblox Studio On Roblox Creator Hub
Let’s begin! Follow along with our helpful video or read the step-by-step instructions below:
Here are the steps for downloading Roblox Studio:
- Go to the Roblox Creator Hub website in your web browser.
- Click on the "Start Creating" button.
- Click on the "Download" button if prompted.
- Follow the prompts to install Roblox Studio on your computer.
- Once the installation is complete, you can open Roblox Studio by clicking on the icon on your desktop or in your program list.
That's it! Now you can start using Roblox Studio to create your own games and virtual worlds. Just remember to always follow good internet safety practices, such as asking an adult for permission before downloading anything and not sharing personal information online. Parents might also want to check out the various Roblox parental controls.
Is Roblox Studio completely free?
Yes, Roblox Studio is a free program that is available to anyone who wants to use it. You can download and use it for free on your computer to create your own games and virtual worlds on the Roblox platform. However, some features and tools in Roblox Studio may require a paid membership to the Roblox Developer Exchange (RDX) program, which is a paid subscription service for Roblox developers. This program provides access to additional features and tools that can help you create more advanced and professional-quality games. If you are just starting out with Roblox Studio and are interested in exploring game development, you can get started for free and learn more about the RDX program as you become more familiar with the platform.
Can you use Roblox Studio on mobile?
No, Roblox Studio is a desktop application that is designed to be used on a computer, rather than a mobile device. It is available for Windows and macOS, and you can download it for free from the Roblox website. However, you can use the Roblox Mobile App to play games and interact with other users on the Roblox platform, even if you don't have a computer. The mobile app is available for free on the App Store and Google Play Store.
Is Roblox Studio only for PCs?
No, Roblox Studio is not only for PCs. It is also available for macOS, so you can use it on a Mac computer as well. To download and install Roblox Studio on a Mac, you can follow the same steps above as for a PC.
How To Set Up Roblox Studio
Here are the steps for setting up Roblox Studio after your student has downloaded it:
- Open Roblox Studio by double-clicking on the icon on your desktop or in your program list.
- If you already have a Roblox account, enter your username and password to log in. If you don't have an account, click on the "Sign Up" button to create a new account.
- Follow the prompts to set up your account, including creating a username and password, and verifying your email address.
- Once you are logged in, you will see the main start screen of Roblox Studio. This is where you can create and edit your games and virtual worlds.
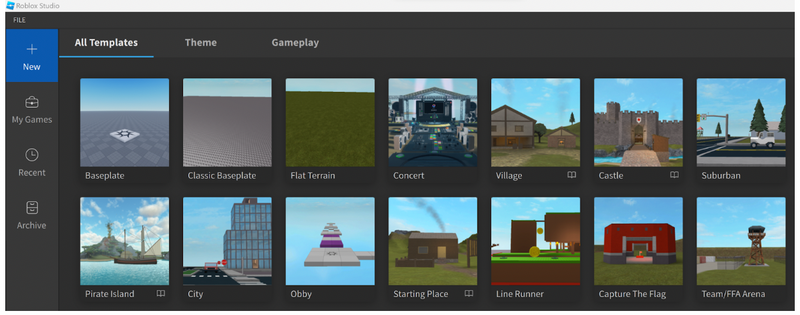
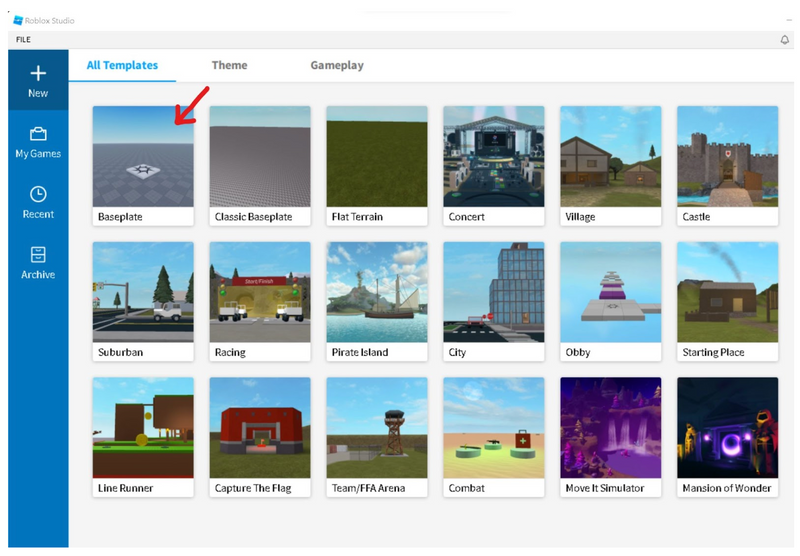
- To start creating a new game, click on the "New +" button in the top menu and choose a starting template, or choose "File > New" from the dropdown menu.
- This will open a new, blank game project. You can then use the tools and features in Roblox Studio to build and design your game.
- To learn more about how to use Roblox Studio, you can check out our blog post, How to Make a Game in Roblox, or visit the Roblox Developer Hub, which has a variety of resources and tutorials to help you get started.
Now your student is ready to start creating their own games and virtual worlds using Roblox Studio. Just remember to always follow the rules and guidelines of the Roblox platform, and have fun using your creativity and imagination.
How To Use Roblox Studio: Introduction To The Roblox Studio Interface
Here is a brief overview of the most important parts of the Roblox Studio interface:
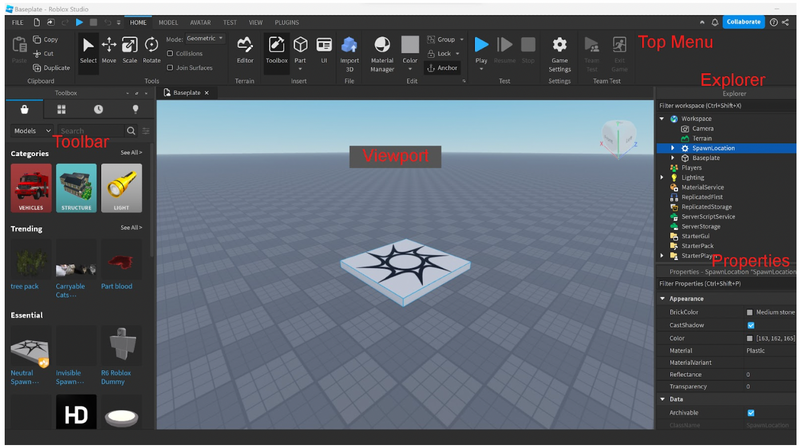
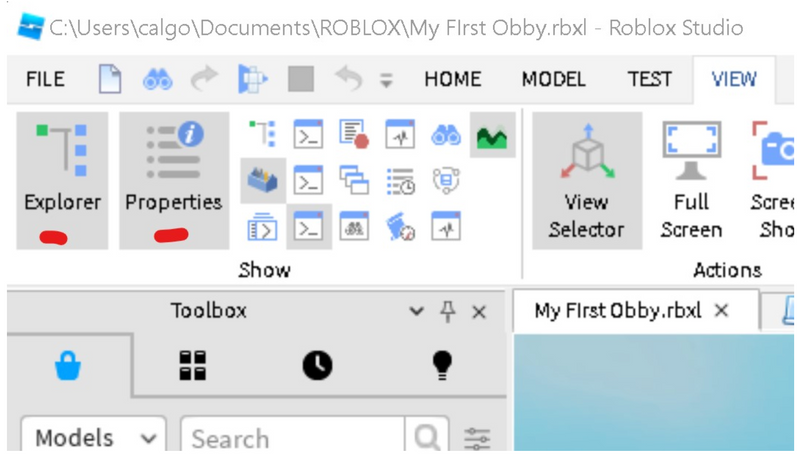
1. The Top Menu Bar
This is where you can find the main features and tools of Roblox Studio, such as creating a new game, saving your work, and testing your game. You will likely find yourself spending most of your time on the Home Menu, and if you are not seeing any of the following panels, you can activate them on the View Menu.
2. The Explorer Panel
This is usually located on the right side of the screen, and it is where you can see a list of all the objects in your game, such as characters, environments, and objects. You can use this panel to select and manipulate objects, as well as add new objects to your game. Everything that appears under the Workspace are the parts of the game that are seen to the players. You will also find ServerStorage and StarterPlayer folders here, where you will make some more advanced magic happen.
3. The Toolbox
This is located on the left side of the screen, and it is where you can find a variety of tools and assets that you can use to build and design your game, made by other creators. These include tools for creating and manipulating objects, as well as a library of premade assets such as characters, environments, and animations.
4. The Properties Panel
Located at the bottom right side of the screen, and it is where you can see and edit the properties of the selected object. This includes things like the object's name, position, size, and appearance.
5. The Viewport
This is the main area in the middle of the screen, and it is where you can see a preview of your game as you build and design it. You can use the viewport to navigate around your game and see how everything looks and works.
Learn Roblox Studio
Check out our tutorial for learning how to code Roblox for beginners for step by step guidance. In addition, there are several helpful ways for kids and teens to learn how to use Roblox Studio, including:
- The Roblox Developer Hub: This is a comprehensive resource center for Roblox developers, with a variety of tutorials, documentation, and other resources to help you learn how to use Roblox Studio, from new creators to advanced developers, and explain how to build games on the platform. You can find the Developer Hub here.
- Online courses and tutorials: There are many online courses and tutorials that can teach you the basics of Roblox Studio and game development. For those who prefer to have a real, certified teacher lead them through how to get started, how to code, and how to publish games, Create & Learn hosts award-winning small-group Zoom classes, including a fun Beginner Roblox Game Coding class that steps new creators through the entire process of how to build games.
- YouTube videos: There are also many YouTube channels and videos that provide step-by-step tutorials and demonstrations of how to use Roblox Studio and build games on the platform. You can search for specific topics or concepts that you want to learn more about, or you can watch video series that provide a comprehensive overview of the program, such as this well-built playlist by stellar Developer AlvinBlox or some fun beginner tutorials on Create & Learn's channel.
- Practice and experimentation: For some, the best way to learn how to use any program is to just start using it and experimenting with the different tools and features. As you build and design your own games, you'll naturally learn more about how the program works and what you can do with it.
Remember to encourage your student to be patient as they learn new things, and to not be afraid to ask for help if they get stuck or have questions. For some extra tips on how to get more coding practice, check out Roblox coding practice tips.
Help Your Student Make Their First Roblox Studio Game
Try to make your first game in Roblox. Follow this step-by-step tutorial to make an obby:
1. Create New Obby Project
Open Roblox Studio and on the “New” Tab select the Baseplate template. Make sure your Explorer and Properties windows are showing in the user interface. If not, click on the View menu and then select those windows by clicking on them.
2. Delete the Baseplate
To make your obby more challenging, let’s remove the baseplate from below the spawn point. In the Explorer window, find the Workspace, and select the small arrow next to it, which will show you all the parts that are inside your workspace. Then click on the Baseplate, and hit the Delete key on your keyboard.
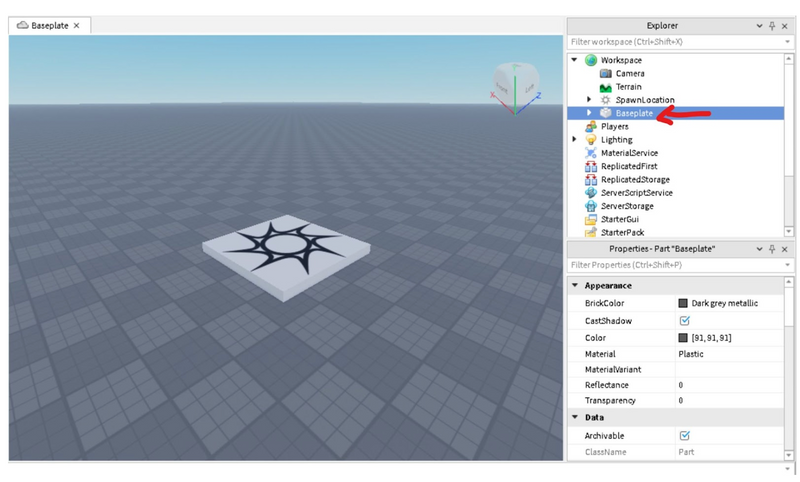
Now you should have a nice, clean sky with a floating spawn point. Pro Tip: If at any time you cannot locate your spawner or other parts, select the part in the Explorer by clicking on it, then use the F key on your keyboard to focus on that part!
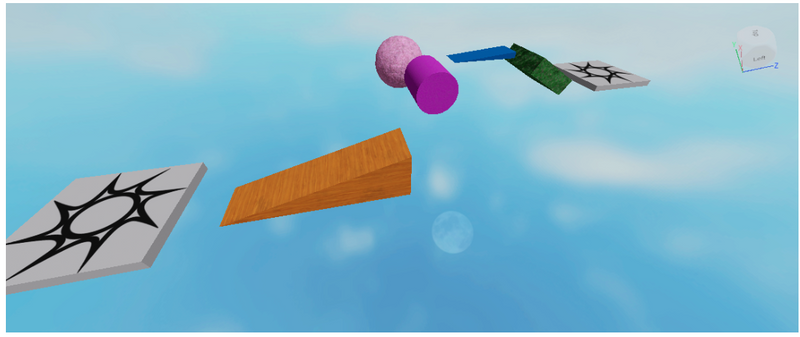
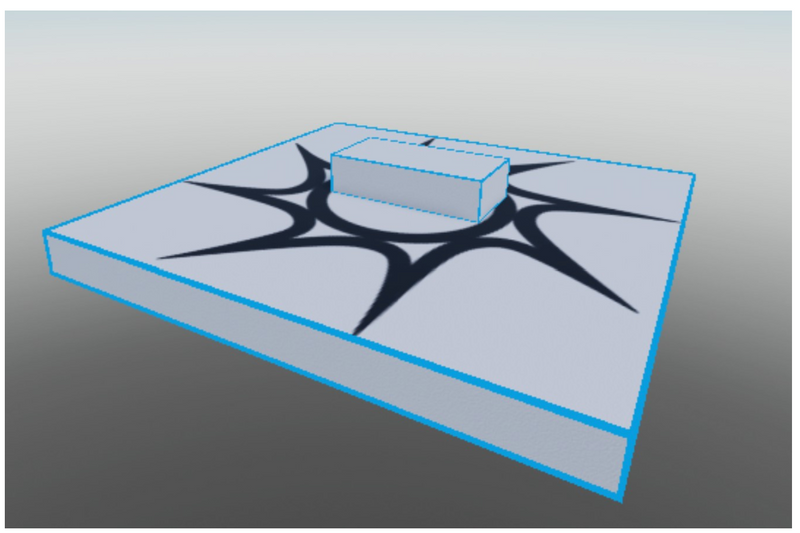
3. Add Your First Part
Find the Part button along the top toolbar of Studio.

Click on the top half of that button to create a part in your project. It should show up on or right next to your spawn point.
Explore Roblox Studio Today And Create
There are several reasons why budding creators might want to try Roblox Studio:
- It's fun: Roblox Studio is a program that allows anyone to use their creativity and imagination to build and share their own interactive games and experiences.
- It's educational: Building games with Roblox Studio can also be educational, as it helps creators learn about things like computer programming, game design, and digital media. Kids learn valuable skills such as logic, problem solving, and critical thinking, which can help them in other areas of their lives as well.
- It's a great way to make new friends: Kids can also use Roblox Studio to connect with other kids who have similar interests in game development. They can collaborate on projects, share ideas, and play each other's games, which can be a great social activity.
- It's a platform for creativity and self-expression: Finally, Roblox Studio is a platform where kids can express themselves and showcase their creativity to a wider audience.
Overall, there are many good reasons why potential game creators might want to try Roblox Studio and explore game development. It can be a fun, educational, and rewarding activity that especially helps kids develop important skills and make new connections.
Up next, empower your student to make multi-player games, a game modeled after the highly popular infinity run game where players must turn, dodge, and jump to avoid obstacles and gain points, and much more in a live online expert-led class Beginner Roblox Game Coding. Older and more experience coders might enjoy Roblox Studio Coding with Lua.
Written by Kari Tonkin, a Create & Learn instructor. Kari has been teaching a wide variety of courses and ages for more than twenty-six years. Some of her favorite subjects to teach include computer science, graphic design, mathematics, and coding languages. She received a Master’s Degree in Curriculum Design with Technology Integration from Black Hills State University in 2016 and has used this knowledge to stay current on new technology trends in education. When she is not working, Kari enjoys playing video games with her family, including Roblox and Minecraft, hiking and camping, and traveling around the United States.

