
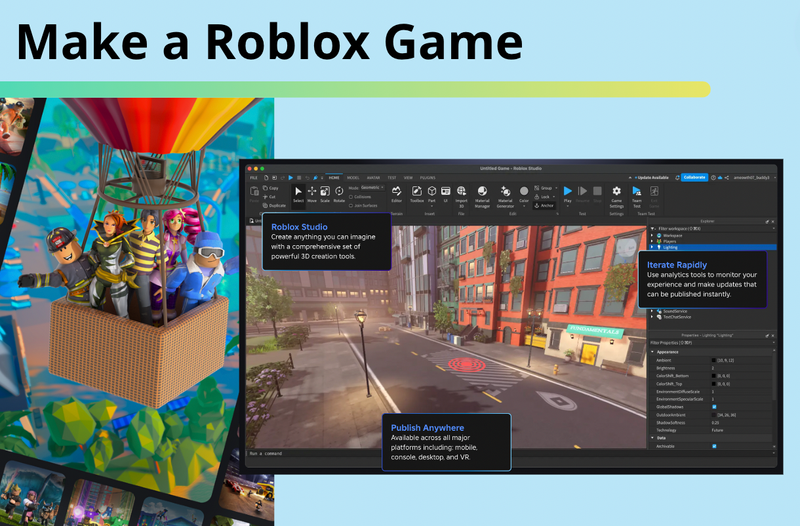
Making Roblox games is a great way to learn Roblox coding while bringing your own fun ideas to life on the massively popular Roblox platform. Anyone can learn to develop Roblox games, and it’s especially appealing to kids and teens who already love playing Roblox. Roblox Studio is the software for designing and building Roblox games while coding is done using the powerful Lua scripting language. You can create almost any type of game—platformers, tycoons, simulators, role-playing games, racing games, and more. The possibilities are endless.
Today, we’ll walk you through a fun Roblox tutorial to create an obby game, one of the most popular types of games on Roblox. We'll also provide an overview of how to use Roblox Studio with a walk through of some of the most popular features, and all the cool ways you can build and customize any game you can imagine. Plus, discover some additional Roblox game ideas to try!
Another great way to start Roblox game development is by joining our small-group Free Roblox Coding Class, where an experienced instructor guides students step by step in building an Obby game. It’s also super fun to see what others create! For a more in-depth experience, the Beginner Roblox Game Making class, designed by professional Roblox game developers, covers essential Roblox game creation topics. Students will also build a series of fun Roblox games.
How to Make an Obby Game in Roblox
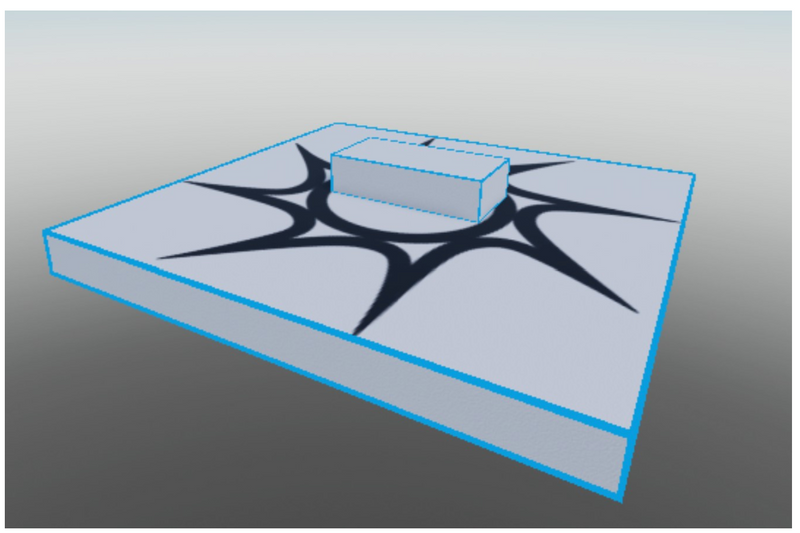
One of the most popular game types on Roblox is the Obstacle Course game, or Obby for short. So, let's create an Obby in Roblox Studio! There are just 3 essential parts to build this fun game:
- Design the game course – Create a series of 3D shapes with different colors and materials to build an exciting obstacle course.
- Add scripts – Use code to make some parts move, making the game more challenging and fun to play
- Publish it! – Invite your friends to play or make it available to the entire Roblox community with just a few clicks.
Now, follow the detailed steps below to start building your own Obby game. You can also watch the video tutorial if you prefer!
How to Design Your Roblox Obby Course with Parts
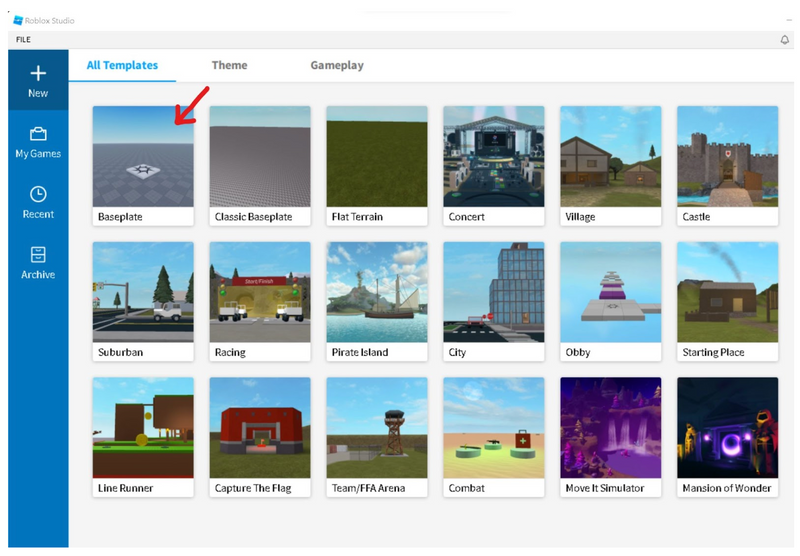
1. Create New Obby Project
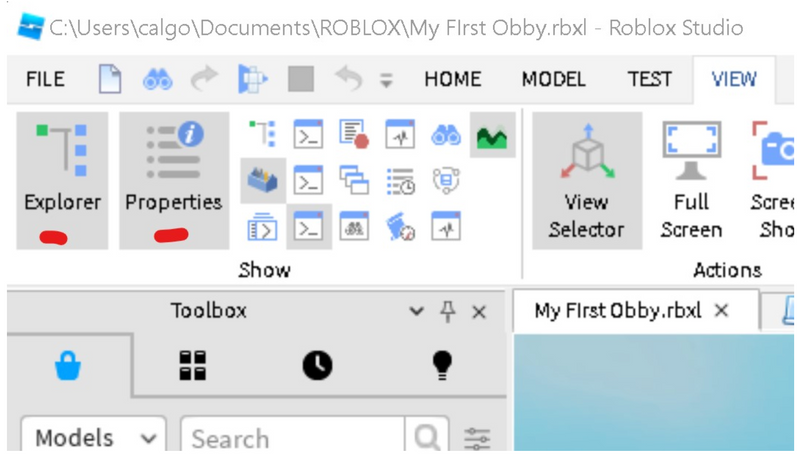
Open Roblox Studio and on the “New” Tab select the Baseplate template. Make sure your Explorer and Properties windows are showing in the user interface. If not, click on the View menu and then select those windows by clicking on them.
2. Delete the Baseplate
To make your obby more challenging, let’s remove the baseplate from below the spawn point. In the Explorer window, find the Workspace, and select the small arrow next to it, which will show you all the parts that are inside your workspace. Then click on the Baseplate, and hit the Delete key on your keyboard.
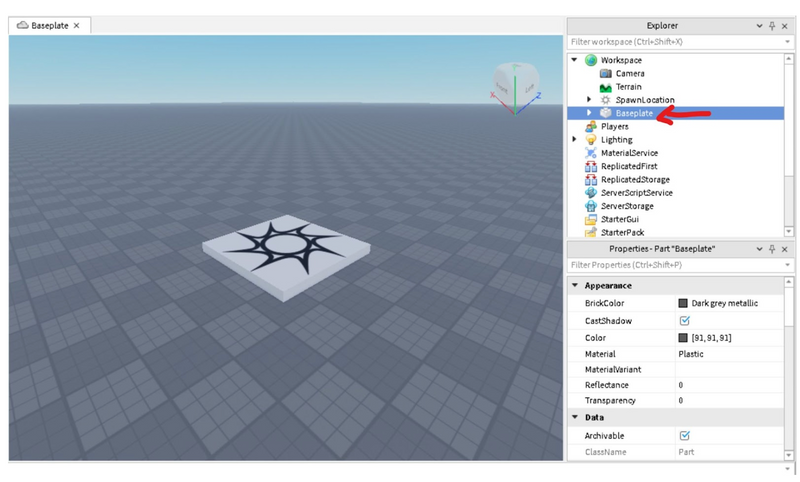
Now you should have a nice, clean sky with a floating spawn point. Pro Tip: If at any time you cannot locate your spawner or other parts, select the part in the Explorer by clicking on it, then use the F key on your keyboard to focus on that part!
3. Add Your First Part
Find the Part button along the top toolbar of Studio.

Click on the top half of that button to create a part in your project. It should show up on or right next to your spawn point.
4. Anchor, Place, and Shape Your Part
With your part still highlighted in the Explorer, find the Anchor button and click that to make sure your part doesn’t fall once you start playing your game. It is best practice to anchor your parts right when you create them, so you don’t forget to do it later.
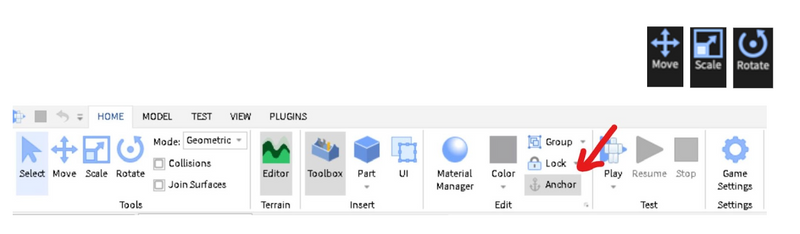
Now it is time to adjust how your part looks, and where you want to place it in the obby. The three tools that make this possible are known as Move, Scale, and Rotate. They are found along the top toolbar and will become a few of the tools you will use the most when making an obby.
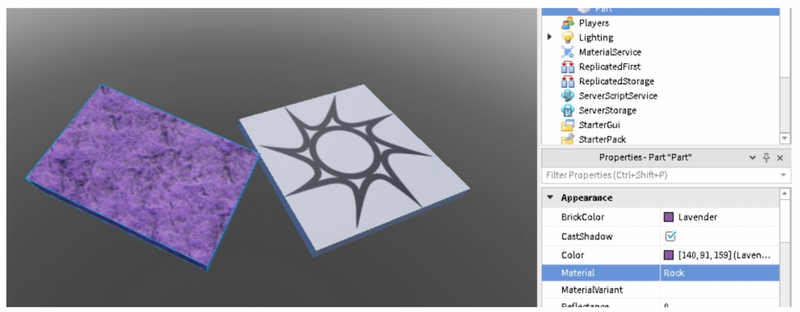
5. Change Color and Material of Your Part
Using the Properties window, usually found under the Explorer window, locate the BrickColor and Material lines. You can change the color of your part as well as the texture by using these property values. Give it a try!
6. Add More Parts
Now you can add more parts to your obby using the Part button on the toolbar. Notice that there is a little arrow below the cube image - if you select that arrow you can select the shape of the part before you add it to your game. Don’t forget to anchor all of your parts!
How to Add a Simple Script to Your Obby: Script a Fading Trap in Roblox
It can be a lot of fun to make some small changes to your obby parts just by adding a Roblox coding script to the part. With scripts, you can have your block light up when touched or disappear slowly as the player runs across the part. There are plenty of ways to make your obby more challenging just by adding a short script or two. Here are steps for how to add a script to your parts.
7. Select Your Part from the Explorer
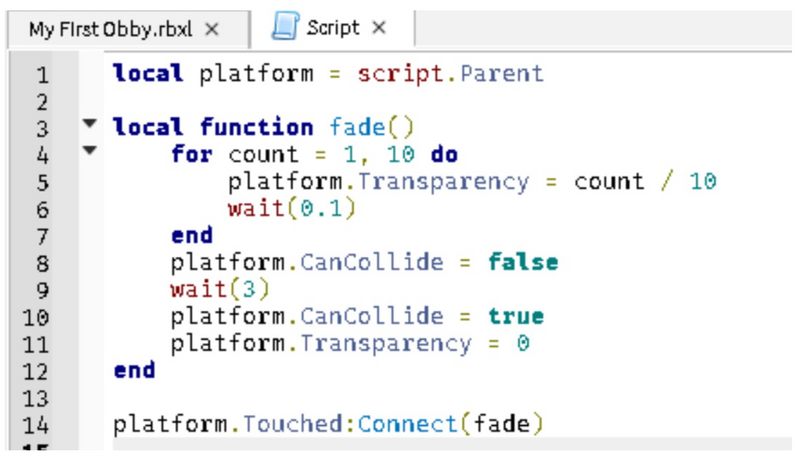
For this script, we will be making one part of your obby disappear when a player touches it. Choose which part you want to apply this script on, and click on the + symbol next to the part in the Explorer. Delete the default script line, print(“Hello World”).
8. Type in Your Script
Type in the following script, making sure all the punctuation marks and indents are included in your script page.Then try out your obby by hitting the Play button on the top toolbar! Once your player touches the part, it should disappear and reappear three seconds later. The three parts of this script include identifying the part to apply (Line 1), the function (action) of having the platform disappear (Lines 3-12), and calling the function to start when the part is touched (Line 14).
9. Save Your Game
Don’t forget to save your game often! You can go to the File menu at the top of the Studio window and then choose Save to File, or if you are ready to push your game out to Roblox, you can select Save to Roblox.
A Complete Overview of How to Make Any Original Game in Roblox
Here's a more comprehensive overview into how to make objects, how to use properties to complete your parts, and how to save time with Roblox commands. So that you can make any game you can dream up on your own.
1. Install Roblox Studio
Up first, install Roblox Studio. Go to the Roblox website and log into your account. Upon logging into Roblox, visit any of your experiences. Click the three black boxes in the upper-right corner, and select Edit. (Or download Roblox Studio here.) A pop-up window will appear informing you that Roblox Studio is installing. Then it will automatically open.
Note: A secondary pop-up window may appear asking you to select a program. Select Roblox and confirm.
Then open it up, and pick your template. You’ll be presented with various templates like “Obby,” “Capture the Flag,” and “City.” Choose a template that fits your game idea, or start with a blank baseplate for complete customization.
2. Familiarize yourself with your tools
Before building, it’s crucial to get comfortable with the key panels:
The Explorer panel shows everything in your game world. This panel is like your project’s “table of contents,” listing all the parts, models, scripts, and other objects in your game. To access it, click on the “View” tab at the top, then select “Explorer.”
The Properties box is where you control how objects behave and look. Once you click an object in the Explorer panel, its properties like color, transparency, and material will show here. To access it, go to the “View” tab and select “Properties” and the property menu will open on the right side the window.
The Toolbox is your library of ready-made models, scripts, and assets you can drag into your game. You’ll find this under the “View” tab as well. You can search for community-made objects or use items from your own inventory.
3. Create your parts
Parts are the building blocks of your game. You can use them to create platforms, obstacles, structures, and more. Here's how to get started:
- Select the Part Tool: In the top menu bar, click on the “Home” tab. In the drop-down menu, click on the “Part” option. This will place a basic block into your workspace. You'll see that it automatically appears as a square block.
- Choose Your Shape: If you want a different shape, click on the arrow under “Part.” You can select from blocks, spheres, wedges, or cylinders. After choosing the shape, click on the workspace to place it.
- Position the Part: Use the “Move” tool from the toolbar. Select your part, and use the arrows to drag it along the X, Y, and Z axes. This allows you to move the object precisely in 3D space.
- Resize the Part: Select the “Scale” tool from the toolbar. Click and drag the handles on your part to resize it. Hold the “Ctrl” key (Windows) or “Command” key (Mac) while dragging to maintain even proportions as you scale.
- Rotate the Part: Select the “Rotate” tool from the toolbar. Click on your part and drag the circles around it to rotate the object on different axes.
- Anchor the Part: If you want the part to stay in place and not fall due to gravity, make sure to anchor it. In the “Properties” panel, check the box next to “Anchored.” You can find this panel by clicking on “View” in the toolbar and then selecting “Properties.”
- Duplicate Parts: If you need multiple parts with the same size and properties, you can duplicate them easily. Select the part and press “Ctrl + D” (Windows) or “Command + D” (Mac). Then, move the duplicated part into position.
4. Adjust it with properties
Once you’ve added parts to your game, it’s time to customize their appearance and behavior using the Properties panel. Adjusting properties carefully is key to building unique, interactive elements that can enhance your gameplay.
- Step 1: Open the Properties Panel
First, ensure the Properties panel is visible. Go to the “View” tab at the top of the screen, and click on “Properties.” The panel will open on the right side of your screen. - Step 2: Select the Part You Want to Customize
Click on the part in your workspace or select it from the Explorer panel. The Properties panel will now display all the customizable settings for that part. - Step 3: Change the Appearance of Your Part
- Color: Scroll through the Properties panel to find the “BrickColor” option. Click the color box to choose from a range of colors.
- Material: Under “Material,” choose from options like Plastic, Wood, Neon, or Metal to give your part a different texture and look.
- Size and Shape: While you can adjust size with the Scale tool, you can also set specific dimensions in the “Size” section of the Properties panel. Enter exact values for X, Y, and Z dimensions for precise control.
- Transparency and Reflectance: Adjust the transparency to make your part see-through by changing the “Transparency” value (0 = solid, 1 = fully transparent). For a shiny effect, set a “Reflectance” value (0 = no reflection, 1 = mirror-like).
- Step 4: Control How Parts Behave in Your Game
- Anchoring: If you don’t want your part to fall due to gravity, scroll down to find the “Anchored” checkbox and check it. Anchored parts stay fixed in place.
- CanCollide: Decide if players can walk through the part or if it should act as a solid obstacle. Uncheck “CanCollide” if you want players to pass through it.
- SurfaceType: For more advanced customization, you can change how the surfaces of your part interact with others. Set “Smooth,” “Weld,” “Hinge,” or “Motor” surfaces depending on the functionality you need.
5. Use others' objects
The Roblox Toolbox offers thousands of pre-made models, scripts, and assets created by other users that can save you time when building your game. Here’s exactly how to find and use these resources:
- Step 1: Open the Toolbox
First, make sure the Toolbox is visible. Go to the “View” tab at the top of the screen and click on “Toolbox.” The Toolbox will appear on the left side of your screen. - Step 2: Search for Models
In the Toolbox, click on the “Marketplace” tab. This is where you can search for models, meshes, images, and more. For example, if you need a tree for your game, type “tree” in the search bar and press Enter. If you’re making an obstacle course (obby), you could search for “spikes,” “lava,” or “platform.” The search results will display pre-made assets that fit your query. - Step 3: Filter and Choose Models
Browse the search results, and pay attention to the ratings and comments to find high-quality models. Once you find one you like, click on it, and it will be added to your game world. You can also use the drop-down menu in the search bar to filter results by category, like “Models” or “Audio.” - Step 4: Move and Adjust the Imported Model
After the model is added to your game, it will automatically appear in the workspace and under the “Workspace” section in the Explorer panel. Use the Move, Scale, and Rotate tools (found in the “Home” tab) to position the model exactly where you want it. - Step 5: Customize the Model’s Properties
You can change the color, material, size, and behavior of any model you import by selecting it and using the Properties panel, just like you would with your own parts. This is helpful if you want to tweak the model to better fit your game’s theme or functionality. - Step 6: Save Models You Plan to Reuse
If you find a model you’ll want to use in other games, you can save it to your inventory. Right-click on the model in the Explorer panel, hover over "Save to Roblox…" from the menu. A pop-up window will appear. Enter a name and description for your model, then choose the appropriate privacy setting (Public or Private). Click "Submit."
6. Add spawn points
Spawn points are locations where players appear when they start the game or after they respawn. Setting them up correctly is essential for guiding the player experience.
- Step 1: Insert a Spawn Location
- Go to the Model tab at the top of the screen.
- Click the Spawn button in the toolbar. A spawn point will appear in your game world. This will look like a simple gray pad.
- Step 2: Position the Spawn Point
Use the Move tool to drag the spawn point to the exact location where you want players to start. You can move it along the X, Y, and Z axes to place it at the right height and position. - Step 3: Customize the Spawn Point’s Appearance
- Select the spawn point in the Explorer panel.
- In the Properties panel, adjust settings like BrickColor to change the spawn pad’s color.
- To hide the spawn point so it’s invisible in the game, set the Transparency to
1. This makes the pad fully transparent. - To remove the default spawn decal, select the spawn point and delete the “Decal” object within it from the Explorer panel.
- Step 4: Adjust Spawn Behavior
- Ensure players can walk through the spawn point by unchecking CanCollide in the Properties panel. This makes sure the spawn pad doesn’t block movement.
- If you want players to only spawn at specific points, select Neutral in the Properties panel. Unchecking this option ensures players spawn exactly where you want them to.
- Step 5: Add Multiple Spawn Points (Optional)
If your game has multiple levels or starting areas, you can add more spawn points by repeating these steps. Make sure each spawn point is strategically placed for your gameplay.
These precise steps ensure that your players start the game smoothly and at the right location, enhancing the overall experience.
Publish, Play and Share Your Roblox Game
Now you're ready to publish your game on Roblox! Follow these steps:
- Step 1: Open the Publish Menu
- Click the "File" menu at the top-left corner of Roblox Studio.
- Select “Publish to Roblox” from the drop-down menu. This will open the publishing window.
- Step 2: Set Up Game Details
- Name Your Game: Enter a clear and descriptive name for your game in the “Name” field.
- Add a Description: Write a brief description of your game in the “Description” field. Include key features and what players can expect.
- Choose a Genre: Select a genre that best fits your game from the “Genre” dropdown menu. Options include Adventure, Racing, Roleplaying, and more.
- Set Device Compatibility: Specify which devices can play your game, such as PC, Mobile, or Console.
- Step 3: Configure Game Settings
- Permissions: Click on “Game Settings” in the top toolbar to access additional settings.
- Navigate to the “Permissions” tab.
- Choose who can play your game by selecting “Friends”, “Public”, or “Private”:
- Friends: Only friends can play your game.
- Public: Anyone on Roblox can play your game.
- Private: Only you and invited players can access the game.
- Permissions: Click on “Game Settings” in the top toolbar to access additional settings.
- Step 4: Publish Your Game
- Click the “Create New Game” button in the publishing window.
- Review all the details you’ve entered. Make any necessary adjustments.
- Click the “Publish” button to finalize the process. Your game will now be available on Roblox according to the permissions you set.
- Step 5: Test Your Game
- After publishing, test your game by clicking “Play” in Roblox Studio or by visiting your game’s page on Roblox.
- Ensure everything functions correctly and make any adjustments as needed.
- Step 6: Share Your Game
- To share your game with others, go to the “My Games” section on the Roblox website or in Roblox Studio.
- Find your game in the list, click on it, and copy the URL from the address bar to share it with friends or promote it on social media.
Cool Roblox Coding Commands
Here are a few Roblox coding commands that can save some time:
- Undo actions: Control + Z
- Redo actions you've undone: Control + Y
- Rotate the parts you have selected: Control + R
- Focus on the camera on the object you've selected: F
- Group objects together: Control + G
Explore More Fun Roblox Game Ideas
Here are a few more Roblox game tutorials to try.
Make a Game on Roblox
Now you know how to make a game with Roblox coding. Up next, learn how to build multiplayer games so you can invite your friends to play their games together! Enroll your child in a live online class to get all their questions answered, and to help them learn with a curriculum designed by experts from Google, Stanford, and MIT. Start with Beginner Roblox Game Coding (Grades 3-8) before progressing to Coding with Roblox Studio in Lua (Grades 6-12) and Advanced Roblox Club (grades 6-12). Start with a free Roblox coding class.
Written by Kari Tonkin, a Create & Learn instructor. Kari has been teaching a wide variety of courses and ages for more than twenty-six years. Some of her favorite subjects to teach include computer science, graphic design, mathematics, and coding languages. She received a Master’s Degree in Curriculum Design with Technology Integration from Black Hills State University in 2016 and has used this knowledge to stay current on new technology trends in education. When she is not working, Kari enjoys playing video games with her family, including Roblox and Minecraft, hiking and camping, and traveling around the United States.

