

Playing games in Roblox can be a lot of fun! If you’ve ever wondered how the creators of some of your favorite Roblox games have been so successful, then it may be time to go behind the scenes and learn to code your own games, too. Using Roblox Studio, you can play around with designing your own games and learning how to write scripts. Here is how to code for beginners in Roblox, with a short project included.
To build your child's Roblox coding skills with live expert instruction, and a curriculum designed by professionals from Google, Stanford, and MIT, enroll them our free Roblox class. They can even earn a certificate!
Roblox Coding For Beginners Intro Guide
Behind every fun Roblox game is a fair amount of script to make objects respond to the players as they navigate the game. From fading platforms to lava blocks, any object in Roblox can be scripted to do whatever the code designer wants to see happen. Let's review some basics with a quick step by step guide to introduce you to coding with Lua.
Step 1: Install Roblox Studio
Begin by downloading Roblox Studio which can be found here. This video has step by step instructions:
2. Get To Know The Roblox Coding Interface
Once Roblox Studio is installed, it’s time to explore the interface. When you open a new project, you'll see various panels:
- Explorer: This shows all the parts and scripts in your game.
- Properties: Adjust how each part looks and behaves.
- Toolbox: A library of assets, including models and sounds.
- Script Editor: Where you write your code.
Start by placing objects in the Explorer and using the Script Editor to add functionality.
3. Learn About Lua, the Coding Language Used in Roblox
Lua is the scripting language that game developers use in Roblox Studio. It is a basic coding language that can be used by both beginners and experienced coders since it is fairly simple to learn and also able to handle advanced scripting techniques. Lua works by using scripts to tell the game how to behave. For example, you can use Lua to make a platform disappear, create new characters, or add special effects. There are a few important concepts to learn immediately before you dive right into scripting in Lua.
Some key Roblox Lua scripting concepts to know:
- Functions: Tell the game to perform an action. A piece of code that is created once but can be used in multiple places throughout the code. You define a code based on what it does for the script.
- Strings: Data values that are made up of more than one word or separate with spaces are referred to as strings. They can be identified by “quotes” around the phrase or statement.
- Variables: Store information. This is a value that can change, so you replace it with a word that represents the value throughout your scripts. For example: BoxSize might be a good variable name for a function that tells the script what size box to show.
- Conditional Statements: When you want something to happen based on certain conditions in your game, this uses a conditional statement. An example of this is an “If…Then” statement or “If… Then… Else” statement.
- Events: Trigger actions, like pressing a button or touching an object.
It is really important to understand the Roblox Studio user interface (UI) and how all of the features work to make scripting easier for you. Not only do you have the main building window (stage) and the toolbar that allows you to use objects others have shared, but also you will also want to get to know several other windows that will help you check for errors, change properties, and more. All of these windows can be opened and closed on the View tab at the top of the Studio interface.
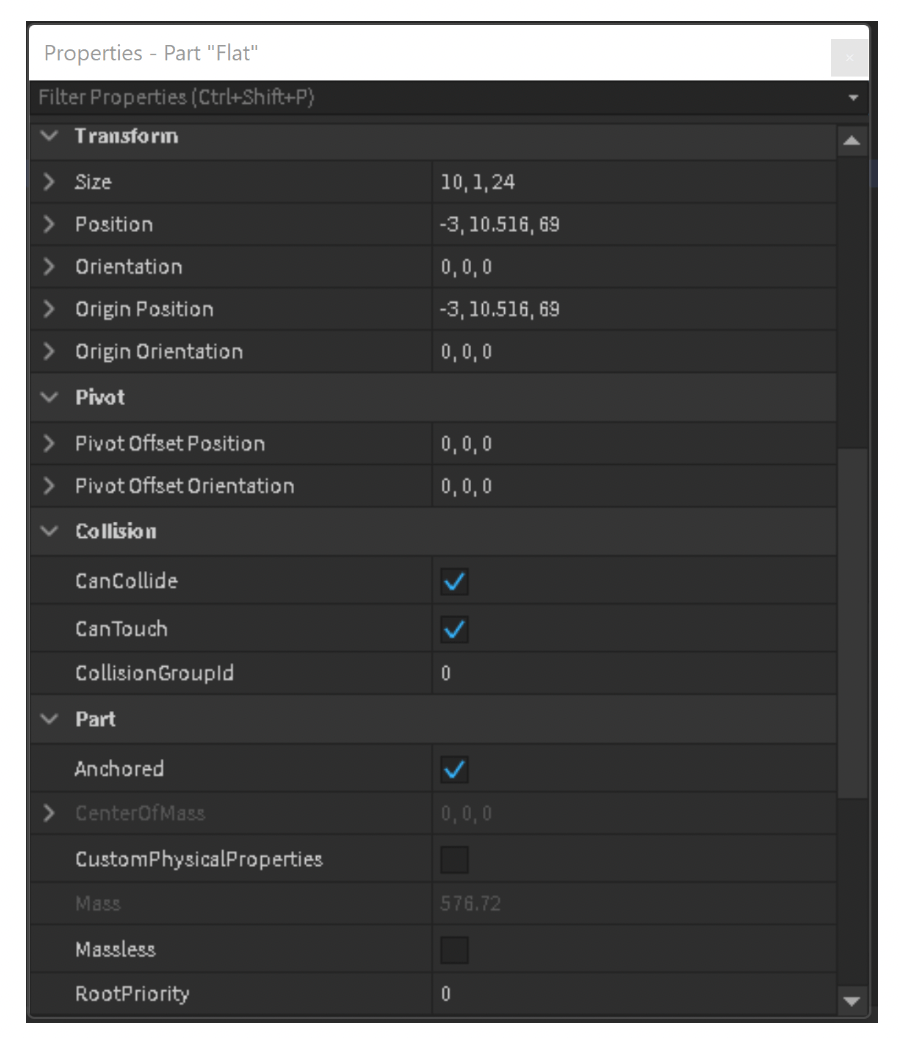
Properties Window: Be sure to keep the Properties Window open below your Explorer Window, as a fast way to make changes to your objects. You can change the color, material, transparency, anchoring, size, and much more.
Get practice going in-depth with the Properties window with this fun tutorial:
Output Window: This window usually lies below the stage window and can tell you all about your project as it runs. It will show any output that the game makes along the way, such as print statements, starting/stopping the server, and if a piece of code doesn’t act as it should, where to find the error.

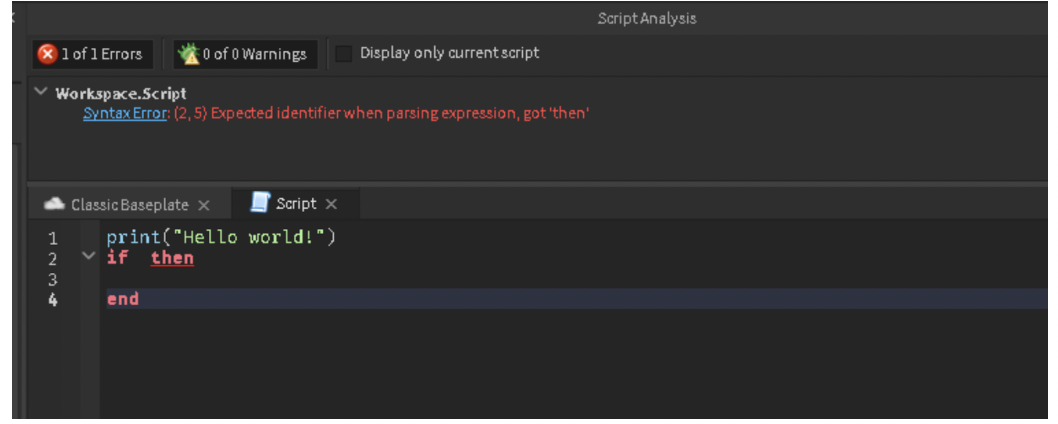
Script Analysis Window: Similar to the Output Window, the Script Analysis Window not only tells you when your script has an error, it will explain what it expected to see on that line of code as well. In this example, I have an If-Then statement with no identifying information for the condition, so the analysis shows that it expected to see the identifier!
4. Place Objects: How to Add and Manipulate Parts in Roblox
In Roblox Studio, you can add objects to your game by placing Parts, to build and shape your world piece by piece! Here’s how:
- Insert a Part: In the Home tab, click the "Part" button to place a block into your game world.
- Move and Scale: Use the Move tool to drag the part around and the Scale tool to change its size.
- Rotate: Adjust the orientation of the part with the Rotate tool.
5. Create Variables: Store Information in Code
In Roblox coding, variables are used to store information that you can use throughout your game. A variable can hold numbers, text, or even objects! Variables make your game more dynamic by allowing you to store and update information. Here’s how to create one in Lua:
- Define a Variable: You start by typing local followed by the variable name. For example: local score = 0.
This creates a variable called score with a value of 0. - Use Your Variable: You can now use this variable in your code to track things like points, player status, or object properties.
6. Script Movement: Add Basic Character or Object Movement
In Roblox, you can use Lua scripts to move objects or characters. Here’s a simple way to add movement:
- Create a Script: Right-click the part or character in the Explorer and choose "Insert Object" > "Script."
- Write the Code: Use the Position property to set where the object should move. For example: part.Position = part.Position + Vector3.new(0, 10, 0)
This moves the part 10 units upward.
7. Event Handling: How to Trigger Actions
In Roblox, event handling is how you make things happen when players interact with your game. For example, you can trigger an action when a button is pressed. Here's how:
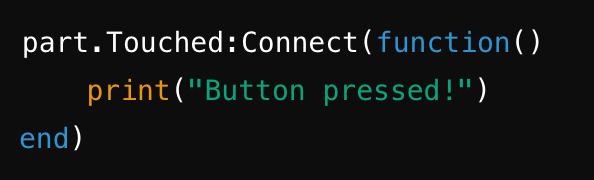
- Create an Event: Add a script to the button part, then use the Touched event:
- Write the Action: Inside the event, code what happens, like opening a door or playing a sound.
8. Loops and Conditions: Using Loops and If/Else Statements for Game Logic
In Roblox coding, loops and conditions help control game logic.
- Loops: A loop allows you to repeat an action multiple times. For example, a for loop can make an object move continuously.
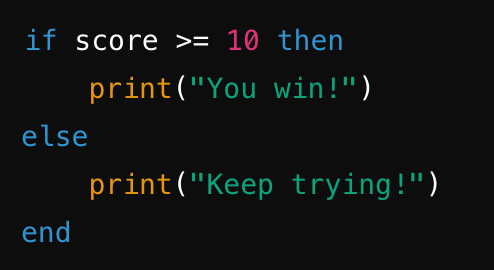
- Conditions: Use if/else statements to create rules. that determine what happens next based on a certain condition. For example, if a player reaches a certain score, they might win.

Walk Through How To Code On Roblox
Watch this video for a great visual walk through of the tools, groups and parts, hotkeys, and more for beginners - before we try your first project together.
Learn How To Code For Beginners For Roblox With A Fun Tutorial
Now let's try your hand at making a quick fun project! When you open a new project in Roblox Studio, there are unlimited options for what you can create. In this tutorial, we will show you how to add a fading platform to your game, one of the favorite challenges in any Roblox Obby.
Whenever you're following a scripting tutorial, keep in mind that it's best to do your best to actually understand what each line of code does, rather than just copying and pasting code. This is they key if you hope to get better at scripting and overall make better games.
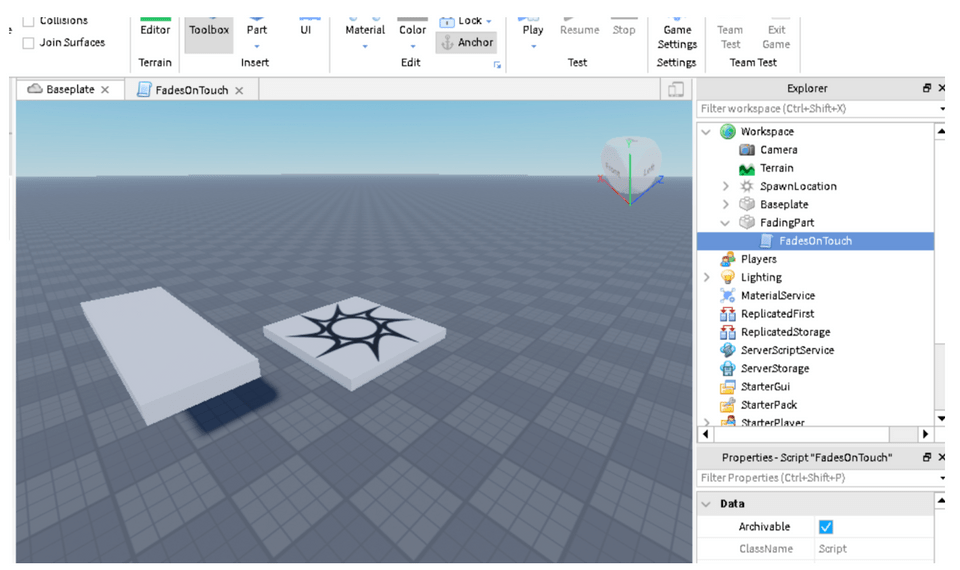
1. Place A Part
Place a Part into your game where you’d like it to appear, and rename it FadingPart. Be sure it is big enough for a player to step on and anchor it on the Home Edit menu.
Add a script to FadingPart and call it FadesOnTouch. Be sure before you start entering in the code in the next step that you delete the default script when you open it.
2. Create A Variable
Create a variable for FadingPart (called platform) and add the following empty function and Touched command to the script:
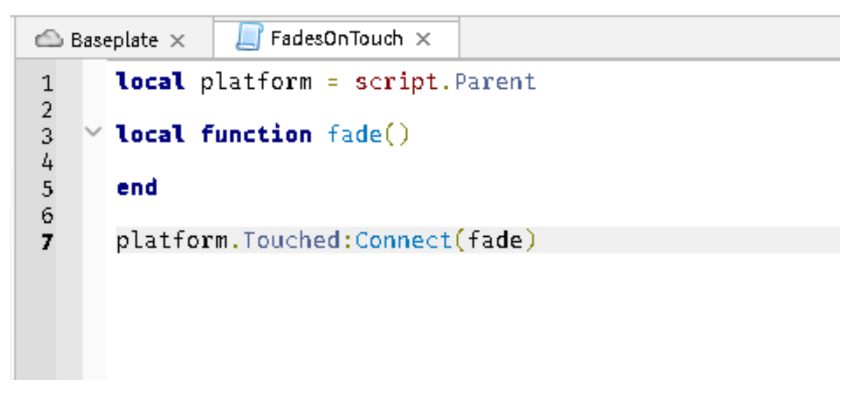
Be sure to note in the code above where there are parentheses and periods, they are important!
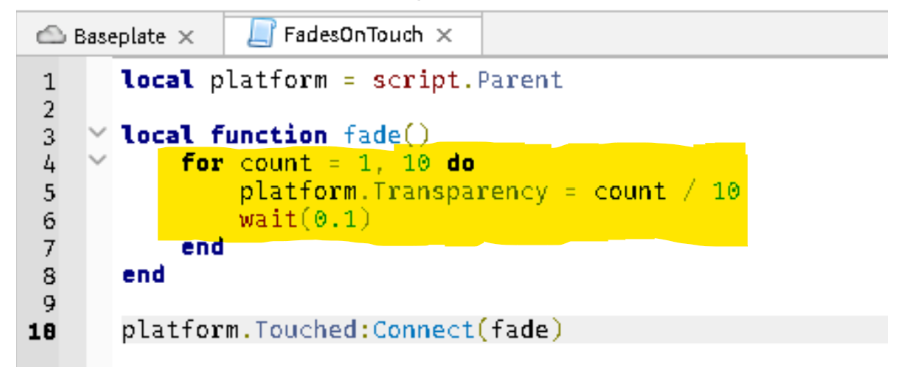
3. Place A For Loop
Next, we can place a For Loop inside the function that will cause FadedPart to fade away once it is touched. This line of code tells Roblox to start at a value of 1, end at 10, and step by increments of 1 to create the illusion of fading. Between each iteration of the loop, Roblox will wait for 0.1 second then loop again until it reaches the end value.
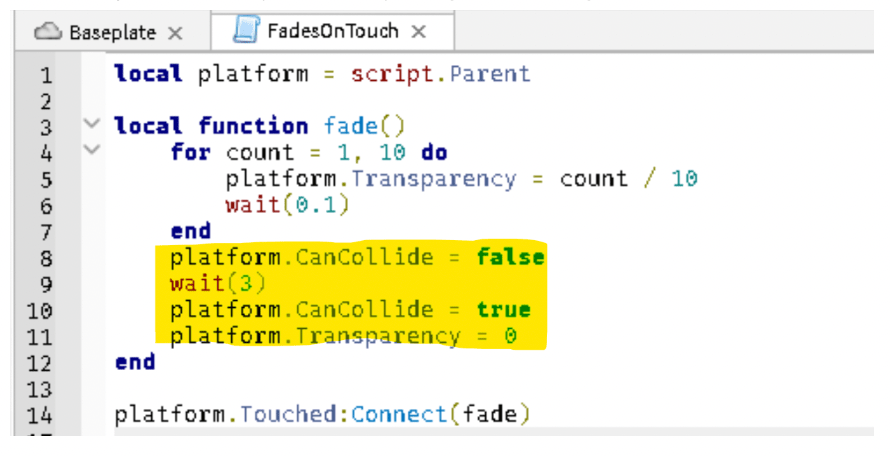
4. Make The Player Fall
Finally, we need the player to fall through the space where the platform was, which is a collision command. And of course, we will need the FadedPart to return (in this case, after 3 seconds) so the player can try it again and again:
5. Try Running It
Your finished FadingPart should run like this:
Here's Another Quick Roblox Scriptiong Challenge To Build
1. Open a new Roblox project
Open up a new project using the classic baseplate. Click on the baseplate and delete it (either click the backspace/delete key or right click and choose delete). Then click on the + sign next to Workspace and create a new SpawnLocation block.
2. Add Roblox parts
Place a new part into your project by clicking on the Part block on the Home tab. Be sure to ANCHOR it! Don’t add any color or materials to it yet, we will be adding that through script. You can, however, scale the part to make it big enough for your player to land on, and move it to where you want it to be.

3. Add a script
Now we will add a script to this Part by clicking on the + sign next to it, and choosing Script from the menu. Go ahead and delete the default script, print("Hello world!").
4. Change the color
Let’s change the color of our part! In the script, add the following code:
game.
Workspace.Part.BrickColor = BrickColor.new("Toothpaste")
Now, hit “Play” on the home tab and see if your part has changed to a light blue color. If your block is still gray, be sure that your script contains all the periods and quote marks as they appear in the script above.
5. Add texture
How about adding some texture to your part? Let’s make the part look like metal. Add the following script below your color script line:
game.
Workspace.Part.Material = Enum.Material.DiamondPlate
Your block should now look like the one in the image below:
6. Make the block light up
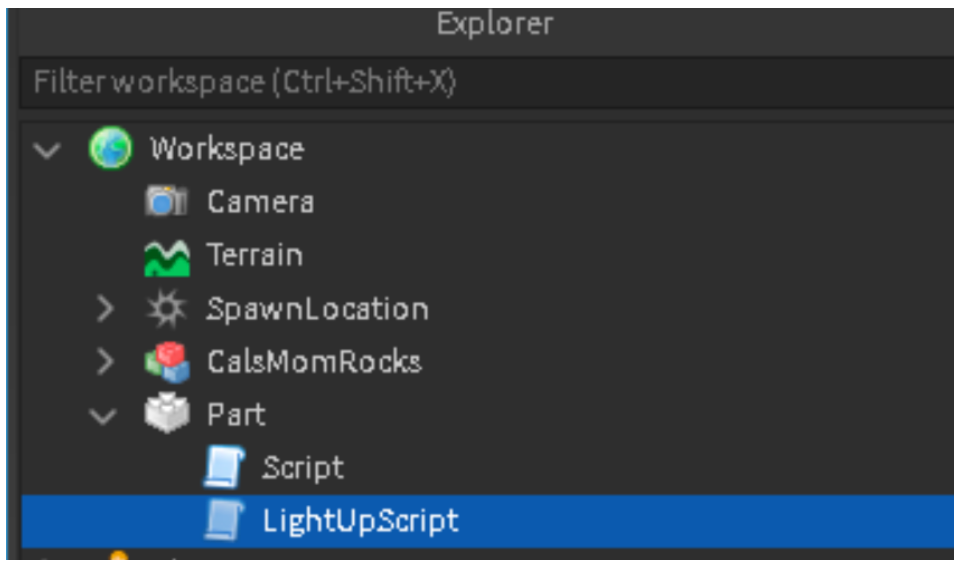
Let’s reward our player for landing on our awesome block by having it light up when they touch it. Add a new script to your part and call it LightUpScript (remember no spaces between the words is best coding practice to follow).
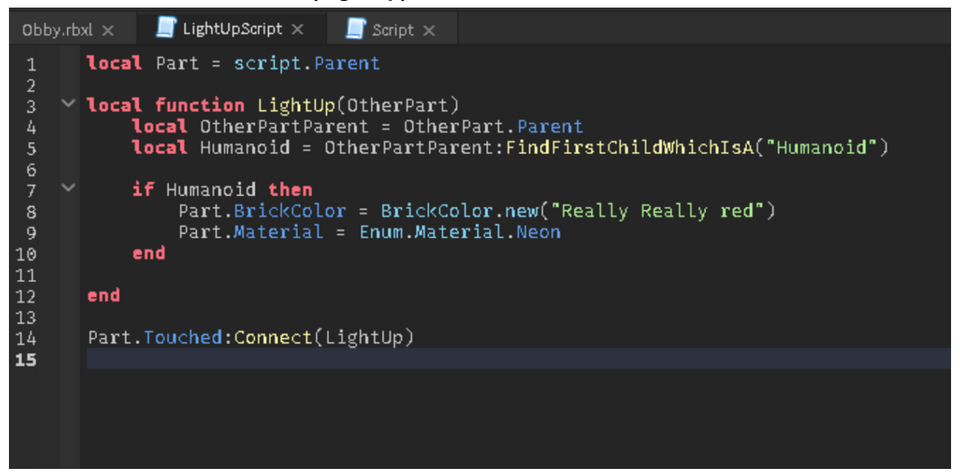
Now delete the default script line, print("Hello world!"), and let’s place in our first function into your “LightUp” script:
local Part = script.Parent
local function LightUp(OtherPart)
local OtherPartParent = OtherPart.Parent
local Humanoid = OtherPartParent:FindFirstChildWhichIsA("Humanoid")
if Humanoid then
Part.BrickColor = BrickColor.new("Really red")
Part.Material = Enum.Material.Neon
end
end
7. Call the function
That is the function’s script instructions, but we have to “call” the function in the game, in order for it to start up and run. Therefore, after the second “end” line above, place the final piece of script:
Part.Touched:Connect(LightUp)
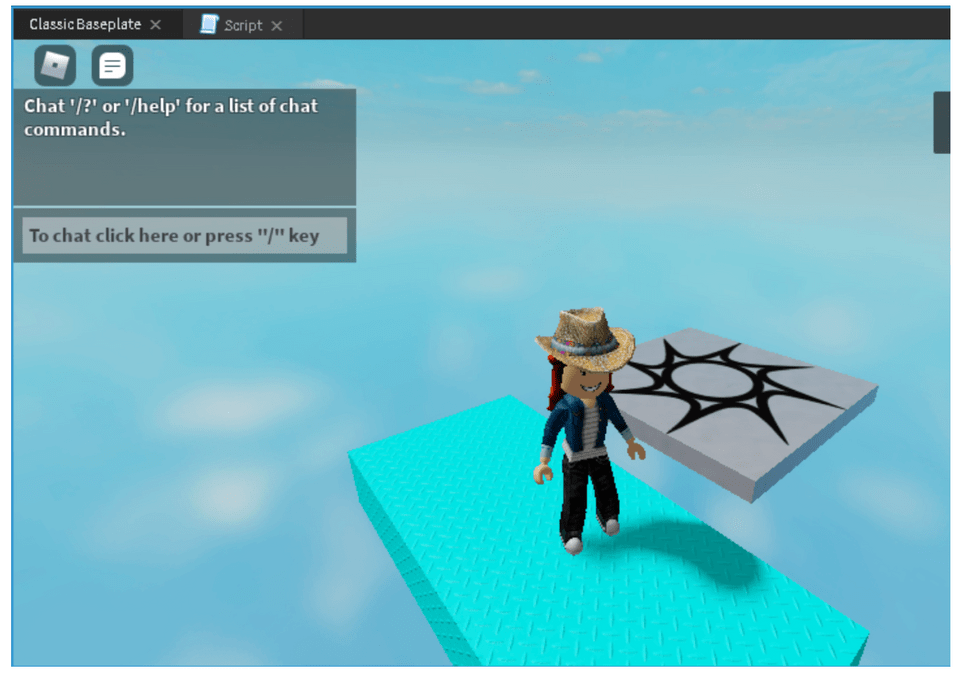
Play your Roblox game!
Now, play your Roblox game, jump on your block, and watch it light up! You can add so many other options to your parts using more scripts. For example, your parts can move, they can harm the player when touched, disappear, or reward points!
Roblox Coding Practice
Now that you know some Roblox coding basics, here are a few fun ways to get some Roblox coding practice.
- Free Roblox Course For Kids: Install and activate Roblox Studio with the help of a live expert, and go through a step-by-step tutorial to build an interactive Obby game with different shapes, colors, and materials.
- Roblox Creator Hub: Roblox has a thorough tutorial section on their developer website that makes learning accessible to most ages.
- Online Tutorials: Follow online Roblox tutorials such as this one on how to make a Roblox game.
- YouTube Videos: There are many Roblox Creators on YouTube that provide video tutorials on how to learn and use scripts in Roblox Studio.
Free Roblox Coding Course
Taking an online course in coding can help students learn proper scripting skills and habits, with the benefit of a live expert who can answer questions along the way. Award-winning STEM education platform, Create & Learn, provides a Beginner Roblox Game Coding class, Coding with Roblox Studio in Lua Class, and Advanced Roblox Game Coding Class, as well as Roblox camps, and each is taught by a professional, experienced instructor. Class sizes are very small, which allows for personal time with each student as they create their games. The best part is that your child can start for free!
How To Code For Beginners In Roblox
Using this short script as a starting point, the possibilities are endless for creating your own fun games in Roblox Studio! When learning to write code, be sure to pay attention to the punctuation in the script, and also which letters are lower- and uppercase - it all matters in order for Roblox to run correctly. We encourage you to next read our Roblox Tutorial: How to Make a Game, so once you have your coding skills sharp, you can learn how to upload and publish your game to Roblox for others to experience.
Written by Kari Tonkin, a Create & Learn instructor. Kari has been teaching a wide variety of courses and ages for more than twenty-six years. Some of her favorite subjects to teach include computer science, graphic design, mathematics, and coding languages. She received a Master’s Degree in Curriculum Design with Technology Integration from Black Hills State University in 2016 and has used this knowledge to stay current on new technology trends in education. When she is not working, Kari enjoys playing video games with her family, including Roblox and Minecraft, hiking and camping, and traveling around the United States.

