

Roblox is a free to play gaming and game-creation system, which allows users to play games and program their own games for other people to enjoy. Today we’re going to explain the most important Roblox coding basics to help you and your child get started on their Roblox adventure.
Enroll your child in award-winning live online Roblox coding classes and Roblox summer camps designed by experts from MIT and Stanford to have fun learning.
Discover Roblox Coding Basics
Roblox is an extremely popular platform for game development, especially for kids, with over 100 million users every month! Roblox Studio uses an object-oriented programming language called Lua to design a game world which is stored and run through scripts. Let’s break down the different Roblox coding basics you and your child will need to get started.
1. Four main types of data
Roblox Studio uses four main data types, and like other coding languages, the developer needs to be careful about which is which.
Strings or Text are the first data type. Strings are words or phrases written in letters such as, “Bla Bla Bla” or “Hello, World!” Strings should be written between two quotation marks (") or apostrophes (').
The next data type is Integers, which are whole, real numbers such as “1, 2, 3, 4….” This data type does not include fractional numbers, also known as doubles, that can be written with a decimal point.
Booleans, or bool numbers, are the third data type and they are the basic components of computer languages. All Booleans are essentially “Yes/No” questions, like a switch that can either be On or Off, or a number that can either be 0 or 1.
The fourth main type of data in Roblox is called an Object reference or ObjectValue, whose purpose is to store a single reference to another object, and it might look something like: game.Workspace.Part.
2. Variables
In coding, a variable is a place to store various types of data. In most programming languages, these variables are sorted or typed: the variable data type must be signified when it is created. If the user needs a variable that holds an integer, for example, you could only assign integers to that variable, and not strings or booleans.
In Roblox Lua, however, variables are not typed, this means that a variable that originally holds a string could later hold a number. As in many other languages, variables are assigned using the equals “=” sign, though in Roblox the variable name needs to be preceded by the function, “local”: e.g. local text = “The quick brown fox jumps over the lazy dog” // or local Cheese = script.Parent.Cheese
3. Print
Print is one of the simplest Roblox coding basics. It is a function that puts a message or any data into the output. When the user writes “print” followed by a message enclosed in parentheses and quotation marks, e.g. print(“Hello World”), then the words “Hello World” will appear in the Roblox Studio's output box when you run your program. You can print strings, polynomial expressions, and variables. If you assign a variable such as: local message = “Hello World”, you can then reference that by putting: print(message), printing “Hello World” in the output when you run the script. This allows you to save time and to debug your program easily.
4. Instancing and Classes
Classes in Roblox are any of the different types of objects you create within your program, such as the baseplate, floating objects, NPCs, etc. Each class of object can have different properties or ways of interacting. Instance is the primary class for all objects in Roblox Studio. By using the special function called Instance.new, users can create objects using code. This function takes the name of the class as a parameter and returns the created object.
For example: Instance.new(“Part”, game.Workspace) “Instance.new” tells the program to “make a new instance,” “Part” references the type of instance you’re creating, that is then followed by a comma, and finally the part’s destination, in this case, the workspace. Instancing can occur in a variable, too. For example, you can put: local MyPart = Instance.new(“Part”, game.Workspace), which allows you to create parts more easily. You can create motors and set them up INSIDE of your script instead of setting them up in properties. This is commonly used for helicopter kits, where you need to use a motor/hinge to spin the rotor.
5. Obby - Create a Starting Point
The simplest and most popular type of game in Roblox is the obstacle course, called “obby” for short by Roblox users. In gaming, these are also called platform games or platformers, where a character needs to jump from platform to platform while avoiding obstacles and enemies. While an obby can be super simple like jumping across several moving platforms, they can also be very complex and interesting, such as the popular games Super Mario Bros, Crash Bandicoot, Metroid, Donkey Kong Country, and Hollow Knight. One of the most important things for getting started on a platform is to delete the game’s baseplate, which means that if the character falls from a platform, it dies. This creates tension that makes platformers simple yet challenging. (Learn how to make an obby game step by step here.)
6. Functions
Aside from the main four data types described above, Functions are another important type of data you can use in Roblox. Functions allow for you to use pre-made “packages” of code in your scripts and recall them later. Functions allow you to use an input and return an output. Finally, they also allow you to receive an input and perform certain things based on the data type of the input. We already talked about the common functions, Print and Local, but there are many including “End” which tells your program to stop running.
7. Parts and Platforms
Parts are the main structures inside your game. Your character will walk on them, fall from them, or be limited in movement by them. To add a part, go to the Home tab and select Part. The part should then appear in the center of your view. You can then move the part by moving your POV to the desired location, then click on the part. Finally you can use the Move tool by dragging the arrows to move the part.
8. Themes and Colors
Game designers use storytelling, sound, and color to create a vibe for their games. The theme sets the tone and ambiance for your game. If you’re making an obby set in the jungle, then all of the parts might be colored and shaped like exotic plants or animals. Once you’ve come up with an idea for the theme of your game and added some parts, you can then use the Model tool to change the color of the part, while using the Material tool will give you different textures and material surfaces to use, such as wood or metal.
9. Collisions and Snapping
Collisions and Snapping will give you greater control when parts are moving within your game. Collisions can be turned on or off. When turned on, your platforms will bounce off of each other when they touch. Turning it off will make parts float around freely, including through one another. As you move parts, a white outline appears if two parts touch, which tells you that a collision is happening.
Snapping is the amount a part will stay in place, move, change size, or rotate. The standard unit of measurement in Roblox is called a stud. If you notice a part moving more than one stud at a time, this happens due to snapping. You can turn snapping on or off by clicking the box next Rotate or Move, while you can set the number of studs in the nearby dropdown menu. Snapping can be helpful in placing objects in an exact place or angle, such as the walls of buildings.
10. Moving the Camera
Being able to move the camera in Roblox Studio is one of the most important basic Roblox skills. On the keyboard, use the WASD keys to move the camera, Q will move the camera up, E to move it down. SHIFT allows you to move the camera slower, while F will allow you to focus on a specific object. Holding the right mouse button will allow you to turn the camera, while the scroll wheel will zoom in and out.
11. Inserting a Script
In the Lua programming language, your code is stored and run from scripts. You can add scripts anywhere in your game. Roblox will run the code in the script when the part is loaded into the game. Hover over a Part in the Explorer window and click the + button. Select Script from the menu which appears — this will insert a new script into the platform. You can use scripts to cause your parts to move, to disappear, or to reappear, opening limitless possibilities for your game design. Don’t forget to rename parts and scripts when you make them, as it can be easy to confuse things in the Explorer if they don’t have distinct names.
Roblox Coding Debugging and Problem-Solving Tips
When your teen starts coding in Roblox, encountering errors is a natural part of the learning journey. Debugging, or finding and fixing these errors, is an essential skill that will not only improve their coding abilities but also boost their problem-solving skills and resilience.
1. Common Errors and How to Spot Them
Some frequent mistakes in Roblox coding include misspelled variables, incorrect data types, and missing punctuation marks like quotation marks or parentheses. These can cause scripts to fail or behave unexpectedly. Encourage your teen to patiently and carefully read through their code to spot these issues.
2. Understanding Roblox Studio Error Messages
Roblox Studio provides error messages when something goes wrong with the code. These messages might seem intimidating at first, but they’re actually helpful clues. Teach your teen to read the entire error message, focusing on keywords that indicate the type of problem and the line number where it occurred. This can guide them to the exact spot in the code that needs attention.
For example, here's an error message:

Let's break it down:
- Workspace.Script:3
This part tells you where the error occurred. "Workspace" is the name of the place where your script is located, and "Script:3" means the error is on line 3 of the script. If you're not sure where line 3 is, you can look at the line numbers in the script editor to find it. - attempt to index a nil value
This is the actual error message. It means that your code is trying to access something that doesn’t exist or hasn't been defined yet. In programming, "nil" means "nothing" or "empty," so this error usually means you're trying to use a variable or object that hasn’t been set up.
3. Strategies for Debugging
One effective debugging strategy is to use the print() function. By inserting print() statements at various points in their script, your teen can track the flow of the program and see which parts are working correctly. This can help isolate the part of the code where the error occurs. Another tip is to break down the code into smaller sections and test each one independently before combining them. This makes it easier to identify where things go wrong.
So for the example above, here's how to fix it:
- Check Your Code: Make sure the object you’re trying to access (like "Part") actually exists in your game. If it’s missing or named differently, update your code to match the correct name.
- Verify Object Creation: Ensure that any objects or variables you’re trying to use have been properly created and initialized before you access them.
- Use Print Statements: Adding print statements before the error line can help you see what’s happening.

Roblox Coding Basics Project: Create a Moving Platform
OK let's put it all together! One of the most engaging and practical beginner projects in Roblox is coding a moving platform. This project not only introduces teens to essential coding concepts but also adds a fun, interactive element to their games.
1. Create the Platform
- Open Roblox Studio and start a new game or load an existing one.
- Go to the "Home" tab and select "Part" to create a new part.
- Resize and position the part to make it a platform. You can change its color and material using the "Model" tab to make it visually distinct.
2. Insert a Script
In the Explorer window, right-click the platform part, hover over "Insert Object," and select "Script." This will open a new script editor window.
3. Write the Script
In the script editor, start by defining the platform's movement. Use the following basic code to make the platform move back and forth:
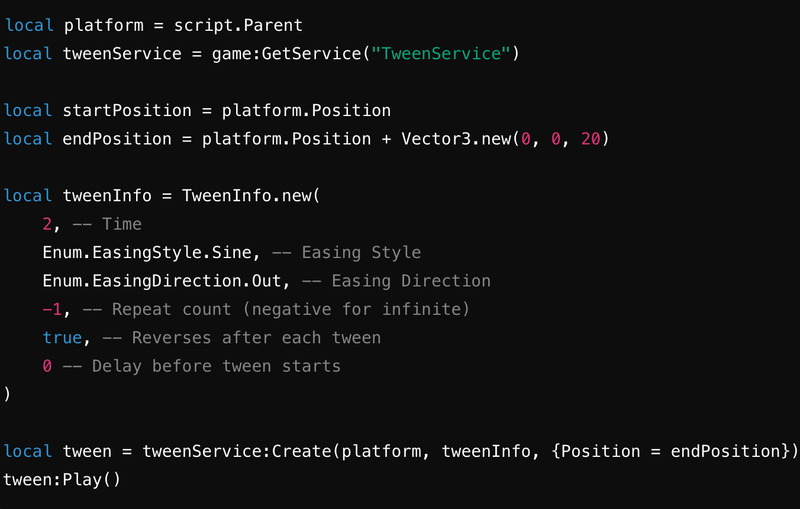
This code makes the platform move back and forth between two points using the TweenService. The movement is smooth, and the platform will reverse direction infinitely.
4. Test the Platform
Click the "Play" button to test your game. The platform should now move back and forth as expected. You can tweak the speed and distance by adjusting the tweenInfo parameters and the endPosition.
5. Experiment and Play
Encourage your teen to experiment by adding multiple platforms, adjusting their speeds, or creating different movement patterns. They can also integrate this platform into a larger obstacle course or game to make it more challenging and fun.
Put Roblox Coding Basics Into Practice
Roblox is super fun and a rewarding experience for game developers young and old. Compared to platforms like Scratch, it is a greater challenge and requires more time learning. Thankfully, your child can enjoy a comprehensive curriculum and supportive live expert instruction one of our fun Roblox coding classes: Beginner Roblox, Roblox Lua, or Advanced Roblox. There's even a free Roblox class to make getting started easy.
Also, the Roblox community is vast and there are a ton of great YouTube channels and websites, including the blog of the Roblox corporation’s Developer’s Hub.
Written by Bryan Gordon, a Create & Learn instructor. After ten years of working as an English teacher, Bryan began studying Math and Computer Science over the past few years. Aside from writing and teaching, he likes cooking, gardening, playing guitar, and hanging out with his cats, Baguette and Wally.

