

Does your child want to create stunning artwork with the most intuitive app? In this tutorial we will cover the basics of how to use Procreate for you and your child. This is a beginner tutorial meant for those who aren’t familiar with Procreate but want to learn the functions on how to start.
We'll also share the tips and tricks creative professionals use in Procreate, so you and your child can make their own ideas come to life. Not only will it make creating beautiful artworks a breeze, but also learning how to use Procreate can help them add dimension and depth to their creations.
Enroll your child in award-winning live online digital design classes, created by professionals from Apple, Google, and MIT. For example, learn how to make awesome posters, cards, videos, and more in our live online Canva class - kids even earn a certificate!
Have Fun With A Procreate Beginner Tutorial
How do you start using Procreate? Today we’ll explain the basic tools and functions for Procreate in 10 simple steps! And in the process you and your child will make an Among Us Character to help you learn the initial setup steps and uses of basic tools on Procreate.
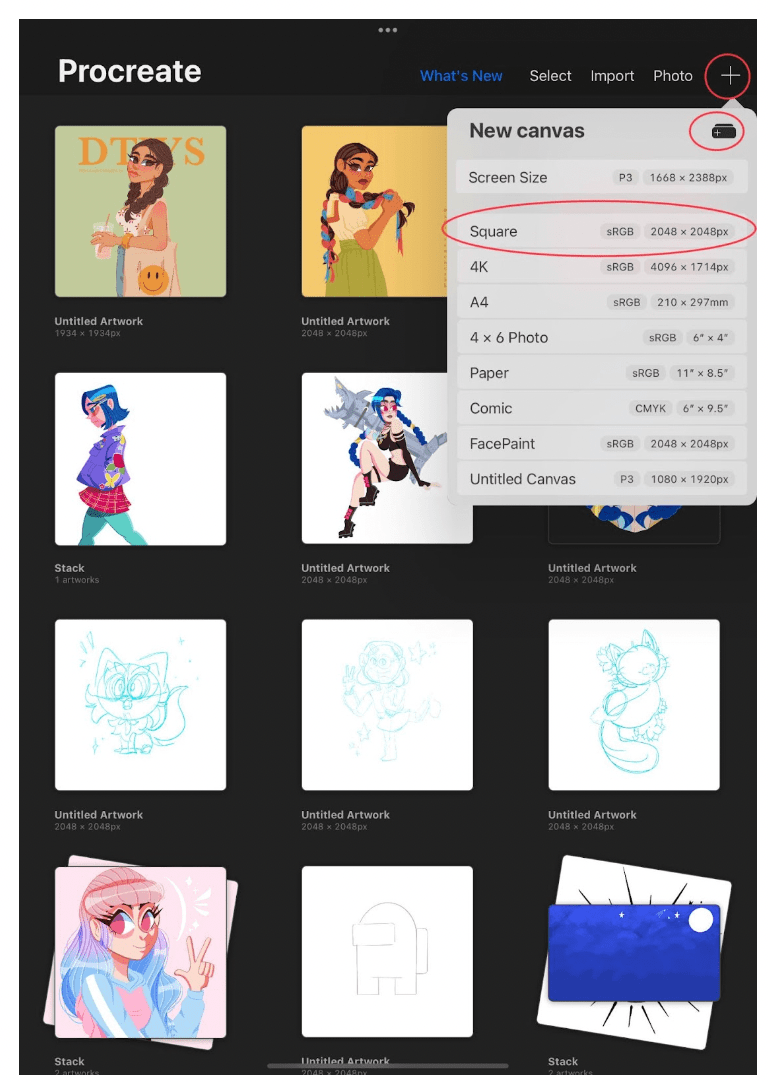
1. Create a new canvas
Once you open Procreate you will see the gallery view where you can browse your artwork. Press the “+” sign to create a new canvas. It’ll give you a variety of canvas size options, but you could also create your own. A square canvas is easily shareable on most platforms so let’s go ahead and choose that one for the sake of this tutorial.
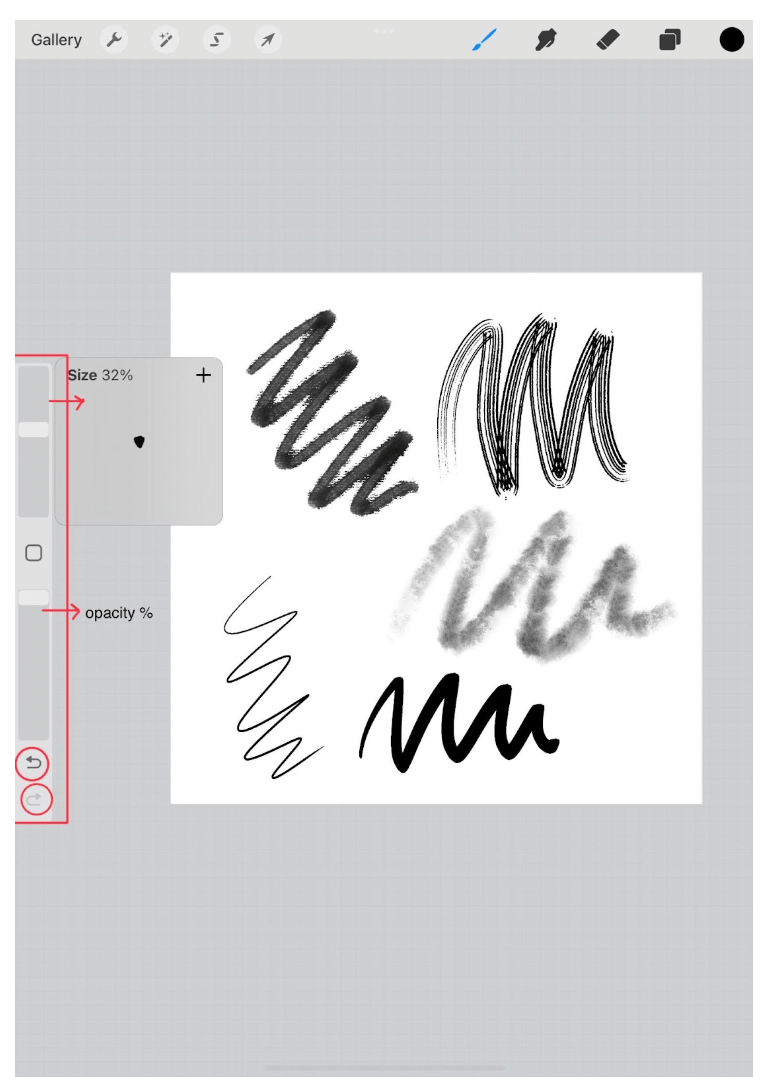
2. Adjust brush size and opacity
Once you click on your canvas, there will be a toolbar on the bottom left corner. This tool bar controls your brush. The top slide controls the size of your brushes while the slider on the bottom controls your brush’s opacity. You can play with opacity and layering different colored strokes to get a neat overlay effect!
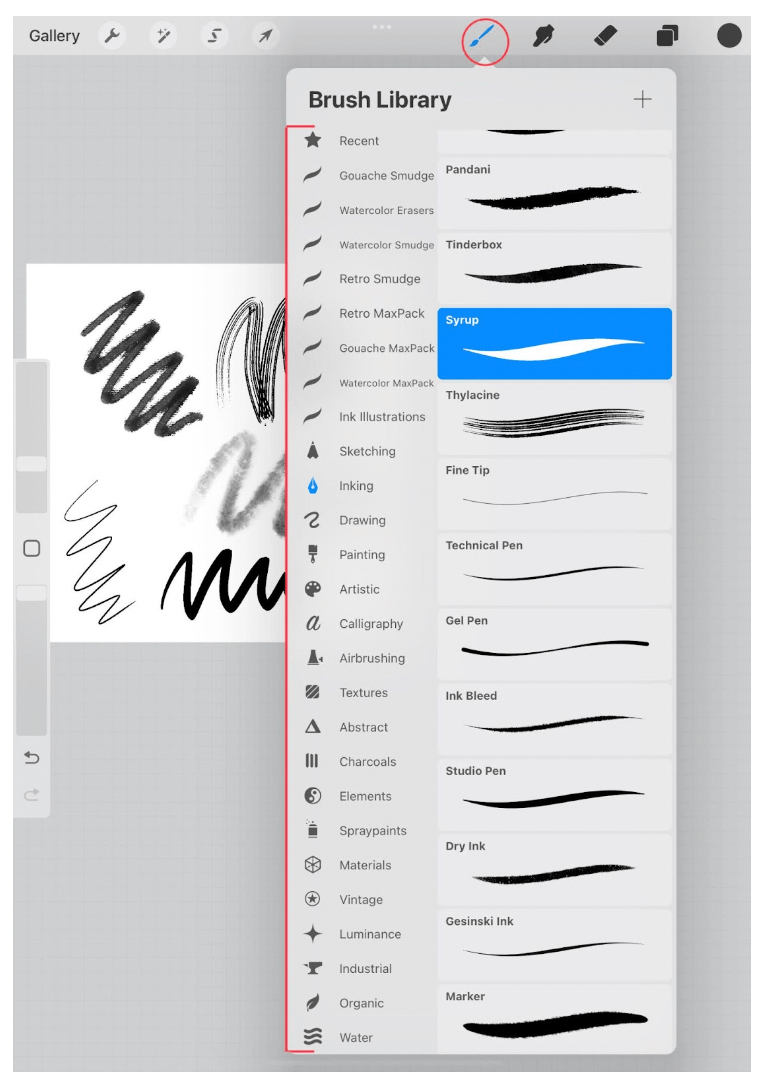
3. Choose your brush
Procreate comes with many preset brushes in the app. You can access them by clicking the brush icon in the top right hand corner. There’s different categories for the different textures the brushes have. You can also download and make your own brushes (which will be discussed in another tutorial).
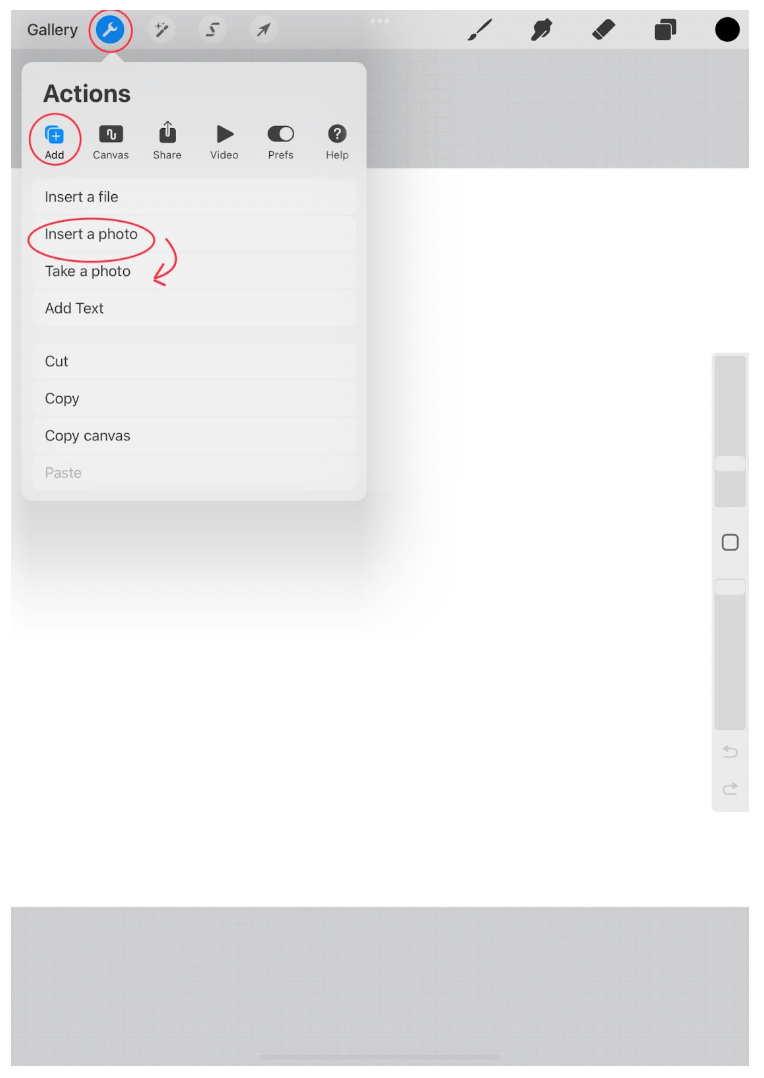
4. Add a reference photo
Sometimes it is good to look at inspiration or reference photos when drawing. Rather than switching from the Procreate app and where the photo is located, you can import one onto your canvas. First click on the wrench icon on the top left corner. It will open the options menu. Click on the “+” add option . Underneath, there will be some options, including one to insert a photo!
You can insert a photo from your photo gallery on your iPad whether it be a downloaded image from the internet or a photo you have taken previously by clicking the “insert a photo” option. You can also take your own photo within the app by clicking the “take a photo” option.
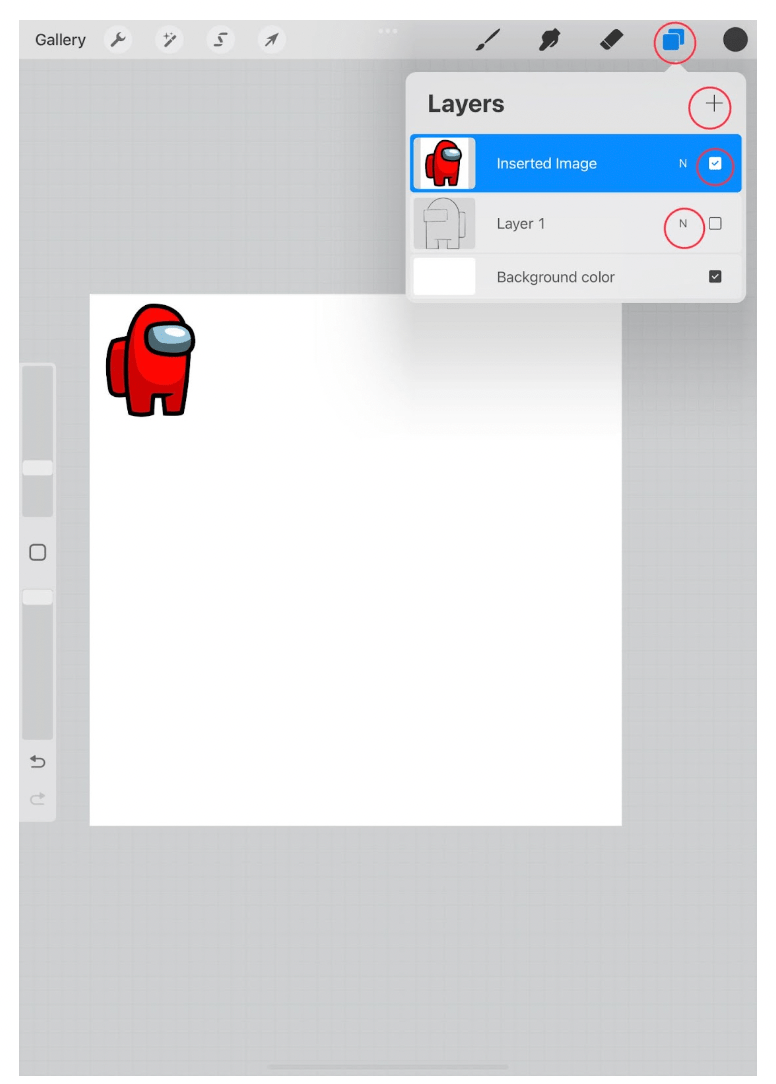
5. Add Layers
Layers will arguably be the most important and useful tool in the app. To add a layer click on the two overlapping squares icon in the top right corner. The order in which they are in matters, with the top layer overlaying all the layers below it. Usually, we make a layer every time we have a new color added in the illustration, but you can also make a new layer for each individual shape so you can move and manipulate it all you’d like.
You can also make the layers invisible by unchecking the box next to the layer. You can also manipulate how the layers interact with each other by pressing on the “N” next to your layer. This tutorial has a section all about layer modes that we won’t get into here but I encourage you to check out and try!
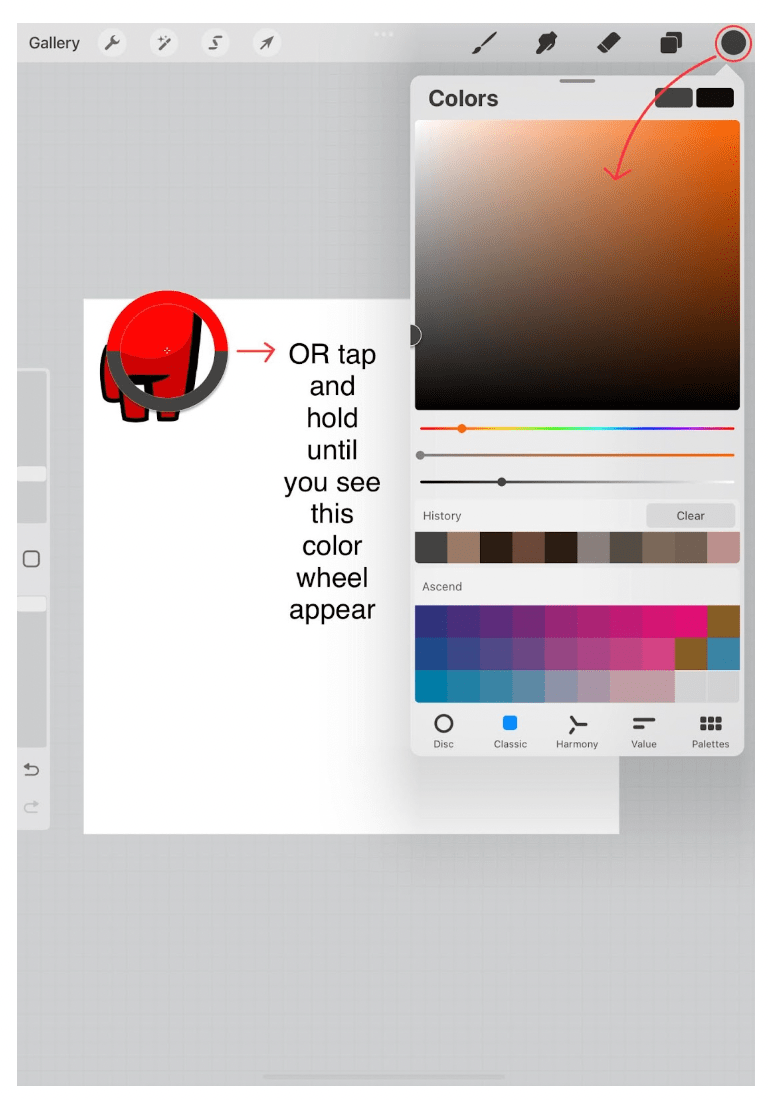
6. Choose color
In the top right hand corner there is a circle with a color on it. You can click on it and choose the color you want your brush to draw in.
You can also pick a color from within the canvas or a photo you have imported by holding your finger down onto one spot on the screen until the circle of color appears. Drag this circle to what color on the screen you want to pick.
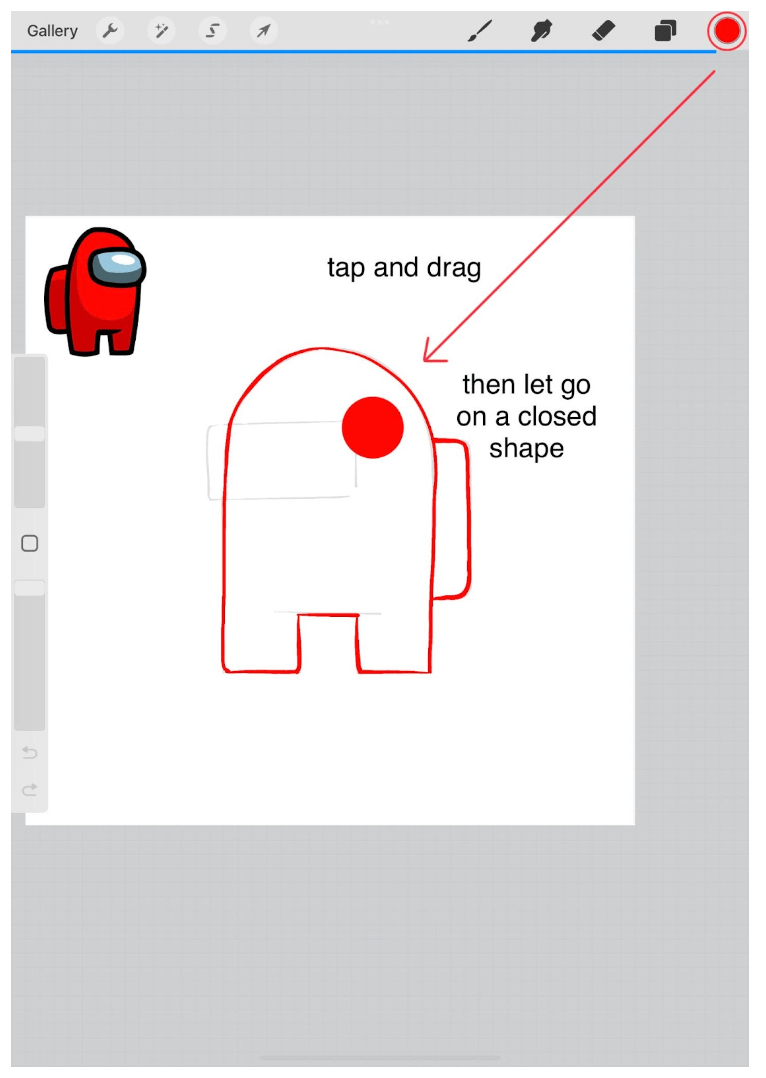
7. Quickly Fill in Color
You can quickly fill in big closed shapes with a single color by pressing down on the color button on the top right corner and drag it to the shape you desire to fill. The color will look like a circle while you drag but once you let go, the shape that it is over will be filled! If the color ends up filling your whole canvas, that means that there was an opening somewhere in your shape. You can undo this action, close the shape up and try again in this case.
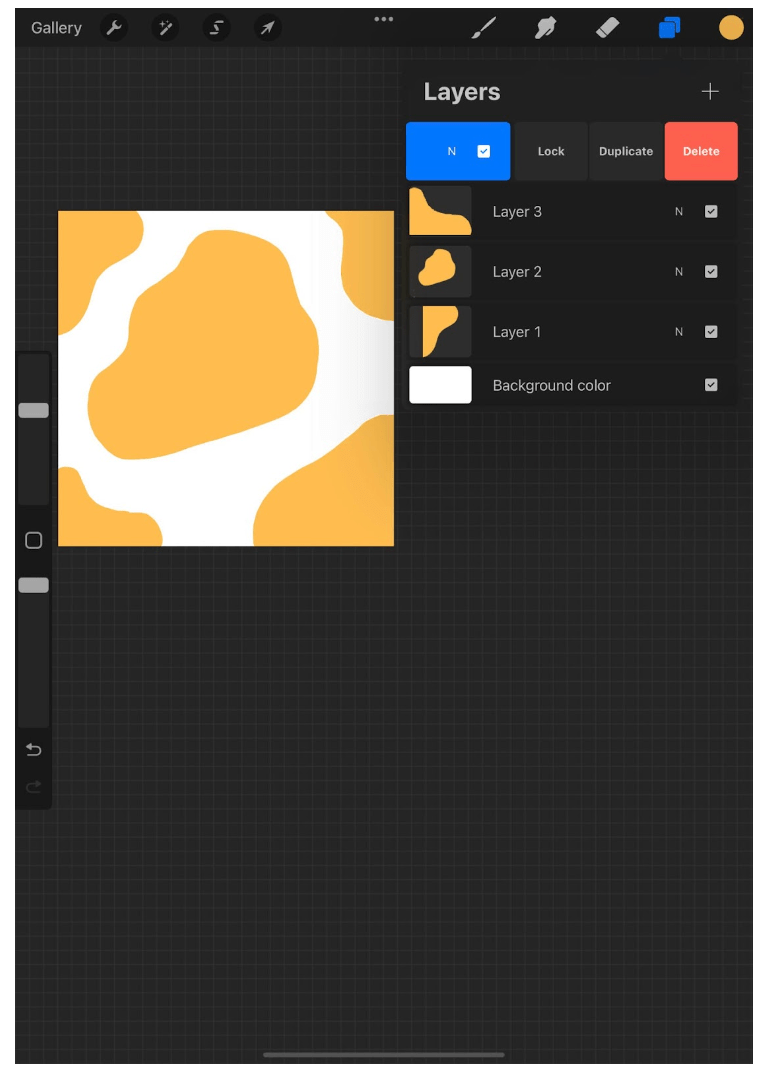
You can do this with each shape you draw. Every character, including the Among Us Characters are made out of different, simple shapes once you break them down like we did in the image below with our layers.
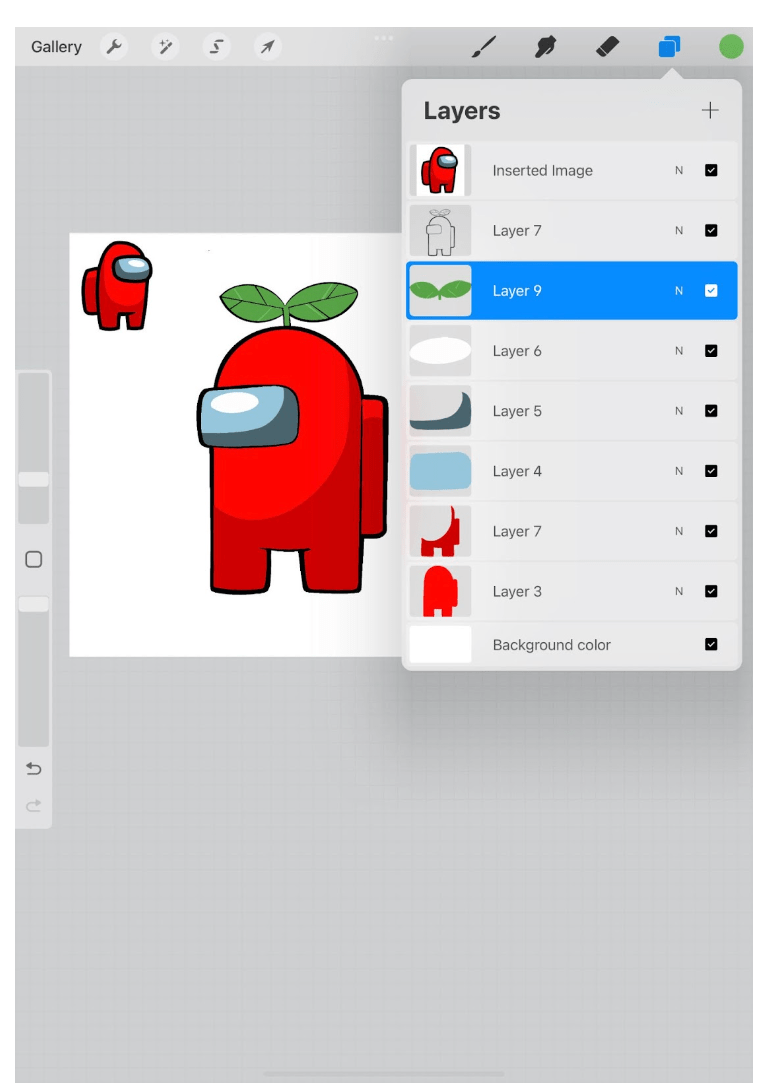
After drawing in the shapes that make up the character and adding black lines to outline it, you have a little Among Us character!
Is Procreate Easy For Beginners?
Yes Procreate can be easy for beginners! Anyone with an interest in art , an iPad and $5 can create on Procreate. There’s no wrong way! Procreate makes it easy to use and learn, and with all the tutorials on the internet (including this one) you’ll be able to master it in no time.
Discover Procreate Tips And Tricks For Beginners
Procreate has made it easier than ever to create professional looking designs quickly and easily. Whether you’re just learning or have been using it for a while, this tutorial will go over the essential and basic tips and tricks for Procreate to help you and your child elevate their designs.
1. Use Quickline for Straight, Continuous Lines
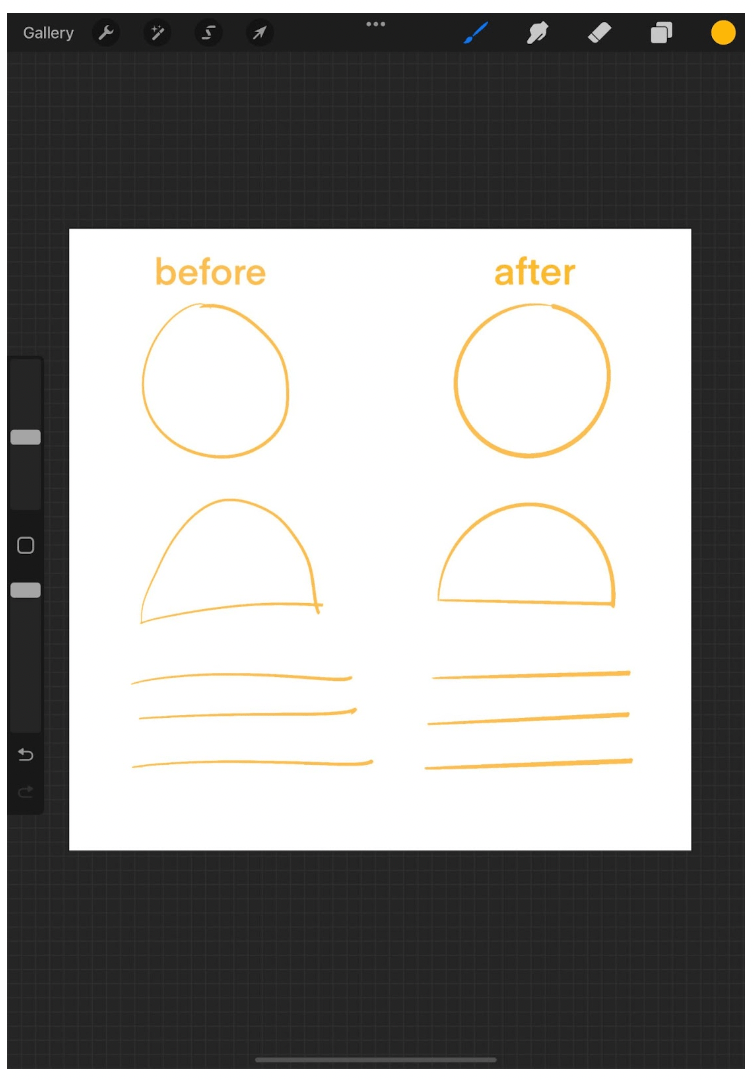
This tool is so helpful to people who have difficulties drawing straight lines. Simply draw a line, curve or circle and hold your Apple pencil on the screen once you are done. The app will then perfect or “stabilize” the lines you have drawn.
2. Use Layers
Layers can add a level of professionalism to your art and can help you stay organized by being able to edit certain details later without it impacting every part of your artwork. To add a layer press the “+” sign right next to the layers panel. You can also access other options for a layer such as delete, lock and duplicate by swiping left on the layer you want to manipulate.
3. Use Blend Modes
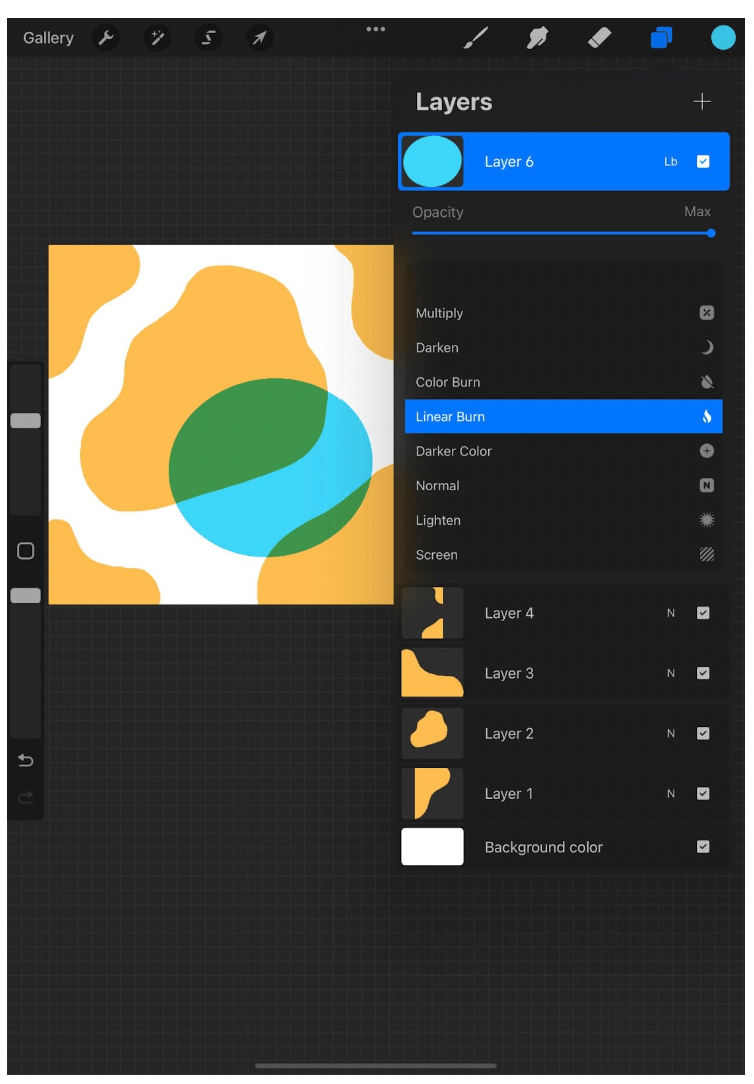
There are tools within each layer that you can use so the different shapes, objects, and textures on each layer can interact with each other in different ways. We call these blend modes. In each layer, you can access blend modes by pressing the “n”. “N” or normal mode is the default blend mode for all layers. You will then see different blending modes such as darken, lighten, control layer opacity and much more. Clicking on them will show a preview of how the layer will interact under that new mode.
4. Take Advantage of Alpha Lock
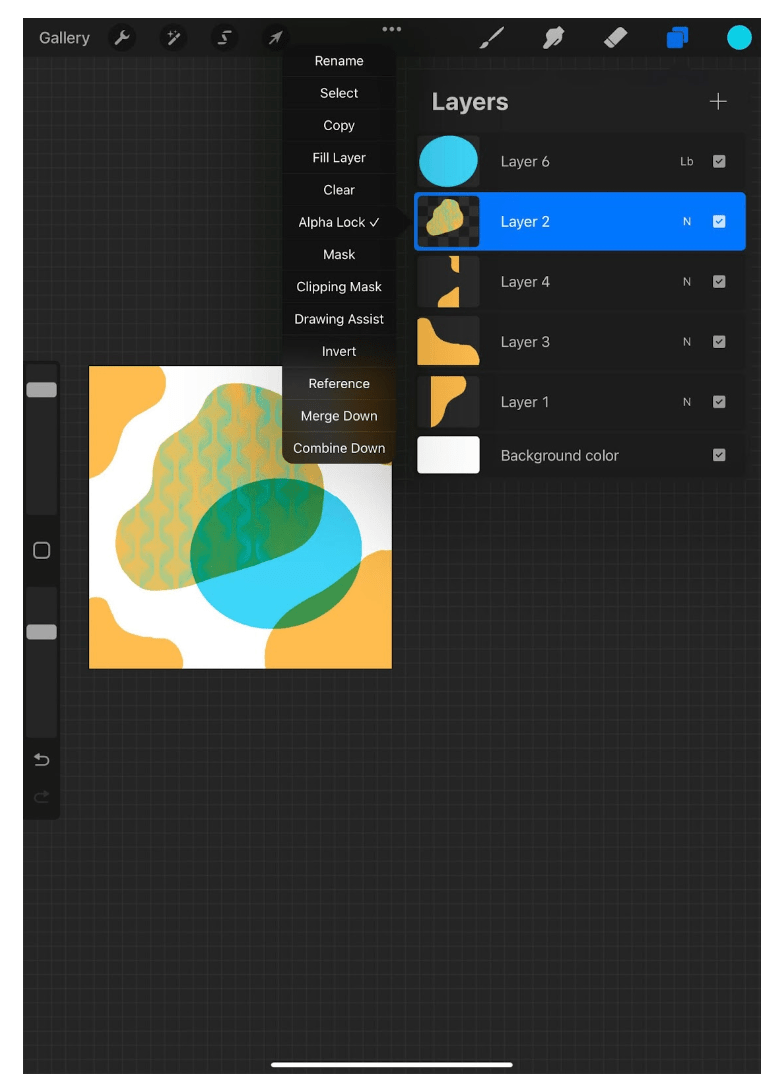
This option is helpful when you want to draw shadows, highlights, and patterns without coloring outside the lines already drawn. Once you have drawn on a layer, tap on the image of the layer you would like to add more details to and select “alpha lock” on the layer. Once “locked” any details you add will stay within the boundaries of your original image.
5. Try Clipping Masks
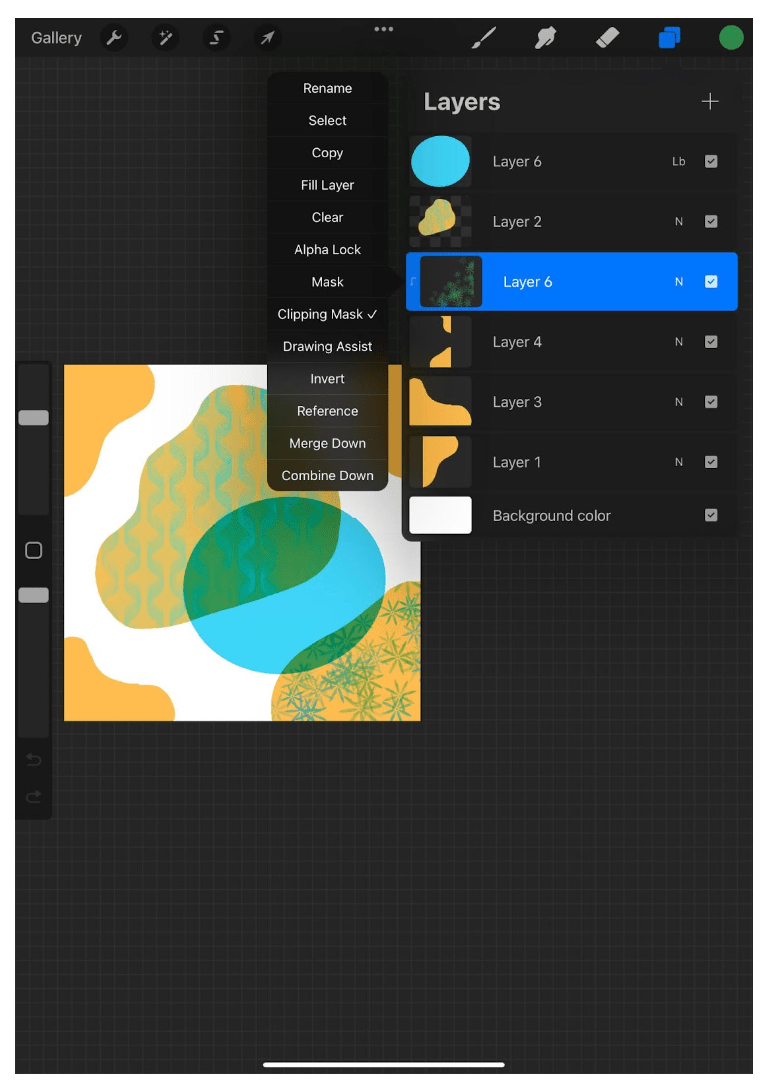
Clipping masks are like an alpha lock but with some key differences. First off, you will be on a new layer! So you will not be impacting your original layer. Add a new layer on top of the layer you want to work on. Select the new layer by tapping on its image and select “clipping mask”. This will “mask” the below image. All new details will be added in the boundaries of the shape below.
Learn More About Digital Design
Up next, learn more about graphic design. Enroll your child in award-winning live online classes led by expert instructors and designed by Silicon Valley professionals with kids in mind. Choose from Budding Digital Artist, Wix Website Design, Imagine and Create with AI Art, and more.
Written by Ashley Velasquez. As a visual learner growing up in the age of technology, she was fascinated by the graphics and videos that would dance on early computer screens. As she started pursuing Visual Communications in college, she found that design involved in translating information, ideas and opinions onto endless platforms.

