Minecraft is a game that offers hundreds, if not thousands, of hours of content for anyone looking for a single-player experience. But nothing quite beats slaying zombies, crafting tools, and building entire worlds with your friends! Today, we will be talking about how to make a Minecraft server: specifically multiplayer servers that you and your friends can connect to and play on together.
A quick note: these instructions are for the current edition of Minecraft. For Minecraft Java, that means 1.21.1; for Minecraft Bedrock, that means 1.21.2; finally, for Minecraft: Pocket Edition, that means 1.1.7. If these instructions become out of date, we’ll make sure to post an update!
To bring everything to life you can imagine in Minecraft, learn Minecraft coding in our fun online classes led live by experts, and designed by professionals from Google, Stanford, and MIT. Enroll your child in our free Minecraft class intro session today!
How To Make A Minecraft Server For Friends
The easiest way to create private multiplayer servers is through Minecraft Realms. Minecraft Realms is a subscription service offered by Minecraft where you and up to ten of your friends can join a private server and play together. It also works for every type of Minecraft, including Java Edition, Bedrock Edition, and even Pocket Edition!
Because it is a subscription service, it unfortunately costs money. However, you can sign up for a 30-day free trial if you and your friends want to test it out. You can find more information about Realms and their subscriptions here.
1. Sign up for Minecraft Realms
You can also sign up for the free trial by going to the Minecraft main menu and clicking on “Minecraft Realms”. From there, you can click on “Add Realm” on the top right of your screen, and then “Free Trial.” You will be directed to the Minecraft website where you will have to sign in with your account and check in with a parent/guardian to get credit card information (and permission!) to sign up for the trial.
2. Set up your realm
Once you have your trial all set, you can begin setting up your realm in Minecraft! Go back to the “Realms” part of the Minecraft menu, and you’ll see an icon that looks like this:

Click on it, and then you’ll provide a name and description for your realm.
3. Create your first world
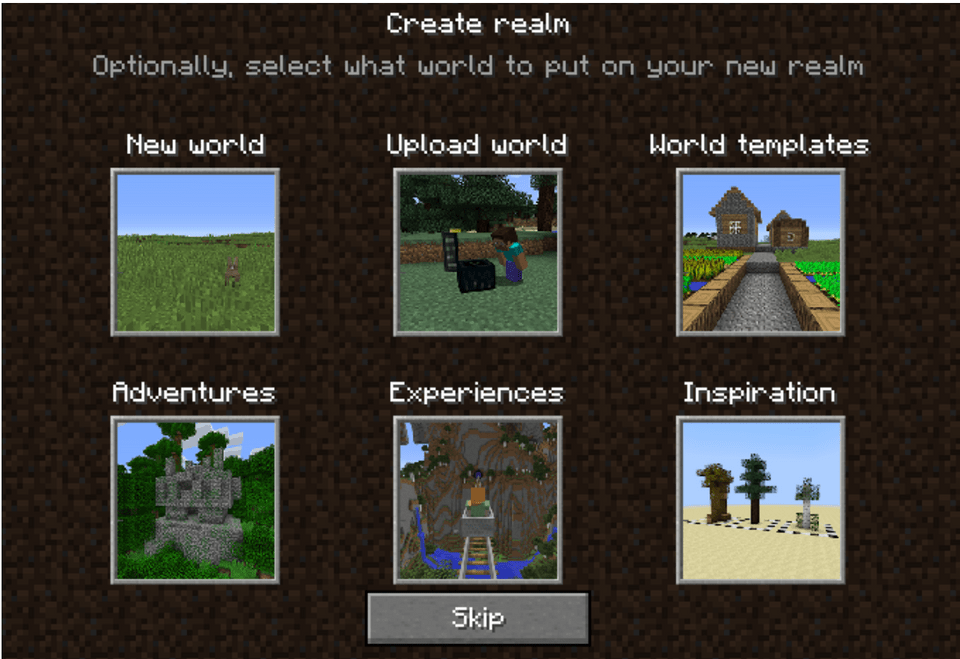
Afterwards, you’ll create your first world on the realm! You’ll be given the following choices:
- New world: making a Minecraft world from scratch the old-fashioned way
- Upload world: taking another Minecraft world that you have on your computer and uploading it to your server
- World templates: use one of Minecraft’s pre-made world
- Adventures: pre-made adventure games made by other Minecraft creators
- Experiences: games and experiences, also made by Minecraft creators
- Inspiration: pre-made structures, placed in the realm to help you and your friends figure out what your next build is going to be!
4. Invite your friends
Once you’ve created the world you want to play in, it’s time to invite your fellow crafters!
- Go back to the “Realms” page, click on your realm, and then click on “Configure realm” on the bottom left.
- Click on “Players” on the top left
- Click on “Invite player”
- Type in the name of the person you want to invite. You’ll have to do this one by one, but you can have a maximum of ten other players, so invite away!
Anyone that you invite to the realm, including yourself, will have access to the realm and all of the worlds on it 24/7!
Something that is worth noting about Minecraft Realms is that while there is some cross-play (playing with friends across different types of devices and editions of Minecraft) available, this method will not allow a Bedrock player to play with a Java player. Likewise, players on the Pocket Edition will also not be able to play with their Java counterparts, but they will be able to play with Bedrock players!
Cross-Platform Play with Java and Bedrock
However thanks to the latest Minecraft updates, Java and Bedrock Edition players can now connect and play together using tools like GeyserMC. GeyserMC acts as a bridge that allows cross-play between Java and Bedrock servers, meaning your friends can join, no matter which version they’re using. Here’s how to set it up:
- Install GeyserMC: Follow GeyserMC’s instructions to set up a cross-platform server.
- Java and Bedrock Together: Once installed, Bedrock players can connect to a Java server seamlessly!
This makes multiplayer gaming easier than ever across versions.
Enhanced Gameplay Options with Minecraft Realms Plus
With the integration of Minecraft Realms Plus, players now have access to even more exciting multiplayer options. Realms Plus includes over 150 pieces of Marketplace content like updated world templates, adventures, and custom experiences. When you set up your server, you can choose from new adventure maps made by Minecraft creators or use templates to jumpstart your builds. These updates offer endless inspiration for you and your friends, making multiplayer gameplay more engaging and creative.
Setting Up A Local Minecraft Server
If you and your friends find yourselves in the same place and on the same wifi, you can play through your LAN, or Local Area Network! Here’s how you do it:
- First, decide which of your friends will host; it should be someone who has a strong enough computer to host the server while also running Minecraft.
- Have the chosen host open up a single player world, either one that has already been created or a new one! Make sure you call the world something that would be recognizable to those you are playing with.
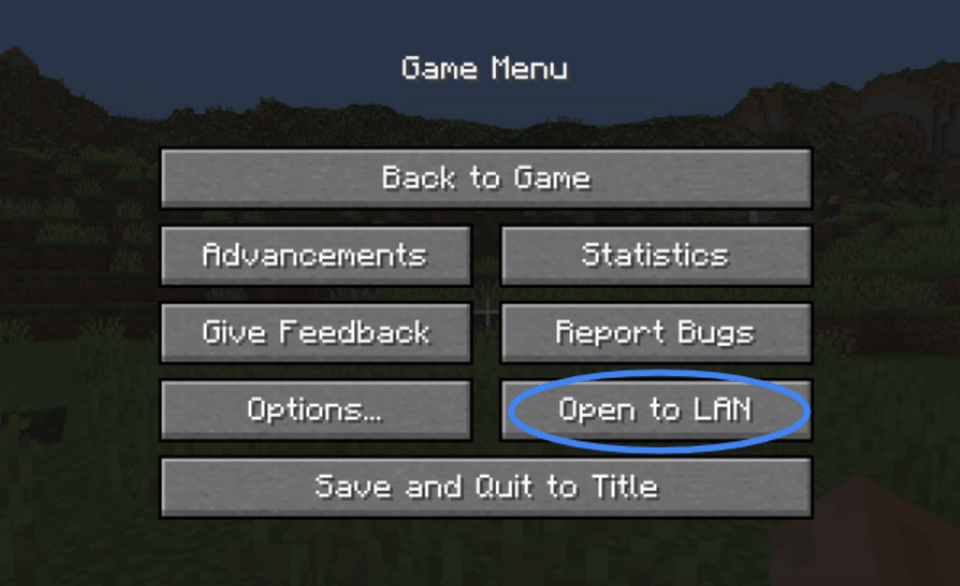
- Click the “escape” key on the top left of your keyboard.
- Click on the “Open to LAN” button. It will then ask the host about settings for the others that will join the server; pick whatever you think is best!
- Now your friends will be able to join! They will be able to find the world through clicking on “Multiplayer” from the main menu.
This is a great method if you are all in the same place and looking for a night of fun and crafting! However, the players won’t have consistent access to this server once they go elsewhere.
Making Your Own Private Minecraft Server
You can also make your own private server by following these instructions made by the Minecraft Help Desk! IMPORTANT: these instructions are very involved and require messing with a few files and changing your network’s configuration. These steps should be done solely by your parents/guardians if they are comfortable with it. If not, you have two great options mentioned above to achieve your goal of making a server with your friends!
Make A Minecraft Server
Enjoy your cooperative crafting! We’ve walked through a few different methods of how we can connect with other Minecraft players to set up private servers. While each has their pros and cons, check in with your friends and parents/guardians to see which one would make the most sense for you. Happy crafting, and we’ll see you next time.
Create anything you can imagine in Minecraft! Enroll your child in our award-winning live online classes for kids, Minecraft Redstone Engineering (Grades 2-5), Minecraft Modding Quest (Grades 2-5), Minecraft Code to Mod (Grades 4-8), and our Minecraft Camps - all led by an expert and designed by professionals from Google, MIT, and Stanford!
Up next, explore the best Minecraft texture packs and learn how to build a Minecraft house.
Written by Create & Learn instructor Jonah Zimmermann. Jonah has focused on creating and teaching computer science, coding, and STEM curricula for elementary and middle school students. In his free time, he enjoys video games and a good Dungeons and Dragons session with friends!