

Today, we're going to learn how to make a memory matching game in Scratch. This game is a classic for a reason. It's so simple, yet presents a challenge that anyone of any age can enjoy. And best of all, games like these exercise our brain. Our brains are just like our muscles: if we work really hard, for example, trying to remember something, or multiple things at once, our brain actually gets 'stronger,' which just means we get smarter!
A veritable classic throughout the ages, long before computers were even invented, you've probably played some version of a memory matching game before. An array of indistinguishable items sit before you, perhaps cards, maybe something like dominoes. When you flip one over, you reveal the pattern or picture on the other side, and the goal is to, on your very next flip, find the other item with the matching pattern or picture on its other side. If the patterns match, you can leave them be and move on to finding another pair. If they don't match however, you must flip them back over, and do your best to remember what was on the other side. Once you've found all the matching pairs, you win!
By the end of this tutorial, you and your child will not only have an awesome game you can play with friends, family, or just by yourself, but also you'll have a game that's easy to build on, change around, make harder, and exercise your brains that much more.
For even more game building fun, enroll your child in our free award-winning live online Accelerated Scratch class, designed by experts from Google, Stanford, and MIT:
Make a memory matching game in Scratch
Let’s learn how to make a memory matching card game in Scratch coding. We're going to put a little twist on our version of the game though: instead of trying to find exact matching images, we'll be trying to find related images, like one half of a sprite with the other half of that sprite. Here's a link to the Finished Project.
In order to do this, we'll work with some blocks you may not often use in Scratch, like Lists, Define Blocks, and Variables "For this Sprite Only." We'll also see how taking some time to think about how our sprites and sprite costumes are organized can have a huge impact on what our actual code looks like. Sometimes, organizing our "data" is just as important as writing good code!
Let’s create a new project in Scratch, and get started!
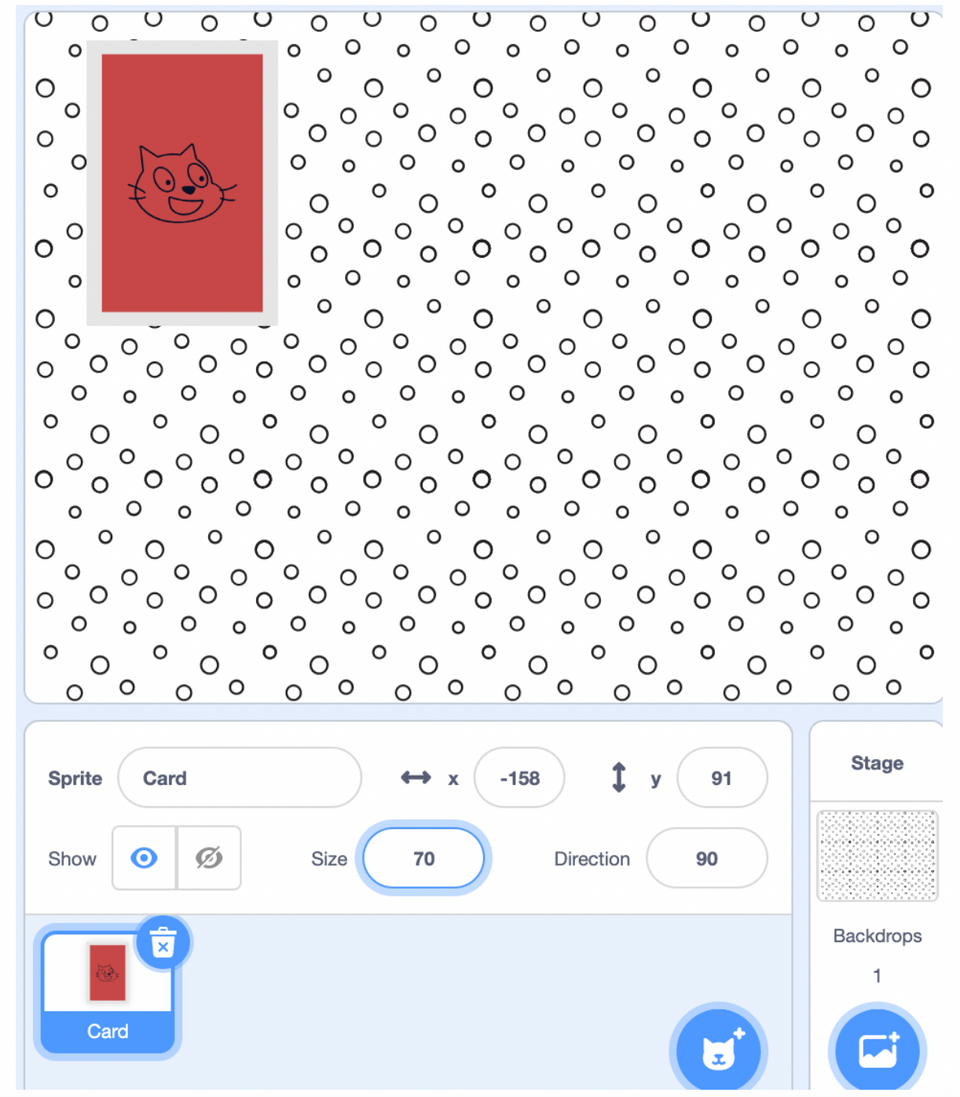
1. Paint a card sprite
Under 'choose a sprite,' let's click 'Paint' and create our own 'card' sprite by using the rectangle tool to make two different colored rectangles in the center, one slightly smaller than the other. You can decorate your card however you like! Once it looks good, make sure to set it to a good size; we want to fit eight cards in our project space for this game. A size of 70 worked for us, but your best size might be bigger or smaller depending on how big you drew your rectangles. This is a good time to pick a cool backdrop, too!


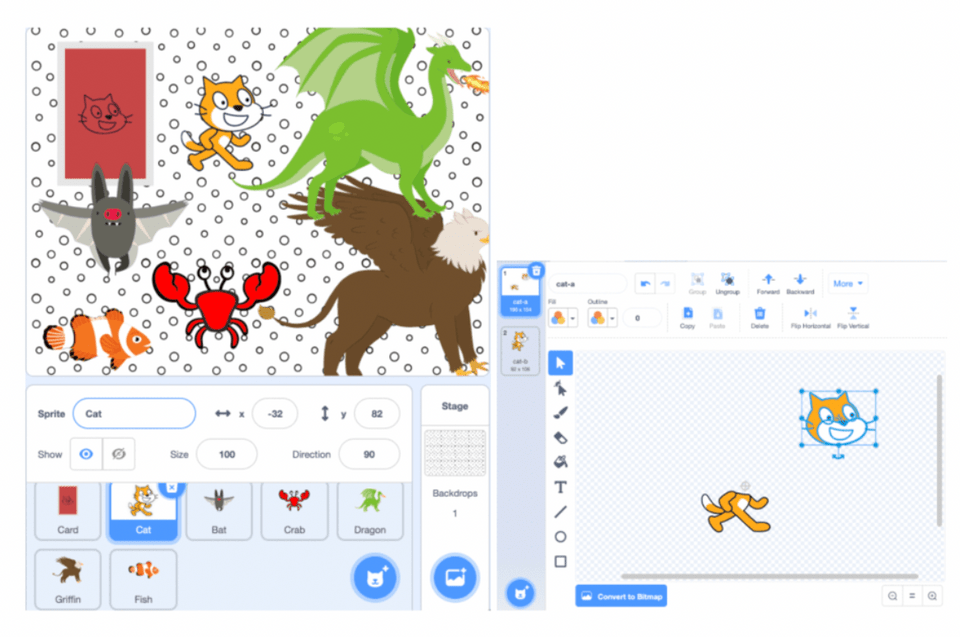
2. Pick your images
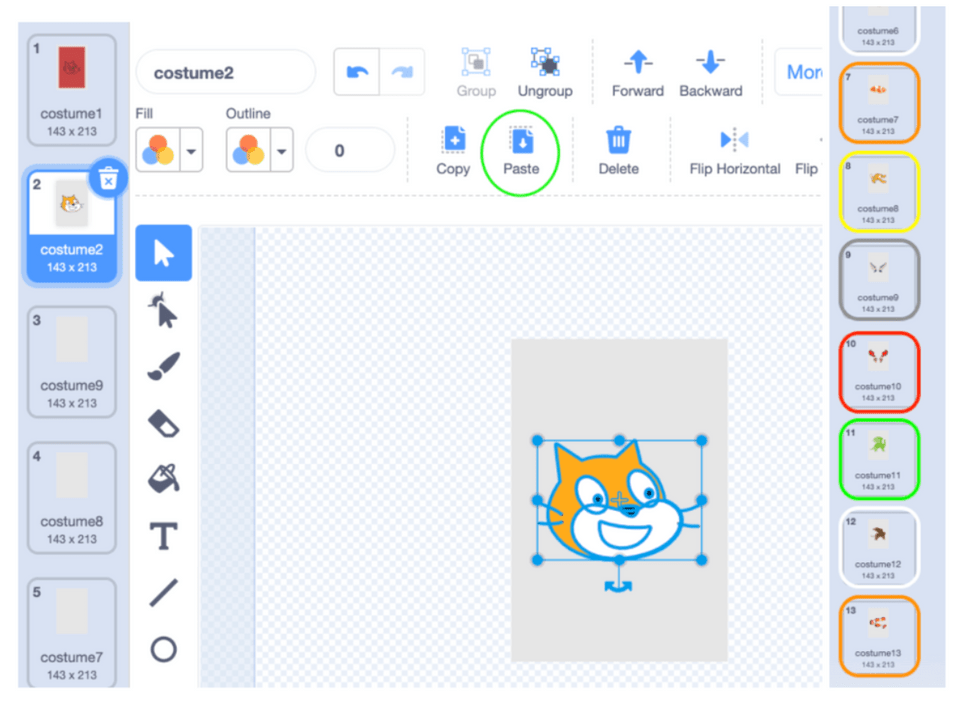
As we said above, we’re making our own cool version of this game. Here's how: we'll pick out six sprites (we're using animal sprites for our version), and the idea is to find sprites that you can easily split up into two pieces, like the Cat has a head and a body, the Bat has a face and the wings, etc. Now let's go into each of those sprites, pick a costume that you like, and, using the pointer tool, split it into two pieces.
Tip: if you hold down the "Shift" key when you're clicking on sprite pieces, you can select more than one at a time.
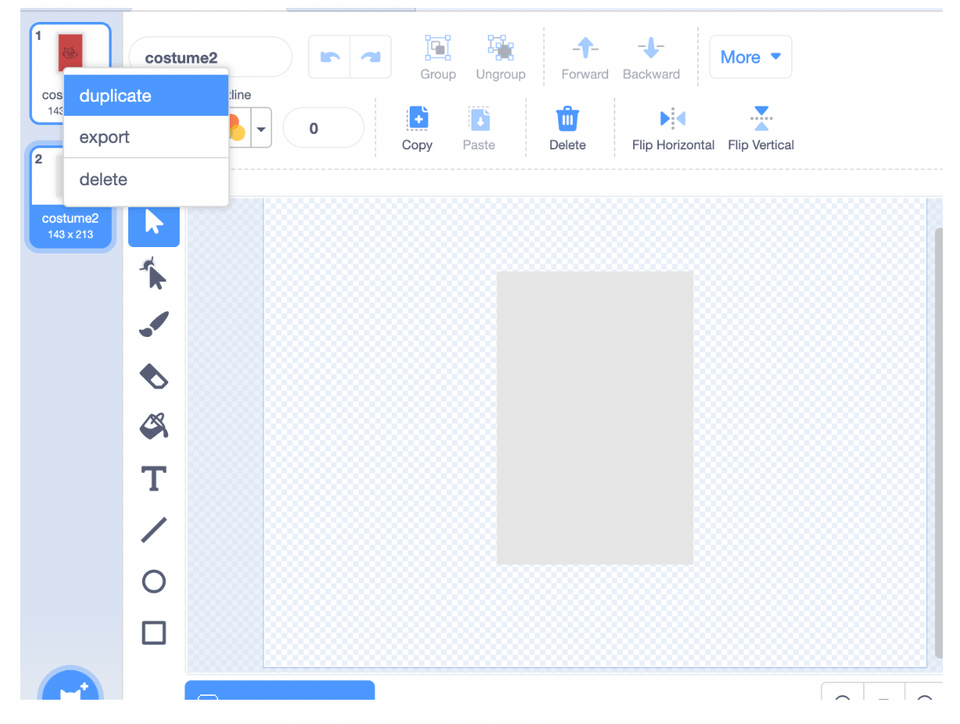
3. Create costumes for your card sprite
This step is important! Our code will rely on the way we set up our costumes. In our Card sprite, duplicate the costume, and remove everything but the first big rectangle. This will give us a 'blank' card. Let's duplicate that blank costume 11 more times, so we have 12 blanks in total.
Now let's go back to the sprites we split up. For each sprite, copy the 'head' of the costume, and paste it into a blank card. Important: start with the first blank costume in your card sprite, and make sure to go in order! We should have six card costumes with six 'heads' now. For the next six blank costumes, copy the 'body' half of your sprites. Make sure to go in the same order you went in for the 'heads!'
If everything is correct, your matching pairs should all be six costumes apart from one another. For example, if your cat 'head' is the second costume, the cat 'body' should be the eighth costume (2 + 6 = 8). You can delete your other sprites now, we just needed them for copying and pasting!
We'll see later on just how important this setup is. We're ready to jump into our code now!
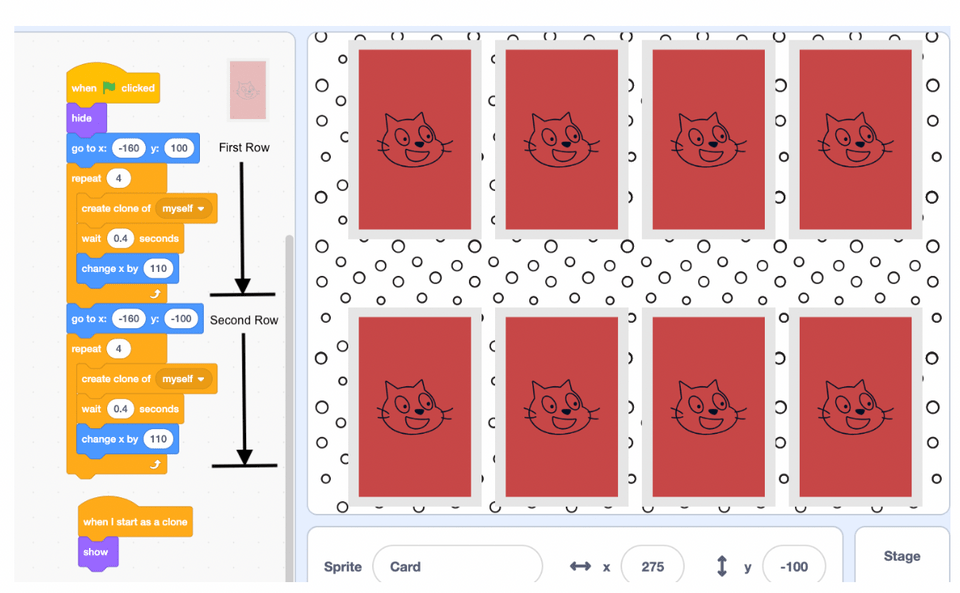
4. "Deal" the cards
Since we just have one card sprite, we'll need to use cloning to create eight cards for our game. We want our clones spread out across the project space when they're created. How will our card clones know where to go though?
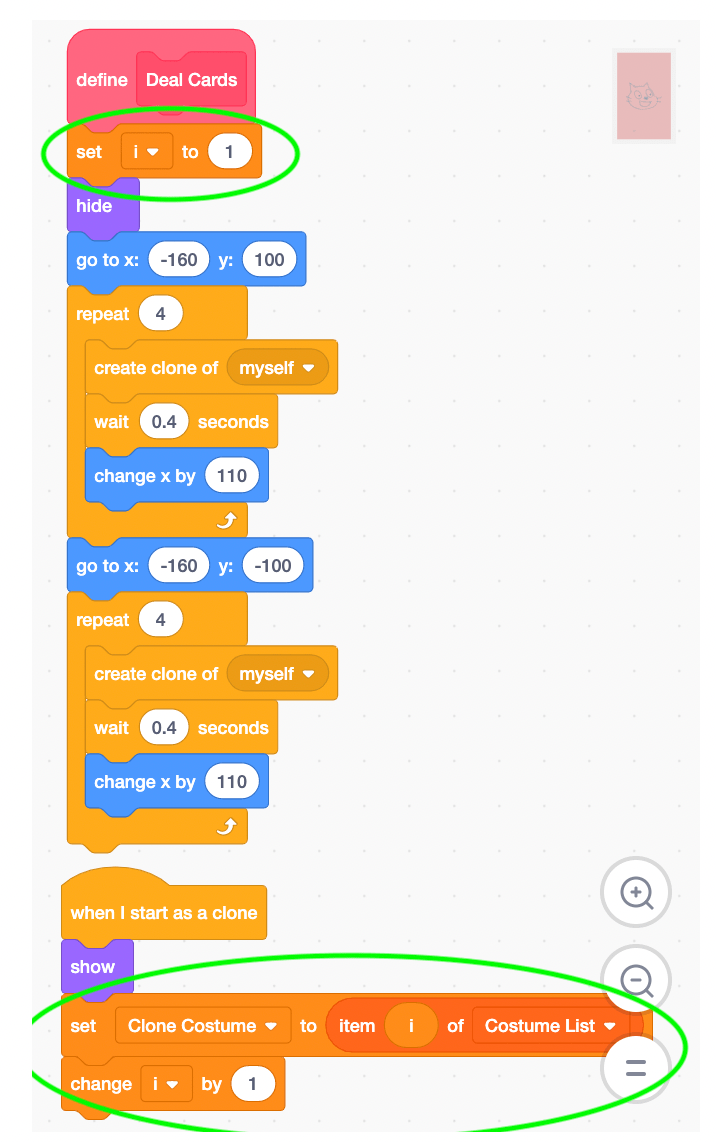
Instead of moving our clones, it will be easier just to move the original sprite, and clone it in a new spot each time. Let's start our first card at (X: -160, Y: 100), and tell it to move over by (X: 110) each time. We'll create four clones in the first row (Y: 100) and four clones in the second row (Y: -100). The only thing we have to tell our clones to do (for now) is show up!
5. Organize your code
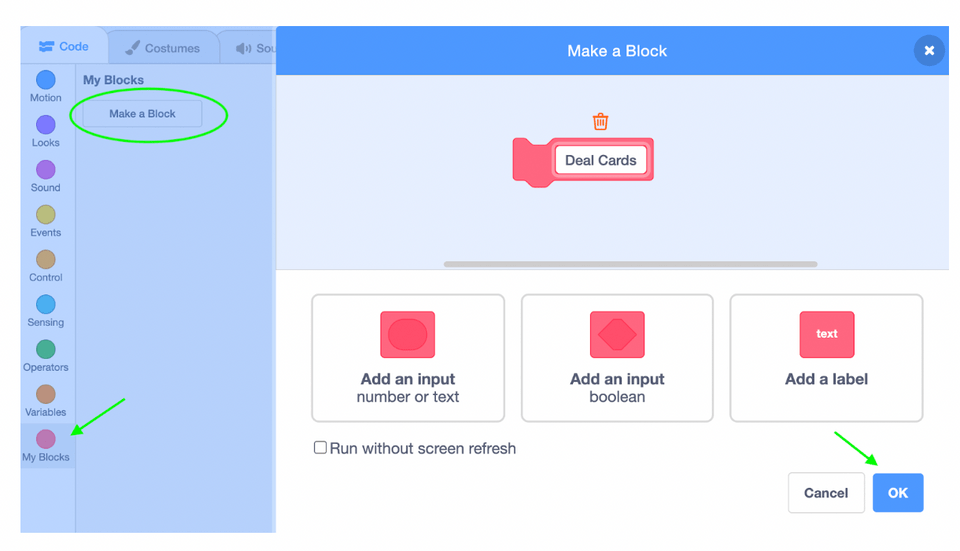
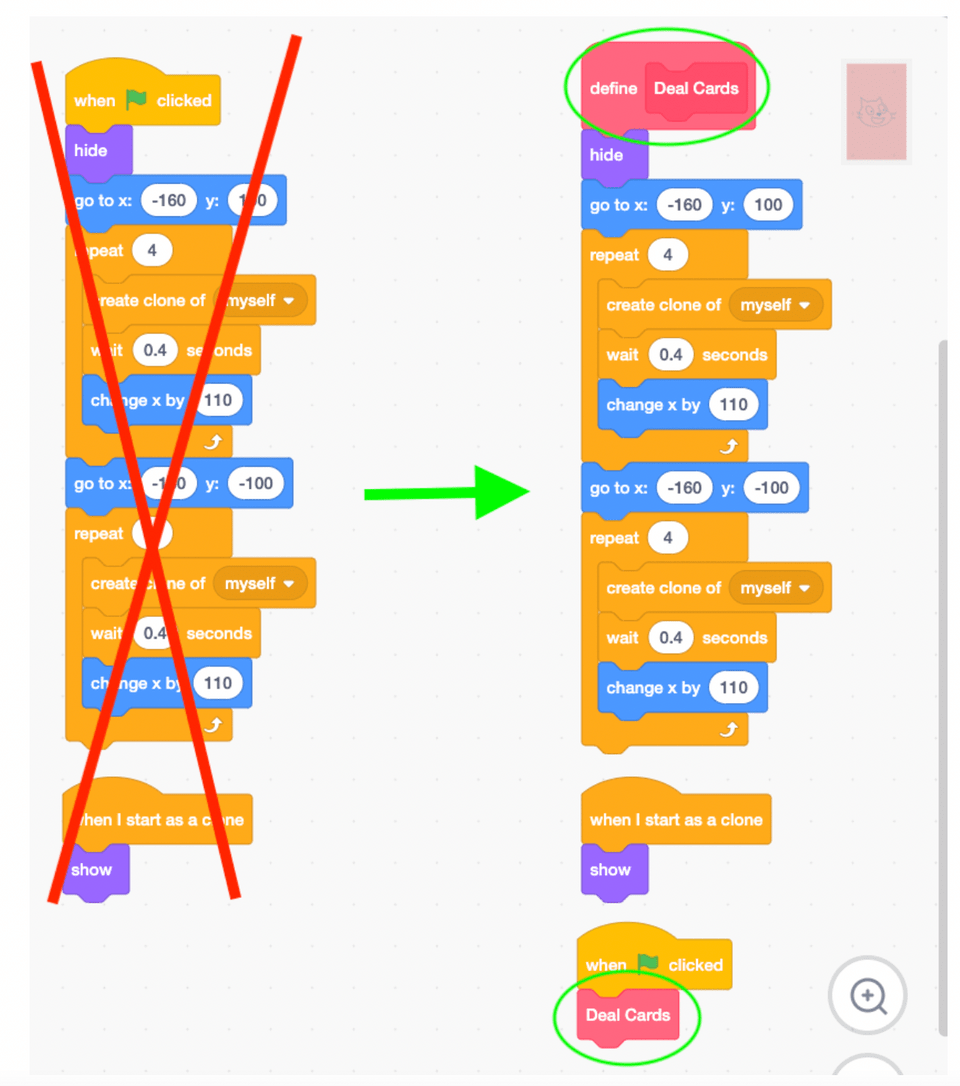
It's never too early in a project to start organizing! Often in fact, the earlier you start organizing, the easier your project will be to build. We're not going to write much new code in this step, just move code around. We're going to take the code we just wrote to "Deal" our cards, and put it under a Define Block.
Define Blocks are a great way to organize code. When we "Make a Block" in Scratch, we get two pink blocks, one big "Define" block in our coding area, and one small block on the left. Whenever you use the small block in your code, whatever code you put under its big Define block will trigger. So when we read our code now, instead of seeing a bunch of code blocks under "When Green Flag Clicked," all we see now is "Deal Cards." Nothing really changed in our project, but it makes a lot more sense when we read what happens when we click the green flag!
If you have a bunch of code blocks that are responsible for one task, you should consider creating a Define Block for that code. We'll see in the next few steps why using a define block will help us keep our code cleaner, too.
Now that we have our cards in the right spot, we need to figure out which costume each card will have. We'll do this by first making a List of all the costumes we need to use for the game, and then use that List to assign each card clone a different costume.
A list in Scratch is another type of variable, but instead of having one value, a list can contain multiple values. This is really handy when we have a lot of different, but related variables we need to perform the same operation with. Our related variables here are the costume numbers in our card sprite, and the operation we want to perform is assigning that number to a card clone.
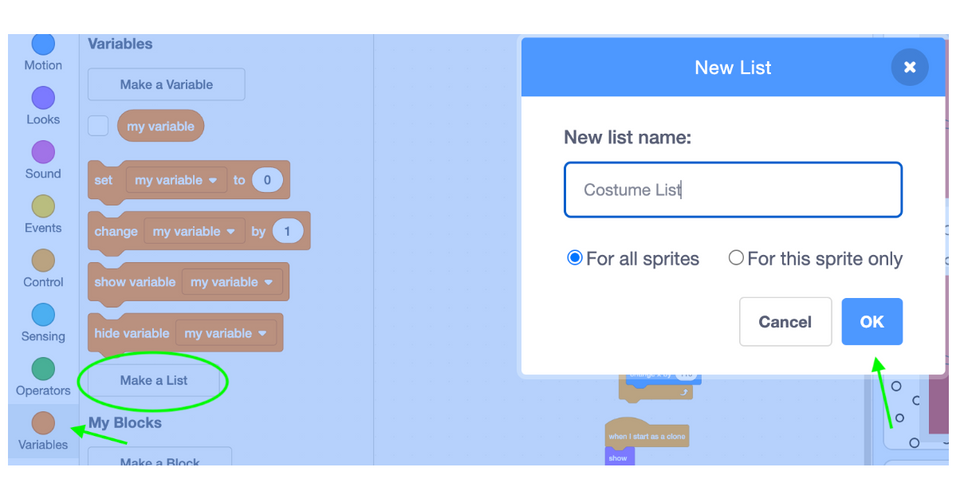
6. Create your costume list
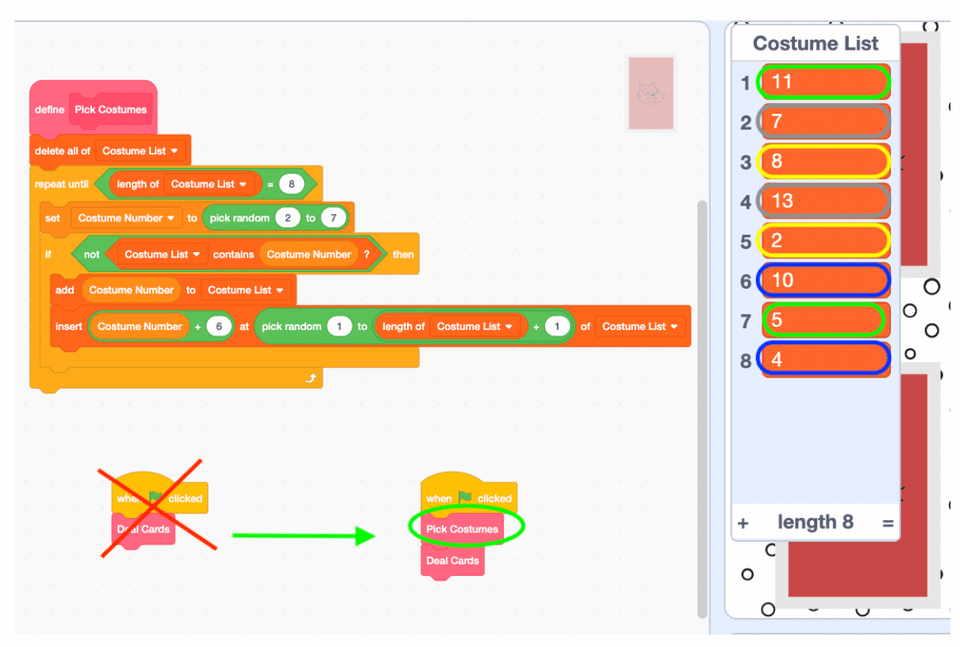
Make a new List called 'Costume List,' and a new Define block called 'Pick Costumes.' Our game should be different every time we play it, so we want to pick random numbers for our costumes. There are two problems we have to solve though. First, we don't want to have the same costume come up twice, so no duplicates. Second, we have to make sure each costume's matching is in the list so we can make a pair!
Under the 'Pick Costumes' Define block, we'll first 'Delete all of Costume List,' so we get a new list every time we play the game. Then we'll use a new variable named 'Costume Number' to help us out. Until we have 8 items in our list ('repeat until length of Costume List = 8'), we want to assign 'Costume Number' a random number between 2 and 7 (these are all the 'head' costumes in our Card sprite).
If that random number isn't already in our list ('not Card List contains Costume Number'), we'll add it to the list, and make sure to add its matching pair as well. We know all the matching pairs are 6 costumes away from each other ('Costume Number + 6'), and we use an "Insert" block with a "pick random" to make sure we're not putting these two numbers next to each other in the list. When we 'add' something to a list in Scratch, we just put it at the end of the list, but when we 'insert' something into a list in Scratch, we can put it wherever we want.
We should end up with a list of four matching pairs in complete random order! Let's 'Pick Costumes' before we 'Deal Cards' under our "When Green Flag Clicked."
7. Assign costume numbers to card clones
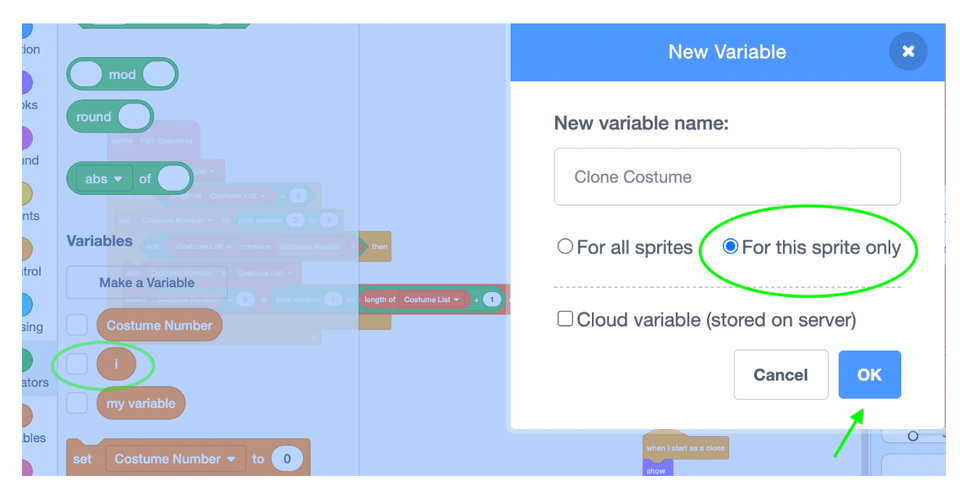
Now that we have a list of all the costume numbers we need, we have to assign each card clone a different number. When the player clicks on a card to flip it over, it should change its costume to a number on that list, and the same card clone has to change to the same costume every time! We're going to create two more variables to help us out here. Let's first create a variable called 'i'. The 'i' stands for 'item,' and this will help us go through our Costume List one item at a time as we assign each clone a new costume number.
Our other variable we can call 'Costume Number,' but this variable, unlike all the others, is "For this Sprite Only." When we use a variable "For this Sprite Only" on a clone, that clone gets its own copy of that variable. So when we clone our card sprite and set the value of 'Clone Costume,' we're not changing the value of that variable for any other clone. Each clone gets to have its own, independent Clone Costume!
Under 'When I start as a clone,' let's set the 'Clone Costume' of the clone. We'll use our 'i' variable to go through our 'Costume Number' list one item at a time. If we set 'i' to one before we start cloning, and change 'i' by one every time we create a clone, then the first clone will be assigned the first number in our list, the second clone will be assigned the second item in our list, and so on.
Ok, now we have all of our cards laid out, and each card has been assigned a different costume. We know that we have four matching pairs, and we have no idea which cards are paired with which. We only have one more big task in front of us: we need to actually be able to play the game!
Whenever the player clicks on a card, it should switch to its assigned costume. After two cards have been selected, we'll check to see if the costumes match up. If they do, we can leave them that way. If they don't though, we'll switch the costumes back, or 'flip' the cards.
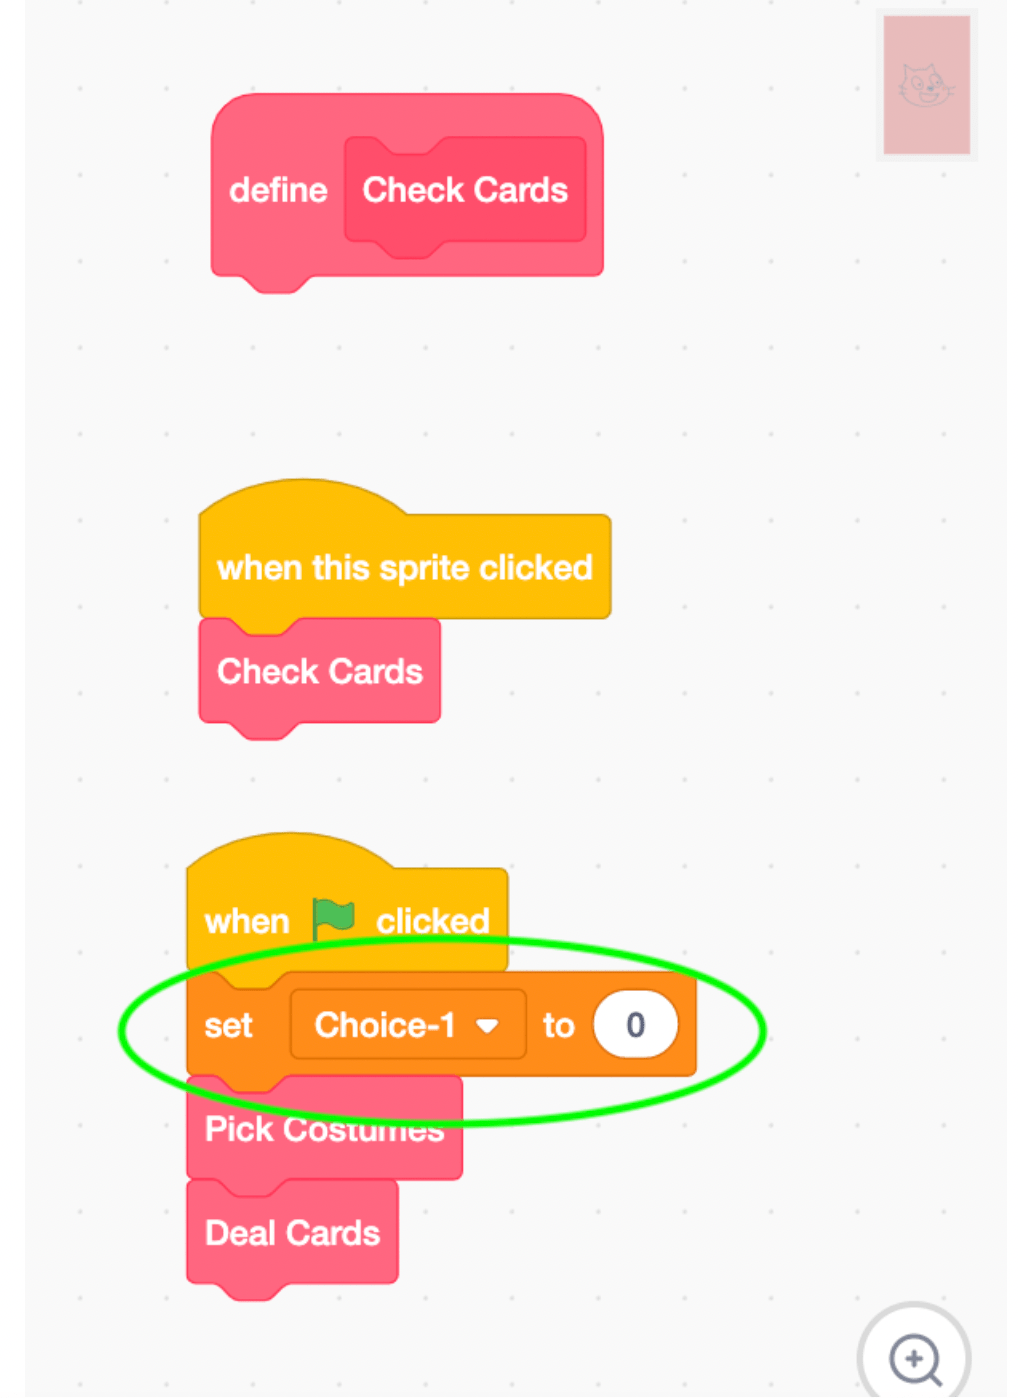
8. Create 'check cards' define block and choice variables
One more define block to organize our code: let's create the Check Cards define block, and do this whenever a clone is clicked. We'll create two more variables as well. One to store the players first choice (Choice-1), and the other to store the players second choice (Choice-2). Let's set Choice-1 to zero when we click the green flag; we'll see why in the next step.
9. Start writing the 'check cards' define block
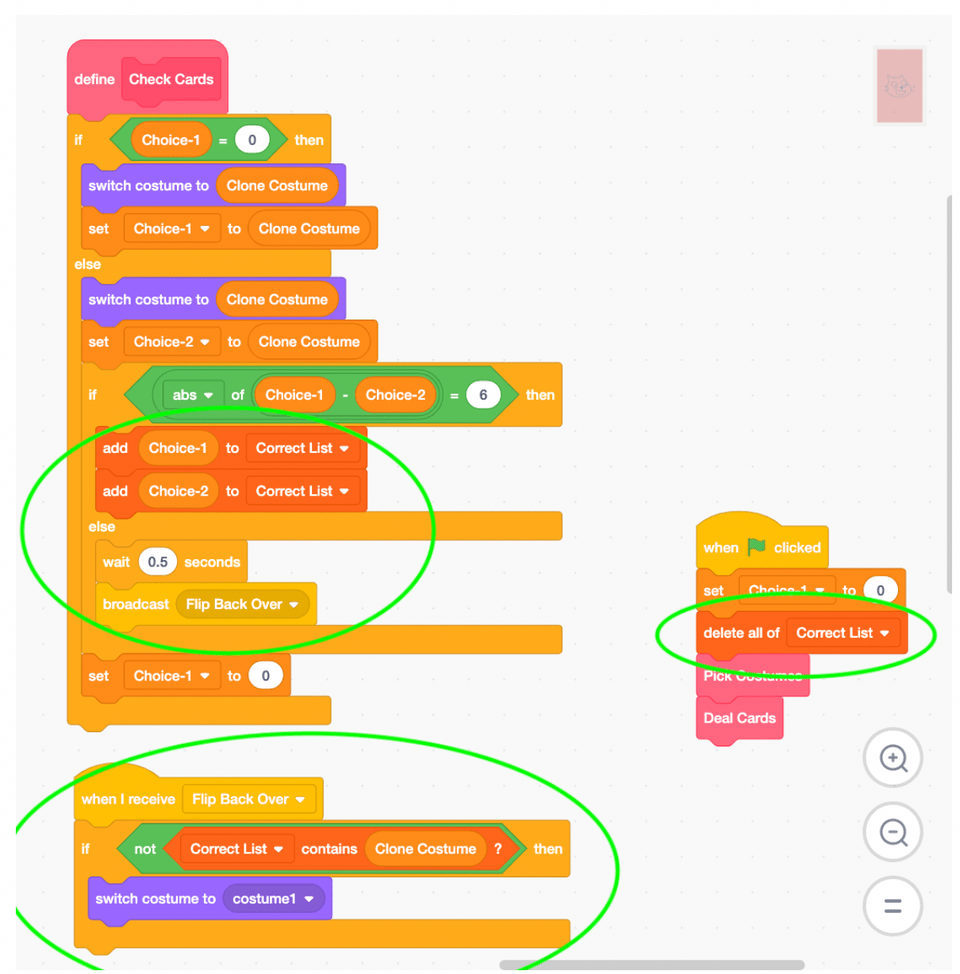
Let's fill in this Define block. Remember, we're going to execute this code every time a card is clicked. Every time a card is clicked, it should switch to its Clone Costume, but if this is the player's second choice, then we also need to determine if they got a match or not. We'll use the value of Choice-1 to help us determine if this is their first or second choice.
If Choice-1 = 0, then let's 'flip' the card by switching its costume, and set Choice-1 to that Clone Costume number. If Choice-1 does not equal zero, then it must be the player's second choice, so we'll switch the costume, set Choice-2, and then check for a match.
We'll check for a match by calculating the distance between Choice-1 and Choice-2. Remember, each costume in our sprite is six costumes away from its match. We can use the 'abs' block to calculate distance. 'abs' stands for Absolute Value, and it's useful when we want to figure out how far apart two numbers are.
Let's take 8 and 2. These numbers are 6 apart, and we can find that by 8 - 2 = 6. But what if we did 2 - 8 instead? Now the answer is -6, but two things can't be a negative distance apart! Absolute Value turns a negative number into a positive number for us. So when we check if 'Choice-1 - Choice-2 = 6', it doesn't matter if Choice-1 is less than Choice-2, we'll still get 6 if it's a match.
Let's set Choice-1 back to zero at the end of our code to get ready for the player's next two choices.

10. Finish writing the 'check cards' define block
We have an 'if-then-else' block to fill in. Our 'then' section assumes that the player found a match, and the 'else' section assumes that the player did not find a match. Let's create a new List called "Correct List" where we'll store all of the cards the player already matched. When they get a match, add Choice-1 and Choice-2 to Correct List.
When they don't get a match, let's wait a moment so the player realizes the cards are different, then we'll 'flip' them back over. The easiest way to do this is just to ask every card to flip back over, as long as it's not already in the Correct List. We'll tell every clone to flip over by Broadcasting a message, "Flip Back Over." When each clone receives this message, it will check to see if its Clone Costume number is in Correct List, and if it isn't, it will switch its costume back.
We also have to make sure to delete all of our 'Correct List' whenever a new game starts. There are a lot of places we could put this code block, but let's just add it to our 'When Green Flag Clicked.'
Ok, we should have a working game now. Woo hoo! Let's spruce it up by checking to see if the player has won, adding some sounds, and adding a cool animation.
11. Check for win
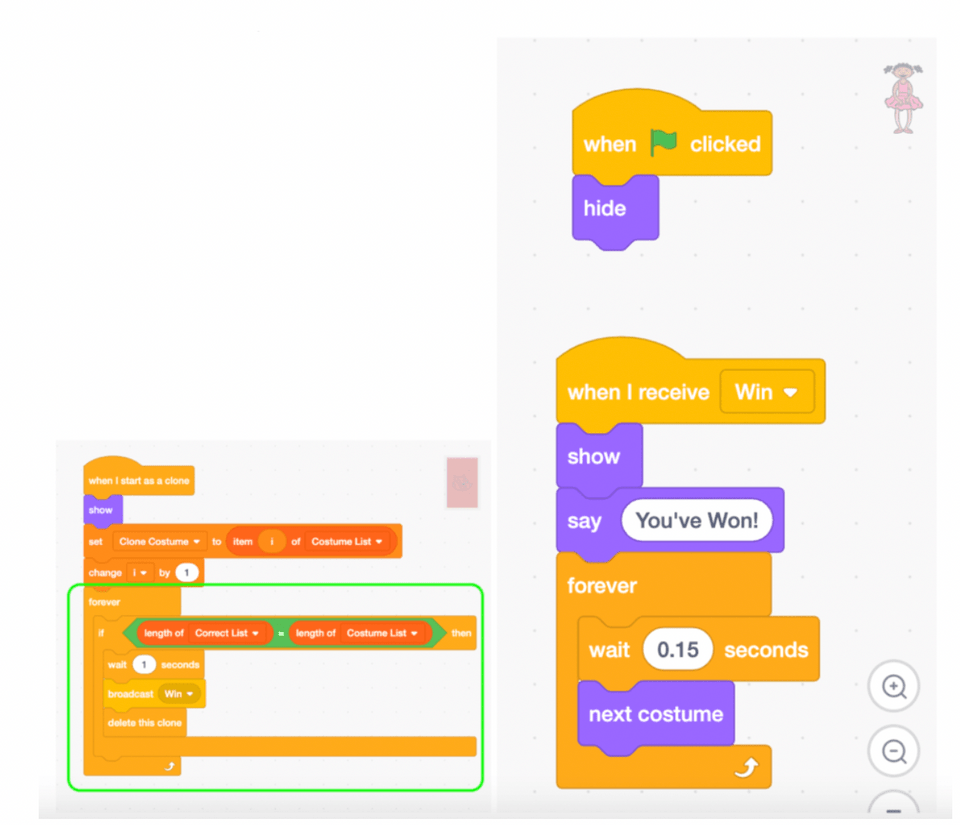
With our Correct List, we have a really easy way of checking when the player wins: if our Correct List is the same length of our Costume List. Let's add code under "When I start as a clone" to forever check to see if these two list lengths are equal. If they are, we can wait a second, and delete the card clones.
For added celebration, we can add another sprite to this project. We'll pick the Ballerina for her celebratory animations. Let's broadcast a 'Win' message, and show our new sprite when it receives this message.
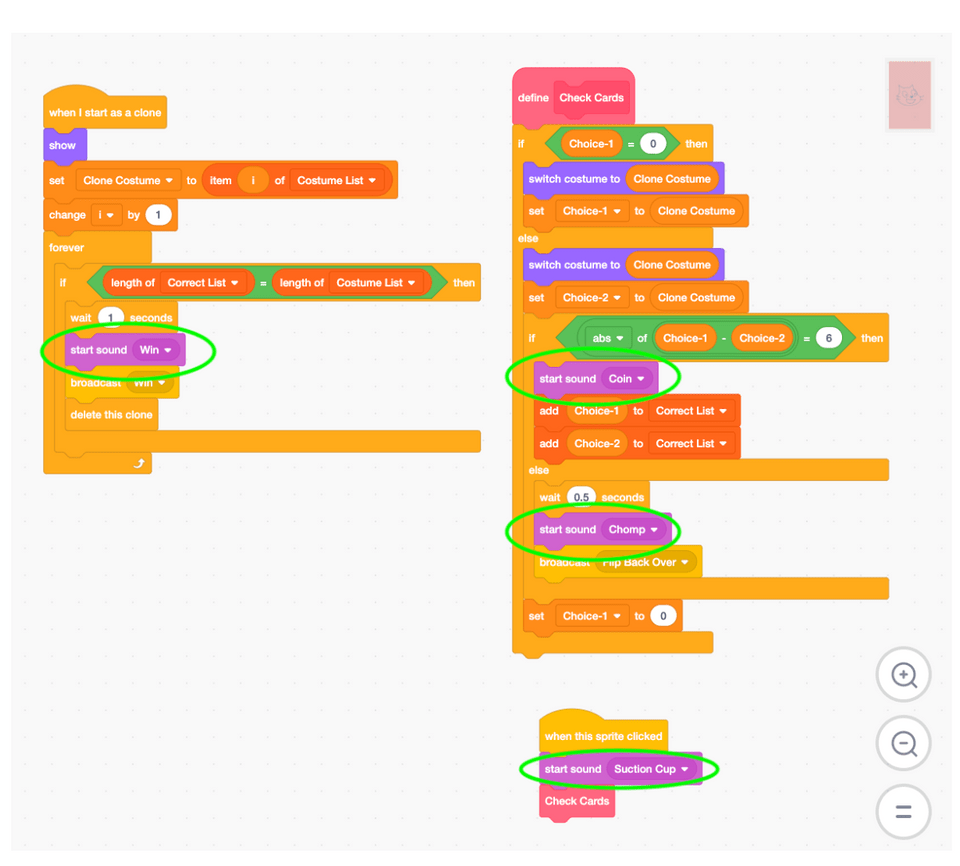
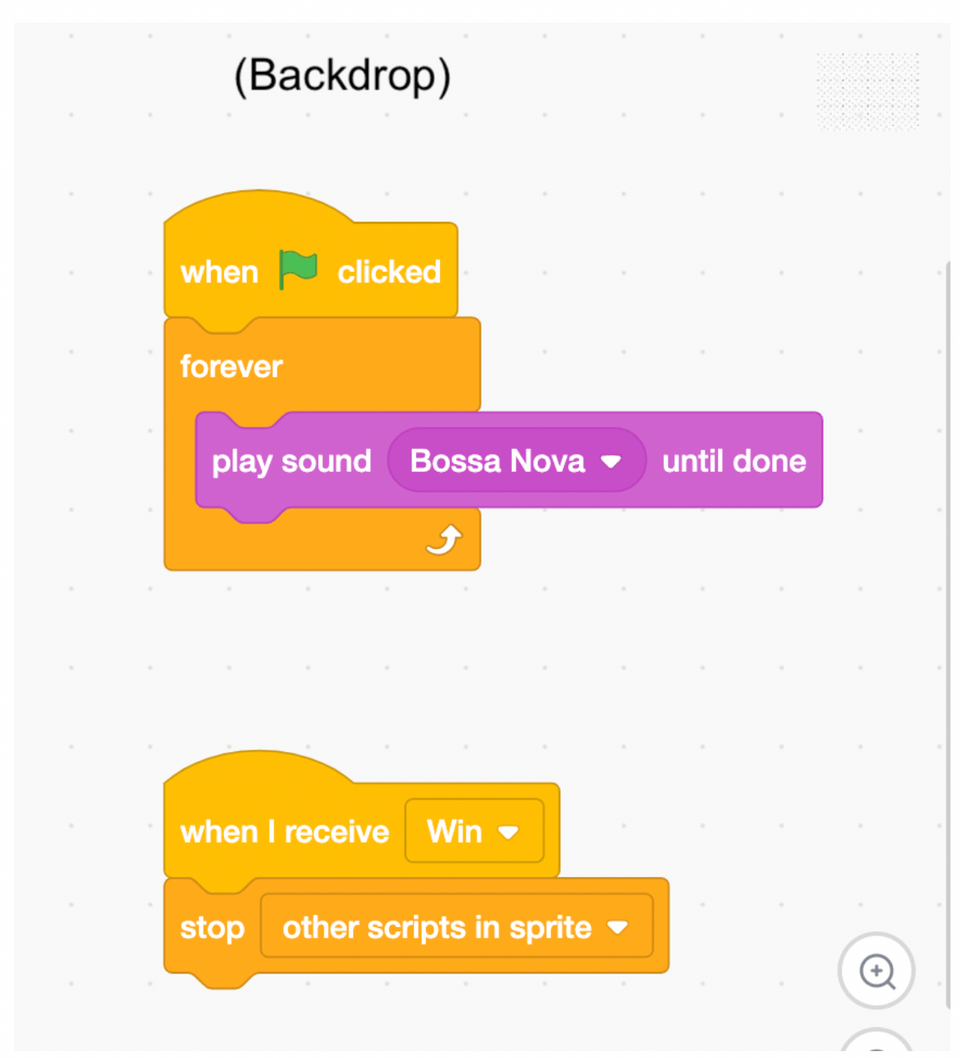
12. Add sound and background music
Feel free to get creative on this step, but here are some suggestions. Let's add a sound whenever: the player clicks a card, the player gets a match, the player doesn't get a match, and the player wins. We can add background music to the Backdrop too, and stop it when the player wins.
13. Add animation
Ok, this step is tricky, but having come this far, we know you can handle it! Right now our cards just show up out of nowhere on the screen when the green flag is clicked. That's fine and all, but wouldn't it be cooler if each card started in the same spot and glided to its position, as if someone were actually taking a deck of cards and spreading them out on a table? Let's do that.
We're going to modify our code under 'Deal Cards' and 'When I start as a clone.' Instead of telling the original sprite to move and then clone it, we're just going to clone our original sprite eight times and tell the clones to move. So each time we create a clone, we need the same code to tell the clone to go to a different spot. Sounds like a job for a variable!
Let's create a variable, ‘X-Multiplier.’ We know each clone is (X: 110) apart. So the first clone is at (X: -160), the second clone is at (X: -160 + 110), and the third clone is at (X: -160 + 110 + 110). That's the same as saying the first clone is at (X: -160 + (0 * 110)), the second clone is at (X: -160 + (1 * 110)), and the third clone is at (X: -160 + (2 * 110)). The Y value for these clones will be at 100 for the first four, and -100 for the last four, so we'll write an 'if-then-else' statement to move the first four clones to (X: -160 + (X-Multiplier * 110), Y: 100), and the last four clones to (X: -160 + ((X-Multiplier-4) * 110), Y: -100). We subtract 4 from X-Multiplier in our 'else' statement to start at the left side of the screen again.
Now we should have a cool animation to start our game, and make the player feel like they're actually sitting in front of a real deck of cards!
Alright, playing this game might be great exercise for our brain, but we think it's safe to say that coding it has been even more exercise! Well done. The fun doesn't stop here though; the way we've built our game today has given us a lot of room for customization!
Ideas for Making a Memory Matching Game in Scratch Your Own
There are countless ways to customize and modify this game to make it harder, more interesting, or simply unique. Coding for kids can always creative!
1. Change the costumes
Because the matching pairs in our game don't actually have to be the same image, you have a lot of freedom in choosing which pairs to use. What other types of matching pairs could make this game even more of a mental challenge?
Perhaps some simple math problems, to test our memory and our math skills at the same time. Maybe you could play with geography and landmarks, like match Paris with the Eiffel Tower, or Egypt with the Great Pyramid of Giza. This would be a great game to test vocabulary as well, and ace that English test you have coming up. The possibilities are endless! We can have as many matching pairs as we want, as long as the costumes are all the same distance apart.
2. Add levels
Since we're just using one card sprite and cloning it, there's really no limit to how many cards we can play with at once. Maybe after beating the game with eight cards, a new round starts with 16 cards. Can you beat it with 32 cards? 64? You'll have to think about what variables you'll need to add to determine the amount of cards, the size of the cards, and where they go.
3. Add a timer, and a score
We have a way to win our game, but no way to lose. Memorizing is one thing, but memorizing under pressure is a whole new challenge! Add a Timer to this game so the player needs to hurry to find all the matching pairs. And perhaps they get a point for every pair they match, or perhaps their score depends on how fast they matched them all. Since you're the programmer, it's up to you!
4. Find bugs, and fix them
A good programmer knows how to break a game, how to discover bugs and glitches in the code to play it in a way that wasn't intended. Our game has a few potential glitches in it right now, like what happens if we click the cards too fast. A great programmer knows how to stop a good programmer from breaking the game! Add code that prevents the player from flipping more than two cards at a time, flipping the same card twice, or flipping cards while they're still gliding at the beginning. Are there any other bugs you can find?
Make Your Fun Memory Matching Game in Scratch
Today we used some fairly complex code to build a simple memory matching game in Scratch that's easy to modify and expand on. We utilized Lists in Scratch to group related values together, and do a lot of cool stuff with just a little bit of code. We used variables 'For This Sprite Only' to give each of our clones in the game an independent copy of that same variable. We harnessed the power of Define Blocks to keep our code organized, and to make sure that no single code chunk gets too long and hard to read. And most importantly, we have an awesome game that can not only test our memory, but also test us on whatever subject we want it to!
If you enjoyed this tutorial, we've got plenty of other awesome games to build in Scratch, such as Pacman. And if you had fun building this game, then you'll have a blast in our Accelerated Scratch class, where you'll really put your coding skills to the test, and learn everything you need to know to make the coolest - and if you like - most complicated of games! Alright kids, great job today.
Written by Ian Kuzmik, a Create & Learn instructor with a Bachelor's Degree in English from Tulane University. He's been teaching grades K-8 since 2019, with a focus in the subjects of ESL and Computer Science.

