
Flappy Bird is a super fun game and it is not hard to make it in Scratch. Today let’s build a Flappy Bird game together in Scratch! I’ll show you how to control the bird with the space key, build moving pillars, and update the score every time the bird flies through them. This is an intermediate level Scratch project.
If your kid enjoys creating games, explore award-winning online Scratch coding classes, led live by an expert, and designed by professionals from Google, Stanford, and MIT. Join a free online Scratch class to learn with a great instructor and get all the help needed to jumpstart on Scratch coding.
Check out upcoming free computer science events for kids led by tech experts: past events have featured guests from Pixar, NASA, Google, and more.
How to Make a Flappy Bird in Scratch
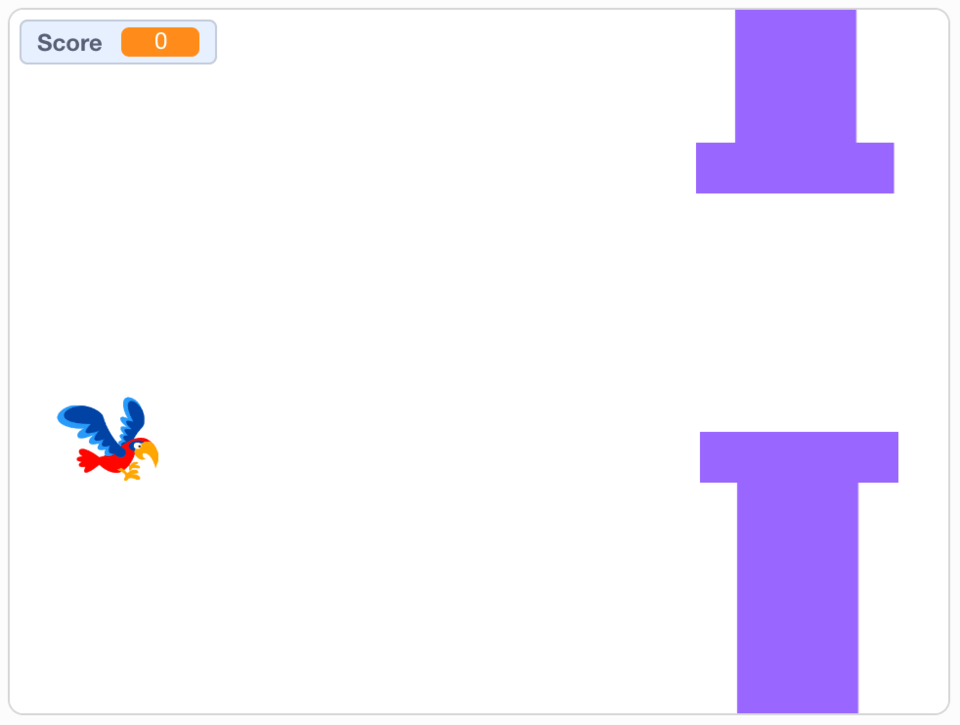
Love playing Flappy Bird? It’s an engaging game where a bird flies through passing objects without colliding into the obstacles. Follow the steps below to create your own version in Scratch! See a finished version of Flappy Bird here.
Scratch’s website: https://scratch.mit.edu/
1. Pick a character
The first thing to do is choose a sprite.

It can be any sprite! Be creative and choose a sprite with at least two costumes so it looks like the sprite will move across the screen. You can hoover your cursor over each sprite to see if it is animated. We chose the parrot. We want to make sure the parrot is small enough to fly through the pillars. Set the “Size” of the sprite in the lower right corner to 30 or something similar.
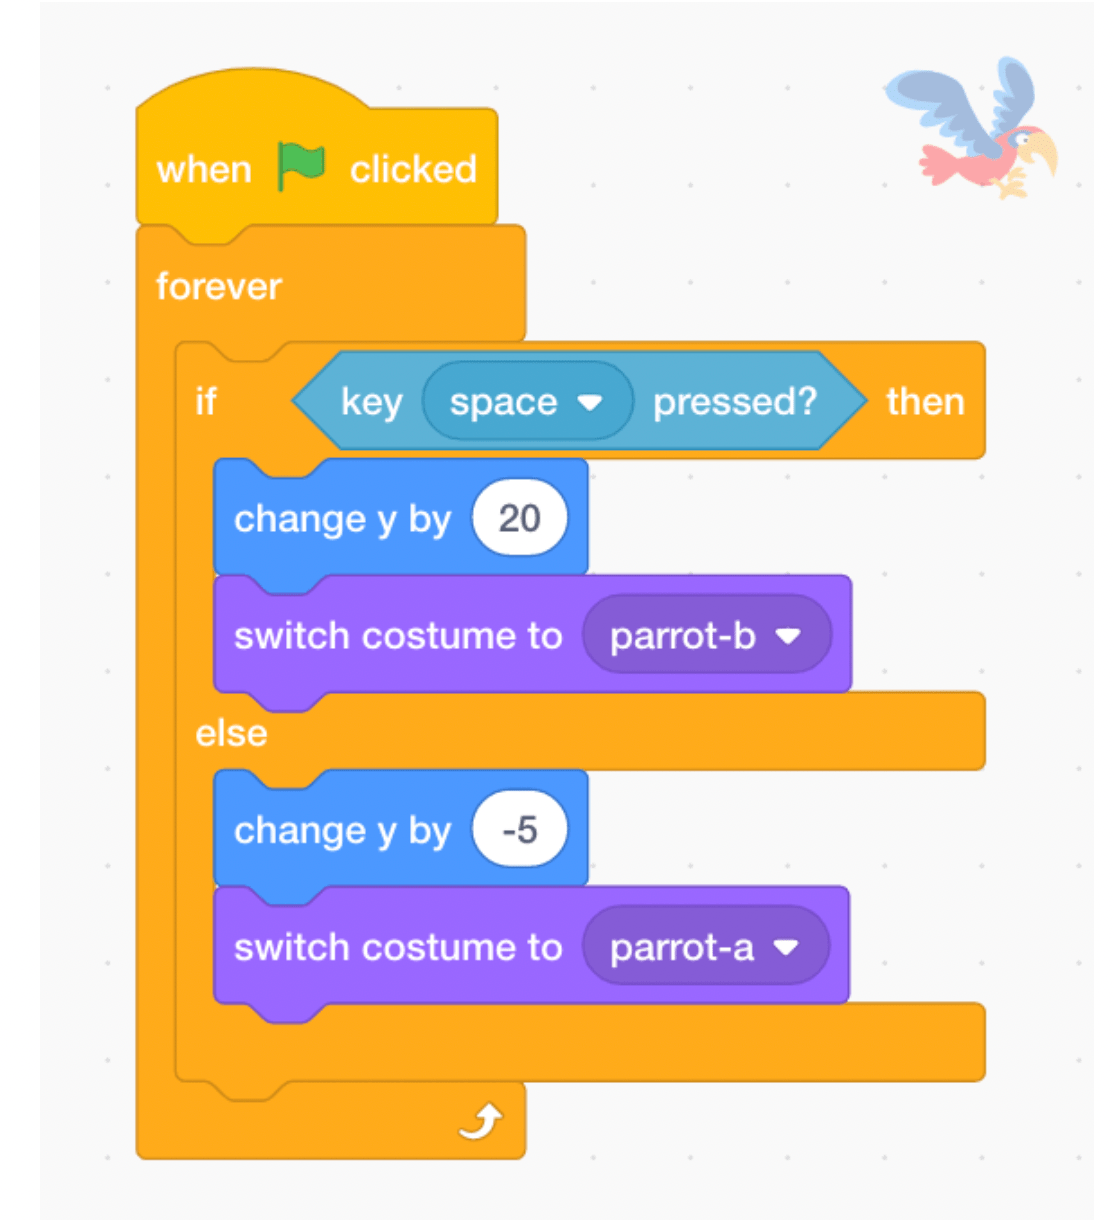
2. Add the code for the “flappy” motion
Our next step is to code the “flappy” motion for the parrot with Scratch coding. Click on the sprite icon in the lower right corner to make sure you are adding blocks to the correct sprite. A box will appear around the sprite and in the center of the screen a lighter image of the sprite will show at the top.
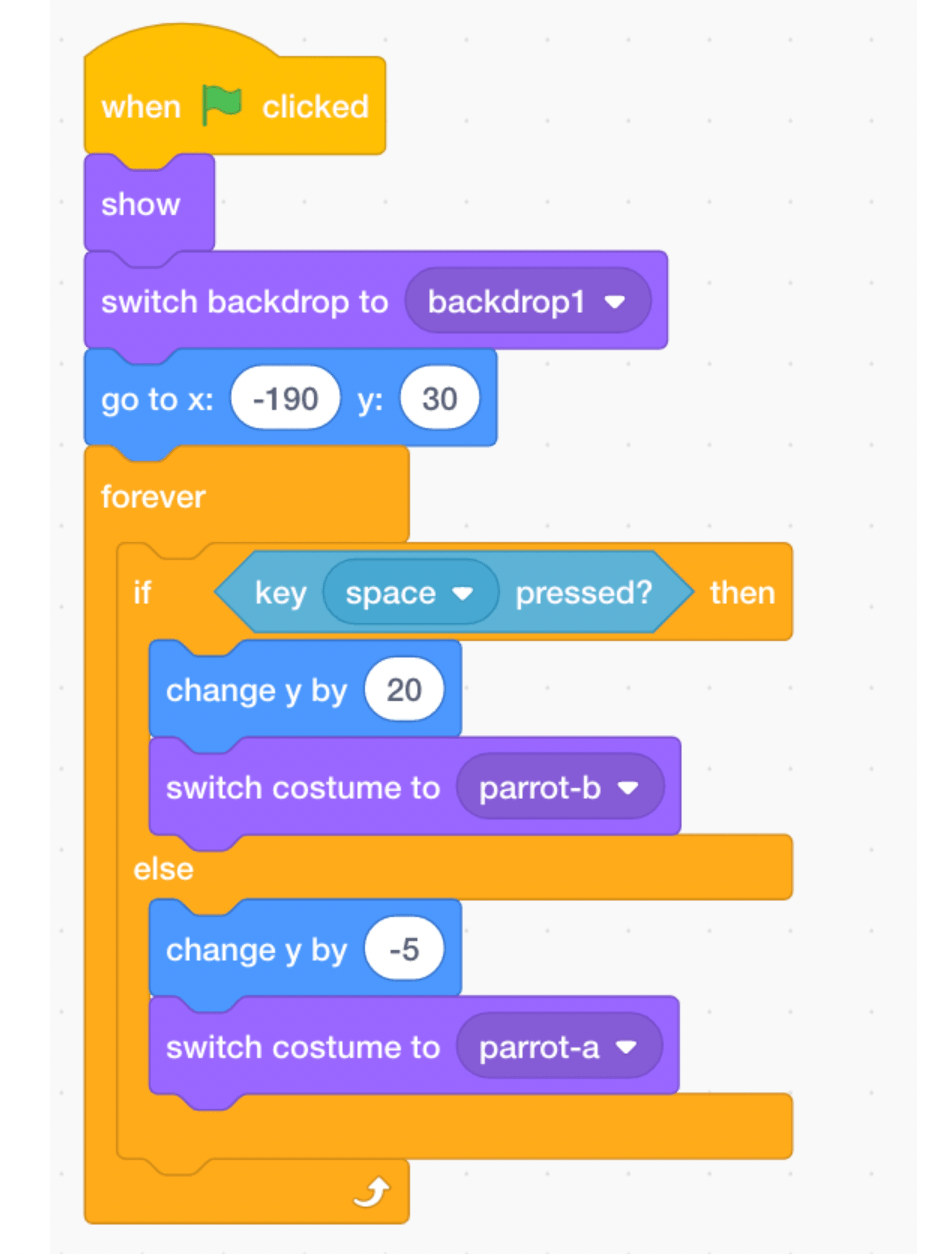
Start with the “when green flag clicked” block from Events. Then get “forever” from Control. The flappy motion should continue as long as the game is running. Inside “forever”, place the “if/then/else” block from Control.
The flappy motion is controlled by the space bar: each time the user hits the space bar the bird goes up. The condition for the if statement by default is an empty hexagon. Add the Sensing block “when space key pressed” to the if statement.
If the spacebar is pressed, the sprite should go up.. Use the “change y by” Motion block and set the number to 20. In our sample project, the bird looks like it is flying, so after we change y, we want to use the “switch costume to parrot-b” Looks block.
The else condition indicates what happens if the space bar is not pressed.. Then the sprite should start to fall a bit. To do this, inside the else part of the block, we need the “change y by -5” Motion block. We still want to make it look like the parrot is flying, so we want to use the “switch costume to parrot-a” Looks block to alternate costumes.In your project, alternate between your sprite’s costumes.
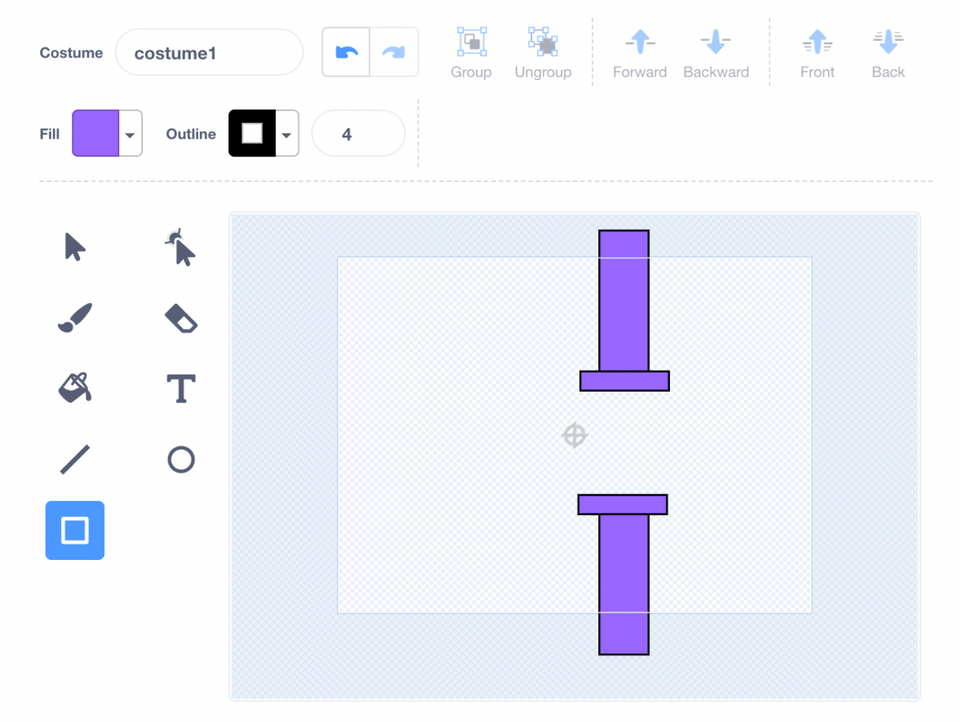
3. Create the pillars that the bird will fly through
Our next step is to make the pillars for the parrot to fly through. We will do this by making a custom sprite. Hover over the circle in the bottom right corner for adding a sprite, and select the option (third from the top) that looks like a paintbrush.
Use the “rectangle” icon from the last option in the first row to draw a pillar sprite. See below how two long vertical rectangles and two short horizontal rectangles are drawn and placed to make our pillars. Feel free to change the fill color and the outline to customize!
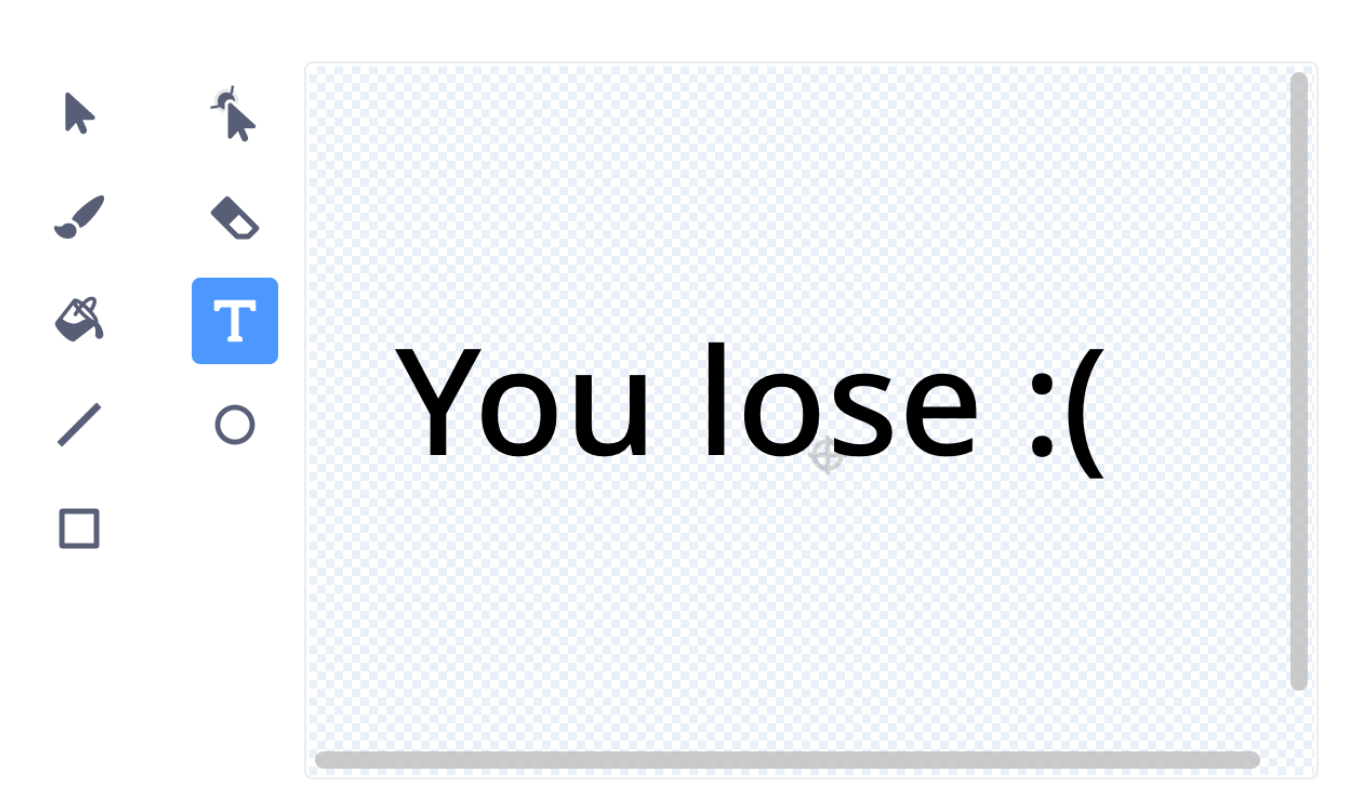
4. Make a background for the end of the game
Let’s also make a new custom background that indicates the end of the game. Similar to how we created a custom sprite, hover over the circle in the bottom right corner for adding a background, and select the option (third from the top) that looks like a paintbrush. Use the “text” option in the second column to display a message to the user that the game has ended.
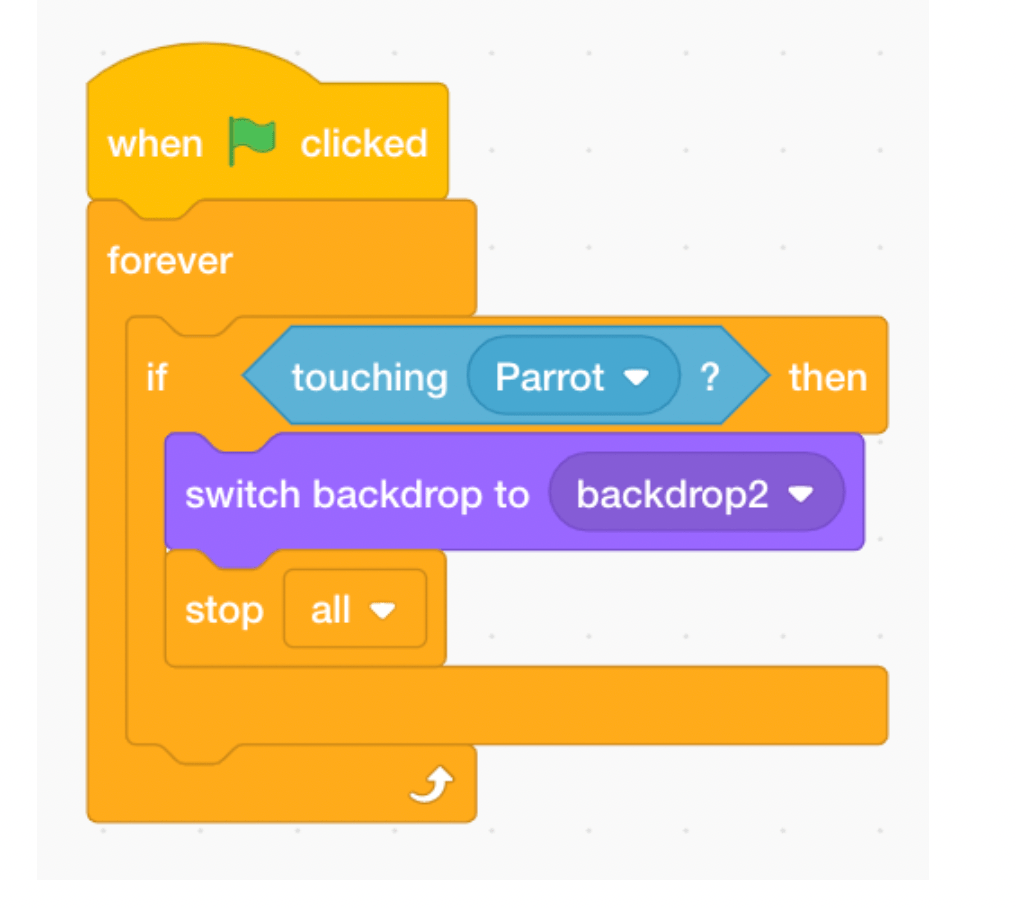
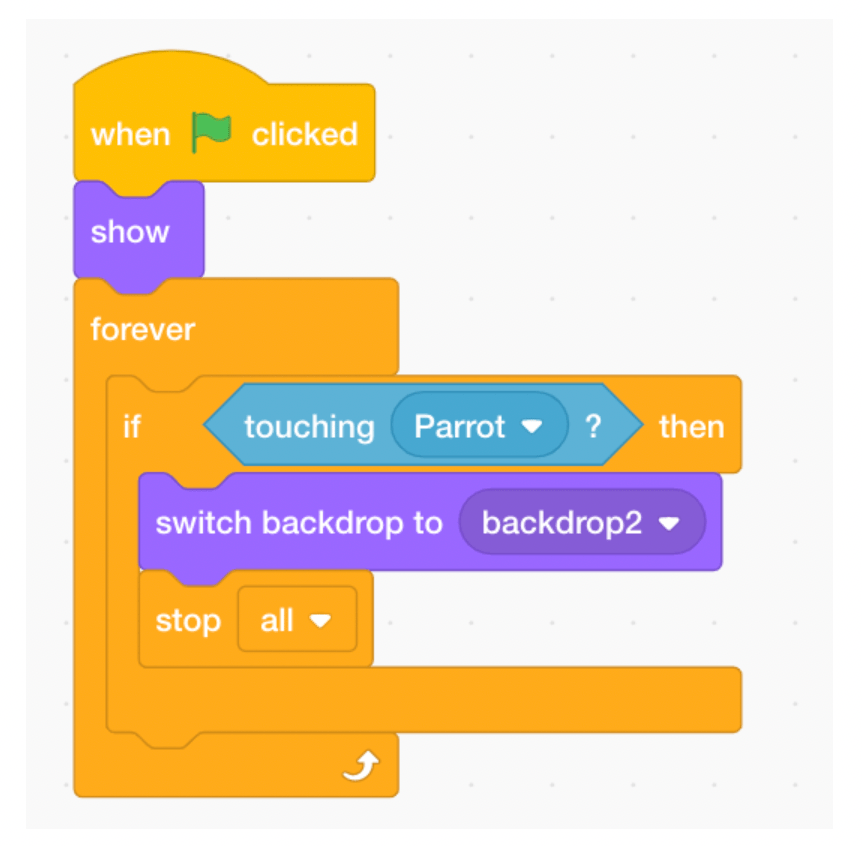
5. End the game if the bird touches the pillars
Click on the pillar sprite so we can add some code for it. The game should stop if the pillar touches your sprite. Start with a “when green flag clicked” block from Events. Underneath that we add a “forever” block from Control.
To check if each and every time your sprite collides with the pillar, place an “if/then” block from Control inside “forever”. The condition for the if statement is the Sensing block “touching “your Sprite’s name’”. Make sure you change the dropdown choice if needed to reflect that the pillars and your sprite are touching.
When this happens, we want to use the Looks block “switch backdrop to backdrop2” to indicate that the game has ended and use the Control block “stop all”.
6. Take care of details for starting and ending the game
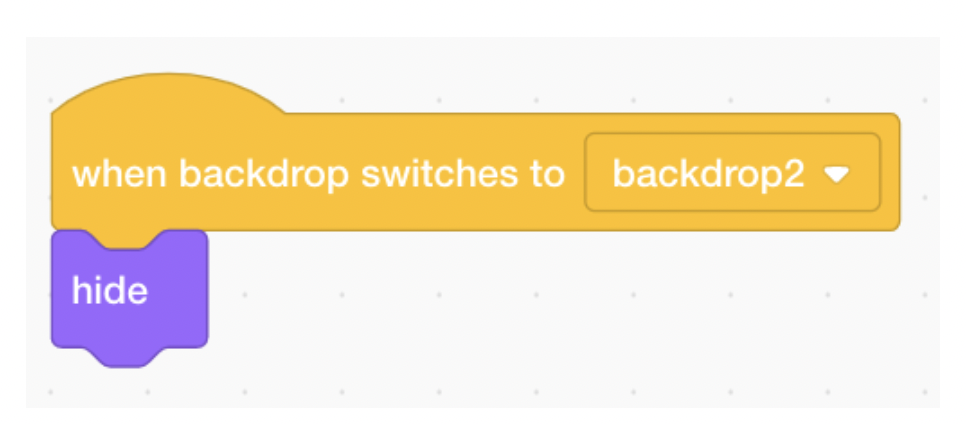
Click the main sprite and return to the code. Add another Events block: “when backdrop switches to backdrop2”. Attach the “hide” Looks block.This ensures the sprite disappears once the game has ended.
Separate the “when green flag clicked” and “forever” blocks that are already there. Some blocks will be added between to ensure the game works properly. Looks block under the “when green flag clicked”, which ensures your sprite is seen at the start of each game. Then we want another Looks block “switch backdrop to backdrop1”. This will remove the backdrop for the end of the game.
Afterwards we want the “go to x/y” Motion block. This will set the starting location of the parrot. The specific coordinates are not important, but make sure the parrot starts on the left side of the screen and somewhere in the middle vertically. We set x to -190 and y to 30.
Reconnect the “forever loop”. Also check to ensure the names of your backdrops match the backdrops you are switching between. Your backdrops may be named something different.
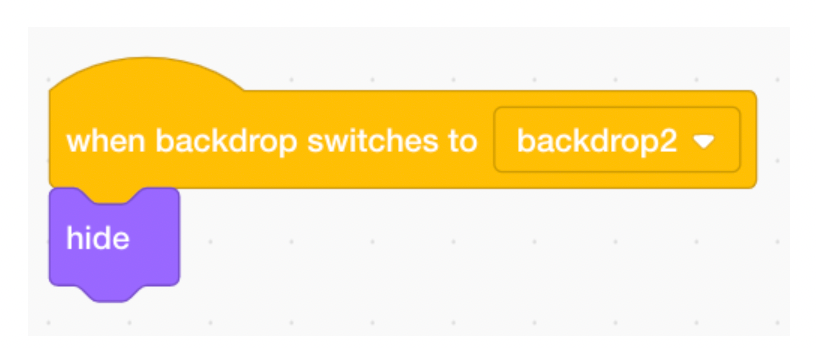
The remaining code is for adding additional features to the pillars. Click on that sprite to continue coding blocks there. Just like with your sprite, we want the pillars to disappear when the game ends. We can do this with the same blocks: “when backdrop switches to backdrop2” and “hide”.
We also want to show the pillars when the game starts, so place the “show” Looks block between the “when green flag clicked” and “forever” blocks we added before.
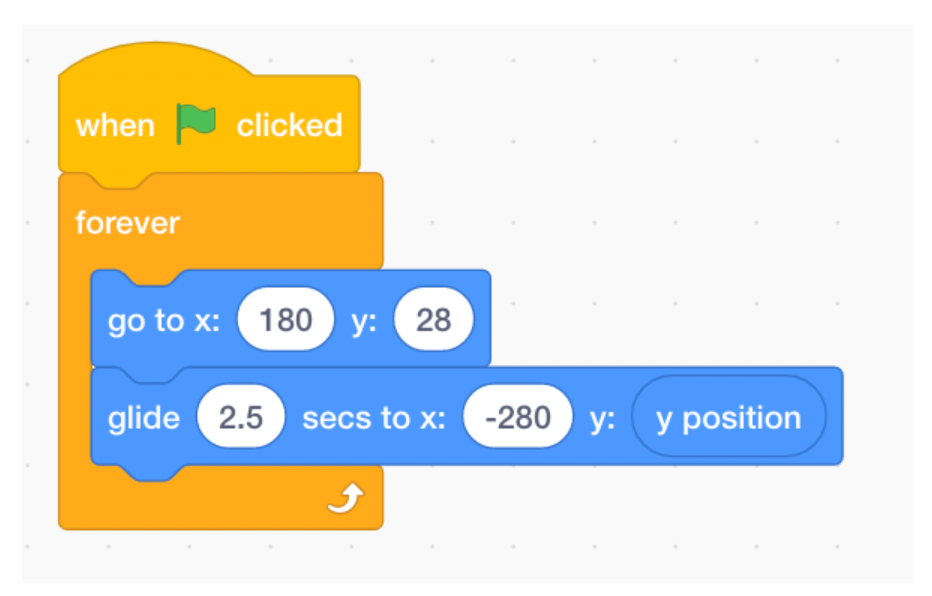
7. Get the pillars to move across the screen
Our next task is to get the pillars to move across the screen. Since we started with the pillars on the right side, we will make them move left. Let’s get a “when green flag clicked” block from Events and a “forever” block from Control. We want the pillars to move as long as the game is still going.
Inside “forever”, we want a “go to x/y” Motion block. This will set the original position of our pillars. To start the blocks on the right size, we set x to 180 and y to 28. Afterwards, we need a Motion block to execute the movement. Choose “glide to x/y”. We set the time to 2.5 seconds, but feel free to play around with this number. The x value needs to be on the far left. Once the pillars reach this point, they will loop back around to the right. We set x to -280. Since our pillars are only moving horizontally, we don’t want the y value to change at all. To ensure this is the case, we can drag the “y position” Motion block into the y space.
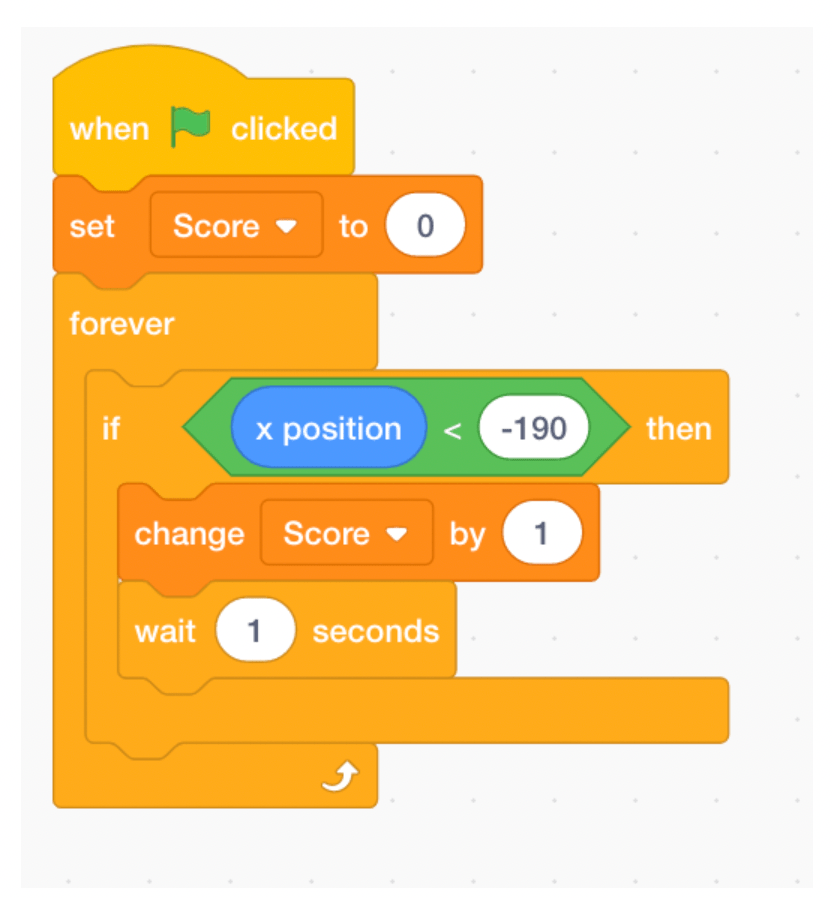
8. Create a score variable
The final step is to keep track of the score, similar to how we did in the flying cat game tutorial. Go to the Variables tab, click “Make a Variable” and name it “Score”. Get a “when green flag clicked” Events block since we will keep track of the score as soon as the game starts. The first Variables block we want is “Set Score to 0”. This will reset the score at the start of each game. You may need to adjust the dropdown option to ensure that it is “Score”. Then get the two Control blocks “forever” and put “if/then” inside it.
The condition for the if statement is when the parrot has flown through the pillars. The parrot only moves vertically and not horizontally, so we know the parrot will have flown through if the pillars move past the parrot’s location. In the if condition, we can detect that by using the “<” Operators block. The left space will be the “x position” block from Motion, and then on the right we put -190. This will check when the pillars have moved past the parrot’s x location.
Inside the if/then statement, we want the “change Score by 1” Variables block. We want to increase the score every time the parrot makes it through! Right after, we also want the “wait 1 second” Control block to make sure the score only updates once every time the parrot flies through.
And that’s it! We hope you enjoyed building your flappy bird.
Make a Flappy Bird in Scratch
I hope you have fun playing your new game! Feel free to customize your game with different characters and play around with backgrounds and themes. Check out our Scratch coding for kids upcoming classes below to learn how to build other cool games. Or help your child try their hand at our Scratch pong game tutorial to keep building their skills.
Written by Sophie Andrews, a Create & Learn instructor. Sophie Andrews is a student at Stanford University studying Math andComputational Sciences. She loves teaching and is a teaching assistant for Stanford's introductory computer science classes. Her work focuses on data science. Last year she built the online National Vote Trackers for The Cook Political Report, and she currently leads the Data Team at The Stanford Daily. She's also interned with the FCC and the National Renewable Energy Lab.

