

Today we'll show you and your child how to make a Frogger Game on Scratch in a few simple steps. You'll learn how to add levels, make faster objects, and much more. Let's get started!
Empower your child to make more games and build their creativity when you enroll them in a fun live online game design class led by an expert, or start with a free beginner coding class, designed by professionals from Google, Stanford, and MIT. Your child can even earn a certificate!
Discover How To Make A Frogger Game On Scratch
We'll guide you from creating your sprites through to adding lives in Scratch, and making the finish line.
1. Select your sprites.
You will need 1 character to “cross the road”, 4 obstacles to dodge, and a finish line. If you would like to use the sprites and backdrops from the example, then you can remix this empty version of the project that has the sprites without the code.
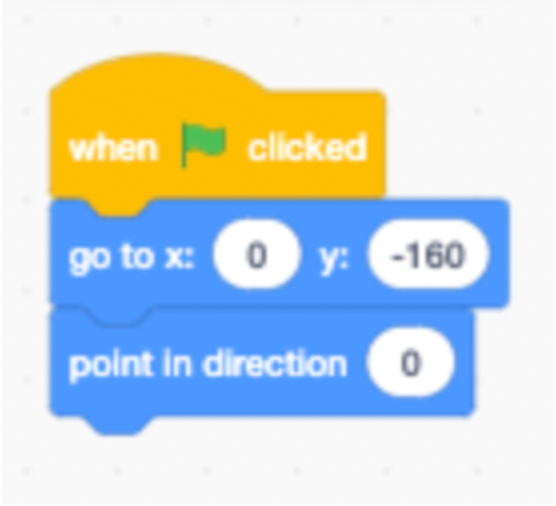
2. Give your frog a starting x and y position.
The x-coordinate will tell the frog its side-to-side position, while the y-coordinate tells the frog its up-and-down position. You can also give the frog its starting direction, by pointing it straight up (direction 0).
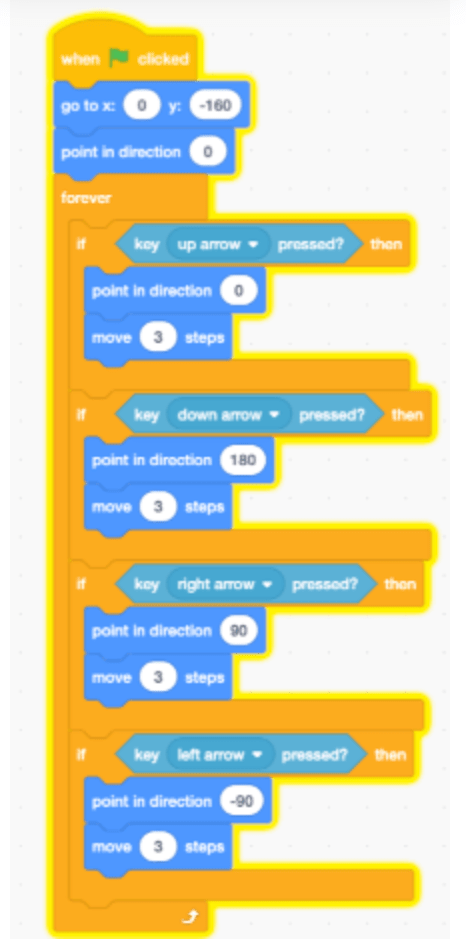
3. We will move our frog up, down, left, and right.
To move the frog put 4 if-then statements inside of a forever loop. If-then statements check if something is true, and if it is then the code inside of the statement will begin. For example, if the up arrow is pressed, then we will point the frog up and move it forward. We will create an if-then statement for each of the 4 arrow keys.
4. Next, we will make the obstacles move across the screen.
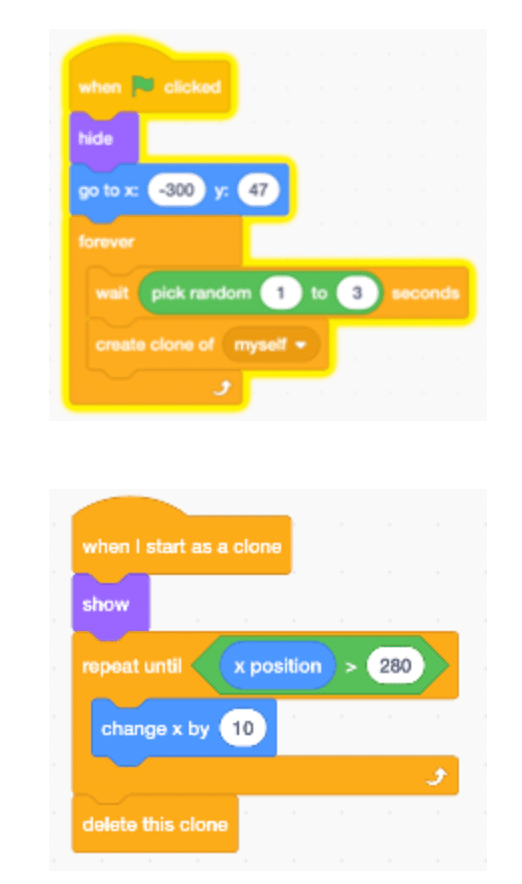
To do this, we will utilize cloning to make copies of the obstacle. Some obstacles will start on the right side and move left while others will move left to right. Make sure the obstacles start at different heights (y-positions), so that they don’t appear to be running into each other.
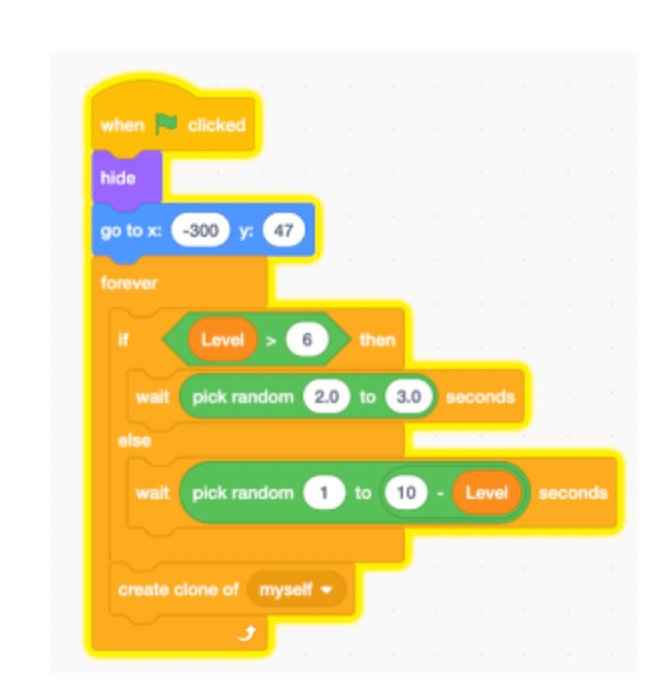
To keep the player on their toes, the clones will be created at random times by using the pick random operator block. When working with clones, it is important to make sure that you hide the original sprite from the screen but show the clones.
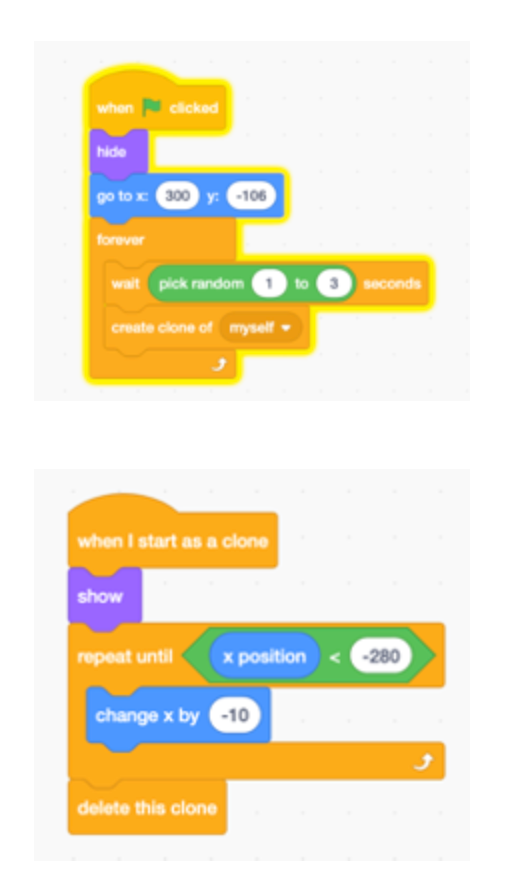
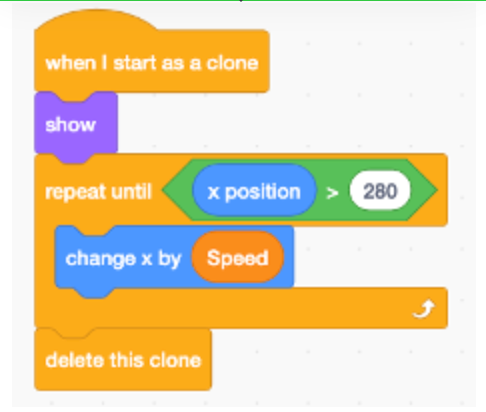
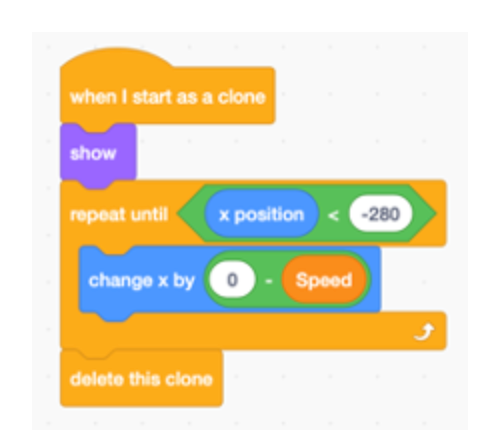
You can tell the clones to immediately show by using the show block from the Looks category and use a repeat until block to move them across the screen. Repeat until blocks are incredibly useful loops that continuously repeat the code until the statement inside is false. In this case, the statement that we are investigating is the x-position of the obstacle clone. For the sprites moving to the right, the x-position will continue to grow and once it is greater than 280 we delete the clone. The opposite is true for the clones moving to the left.
Obstacles Moving Left to Right
Obstacles Moving Right to Left
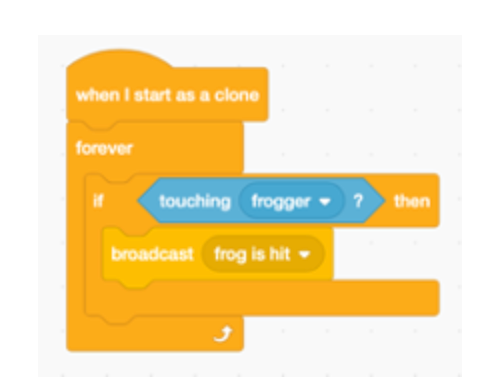
5. Broadcast a message.
If the frog touches the moving car, then we will broadcast a message to the entire project. Broadcasting and receiving blocks allow our code to communicate across characters.
In this scenario we want the obstacle clone to check whether it is touching the frog, and if it does, we want to send a signal to the entire project that the frog has been hit.
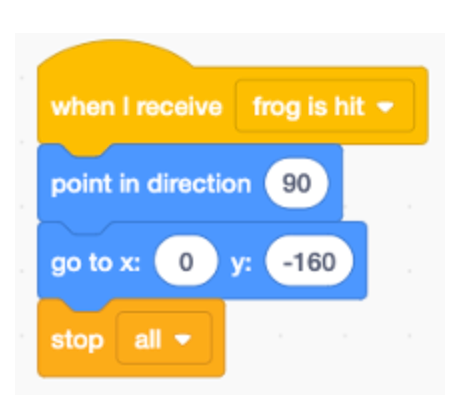
The frog character will receive this signal and immediately reset back to the bottom of the page. We can also include a stop all block, so that the entire project shuts off.
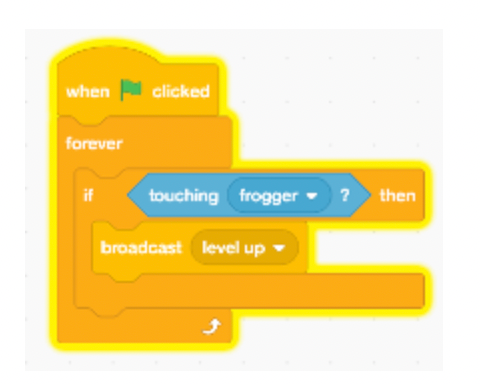
6. Make the finish line message.
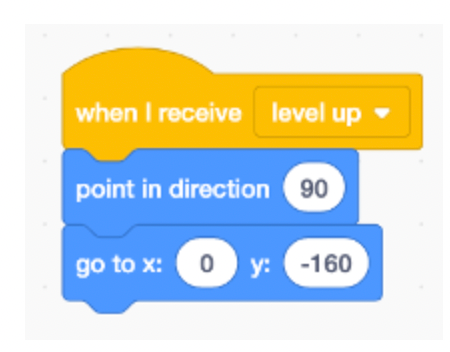
Similarly, we want the finish line to also check whether it touches the frog character. If the frog successfully makes it to the finish line, then we will send a different message (ex. level up). For now, we will simply have the frog reset back to the bottom if it reaches the end.
Finish Line
Frog
7. Add lives and more.
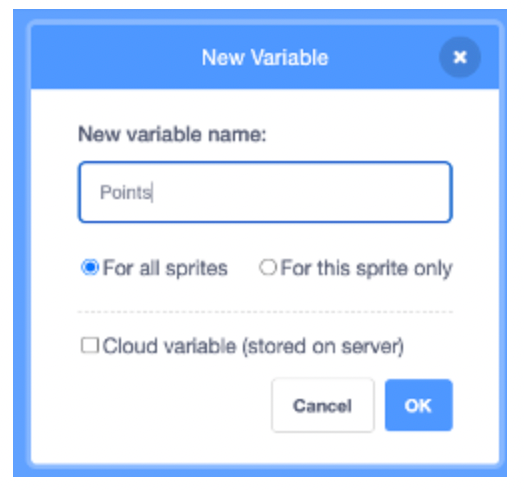
To create a more challenging and fun game, we will add Lives, Points, and Level variables. A variable is a memory box within the game, so that the code can track and remember important information.
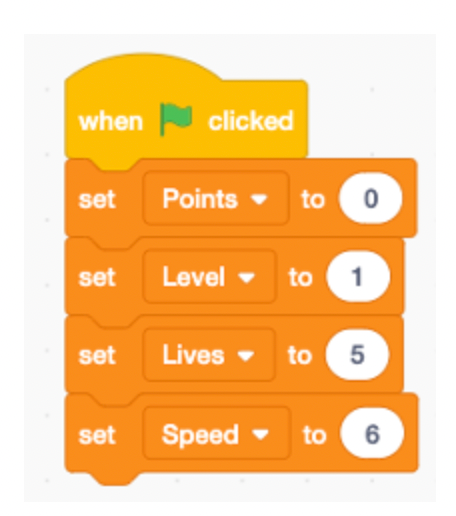
You can create a variable for each of these in by clicking on Make a Variable in the Variable blocks category. Make sure to press For all sprites, because we want the information to be shared to all the characters.
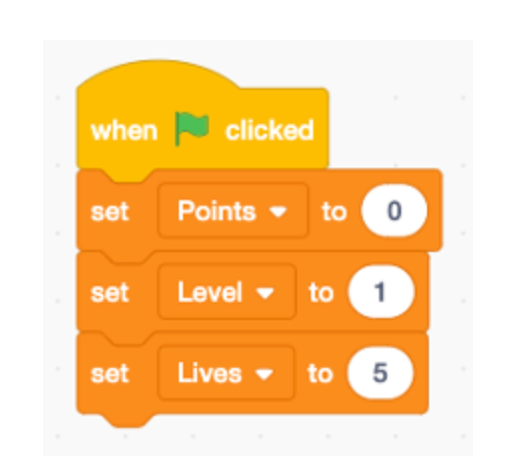
When the green flag is clicked to start the game, the Points will be set to 0, the Level will be set to 1, and the Lives will be set to 5.
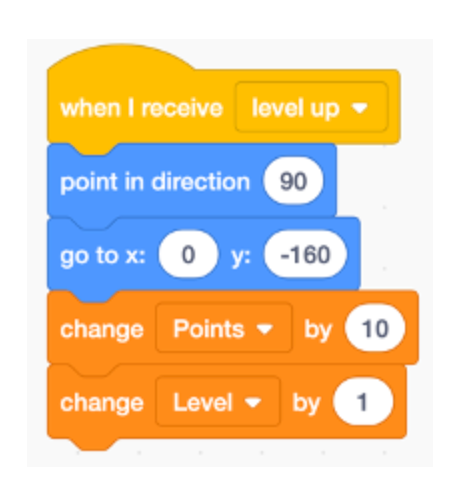
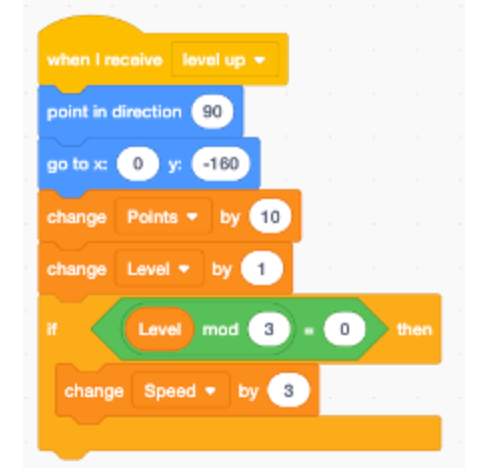
When the frog receives the message that it has reached the finish line (level up), the Level variable will increase by 1 and the Points variable will increase by 10 to give the player a higher score.
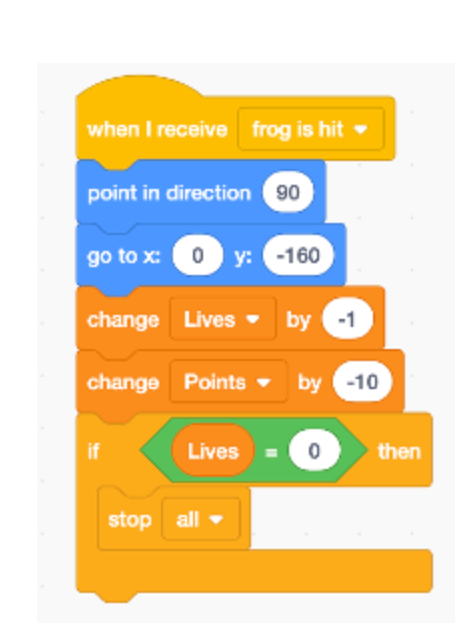
When the frog receives the message that frog is hit, then we will subtract 1 from the Lives variable and 10 from the Points variable. Additionally, we will check if the Lives equal 0. If the player runs out of Lives for their frog, then we will stop the game.
8. Add levels.
The Level variable will make the game become more difficult as the player continues to advance. The Level variable will accomplish that task in two different ways. First, it will make the obstacles create clone more frequently as the Level increases.
By using an if-then-else block, we can make the code check what Level the player is on. If-then-else blocks operate similarly to if-then blocks, but the key difference is that an if-then-else block allows us to provide an option to the code if the statement is false.
For example, if the level is greater than six, then the clones will wait between 1 to 3 seconds to be created, or else the clones wait between 1 to 10 – Level. So, if the player is on Level 3 (which is not greater than 6), the clones will be created a random number of seconds between 1 to 10 – 3, or 7. The if-then-else block allows us to make sure that the obstacles are not created instantaneously or at a negative time when the Level variable is high.
9. Make the obstacles move faster.
The second way we can make the game more challenging, is by making the obstacles move faster depending on the Level variable. This will require a new variable called Speed that we can set at 6 to start the game.
After leveling up, the code will check if the Level mod 3 is equal to 0. The mod block gives the remainder of the first input divided by the second input. By checking if the Level is divisible by 3, we can increase the Speed variable by 3 steps gradually. This will mean that at Level 3, the Speed will increase to 9. And at Level 6, the Speed will increase by 3 more steps to 12, and so on. Adding this code ensures that the Speed does not become too large, too fast.
To make the obstacles move more quickly, we will add the Speed variable into the change x block. For the obstacles going from the left to the right, change the x coordinate by the Speed variable, because we want the x-position to increase. For the cars going from right to left, change the x coordinate by 0 minus the Speed variable, because we want the x-position to decrease (change by a negative number).
Obstacles Moving Left to Right
Obstacles Moving Right to Left
10. Keep creating!
Make sure to continue building, testing, and debugging your game. This is just a start to what you can create! Some interesting challenges could be adding a Game Over screen, background music, or more obstacles to frustrate the player.
Review Of Key Coding Concepts From Our Frogger Game
Congratulations on completing your Frogger game in Scratch! Throughout this project, you and your child have learned and applied several essential coding concepts that are foundational in game design. Let’s take a moment to review these key concepts:
1. Sprites and Positioning
- Concept: Sprites are the characters and objects in your game. In this project, you used sprites for the frog, obstacles, and finish line.
- What You Learned: You learned how to select and position sprites on the stage using x and y coordinates. Understanding these coordinates is crucial for controlling where your sprites appear and how they move.
2. Movement and Direction
- Concept: Moving a sprite involves changing its x and y coordinates. Direction determines which way your sprite faces when it moves.
- What You Learned: By using if-then statements, you controlled the frog’s movement in four directions—up, down, left, and right. This logic allows players to navigate the frog through obstacles.
3. Loops and Cloning
- Concept: Loops allow you to repeat actions, and cloning lets you create multiple copies of a sprite that can act independently.
- What You Learned: You used a forever loop to continuously check for key presses and move the frog. You also used cloning to create multiple obstacles, adding challenge to your game by making these obstacles move across the screen at random intervals.
4. Broadcasting Messages
- Concept: Broadcasting is a way for sprites to communicate with each other in Scratch.
- What You Learned: When the frog touched an obstacle, a broadcast message was sent to reset the game. Similarly, when the frog reached the finish line, a message was sent to level up. This concept is key to making different parts of your game interact smoothly.
5. Variables
- Concept: Variables are used to store data, like the player’s score, lives, or level.
- What You Learned: You created variables to track lives, points, and levels. These variables allowed your game to get more challenging as players advanced, by increasing the speed of obstacles and the frequency of their appearance.
6. Conditional Statements
- Concept: Conditional statements (if-then and if-then-else) allow your game to make decisions based on certain conditions.
- What You Learned: You used conditional statements to control how the game behaves depending on the player’s actions. For example, you used an if-then-else block to check the player’s level and adjust the difficulty accordingly.
Code A Frogger Game On Scratch
You and your child have made a cool Frogger game that's all your own. To find out how to make more cool games with live expert guidance, enroll your child in our free Scratch class, where they'll learn coding in a small group of just 5 students maximum.
Up next, have fun creating a musical app or a PacMan game in Scratch.
Written by Matt Kalnay, a Create & Learn instructor. After graduating from UC Davis with a B.S. in Biology, he joined Peace Corps Indonesia as an English as a Foreign Language Instructor. Following his return to the United States, he decided to pursue his passion in the field of Software Engineering and Web Development.

