

In this tutorial, you and your child are going to learn how to make a golf game in Scratch! There are two basic types of golf games you can make. The first type simulates normal golf, like on a golf course, where you're trying to hit a ball across a long distance over different types of terrain. The second type simulates miniature golf, where the challenge becomes navigating complex obstacles in a small space. The goal of both is the same, get the golf ball into the hole. We'll be making a mini-golf type of game today!
This game will be played from a 'bird's-eye-view' perspective. That means we'll be looking down at each level, as if we were viewing it from the sky. Building a mini golf game is fun because each level is like a new maze we need to solve, and our success will depend on how well we can predict the way our golf ball is going to bounce off the walls of our maze. We'll also introduce 'tunnels' to transport our ball to different areas. These will make the hole easier to get to in some situations, but present a hazard in others.
To help your child learn even more about Scratch coding, join our online Scratch classes (Scratch Ninja for Grades 2-5 and Accelerated Scratch for Grades 5-9), led live by an expert, and designed by professionals from Google, Stanford, and MIT.
Learn How to Make a Golf Game in Scratch
In order to build our game, we'll be using X and Y locations to set up each level, talk about how to use a 'velocity' variable, and examine how to get sprites to bounce in Scratch. Here's a link to the Finished Project.
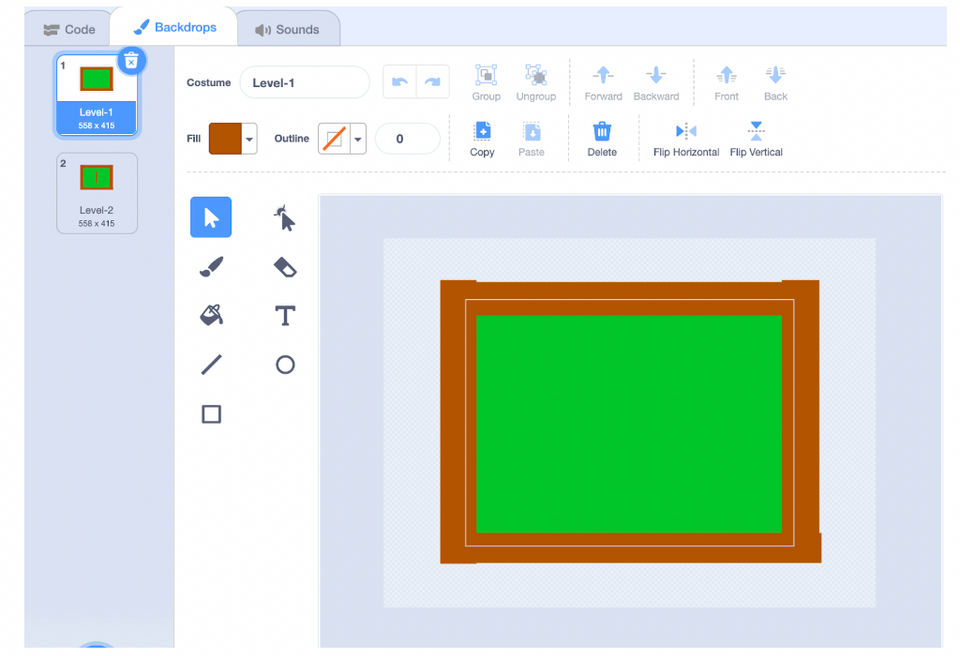
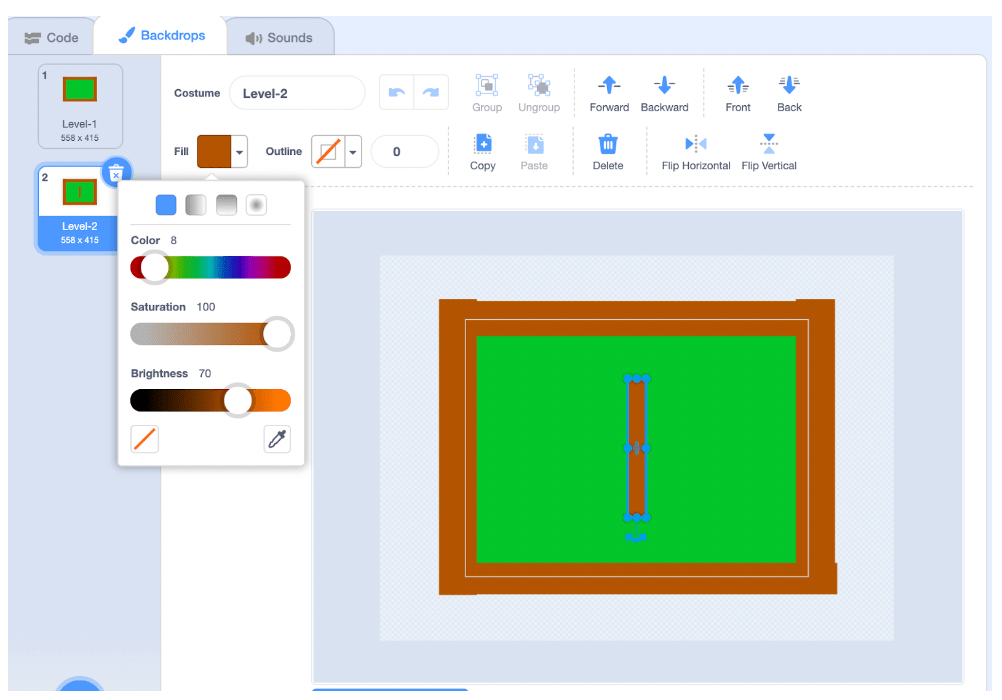
1. Create Some Backdrops
We'll start building our game by designing just a couple levels. We'll certainly add more later, but before we spend too much time on level design, we want to make sure our game will work properly! The most important thing to keep in mind for this step is to use just one color for the walls of your level, and make sure to use the same exact color every time. We'll see why in a later step.
Hint: copying and pasting will help make sure your colors stay the same, but to double check, you can see if the 'Color', 'Saturation', and 'Brightness' values show the same number for each wall.
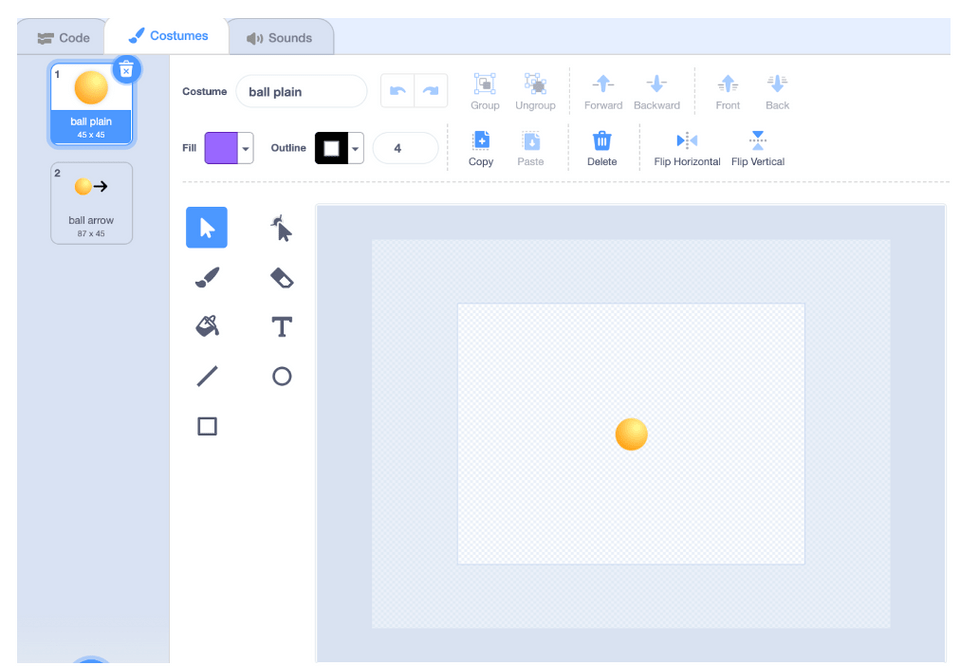
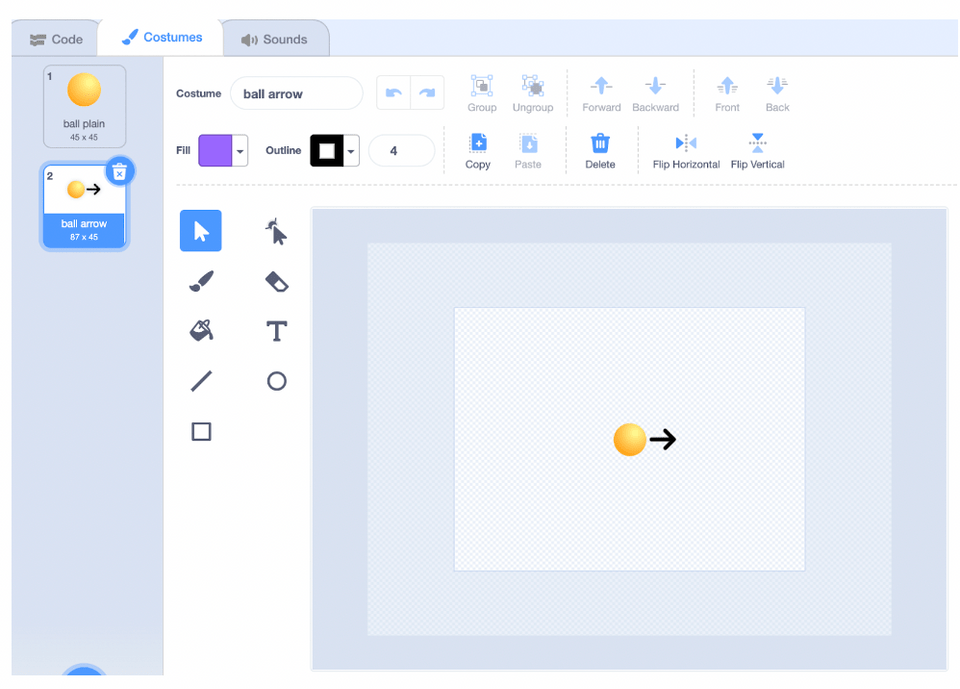
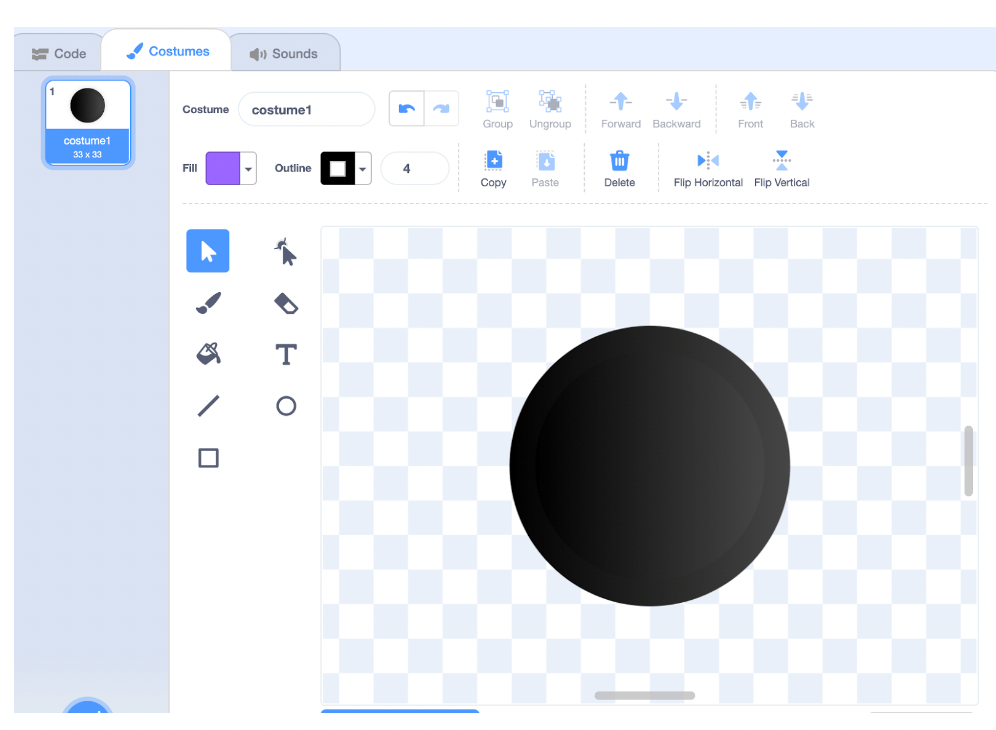
2. Add Ball and Hole Sprite
Our golf ball will have two costumes, one will just be a plain ball, but the other will have an arrow that points to the right. This arrow will help us aim our ball by telling us which direction it's pointing in. You can draw the arrow yourself, or just copy and paste a costume from the Arrow sprite in Scratch. For the Hole sprite, select the Button sprite and color it black.
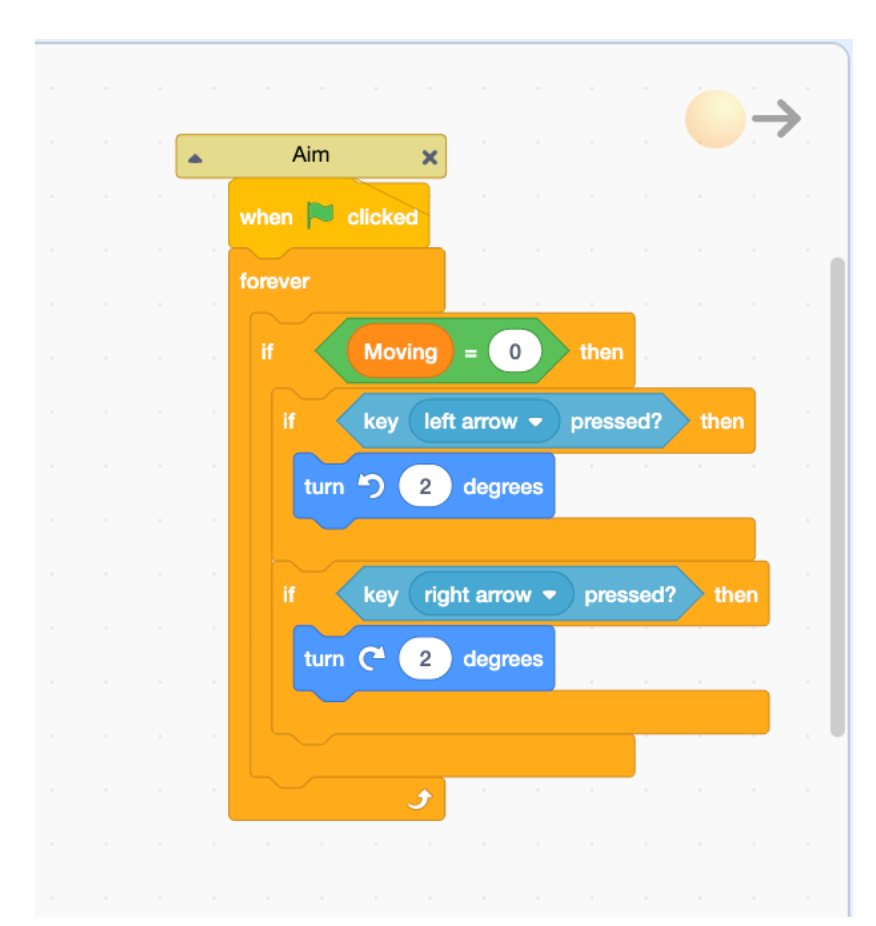
3. Aim the Ball
In order to Aim the ball, we will turn it a little bit when we hit the left or right arrow keys. We're going to introduce a variable now as well, 'Moving'. We don't want to be able to turn the ball once we've hit it, so we'll only be able to turn when 'Moving' equals 0.
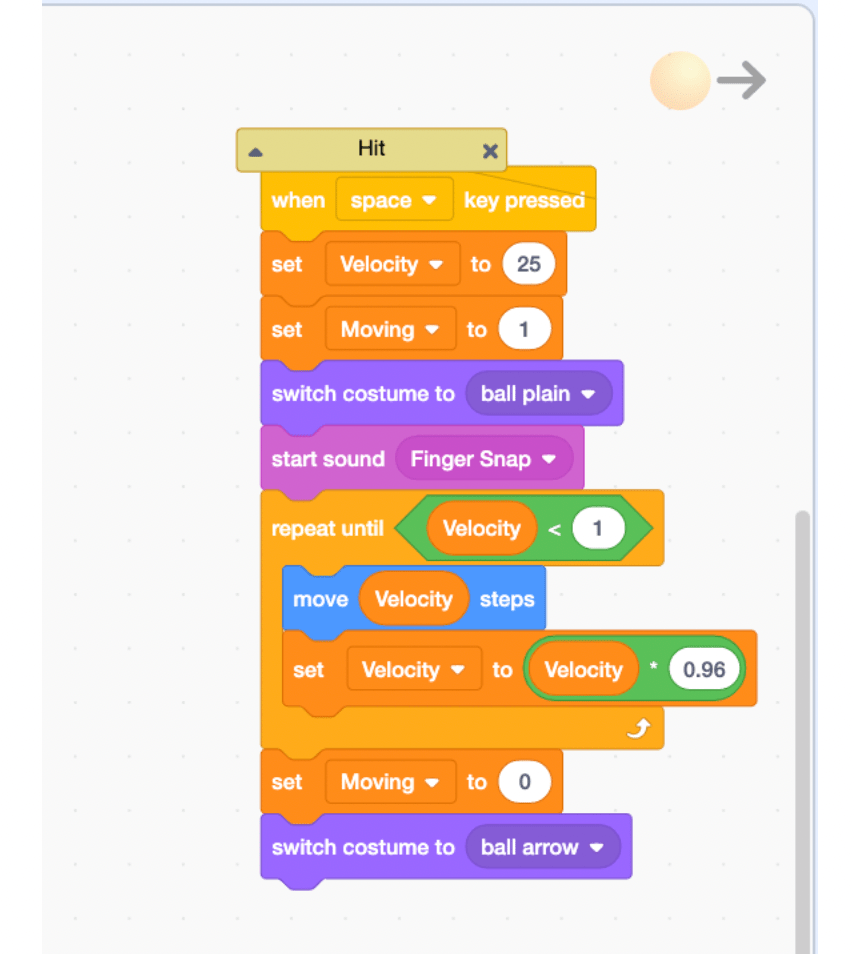
4. Hit the Ball
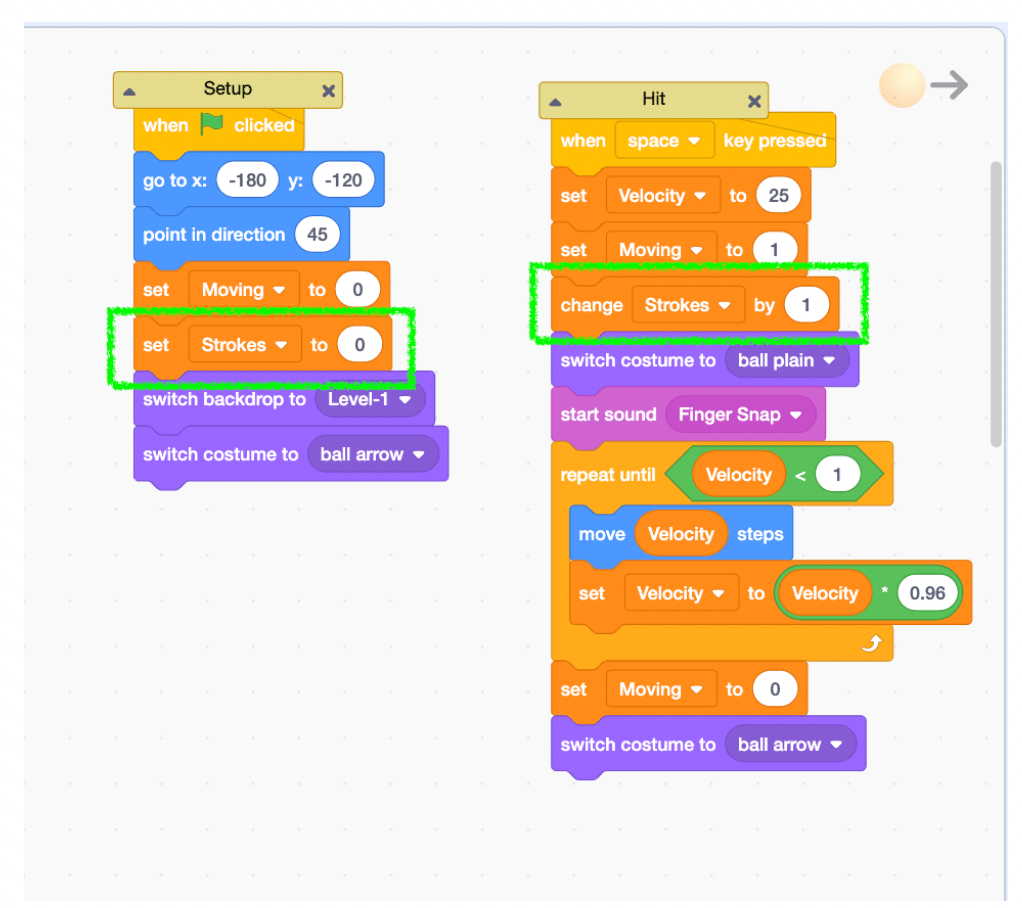
Our ball should move fast when we first hit it, but slow down over time, just like a real golf ball. We're going to create a variable, 'Velocity' to keep track of this for us. In physics, Velocity measures how quickly something is moving, or more specifically, how fast it changes its position. The move block will be responsible for changing the position of our ball, and we'll have it move 'Velocity' steps. As our ball is moving, we'll decrease 'Velocity' by multiplying it by 0.96. Every time we move, we'll set 'Velocity' to 96% of what it was the last time we moved. Once Velocity reaches 1, we can just go ahead and stop.
We'll also make sure to set our 'Moving' variable correctly, change to the appropriate costume, and add a snappy sound effect.
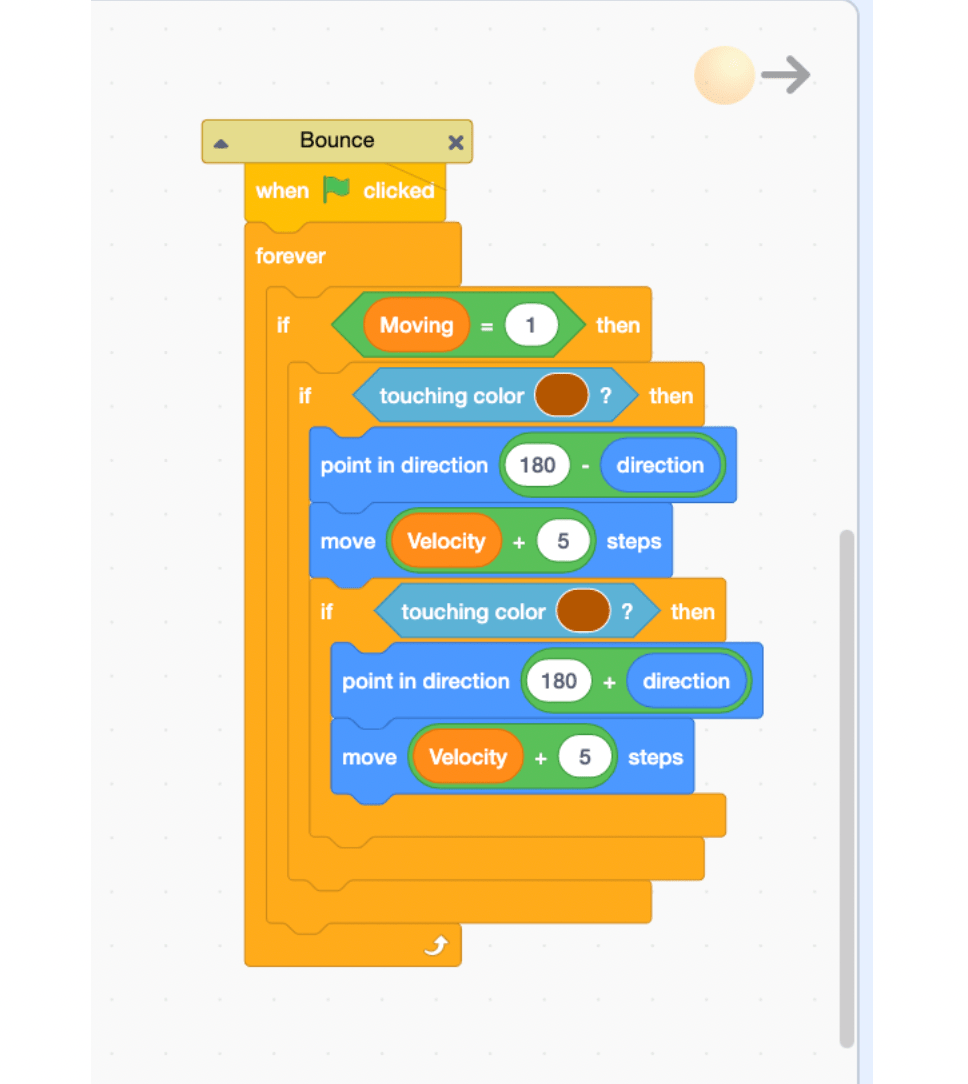
5. Make the Ball Bounce
This will be the hardest step. We want to bounce whenever we hit a wall, but there is no general 'Bounce' block in Scratch. In order to make the ball bounce, we must change its direction. If the surface is horizontal, then the ball should point in direction (180 - direction), but if the surface is vertical, then the ball should point in direction (0 - direction). How will we know if the surface is horizontal or vertical?
A perfect solution to this problem would involve painting one color on all horizontal surfaces, and another color on all vertical surfaces, and bouncing differently depending on what color we're touching. But this will make levels a lot harder to build, and still be subject to bugs if we make even the tiniest mistake. We're going to use another solution that will make our game a lot easier to build, work 99 percent of the time, and only cause glitches in rare cases.
When our ball is moving, we'll check to see if it's touching the color of our Wall, and assume that every surface we bounce off of is horizontal by pointing in direction (180 - direction). If we're still touching the color of our wall, then we can assume that the surface was actually vertical, and we can correct the first bounce by pointing in direction (180 + direction).
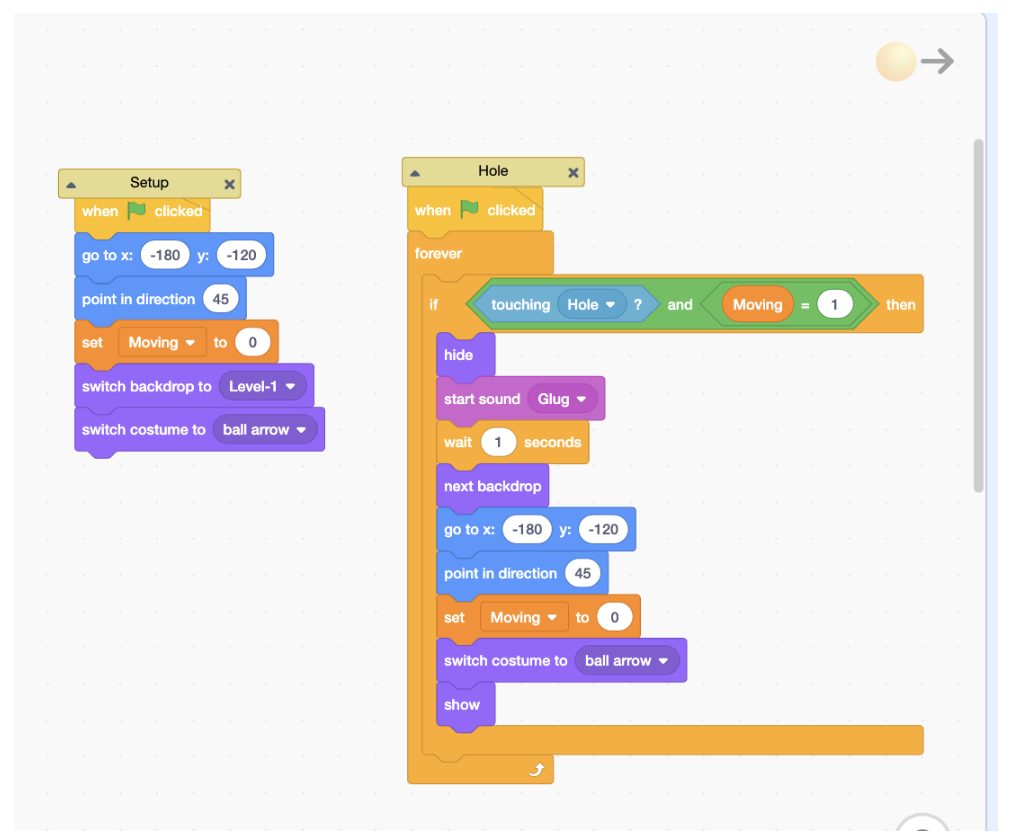
6. Check if the Ball is in the Hole
Our last step to get the basic game working is to see if we've actually made it into the hole! If the Ball is touching the Hole while it's moving, we want to go to the next level (next backdrop), and also reset some properties of the Ball, like its position and direction.
This is a good time to make sure we set some properties of the Ball when we start the game as well.
Now we have a basic golf game that works. It's time to add some more levels and features!
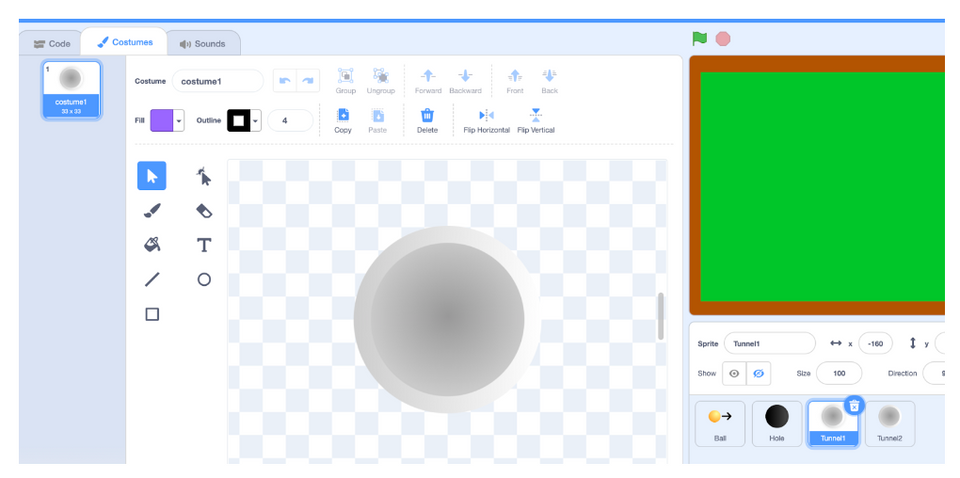
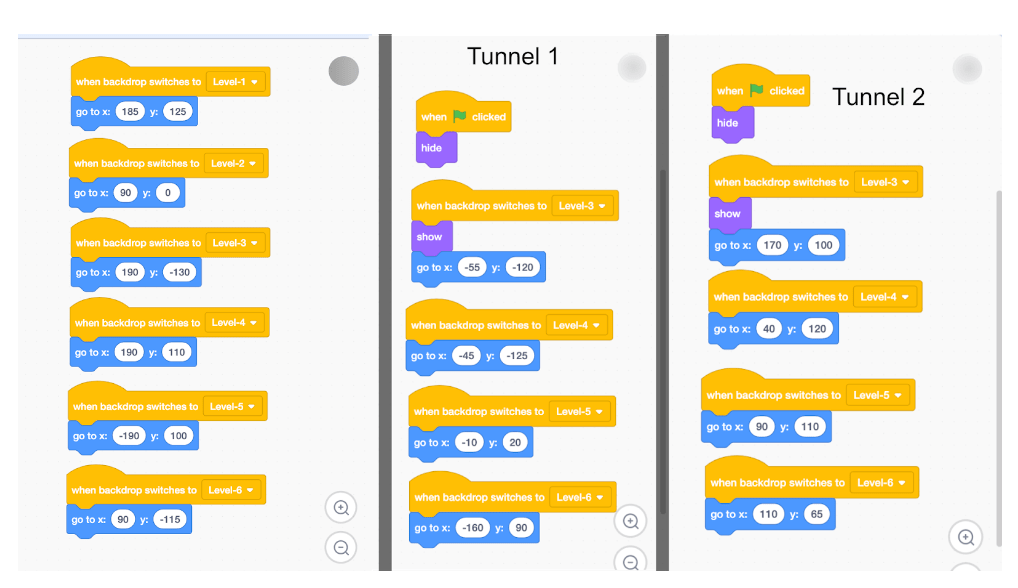
7. Add Tunnel Sprites
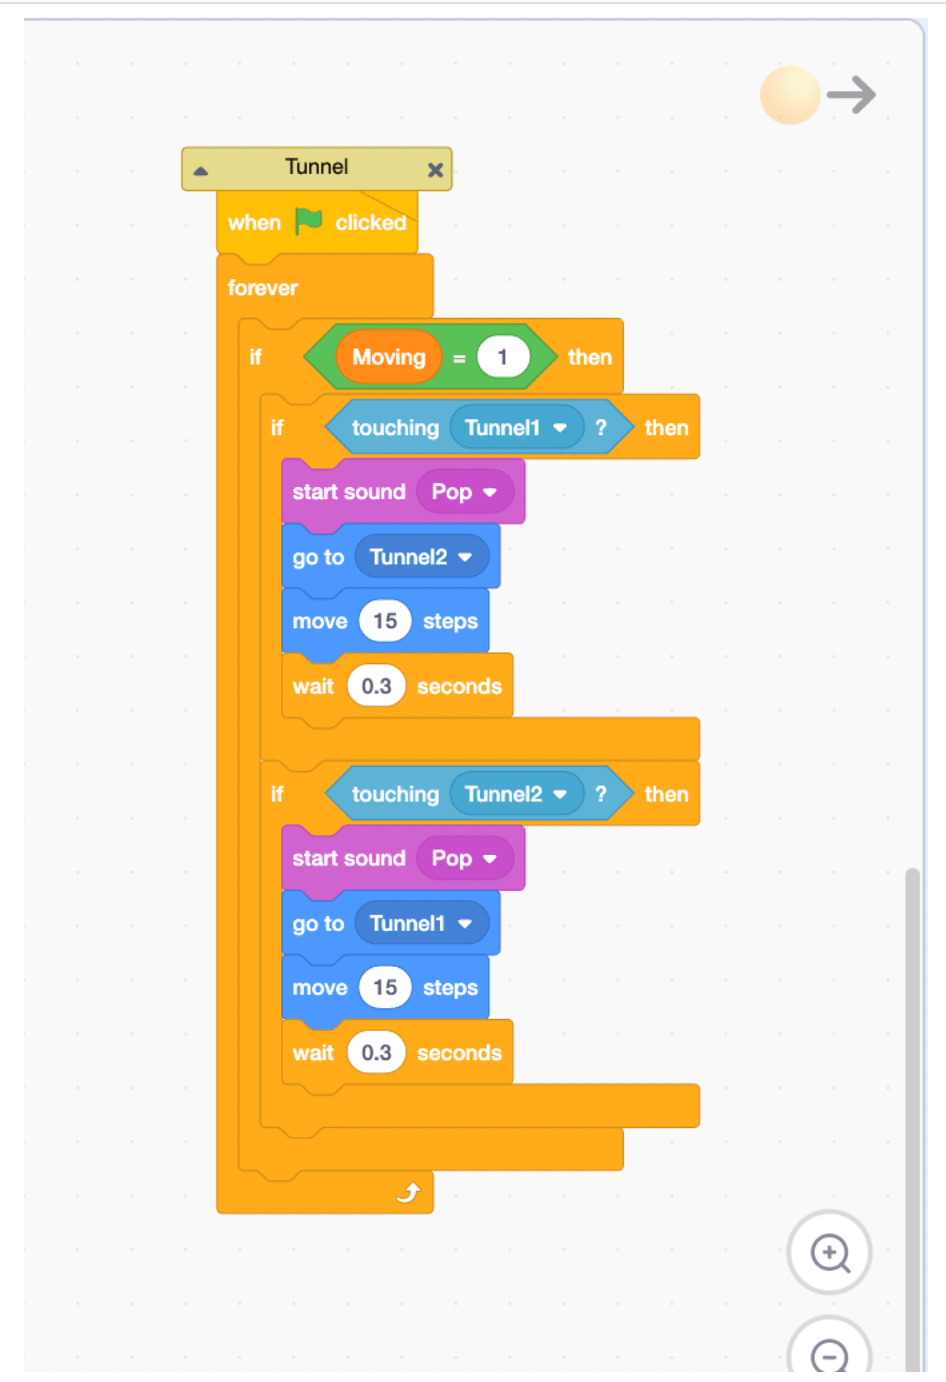
In some mini golf courses, there are certain holes that take your ball from one spot to another. This can add complexity to the levels we design! We'll start by adding two more sprites, just like the 'Hole' sprite, but white instead of black. Now we can write code in our ball to check to see if we're touching a Tunnel. If we are, we'll go to the other Tunnel, move a few steps away, and wait a short amount of time (that way we don't immediately travel back to the first Tunnel).
8. Add More Levels
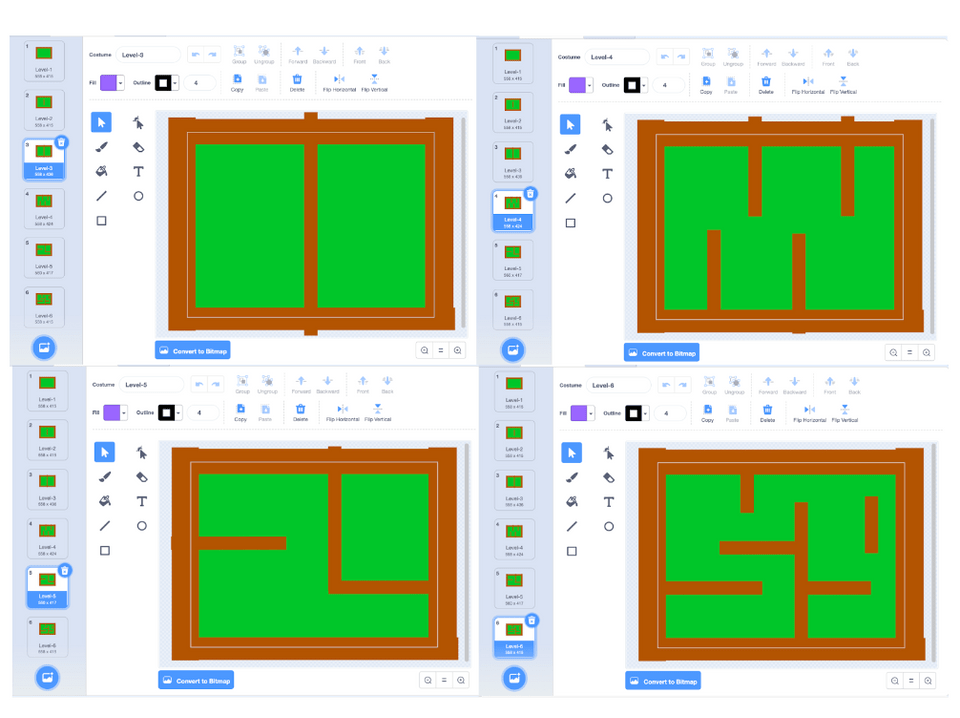
We can design more levels with our new feature in mind. We'll write code that places our tunnels in certain spots in the next step, but for now, just think about where you'll want to put them. We’re adding four more levels to our game.
9. Place Holes and Tunnels
For each level, move the Hole sprite to where you want it to be, check the X and Y location, and write code that tells the Hole to go to that X,Y location when the backdrop switches to that level. We can do the same thing for the Tunnels; we'll hide them at first though, since we don't use them in levels 1 or 2.
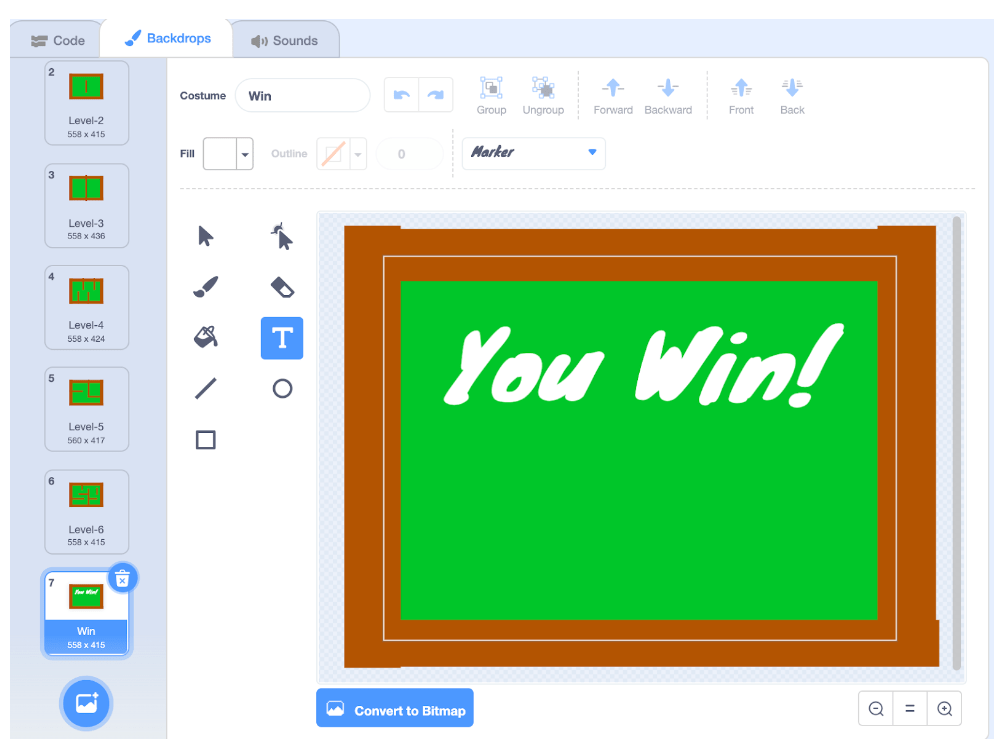
10. Win Screen
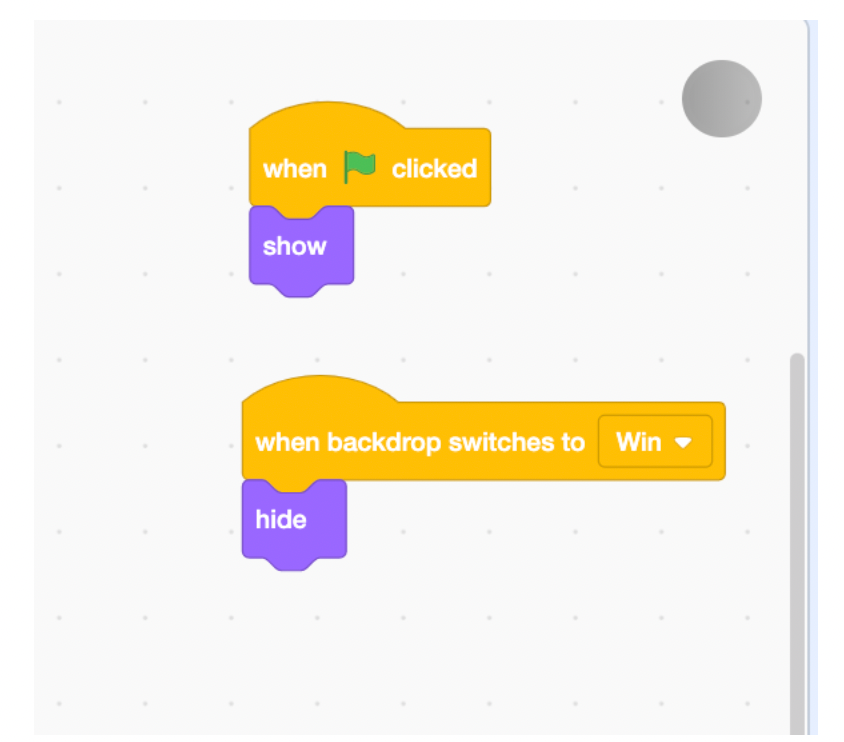
Copy the very first backdrop, and with the Text tool, write 'You Win!' in big letters. Make sure to tell the Hole to hide when the backdrop switches to the Win screen, but you can keep the tunnels around if you want!
11. Add Score
Golf, unlike most games, is all about getting the lowest score possible! Every time you hit the ball, this counts as a 'stroke'. The fewer strokes you have in a game, the better, because it took you fewer tries to get to the hole. Let's add a variable, 'Strokes' and change it by 1 every time we hit the ball.
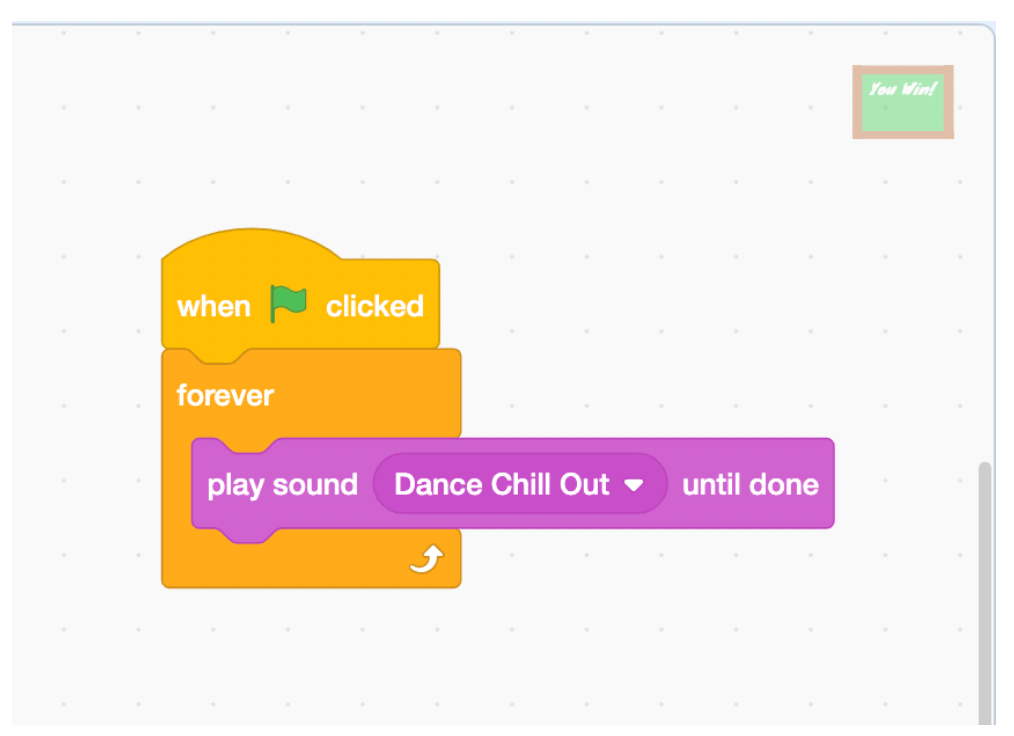
12. Add Background Music
What's essential to every game? Music! In the sounds tab, find a good loop that fits the mood of your game, and tell your backdrop to play that sound until it's done forever when you click the green flag.
Make mini golf in Scratch
We built a fun game together in this tutorial, but we think you can make it even cooler! Here are some ideas on how you can expand on the game you built today.
1. Add More Levels
We only have six levels in our golf game today, but you can add as many as you like! Just make sure to keep the same color for your walls in whatever level you build, and add code that moves the Hole and Tunnels to the correct X and Y location for that level.
2. Add More Features
Lot's of mini golf games have other obstacles, like water that makes you start from the beginning again, or moving walls. How could you add those to this project? You can also add certain sections to your level that increase the Velocity of the Ball when it touches them, or perhaps decrease the Velocity of the Ball at a faster rate.
3. Add Customization
One of the fun parts about going out and playing mini golf is choosing the color of your ball. Add a 'Start' screen to this game, and let the player choose the color of the Ball before playing the game. You could do this with the color effect block in the 'looks' section of the code, or by simply having different costumes or sprites.
Code a Cool Golf Game in Scratch
In this tutorial, we learned how to build a mini golf game in Scratch. We used a Velocity variable to keep track of how fast our golf ball was moving, and examined some ways that we can get sprites to bounce in Scratch. Most importantly, we built a game that will be perfect for remixing and expanding. We can't wait to see what you come up with!
Up next, learn how to make a basketball game on Scratch.
To find out how to make a soccer game in Scratch, join our Game Building Coding Club. In 55-minute sessions each week you’ll build a new fun project with live expert instruction! Or check out our fun free Scratch intro class to advance your Scratch coding skills.
Key Coding Concepts Review
Today we explored several core coding concepts that not only brought our mini golf game to life but also provided a foundation for more complex projects. Here’s a recap of what we learned and how we used these concepts:
1. X and Y Coordinates
Understanding X and Y coordinates was crucial as we set up our game’s levels. Every element—walls, holes, and tunnels—needed to be precisely placed on the grid, and this made coding smoother when moving between levels.
2. Velocity and Motion
We introduced a variable called "Velocity" to control how fast our golf ball moves. Velocity is key in replicating real-world physics, where the ball starts fast but slows down over time. We used the move block to determine the ball’s position and gradually decreased the Velocity to create that realistic rolling effect.
3. Sprite Interaction and Conditional Logic
Bouncing the ball off the walls was a challenge! Since Scratch doesn’t have a built-in bounce function, we had to create our own. We tackled this by writing code that changes the ball’s direction based on whether it touches a horizontal or vertical surface. Using color detection for our walls simplified things, making it easier to build levels.
4. Tunnels and Teleportation
Introducing tunnels added an extra layer of complexity. We coded our ball to teleport from one tunnel to another, which brought new strategic possibilities to the game. This showcased how simple logic combined with creative design can create engaging gameplay features.
5. Customizing Levels and Game Flow
We discussed how to add multiple levels and even created a winning screen. By positioning sprites like the hole and tunnels with precision and resetting variables, we maintained smooth transitions between levels. This step highlighted how planning and code organization are key to building more extensive games.
6. Scoring and Game Rules
Our game’s scoring system followed golf’s unique twist—aiming for the lowest score. We added a "Strokes" variable that tracked how many attempts it took to get the ball in the hole, which is the essence of a mini-golf challenge.
Written by Ian Kuzmik, a Create & Learn instructor with a Bachelor's Degree in English from Tulane University. He's been teaching grades K-8 since 2019, with a focus in the subjects of ESL and Computer Science.

