Building a scrolling game in Scratch coding may sound intimidating but it doesn’t have to be. In this tutorial, we will show you how to make a scrolling game on Scratch using more logic and less blocks.
Our scrolling game revolves around a car, which will be controlled by the player; and a tricky pathway that the car is supposed to stay on in order to continue rolling.
Additionally, we will use right, left, and up arrow key to control the car’s position in this game. The goal is to utilize the three keys in order to stay out of the “red zone” which appears whenever one pathway ends and the new one begins. The player must pay close attention to the road and take swift action in order to stay afloat.
To add an extra touch to the animation of the game, we will add a few sprites to the background to make our scrolling game even more dynamic.
To make even more cool Scratch games, check out our Game Building class and a free Scratch class for live expert guidance.
Here's how to make a scrolling game on Scratch
Start by logging into your Scratch account here.
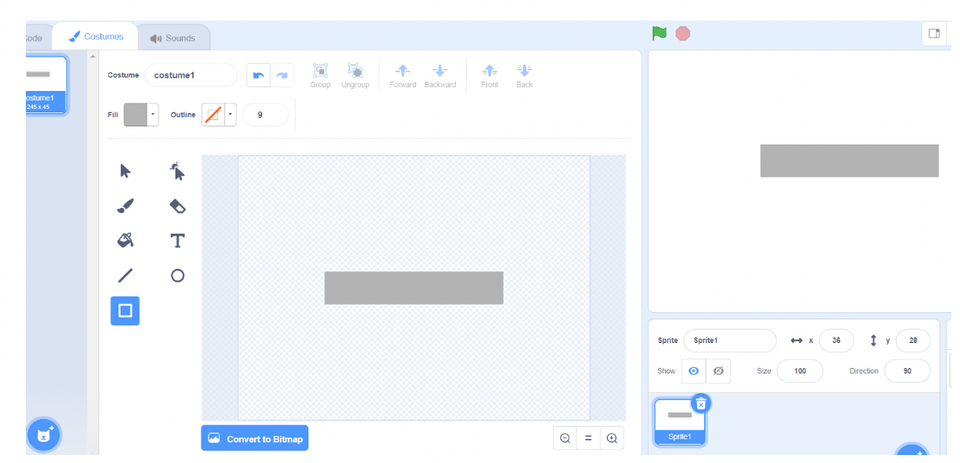
STEP 1: Create a “pathway” Sprite, using the Paint option.
Instead of clicking on the Sprite icon that takes us to the Sprite library, we are going to move our mouse pointer to hover over it, and then select Paint to create our own Sprite. This action takes us to the Costumes tab where we will click on Convert to Bitmap and “Fill” to choose the color. To save time, use Rectangle tool and then left-click and press down on mouse, and start to drag your mouse pointer from left to right. We want to make our Sprite appear around the center of the canvas.
STEP 2: Create a backdrop using Paint and add layers.
Similarly, we are going to skip the Backdrop Library by selecting the “Paint” option once the mouse pointer is hovered over Backdrop icon. Once in Backdrops tab, click Fill to select a desirable background color, and then click on Rectangle tool. Left click and hold your mouse in upper left corner of the screen, then drag and release it in the right bottom corner. We now have our first/base layer. Use the same technique to add our second and third layer. Just be sure to deselect “outline”.
Remember, the red line will be the losing point in the game. We’ll use the blue layer for our shark Sprite.

STEP 3: Import the reset of the Sprites and add a second backdrop.
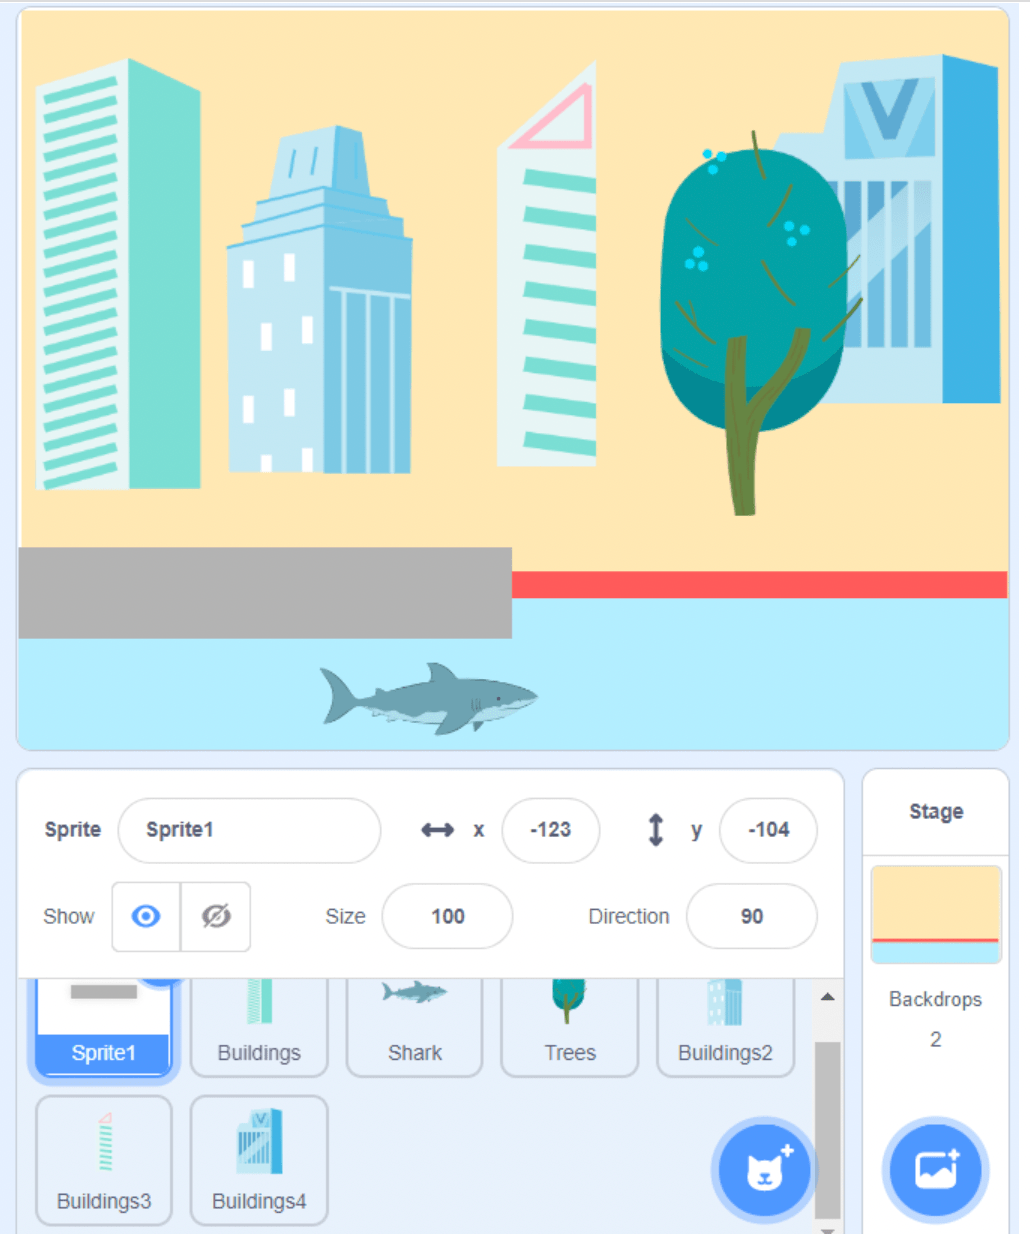
Add a second backdrop which will be used for our “Game Over” message. We can either get it from the Backdrop Library or we can make our own. Next, choose Buildings, Shark, and Trees Sprites from the Sprite Library. Once we have selected all three Sprites, right-click and duplicate the Buildings Sprite four times. One by one, clicking on the Costumes tab and choose from building-a, building-b, building-c, etc.
All four Buildings Sprites should have a different picture. Drag and place your buildings and the tree a few inches above the red line and apart from one another. Drag and place the shark at the bottom of the screen and resize it from 100 to 50 by clicking inside of the Size bubble. Drag and place your custom-made pathway Sprite on the left of the stage and on top of the red line.
STEP 4: Coding time! Make your background Sprites “scrolly”.
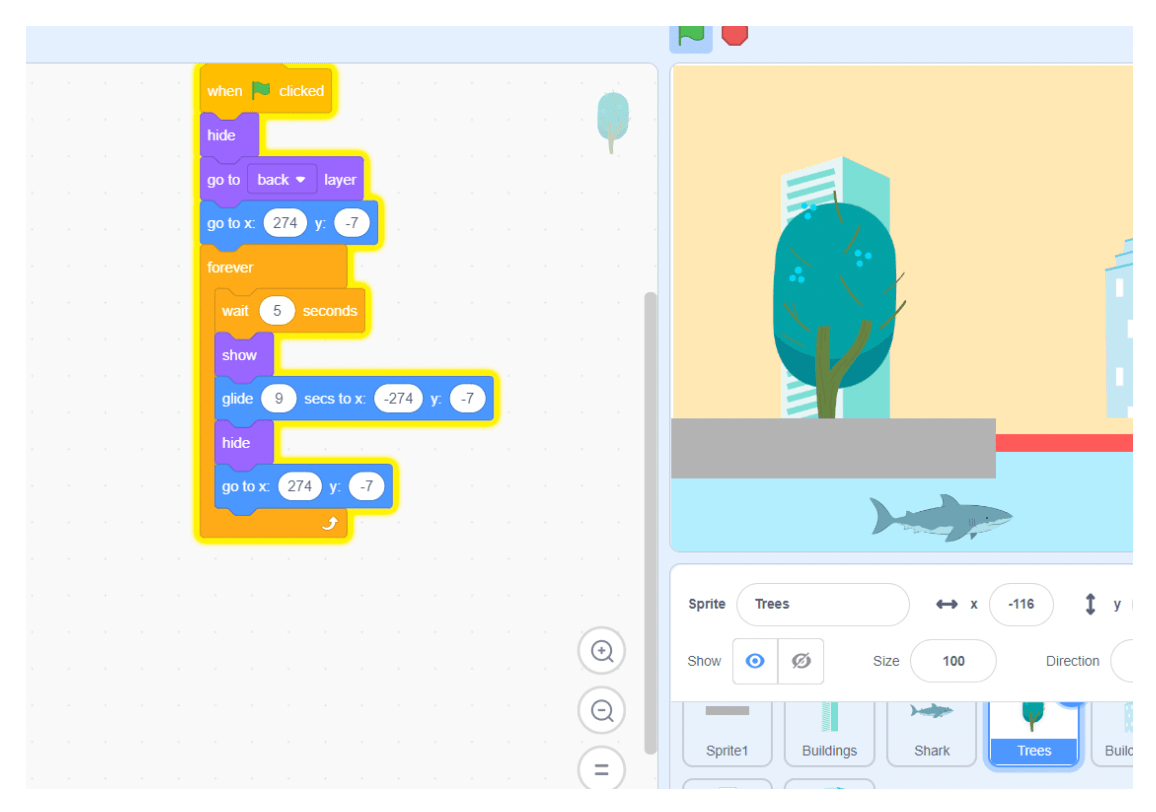
The idea is to have an “in-transit” view of our game. The car will eventually be placed on the pathway, and it will move from left to right while surrounding objects, such as trees and buildings, will move towards the car. We will use our Trees Sprite to demonstrate what is meant by that, in terms of blocks, and then we will apply the same concept for all Buildings Sprites.
Code wise, we will manipulate the x-axis because the x-axis represents the horizontal plane of a graph. Our y-axis will stay the same for all background Sprites. In Scratch, the range to the right of where x-axis and y-axis intercept is from -1 to about -274, and +1 to about +274 is the range to the left. Hence, we will start the gliding of our background Sprites from -274 to +274 with an exception that we will use the “hide” block and “show” block once our Buildings and Trees Sprites reach the very end on the left and will start over on the right of the canvas. For a smoother look, change the period of wait time for each Sprite in this step to avoid overlapping as they scroll right to left. However, the gliding time for all background Sprites will be the same (9 seconds).
STEP 5: Add the car Sprite and use left/right arrow keys to move it.
Now that we have set our stage and used the same blocks from the Trees Sprite for our Buildings Sprites, it is time to work on our car Sprite. Select a car of choice from the Sprite Library and resize it to fit inside of our path sprite. Be sure that it is also inline with the red layer, so that we can end the game when the path is pulled from under the car – hence the reason for player to stay vigilant and make the car “jump” when it is time to.
There are four important concepts in terms of code for the car:
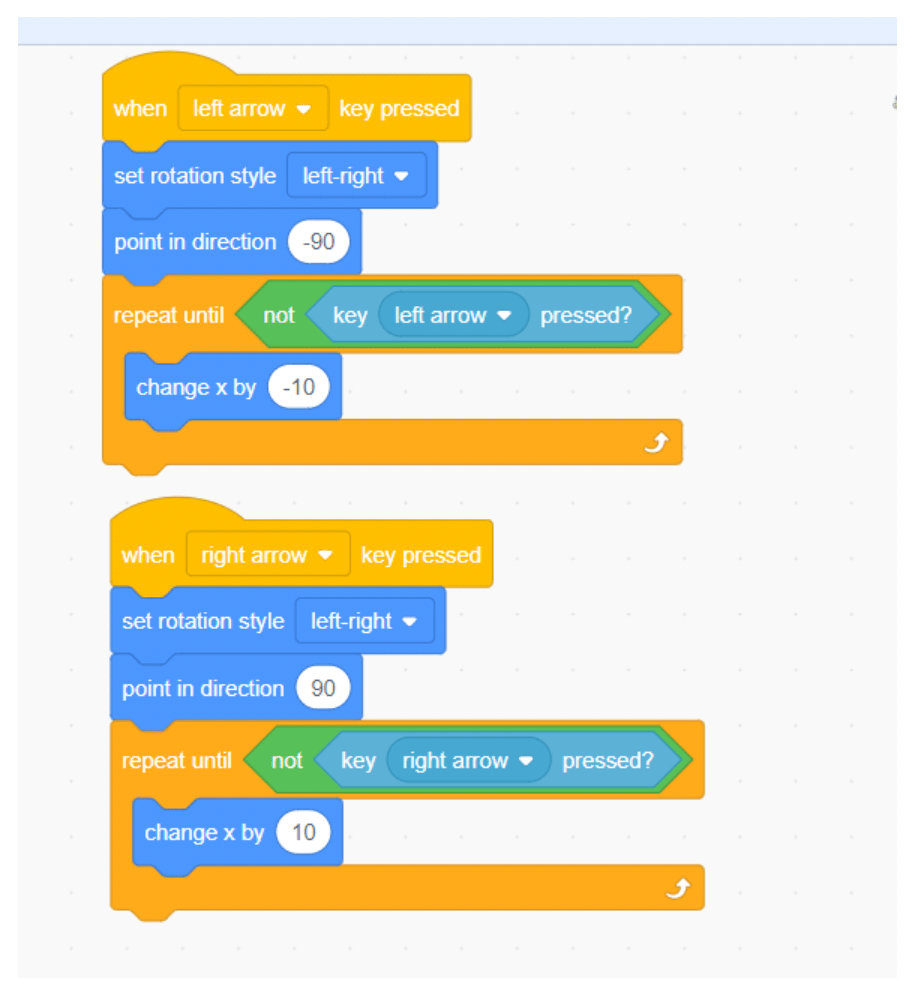
1. Turn to the right and move in that direction when the right arrow key is pressed
2. Turn to the left and move in that direction when the left arrow key is pressed
3. Go airborne or “jump” when the up arrow key is pressed
In this step, we will only focus on the right and left arrow keys and make them as simple as possible. Something to keep in mind though…would we want the car Sprite to be able to move left and right while in the air? The answer is no, but we will deal with that part later.
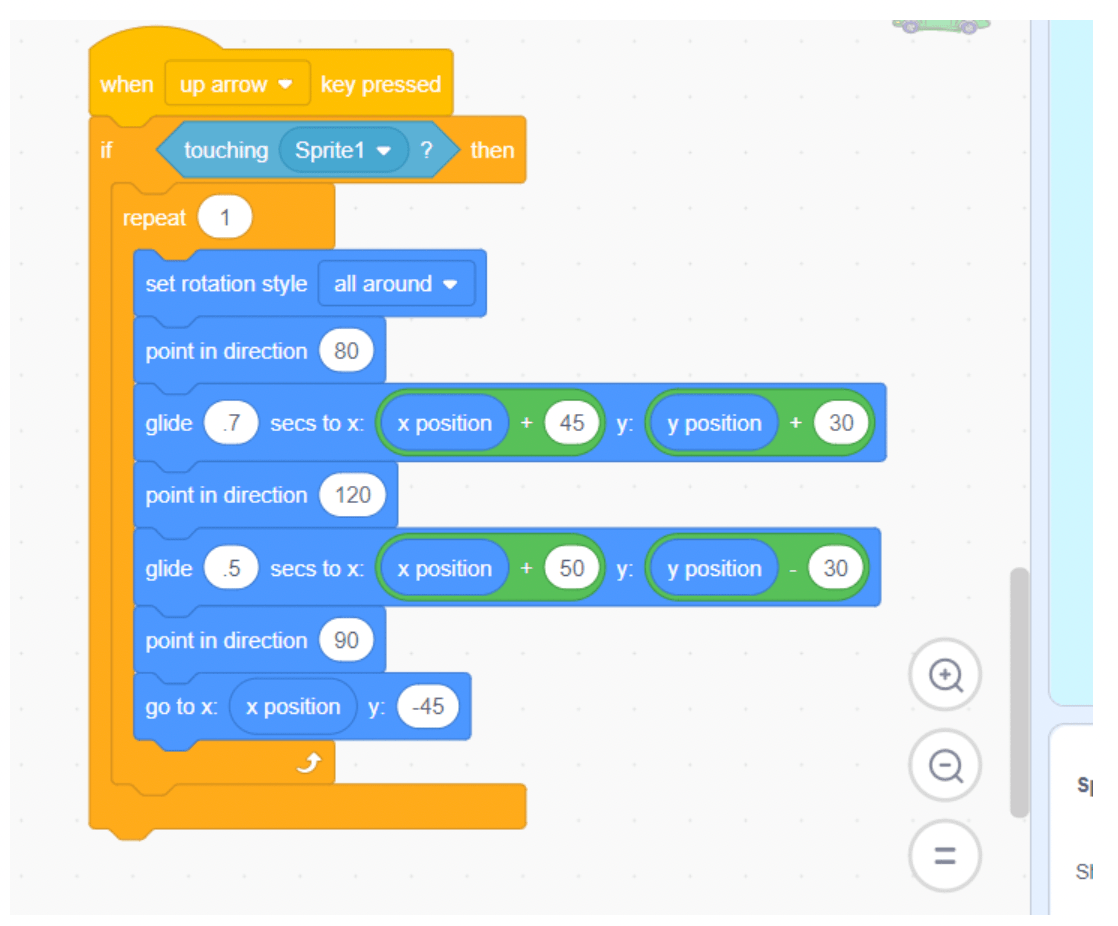
STEP 6: Up arrow for the car to avoid falling to the “red-zone”.
We want to see the front of the car slightly lift off the ground and move forward a little faster than usual, as if it had a powerful accelerator. However, we only want to allow for this action while the car is on the ground and rolling. In other words, if the player does not press the up-arrow key in time, and the car is no longer touching the pathway Sprite, then it will sink, and the game will be over.
Similarly, we want to make this game challenging by restricting the car for going “airborne” every time the up arrow key is pressed. In that case, we need to add some sort of a condition to our logic for the up arrow key. The rest can be done using simple blocks like glide to x y position. We can also use direction block to make the car appear like it is slightly pointed up at the time it goes “airborne”, and make it point down once it exceeds a certain height. This makes the game more advanced, and the player must know exactly when to utilize the up-arrow key.
STEP 7: “Game Over” backdrop.
Before we get to the scrolling part of the game, let’s take care of a few other things. We want to think about what happens when the player doesn’t press the up arrow key and the car touches the red line. Here is the list of things that we want to see happen:
- Sink the vehicle to the bottom
- Switch backdrops and announce “Game Over”
- Hide all Sprites
- Show all Sprites when the game starts over
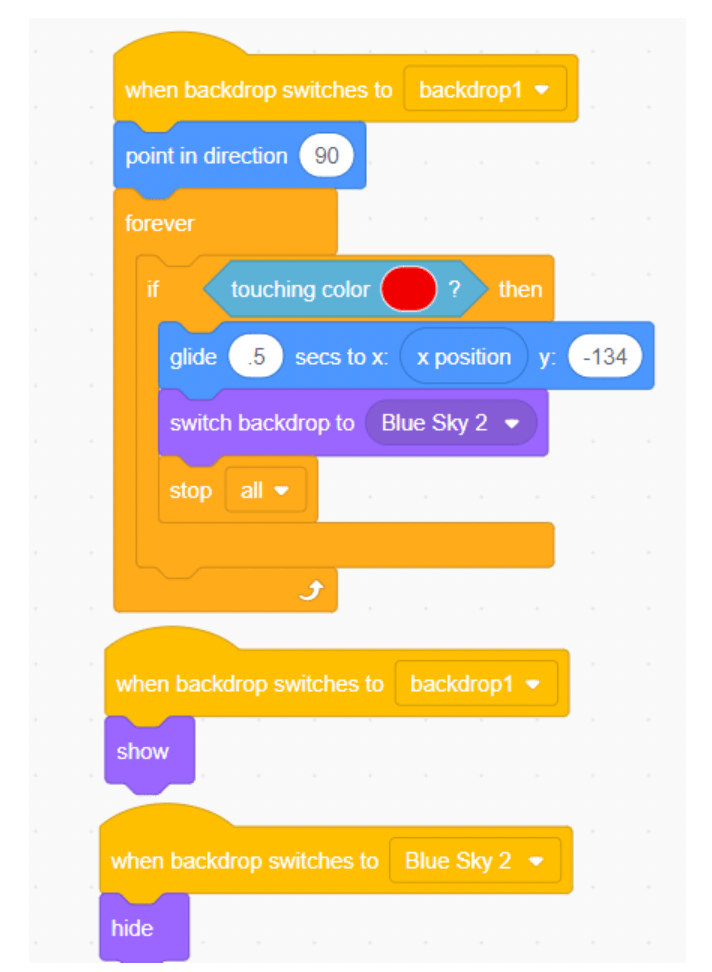
This is fairly easy to program in Scratch. Let’s start with the “sinking the car” part. We first want to check and see if the car is touching the red line. If so, we want to make it glid to the bottom of the canvas (screen) by selecting a low point of y axis. In our case, -134. Then we want to switch our backdrops to “Blue Sky 2” which is the backdrop we chose as our “losing” part. And to make them appear again, we’ll check to see if the green flag is clicked, and if so, we’ll switch the backdrops to our original backdrop or in our case “backdrop1”. We will use these two backdrops interchangeably, and hide Sprites when the backdrop is Blue Sky 2, and then make them show back up once the backdrop1 is on.
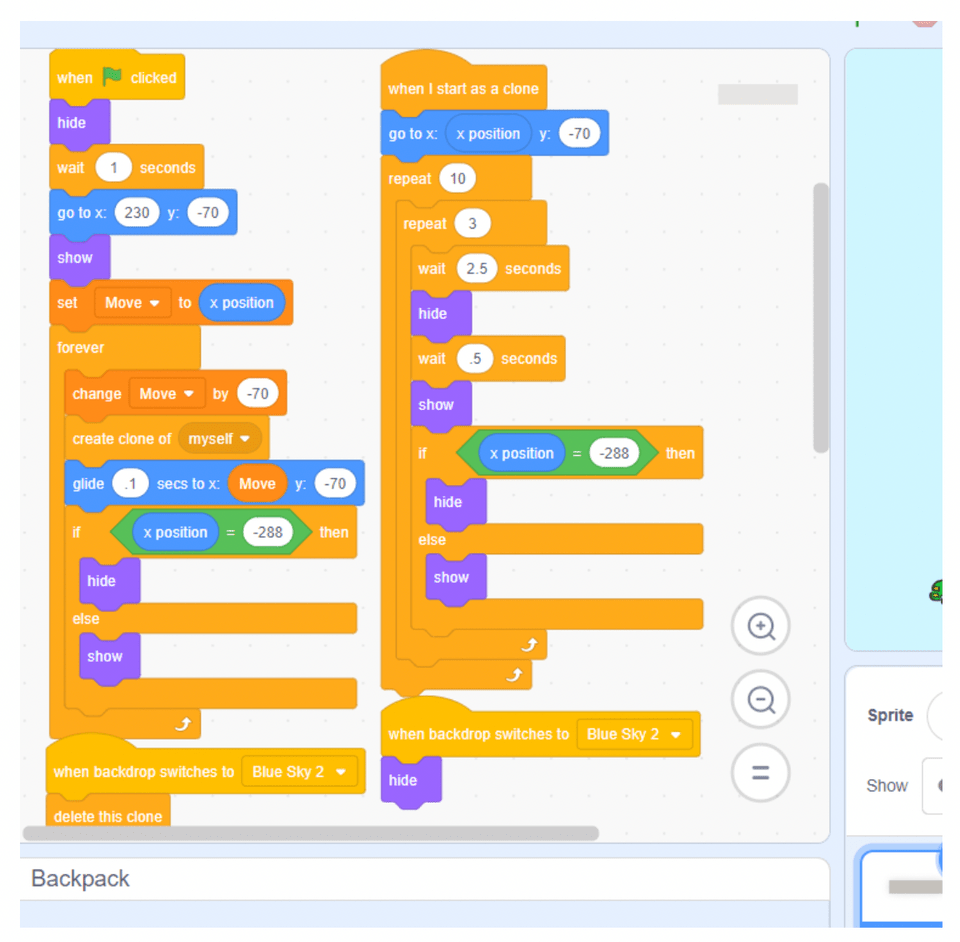
STEP 8: Program Pathway sprite.
We saved the best for last. It is time for the scrolling idea to come alive. For this to happen, we chose to go with the clone block and a variable we named “Move” track the x and y points. Basically we are going to clone our existing “pathway” Sprite and then attach the clone to the back of our original pathway Sprite, all the while, they are gliding right to left. The trick is to continue to make clones after that point which will result in a stack of clones that will automatically position themselves next of the previous clone before they start to glide.
The twist is to throw in a little bit of unpredicted behavior of this clone and glide process, by hiding then showing the Sprite. For that part, we will use a couple of repeat blocks and throw them inside of another repeat block, to make their patter less predictable.
The very outer repeat block can be replaced with a forever loop, and at that point, we can have a few more repeat loops inside, each holding in the code that will dictate how many seconds to wait until our clones go from “hiding” to “showing” phases which makes for a tricky scrolling look.
Make a scrolling game in Scratch
In this tutorial, we showed you how to improvise commonly used blocks, such as glide, clone, hide, show, etc., and build a sophisticated scrolling game. With little effort and a clear-cut objective, we have accomplished a lot. In other words, it is the logic behind the code that drives and simplifies complexity. An idea, plan, and creativity are all part of logic, and when combined, great apps are built. Up next, see how to make a clicker game on Scratch.
To make more fun Scratch games try Create & Learn's Scratch coding for kids classes or advanced Scratch programming for older children, designed by experts from Google, Stanford, and MIT. There's even a free intro session, so there's no risk in trying!
Written by Sandra Dizdarevic, a Create & Learn instructor with 6 years of experience teaching STEM to children in the 3rd through 11th grade. She has an Undergraduate as well as a Masters Degree in Management Information Systems from UNO.