

Candy heart messages are one of the most fun parts of Valentine’s Day. Wouldn’t it be great if your child could create a virtual message generator to send messages to their friends online? In this fun Scratch Valentine's Day coding project tutorial, I will show you how to do just that by creating a Candy Heart Message Generator.
If you would like to follow along with my version of the project you can find it here. Let’s get coding!
For live expert guidance making all sorts of cool games in Scratch, enroll your child in fun online game coding classes, designed by experts from Google, Stanford, and MIT. Start with beginner-friendly Scratch coding.
Fun Valentine's Day Coding Project With Scratch Coding
Creating a candy heart message generator in Scratch is a wonderful Valentine’s-themed coding activity. Follow along to learn how to create a candy heart message generator in Scratch!
1. Create a New Project and Add a Backdrop
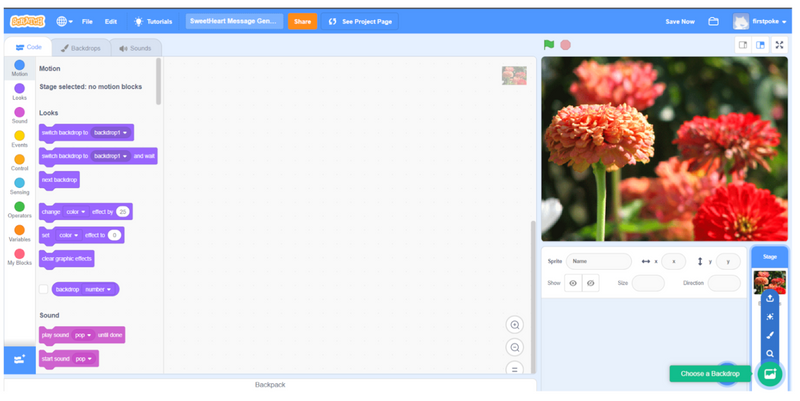
The first step, of course, will be to create a new project. Navigate to Scratch and click “Create” to create a new project. Delete the cat sprite that will load in by default and then select a fitting backdrop by clicking the “Choose a Backdrop” button in the bottom right corner (shown in green in the image above). We chose “Flowers,” but the choice of backdrop is yours!
2. Add the Candy Heart Sprite
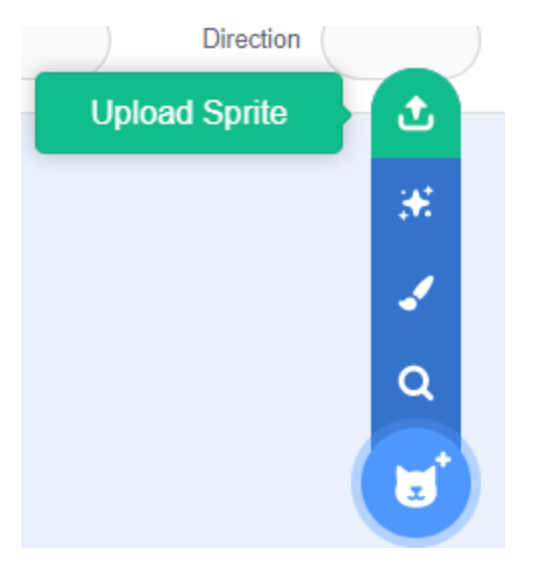
Since Scratch doesn’t come with a Candy Hearts box sprite, we can upload one from our own computer. Download the sprite image here! Then, in Scratch, mouse over the “Choose a sprite” button and click “Upload sprite.” Find the Candy Heart image on your computer and upload it to Scratch. Then, move it to the center of the screen and update its “size” field to make it an appropriate size - we chose 70.
3. Create a “Click Count” Variable
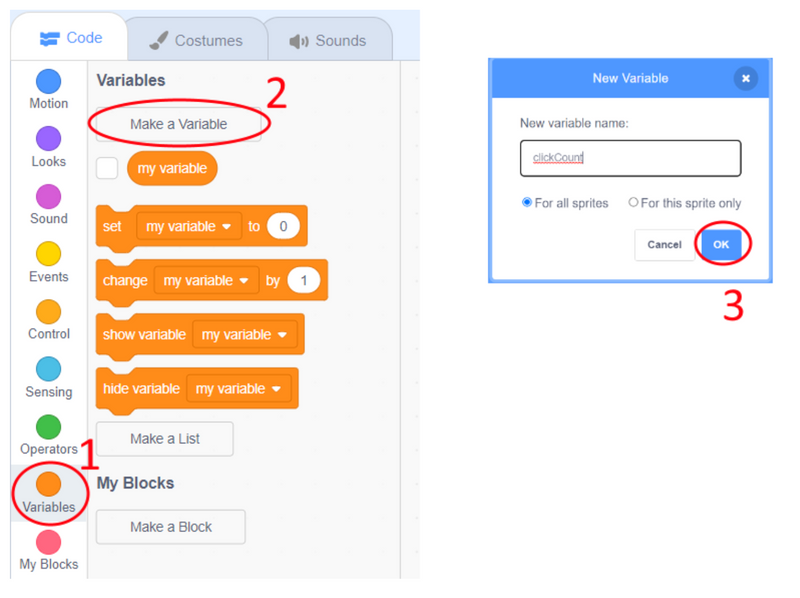
We are going to make our candy heart box dispense a message after it is clicked four times. To control this, we will need to make a new variable called “clickCount.” Click the orange “variables” tab and click “Make a Variable.” Give it the name “clickCount” and press “OK.”
4. Code the Candy Heart Box
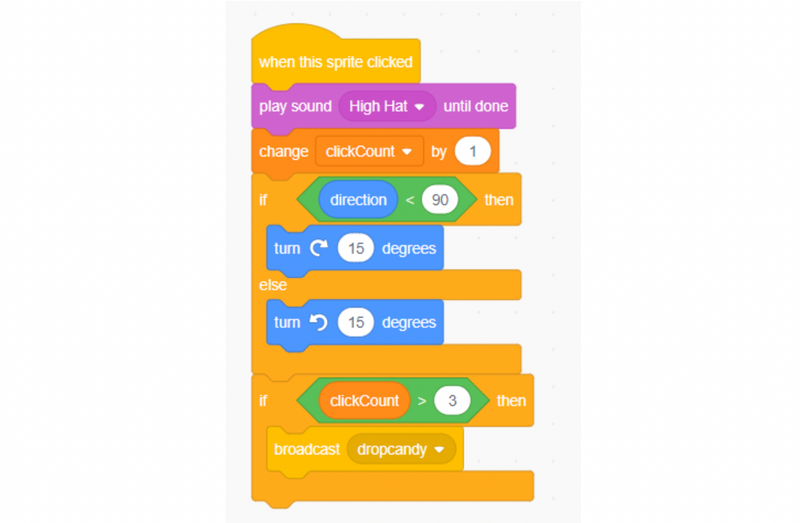
With our variable in place, we are ready to code the Candy Heart Box sprite. Read below to learn what each block of code does; then, add them to your own program.
- When this sprite clicked: The code below will run every time the candy box is clicked
- Play sound (high hat) until done: This block makes the sound “high hat” play when the box is clicked. We chose this sound because we thought it was appropriate, but you can choose any sound you like from the Scratch sound library. Note that, to import a sound to your project, you must click the “sounds” tab at the top and click the blue “+” sign. Once you click the sound, head back to the “code” tab to use it in your project.
- Change (clickCount) by 1: We need to track how many times the sprite has been clicked, so this will increase our clickCount variable by 1 each time the box is clicked.
- If ([direction] < [90]) then…else: We want our box to rock back and forth each time it is clicked. This if/else block checks to see if the angle is currently less than 90. If it is, the box will rotate 15 degrees clockwise; if not, the box will rotate 15 degrees counterclockwise. Essentially, this makes it so that the box rotates back and forth each time it is clicked.
- If ([clickcount] > 3) then: This block checks if our clickCount variable is greater than 3. If it is, it executes the line below.
- Broadcast (dropcandy): This block broadcasts a message called “dropcandy” which can be received by other blocks. This will be helpful in the next step.
5. Add and Edit the Message Sprite
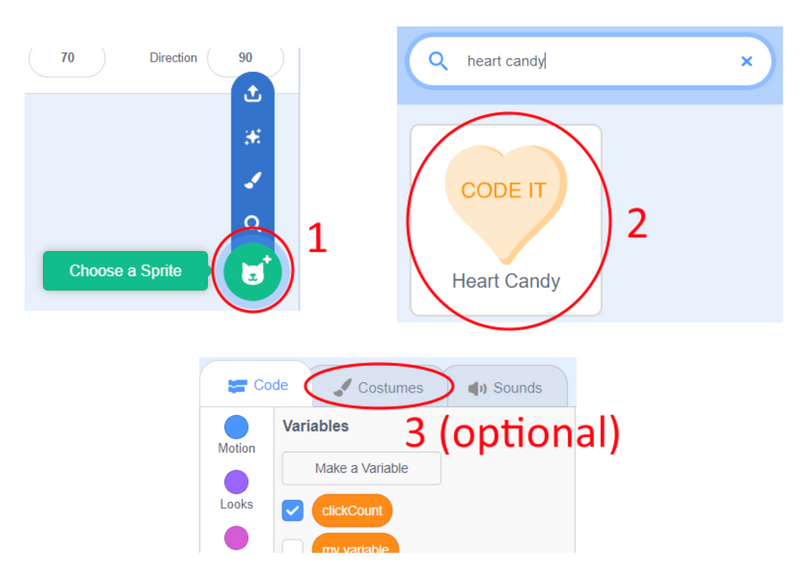
We will use a second sprite to display messages in our program. Click the “Choose a Sprite” button, search for “heart candy,” and click the sprite to load it into your program. The sprite comes pre-loaded with four messages; you can customize these messages and add additional costumes using the “costumes” tab at the top of the page.
6. Code the Message Sprite
Once you have your message sprite added and customized, it’s time to code it! We will add two different blocks of code to our program. Read below to better understand the code in the image above. Then, when you’re ready, add the blocks to your program.
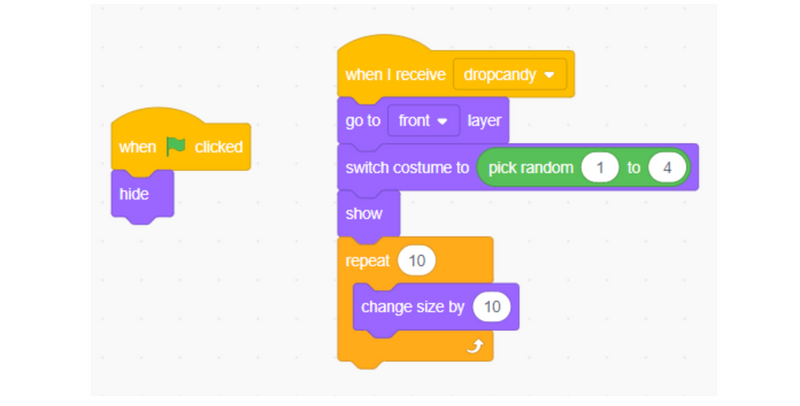
- When green flag clicked: The code below will run when the green flag is clicked
- Hide: We don’t want our message to show at the very beginning of the program. This block will hide the message when the green flag is clicked, and we can code it to appear later when we are ready.
- When I receive (dropcandy): Before, we coded our Candy Hearts Box to broadcast “dropcandy” when it had been clicked four times. The code below will run on our message sprite when this “dropcandy” message is received.
- Go to (front) later: We want the message to be in front of the Candy Hearts Box, which can be accomplished with this block of code.
- Switch costume to (pick random [1] to [4]): We want a random message to be displayed. Since each costume of our sprite has a different message, we can accomplish this by switching the costume to a random number between 1 and the total number of costumes our message sprite has. In our case, the number of costumes is 4, but it may be more or less for you depending on how you customized the sprite.
- Show: If you remember, we previously instructed this block to “hide” at the beginning of the program. At this point, we’re ready for it to be visible, so we use this “show” block.
- Repeat (10): The code within this repeat block will run 10 times.
- Change size by (10): This makes our message grow by 10. Since it’s repeated 10 times, it has the effect of making it look like the message is growing into the program.
7. Create a Reset Button
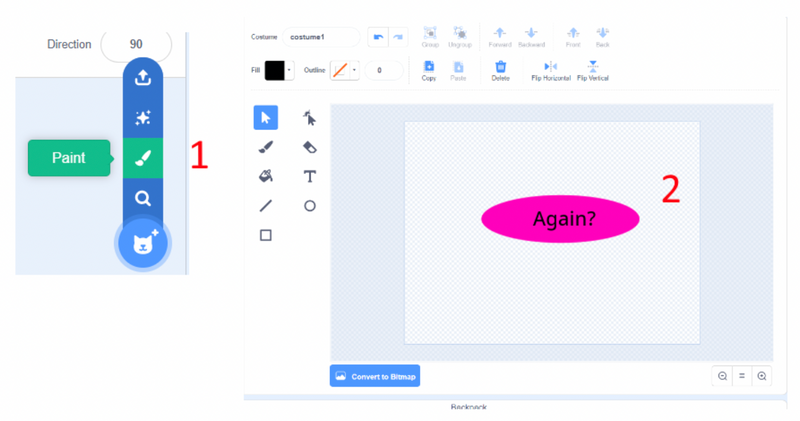
Odds are, the user will want to use our program more than once. Let’s code a button that will reset our program! First, click “choose a sprite” and “paint.” Design a reset button; we recommend using a filled oval with the word “again?” inside. Finally, scale down the size of the button and place it in a convenient location on your project - the bottom-left corner works great!
8. Code the Reset Button
With your reset button created, you are ready to code it. Let’s take a look at what these three blocks of code do, and then you can add them to your program.
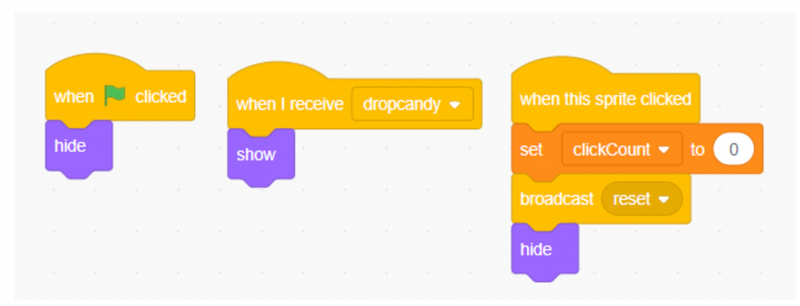
- When green flag clicked: The code below will run when the green flag is clicked
- Hide: We don’t need this reset button to show until after the first message has appeared, so we will hide it at the beginning of the program when the green flag is clicked.
- When I receive (dropcandy): The user will need access to the reset button every time a message appears. Messages are triggered when the dropcandy message is broadcast, so we can use this block to execute the code below it whenever this dropcandy message is received.
- Show: This block makes the reset button appear.
- When this sprite clicked: The code below will run if someone clicks the reset button
- Set (clickCount) to 0: Since we’re resetting our program, we will need to reset our clickCount variable
- Broadcast (reset): This will transmit a “reset” message that we will use in the next step
- Hide: The button has served its purpose, and it can now hide until it is needed again.
9. Reset the Messages Sprite

Click on the “Heart Candy” sprite - now that we have implemented our “reset,” functionality, we can incorporate it here. Read the description of the new code below, and then add it to your program.
- When I receive (reset): The code below will run when the “reset” message is received from our reset button.
- Set size to (100%): Before, we increased the message size by 10, 10 times over. If we want to run the program again, we should reset the message size to normal.
- Hide: If we’re going to run our program again, we should hide the message sprite until the box has been clicked 4 times again.
10. Allow Reset From Green Flag

Click the “candy hearts box” sprite. In addition to allowing the user to reset the program with the “again?” button, it’s also a good idea to let them reset the program when the green flag is clicked. We can do so with the code above.
- When green flag clicked: The code below will run every time the green flag is clicked.
- Set (clickCount) to 0: This will reset our clickCount variable to 0.
- Broadcast (reset): This will broadcast our reset message, which will be received by the “Heart Candy” sprite.
Enjoy Your Valentine's Day Coding Project
If you and your child have followed along until this point, congratulations! You have successfully created a message generator in Scratch, just in time for Valentine’s Day. If you had fun with this project and are ready for another Scratch tutorial, check out How to Make a Virtual Pet in Scratch. If your child would like learn more about building with Scratch, enroll them in a free Scratch class. They can even earn a certificate! Thanks for reading, and happy coding!
Written by Matt Schofield, an educator and avid coder. After studying Spanish at the University of Pennsylvania, Matt began teaching English as a second language to elementary students in Baltimore. In addition to his full-time teaching position, Matt enjoys teaching computer science in the evenings and weekends with Create & Learn.

