

As winter approaches, you may find yourself in the mood to create winter-themed projects in Scratch. But, of course, no winter project would be complete without falling snow! In this tutorial, we will show you how to create falling snow in Scratch that will spice up any project. Let’s get coding!
For live expert guidance creating all sorts of cool Scratch projects, enroll your child in our award-winning free Scratch class for kids, designed by experts from Google, Stanford, and MIT.
How to Make Snow Fall in Scratch Coding
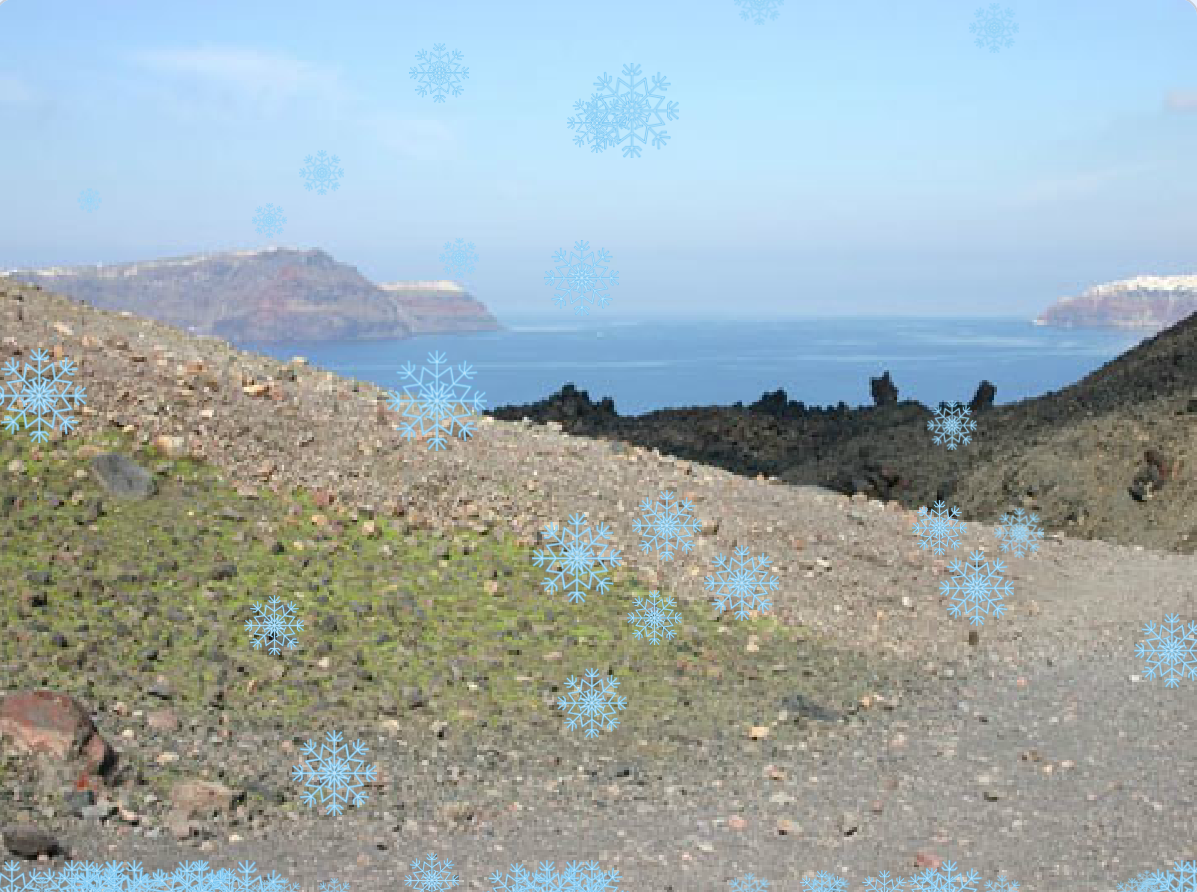
Creating falling snow in Scratch is a fun programming activity that will enhance any project you are working on. Follow along to learn how to create falling snow in Scratch! Here's the project we'll be making. You can also watch our video tutorial if you prefer.
1. Create a New Project and Add Backdrop
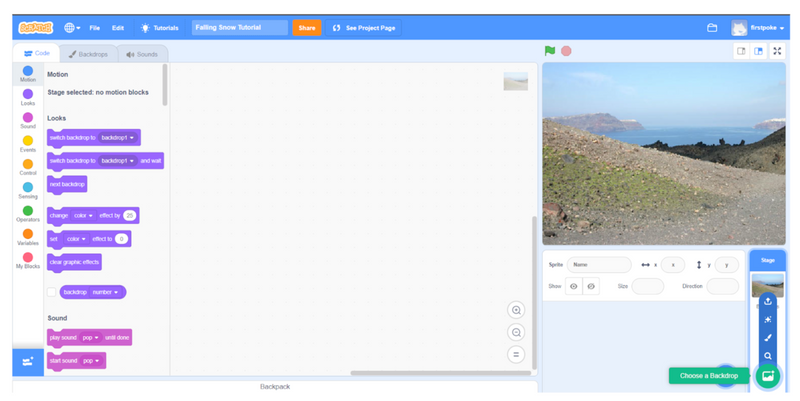
The first step, of course, will be to create a new project. Navigate to Scratch and click “Create” to create a new project. Delete the cat sprite that will load in by default and then select a fitting backdrop by clicking the “Choose a Backdrop” button in the bottom right corner (shown in green in the image above).
2. Add a Snow Sprite
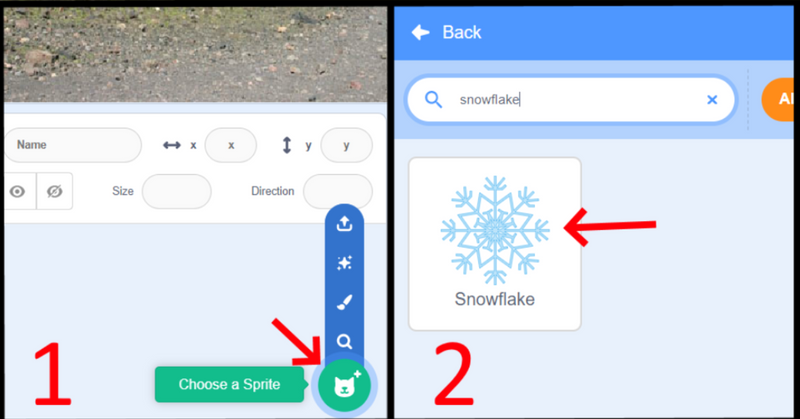
Once you have chosen a backdrop, the next step is to add in a snowflake sprite. Click the “Choose a Sprite” button in the bottom right, search for “snowflake,” and click the snowflake sprite that appears. When the snowflake sprite loads in, it will be very large; we will fix that in step 4!
3. Create Snowflake Clones
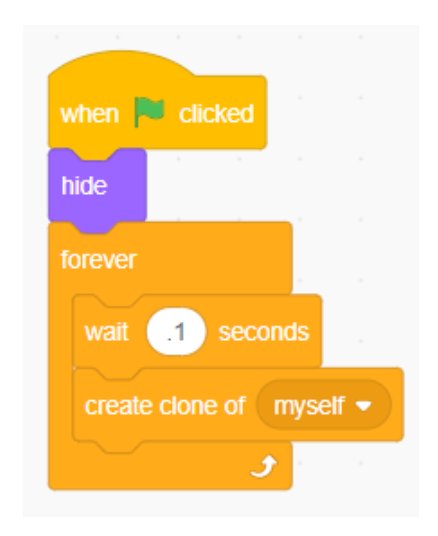
Right now, we only have a single snowflake in our project. However, to create snowfall, we are going to need an infinite number of snowflakes! Instead of loading in hundreds of snowflakes manually, there is a smarter method. Scratch has a function called “cloning” which will make copies of our snowflake sprite. Take a look at the code above; let’s dive into what each block of coding is accomplishing.
- When “green flag” clicked: This block will cause the blocks below to run when the green flag is clicked.
- Hide: Although we want our original snowflake sprite to exist so that it can be cloned; we don’t actually want it to be visible. Without this hide block, our original snowflake would stand still in the middle of our project. By hiding it, we are still able to clone it, but it is not visible.
- Forever: This creates a loop that will run forever. This suits our needs, because we want our snow to fall forever (or, at least until the stop sign is clicked to end the program).
- Wait .1 seconds: This block controls how often a new snowflake appears on the screen. The .1 value can be increased or decreased to control the rate of snowfall; a value of 0 will create very heavy snowfall, while a value of 1 will create occasional snowfall.
- Create a clone of myself: This block tells the program to create a copy of the original snowflake.
Once you are comfortable with and understand this code, go ahead and add the code to your own project, adjusting the value in the “wait” block to suit your needs.
4. Control Snowflake Behavior
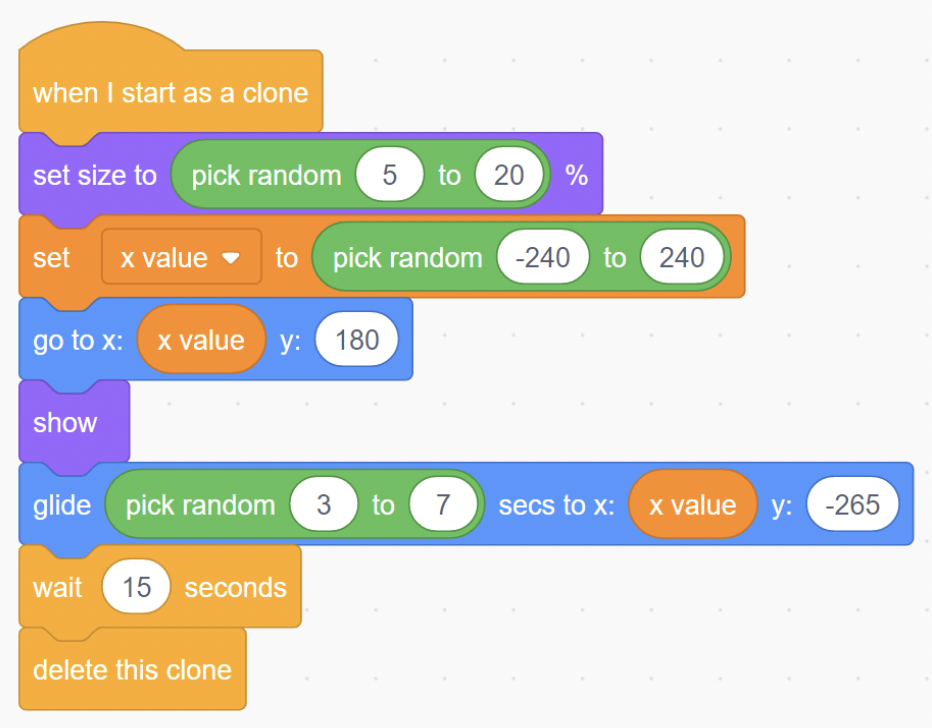
At this point, we have created code that will infinitely clone our original snowflake. Now, we need to control what happens with these new snowflake clones. Let’s analyze the code above to figure out how it works.
- When I start as a clone: This block makes it so that the following blocks will run every time a new clone is created.
- Set size to (pick random 5 to 20) %: In real life, snowflakes aren’t all the same size. Our program will look more realistic if we code in small changes in snowflake size. This block makes it so that, every time a snowflake clone is created, its size will be between 5%-20% the size of the original snowflake. This block also solves the issue of the snowflake being incredibly large. If you wish for greater or less variation in the sizes of your snowflakes, you can change these values as you wish.
- Set x value to (pick random -240 to 240): Sprite placement in the Scratch canvas is controlled by an invisible grid, and you can place things around the grid by giving them an x value and a y value. The x value controls placement left to right, and the y value controls placement up and down. X values can range from -240 to 240; the closer to -240, the further left, and the closer to 240, the further right. Y values range from -180 to 180, with -180 being at the bottom of the screen and 180 being at the top. All that said, this block of code randomly chooses and stores an x value that will be somewhere between the left and right of the screen.
- Go to x: x value y: 180: This block of code moves our snowflake clone to the appropriate location. The x value was determined in the previous step, and the y value is set to 180 so the snowflake will appear at the top of the screen.
- Show: As you’ll remember, in the previous code we set up, we made our original snowflake invisible with a “hide” block. If we want our new snowflake clones to be visible, we will have to make them appear with a “show” block.
- Glide (pick random 3 to 7) secs to x: x value y: -265: The glide block will make our snowflakes glide across the screen to a specified location. To make the snowflakes appear more realistic, we have placed a pick random block inside the glide block to ensure that not every snowflake will fall at the same rate. For some, it will take them 3 seconds to fall, while for others, it will take 4, 5, 6, or 7 seconds. Since our snowflakes will be falling straight down, we can use the same x value as before. You can change the y value depending on how far down you want the snowflakes to fall, but we have found -265 to work well.
- Wait 15 seconds: To make it look like the snowflakes are sticking to the ground, we let them sit there for 15 seconds before disappearing. You can eliminate this block if you do not want the snowflakes to stick, or you can increase the value to make the snowflakes stay longer. Be careful not to set the value too high, though, or too many snowflakes may be on the screen at once and your program may crash!
- Delete this clone: As we mentioned in the previous explanation, if too many snowflakes are on the screen at once, your program may crash. This block of code deletes the snowflakes to make room for new snowflakes to appear.
There are a lot of blocks for this part of the program, so it’s okay if you don’t understand every single detail. However, hopefully you have a general understanding of how the program is working. Once you feel comfortable with this code, go ahead and add it to your program.
5. Hide the X Value Variable
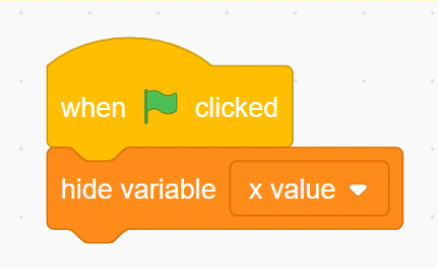
If you have noticed, our program is displaying the x-value variable in the top-left corner. You can get rid of this variable display by including the above code.
Enjoy!
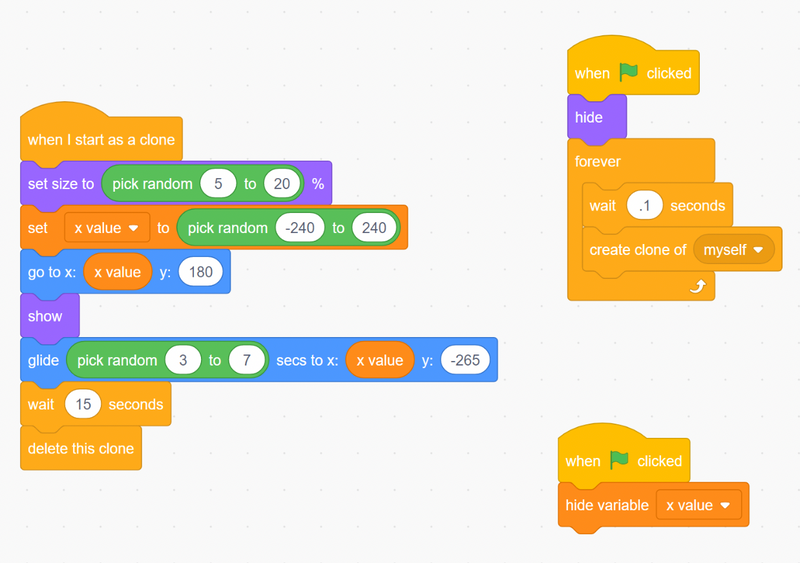
If you have followed along up until this point, you should have all of the above code in your program, and you should see snowfall when you click the green flag. Now that you have falling snow, you can further customize your program. Perhaps an animated snowman or reindeer could be a good addition!
Make Snow Fall in Scratch Coding
We hope you enjoyed this tutorial and were able to add falling snowflakes to your Scratch project. If you’re ready for a more advanced Scratch tutorial, check out How to Make a Game with Levels on Scratch. If your student would like to take Scratch classes with a live teacher and other students to get all their questions answered and follow a learning path that is designed for their age and fun, check out our incredible Scratch courses for kids. They can even earn a certificate. Thanks for reading, and happy coding!
Written by Matt Schofield, an educator and avid coder. After studying Spanish at the University of Pennsylvania, Matt began teaching English as a second language to elementary students in Baltimore. In addition to his full-time teaching position, Matt enjoys teaching computer science in the evenings and weekends with Create & Learn.

