Today, let’s make a jumping game in Scratch together. This is a very popular type of game—perhaps it's the prospect of beating your old high score, or simply the thrill of reaching new heights. Whatever your reason, we'll have a lot of fun building this game, learn cool Scratch coding strategies, and most importantly, by the end of this tutorial, you'll have a great game that you can challenge your friends and family with! This is an intermediate level Scratch project.
Want to improve Scratch coding skills with an expert? Sign up for our award-winning online, small group free Scratch class led live by an experienced instructor and designed by professionals from Google, Stanford, and MIT.
How to Make a Jumping Game in Scratch for Beginners
Here is how a typical vertical jump game works. When the game starts, platforms begin falling from the sky. The main character will start falling too! The only way to stay alive will be to keep jumping from one platform to another. The longer the character jumps on the platforms, the higher your score!
For this project, we 'll use the X and Y locations in Scratch, Clones, and Variables. Variables will not only be for the score, but also to make the game harder as it goes on. Here's a link to the Finished Project.
To setup the game:,
- Choose a backdrop
- Choose sprite to jump
- Choose or paint one sprite for your Platforms. ,

In the sample project, the Paddle sprite is our platforms, and for our jumping sprite, the Hedgehog, because hedgehogs are pretty cool. Let's get started!
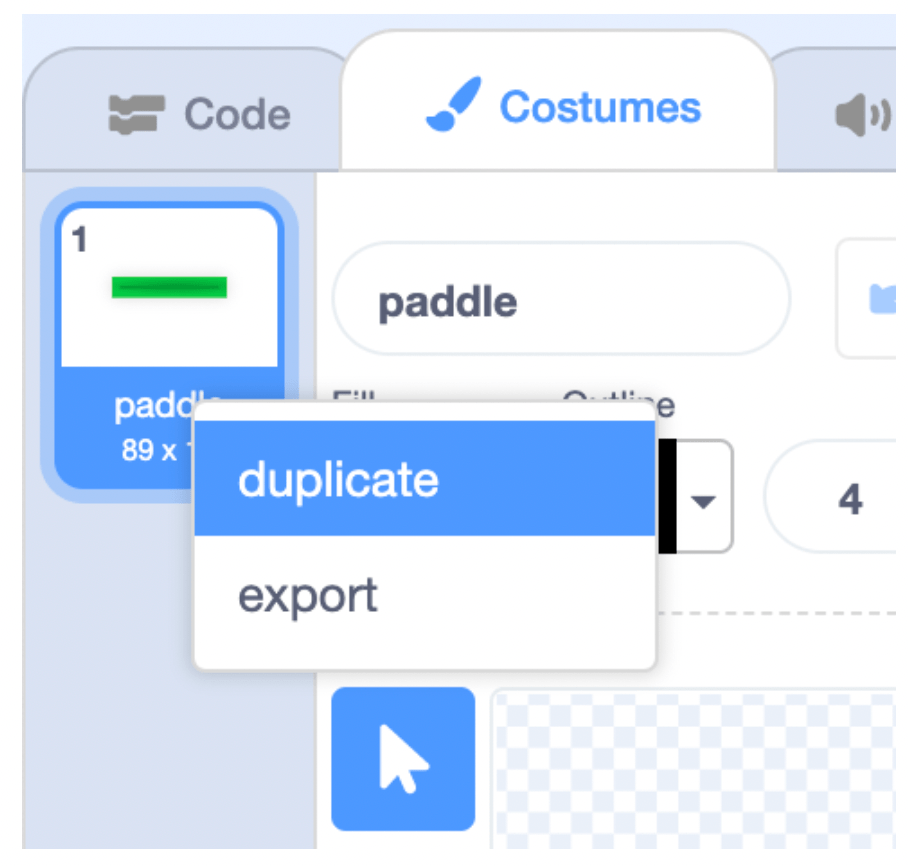
1. Create Multiple Costumes for Our Platforms
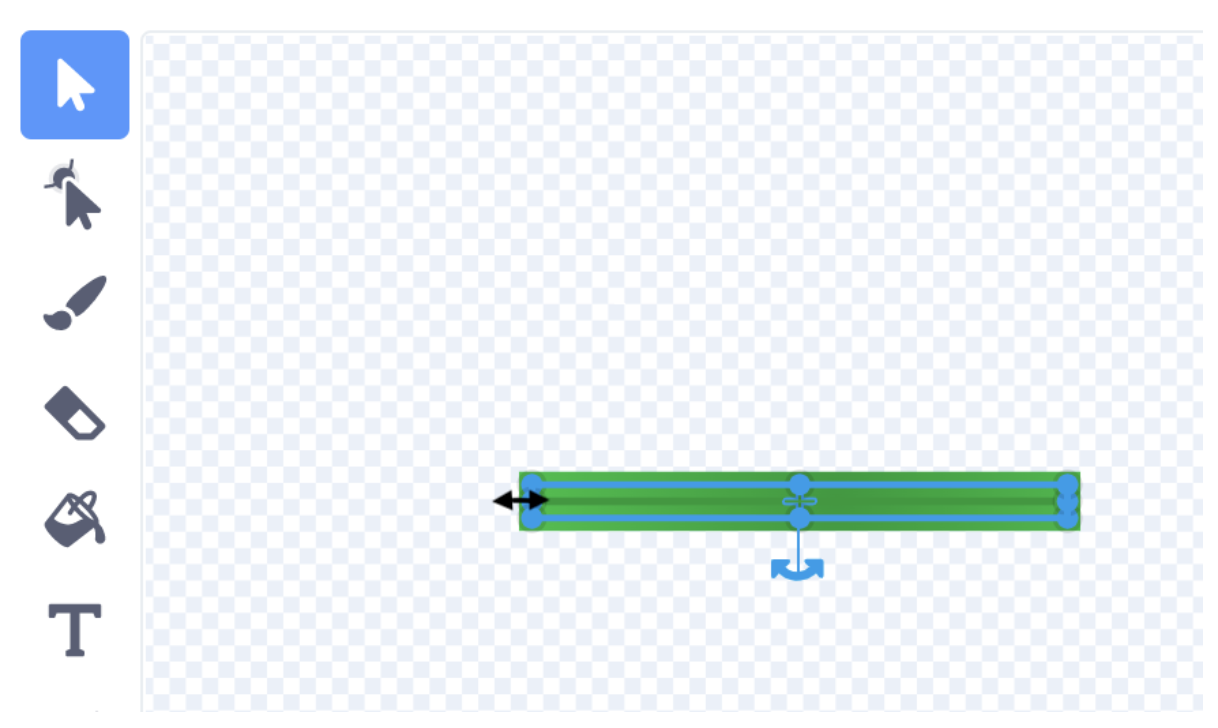
This game will be more fun if the platforms are of different sizes. Select the platform sprite and go to the costumes tab. Duplicate your sprite's costume twice, and with the select tool, drag one costume out to be long, and drag the other costume in to be short. When done, you should have 3 platforms - one short, one long, and one just normal. Feel free to change the color of the platforms.
2. Clone your Platform
The best way to show more than one platform on the stage without adding more sprite is to create a clone of the platform. What is cloning? A clone is a copy of the original sprite that also copies the code that gives behavior to the clone. Typically, the original sprite is hidden and the clone is shown.
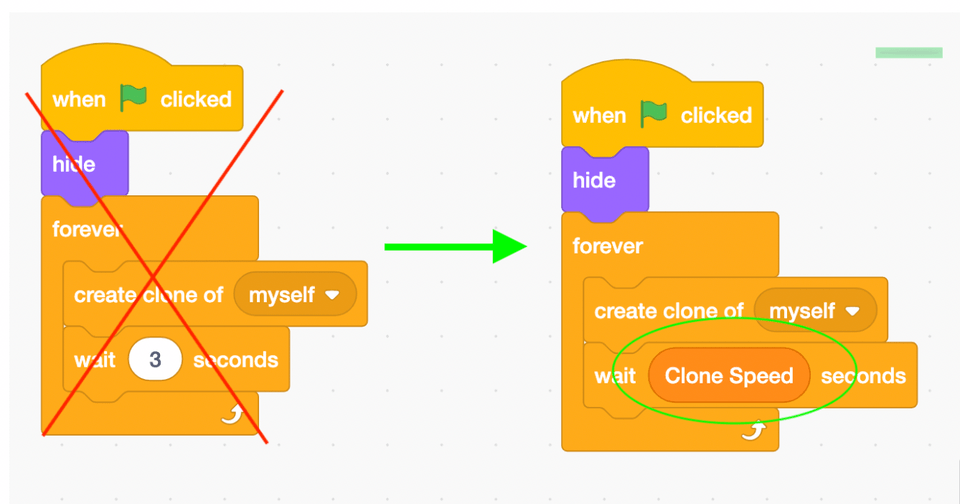
The platforms will start cloning when the game begins. Get a ‘when the green flag clicked’ block. Add a hide block. Next the clones will be created every 3 seconds. Use a 'forever' loop and a 'wait' block to clone our platform.

3. Define our Clones a Job
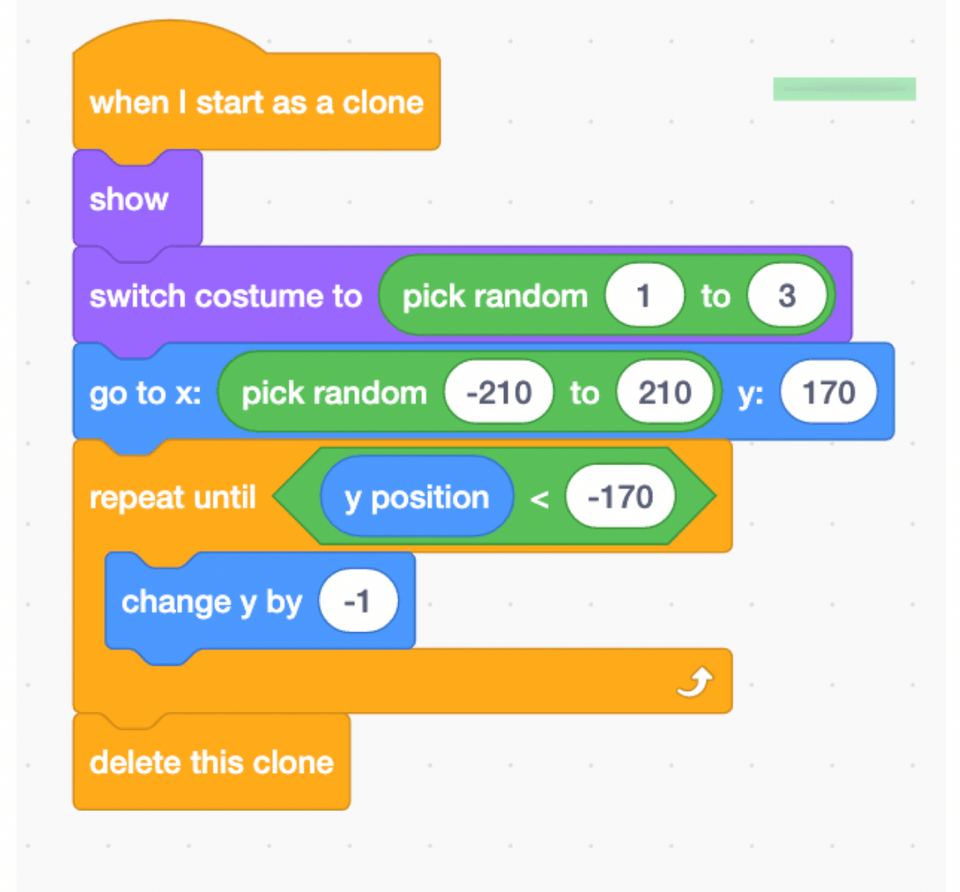
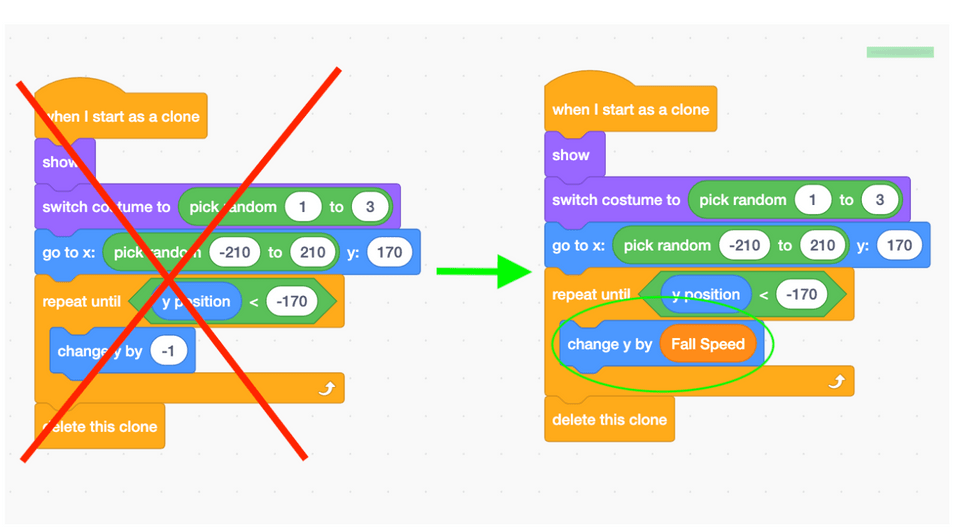
The clones are being created! But they can’t be seen and they don’t know what to do yet. Let’s code how the clone should behave. Find the "When I start as a clone" block to give them a job. Notice the shape. It is an event block that cannot be connected to another block. The clones should move from the top of the screen to the bottom of the screen, and then delete themselves.
First things first, clones need to randomly pick one of the three costumes in our sprite, and also 'show' since the original sprite is hidden. Then tell them exactly where they should start: at a random spot from the left edge (X: -210) to the right edge (X: 210) and at the top (Y: 170). Next, change their Y position by a negative number until they're at the bottom of the screen (Y < -170). Finally the clones can delete themselves. Thanks, clones.
Now it is testing time to make sure the game works so far. When we click the green flag, our platforms should be falling down the screen. Now onto the jumping sprite. The jumping sprite should do three things: move left and right, fall down, and most importantly, jump.
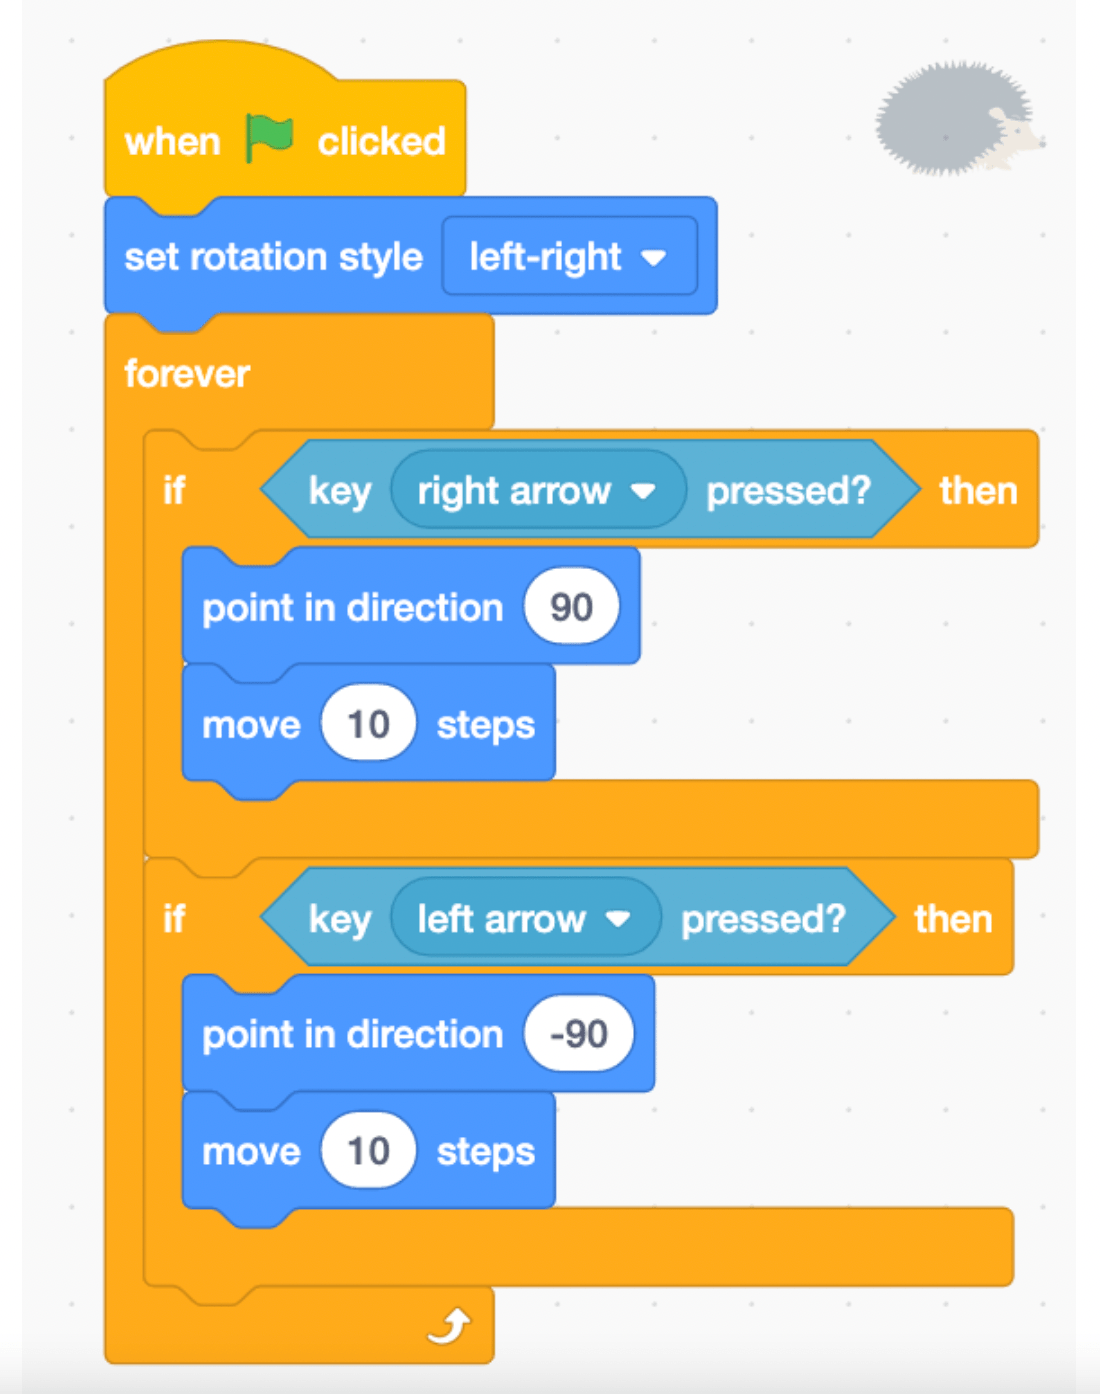
4. Move Left and Right
Control the jumping sprite’s movement using the left and right arrow keys on the keyboard. Create the condition if a key is pressed by using a 'key _ pressed' Sensing block with an 'if-then' block. Let's tell our sprite to point right (direction 90) and move ten steps if we hit the right arrow key, and point left (direction -90) and move ten steps if we hit the left arrow key. To ensure this happens each and every time the key is pressed, put it all in a ‘forever loop’ so we're always checking to see if those keys are pressed! If you don't want it to turn upside down, and you can set the rotation style of your sprite to 'left-right'.
5. Make it Jump!
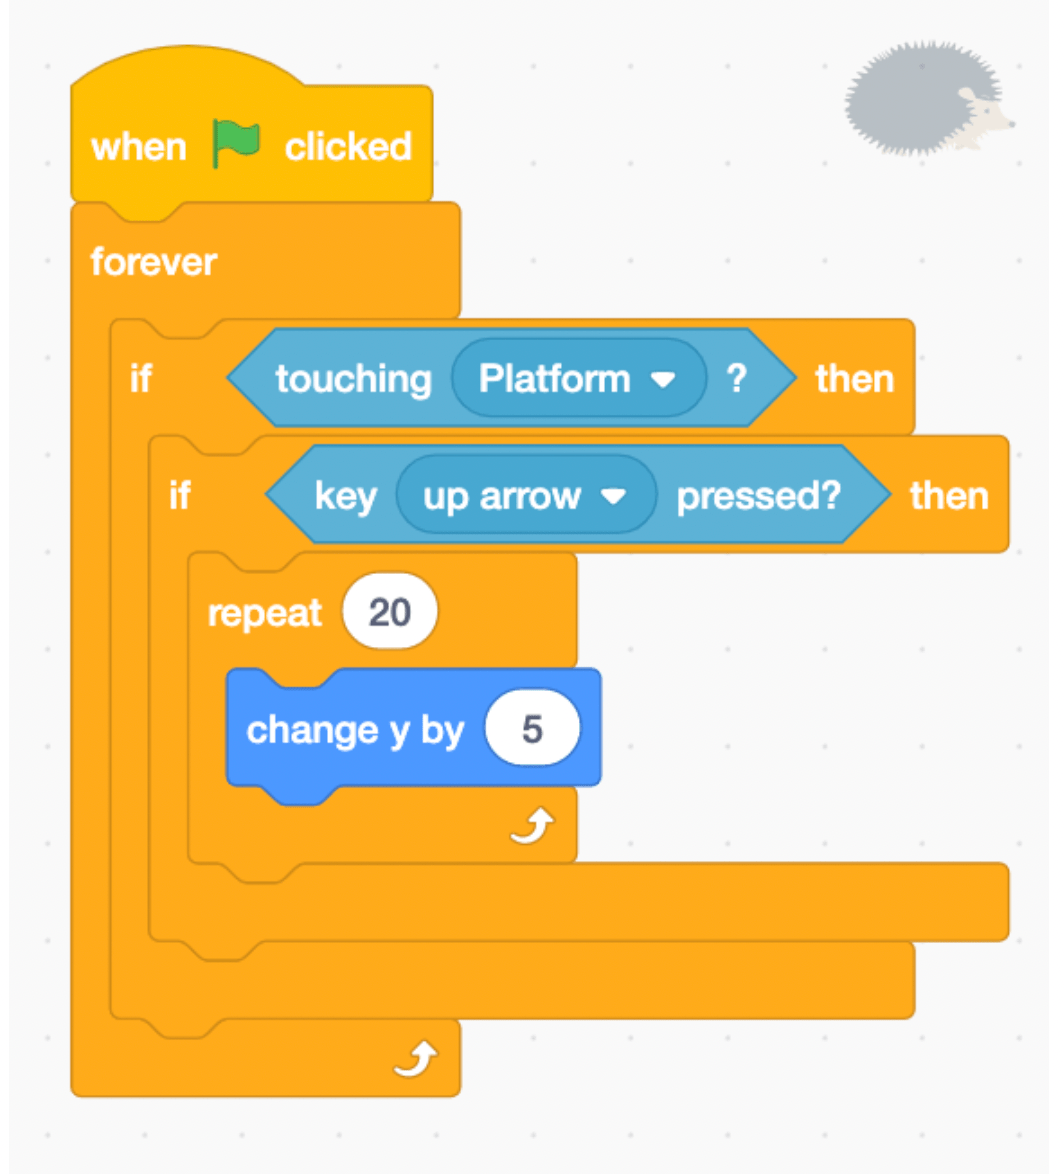
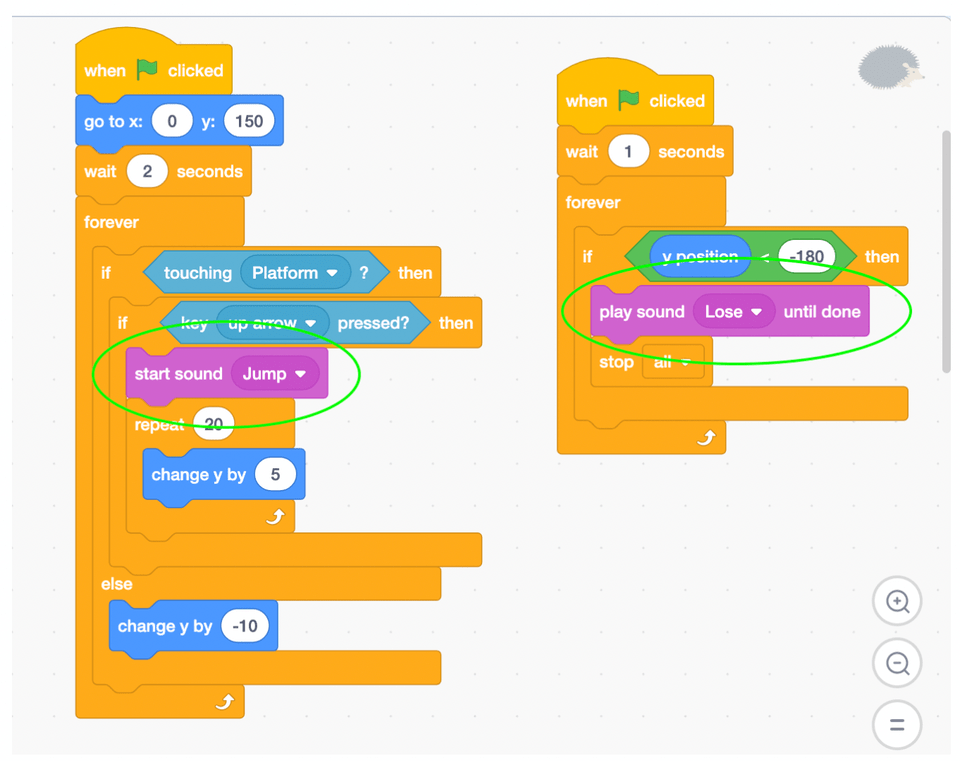
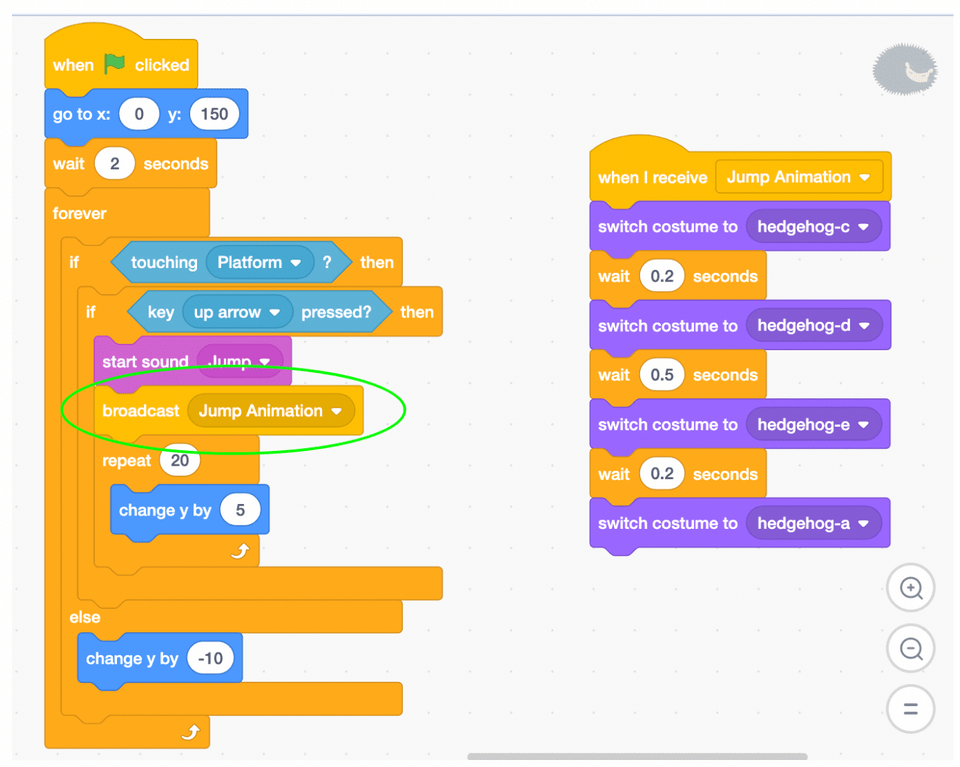
Now let’s code the sprite to jump when the Up arrow key is pressed. Of course, everyone knows hedgehogs can't fly, and let's assume your sprite can't either. Before the sprite jumps, let's check to see if the sprite ison a platform first, that way the sprite has something to jump off of. If the sprite is on a platform, then the sprite to see if the Up arrow key is pressed. This is accomplished with nested if statements. We'll make our sprite 'jump' by increasing its Y position a tiny amount inside of a repeat block.
6. Make it Fall
Time to add some gravity! Currently our sprite senses if it is on a Platform with the code, 'if touching platform.' If we replace our 'if-then' block with an 'if-then-else' block, the sprite can do something when it's not touching the platform too! If it's touching the platform The sprite can jump, if it's not touching a paddle though (else) let's fall by changing Y by -10. Finally , when the green flag is clicked, the sprite starts at the top of the screen, and the game waits giving the player a couple seconds to get ready.

7. Game Over Condition
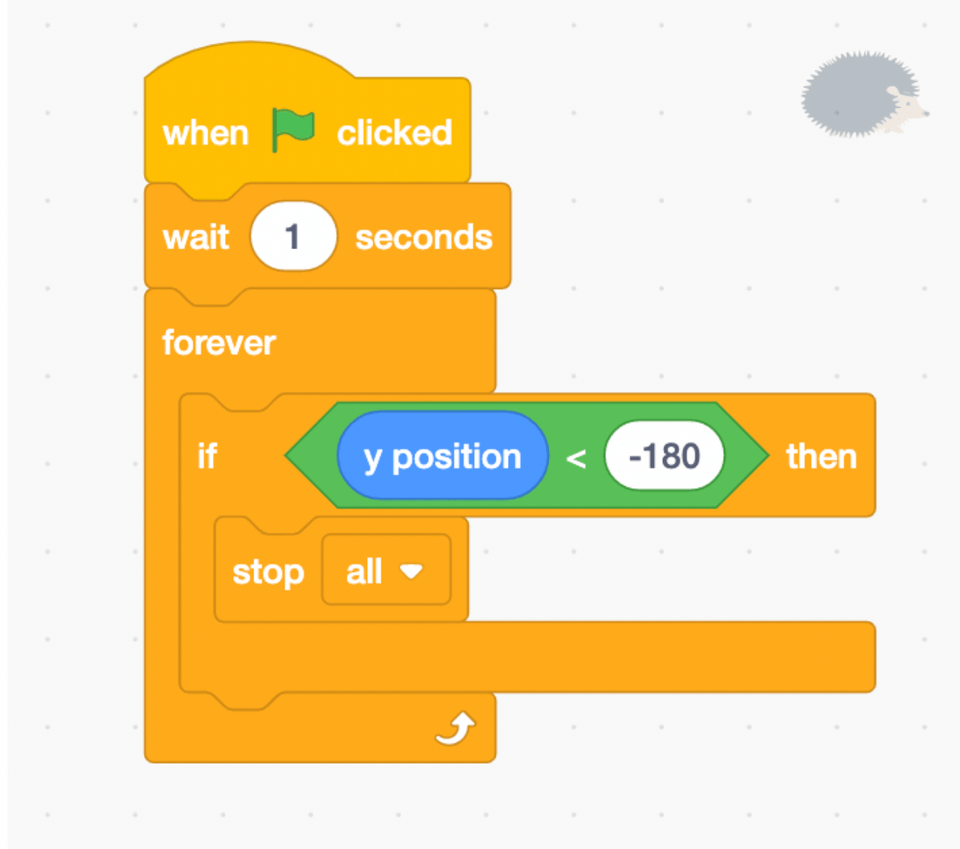
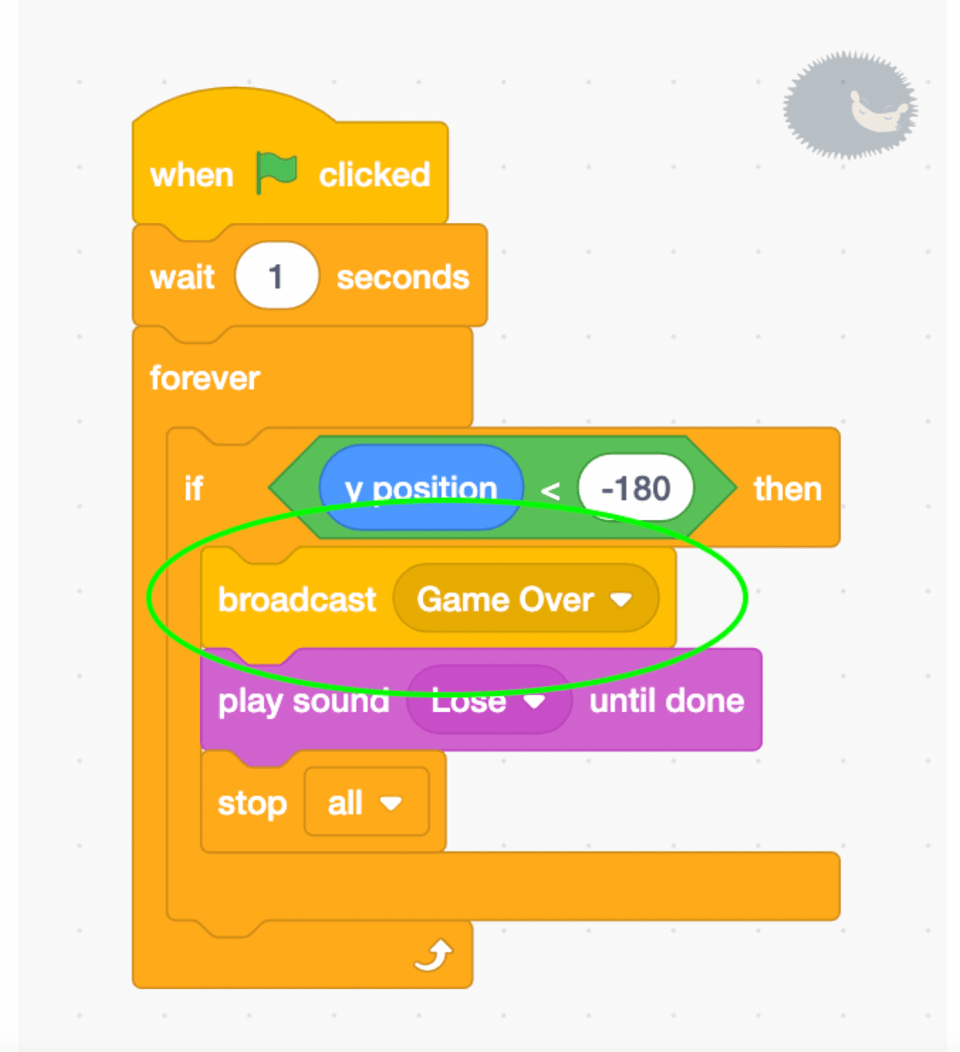
The sprite may fall now, but the game never actually ends. The game should end if the sprite is at the bottom of the screen (Y < -180). Create an if Y< -180 condition and stop all. Bug alert! Sometimes our game ends instantly when we try to restart it. That might happen if we click the green flag when the sprite is already at the bottom, even though it was coded to go to the top elsewhere. Add a small wait block to prevent this bug and give the sprite time to return to the starting position.
8. Add a Score
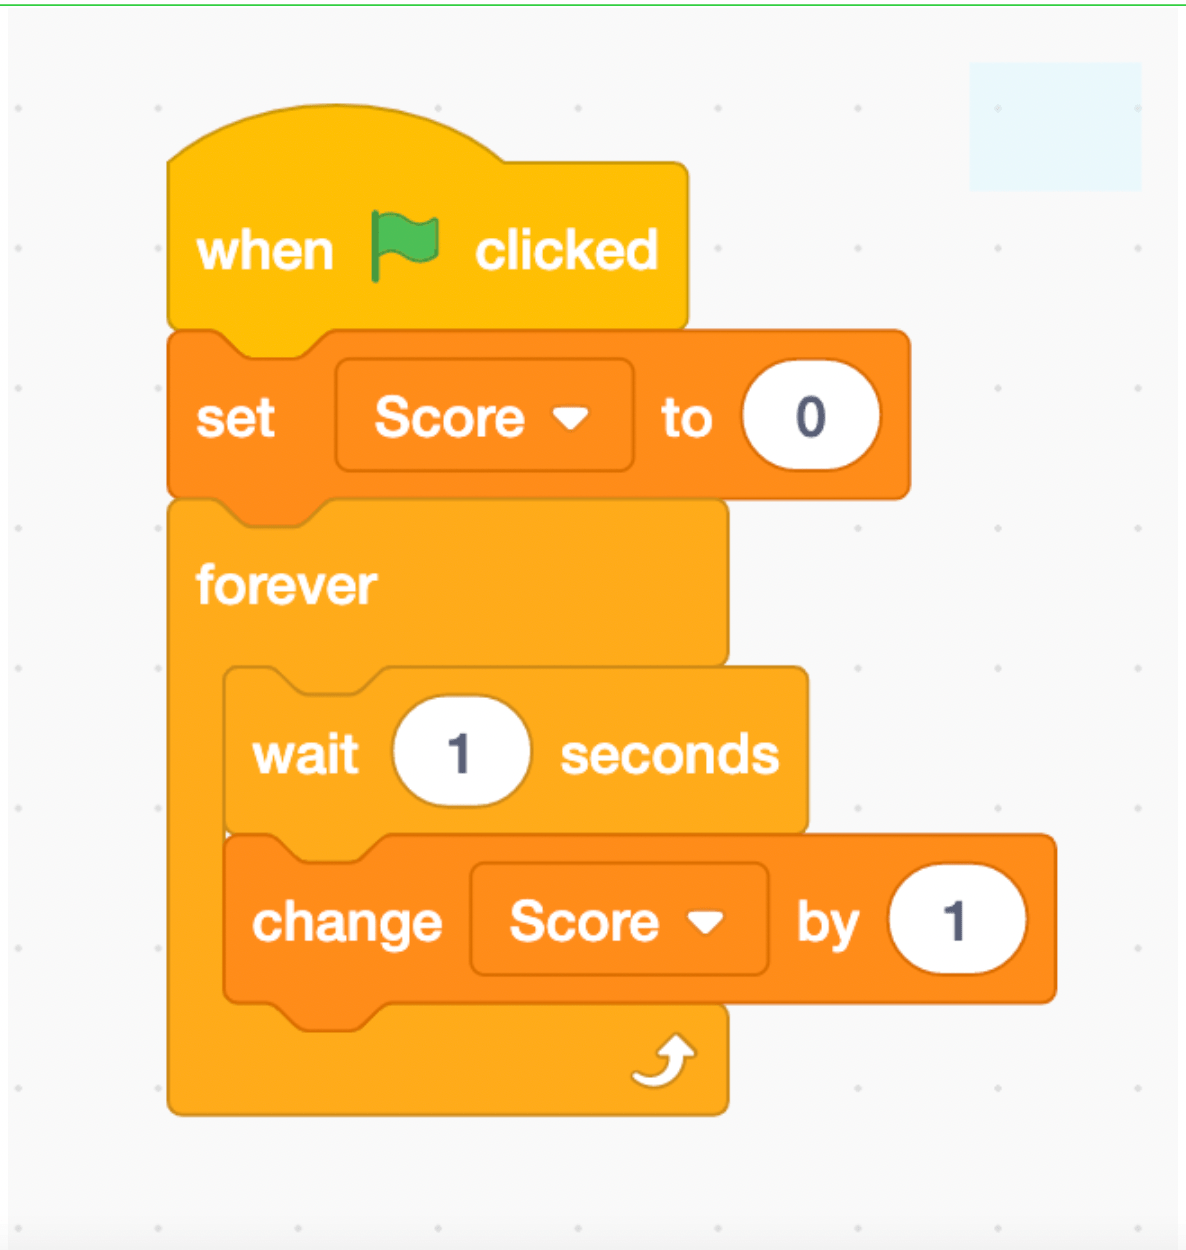
What's the point of playing a game if you can't beat your old high score, or better yet, your friend's high score? Let’s create a 'Score' variable, and the longer you stay above the bottom of the screen, the higher your score. Increase the core by one every second. Not sure which sprite to put this code under? For code like this, that doesn't really relate to any one sprite, use the backdrop. Yes, you can write code for your backdrop!
Alright, we suppose we've got ourselves a pretty fun game here already. Are you thinking what we're thinking though? Is this game just a little too easy? Let's turn up the difficulty a bit...
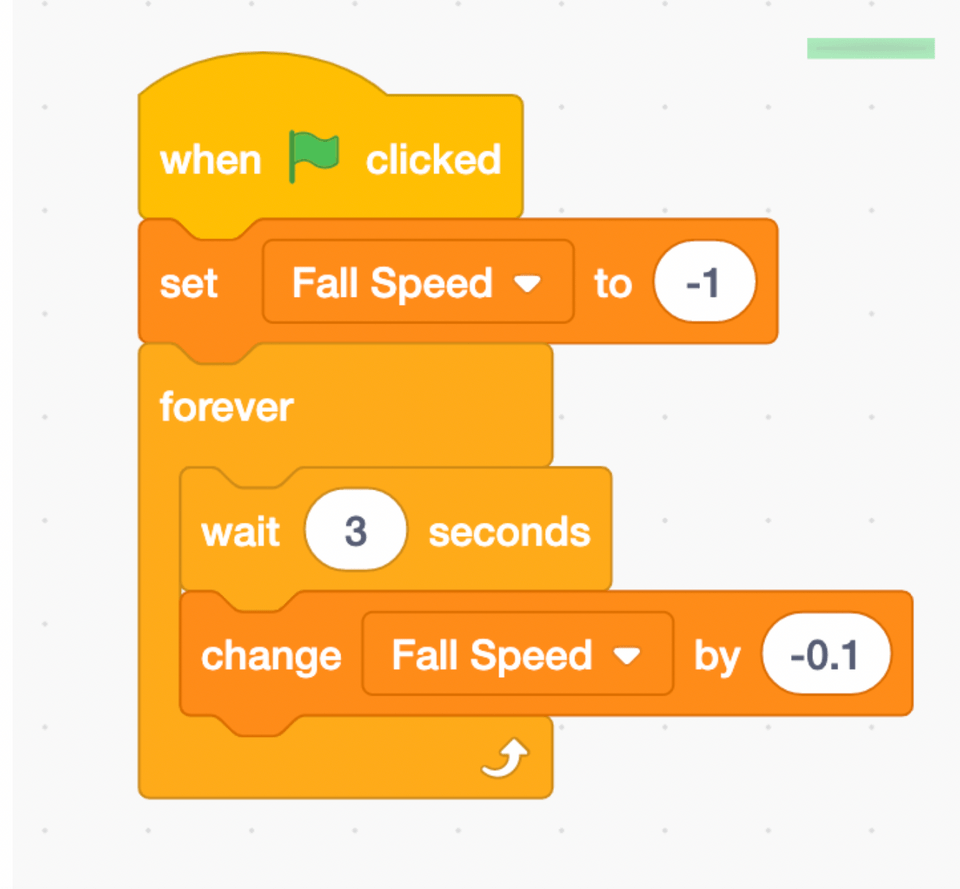
9. Make our Platforms Fall Faster
Let's go back to the platform code, and make a variable called 'Fall Speed'. This variable will control how fast the Platforms fall down the screen, so instead of telling the clones to change Y by -1, change Y by Fall Speed now. When the green flag is clicked, set Fall Speed to -1 and decrease it just a little bit every few seconds.
10. Clone our Platforms Quicker
Since the platforms are falling faster now, cloning should happen faster, too. Create another variable called 'Clone Speed', and set it to 3 underneath when the green flag clicked. Instead of waiting 3 seconds between each clone, update the wait block to 'Clone Speed' seconds now. To ensure the platforms clone and fall together, when changing 'Fall Speed', let's change clone speed as well. Make sure not to make Clone Speed too small though, or else there might be too many clones at once, and the game might crash!

Ok, now we're really jumping! There are just a couple things still missing though. Sounds and Animations can take any good game and turn it into a great game! Or vice versa, make an otherwise great game just a little bit dull.
11. Add Sound
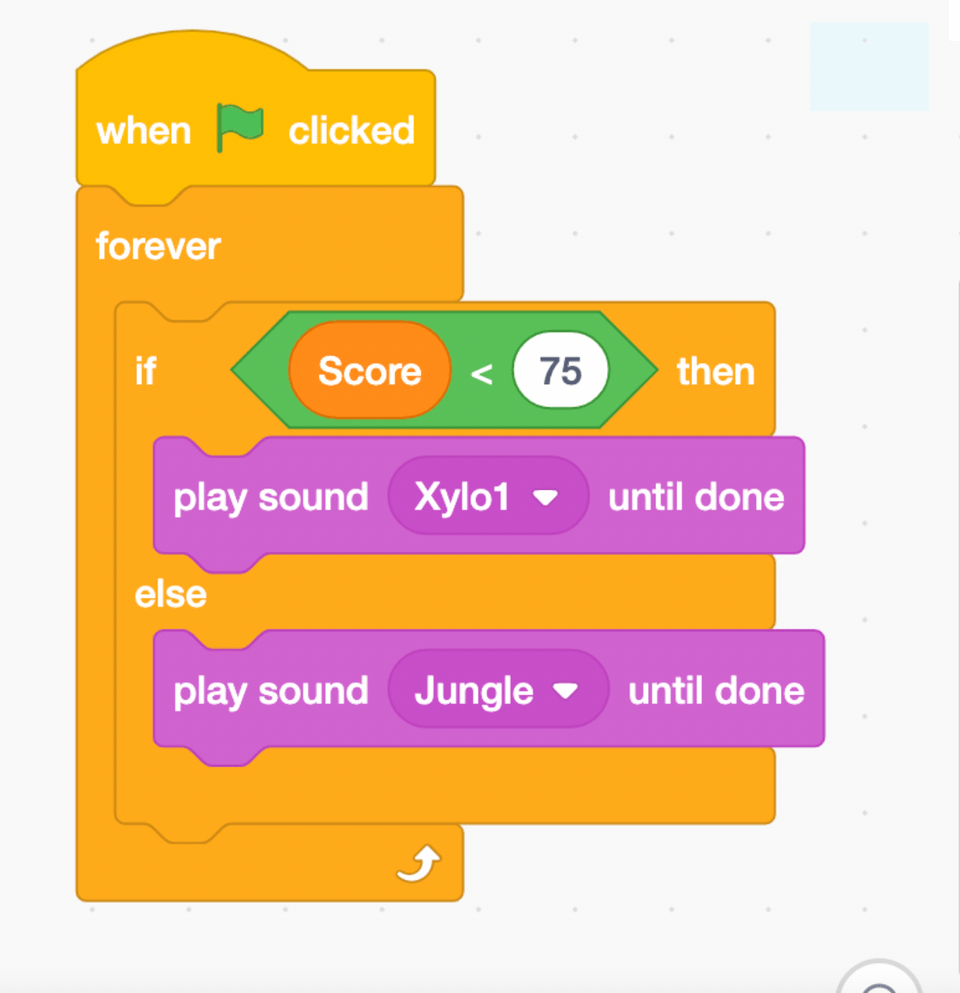
Play a sound every time the your sprite jumps, and when the game is over. Add some background music in the backdrop code too, by putting a 'play sound _ until done' inside a 'forever' loop after ‘when green flag clicked’. If you want to be extra fancy, use an 'if-then-else' block to change which music you play as the score goes up, and the game gets a little faster.
12. Add Animation
Every time the sprite jumps, let's have our sprite cycle through a few different costumes. Use a 'broadcast' block for this, so as not to interrupt the existing code. Broadcasting sends a message, and this sprite (or any sprite!) receive that message and activate some code. Whenever the sprite jumps, Broadcast a new message called 'Jump Animation,' and have the sprite cycle through some costumes when it receives this message. The Hedgehog comes with some great costumes for jumping already, but if the sprite doesn't, drawing/adding them yourself can be really fun too!
Wow! Looking (and sounding) a lot better now. You may have noticed a small bug though. When the game is over, the score still goes up for a few seconds, the platforms keep falling, and the background music and the 'lose' music play at the same time. This can be fixed by adding a little more code.
13. Stop Scripts in Other Sprites
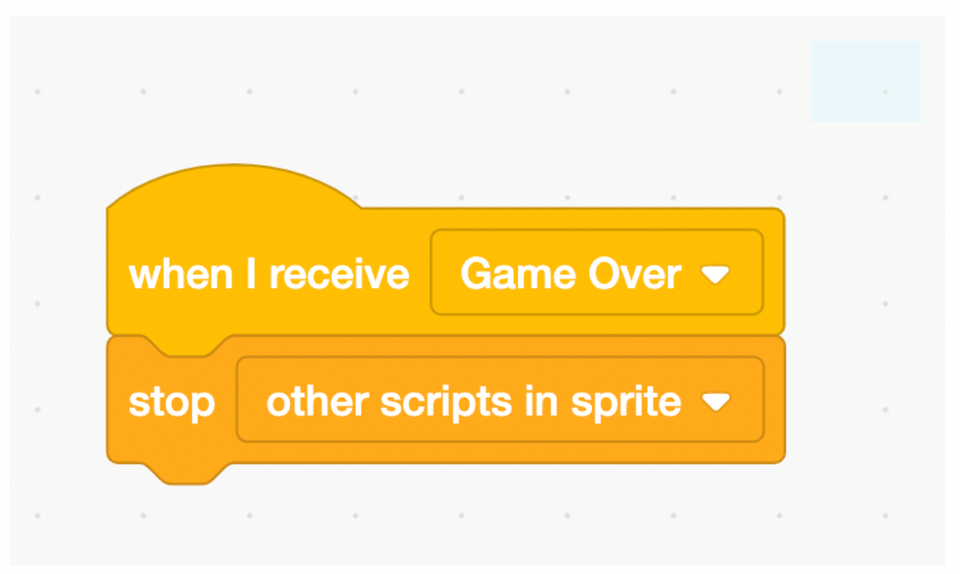
If the game is over, let's tell other sprites to stop what they're doing while the 'lose' music plays. This can be accomplished with Broadcasting, and the 'stop other scripts in this sprite block.' You can think of 'scripts' as just a fancy word for 'code blocks.' Let's have our Platform and our Backdrop stop what they're doing when they receive a "Game Over" message.
14. Create a Game Over Sprite
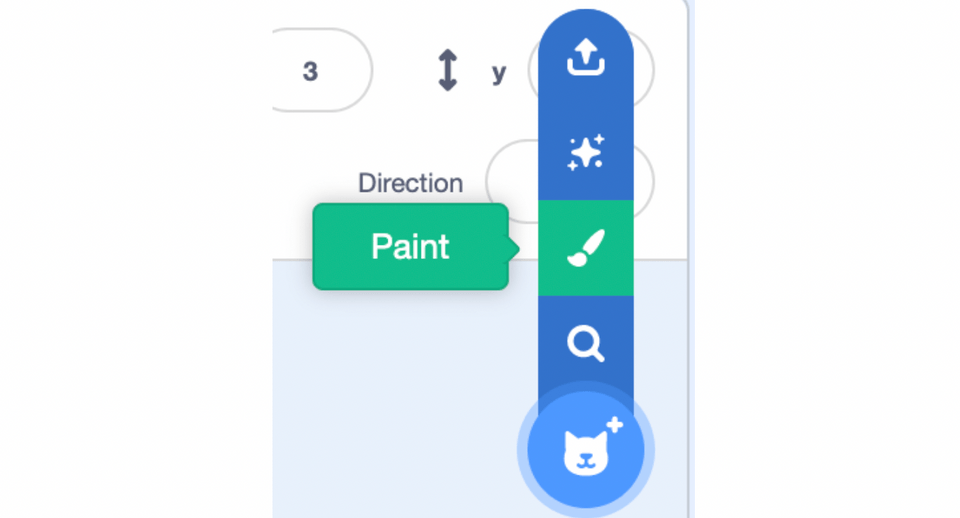
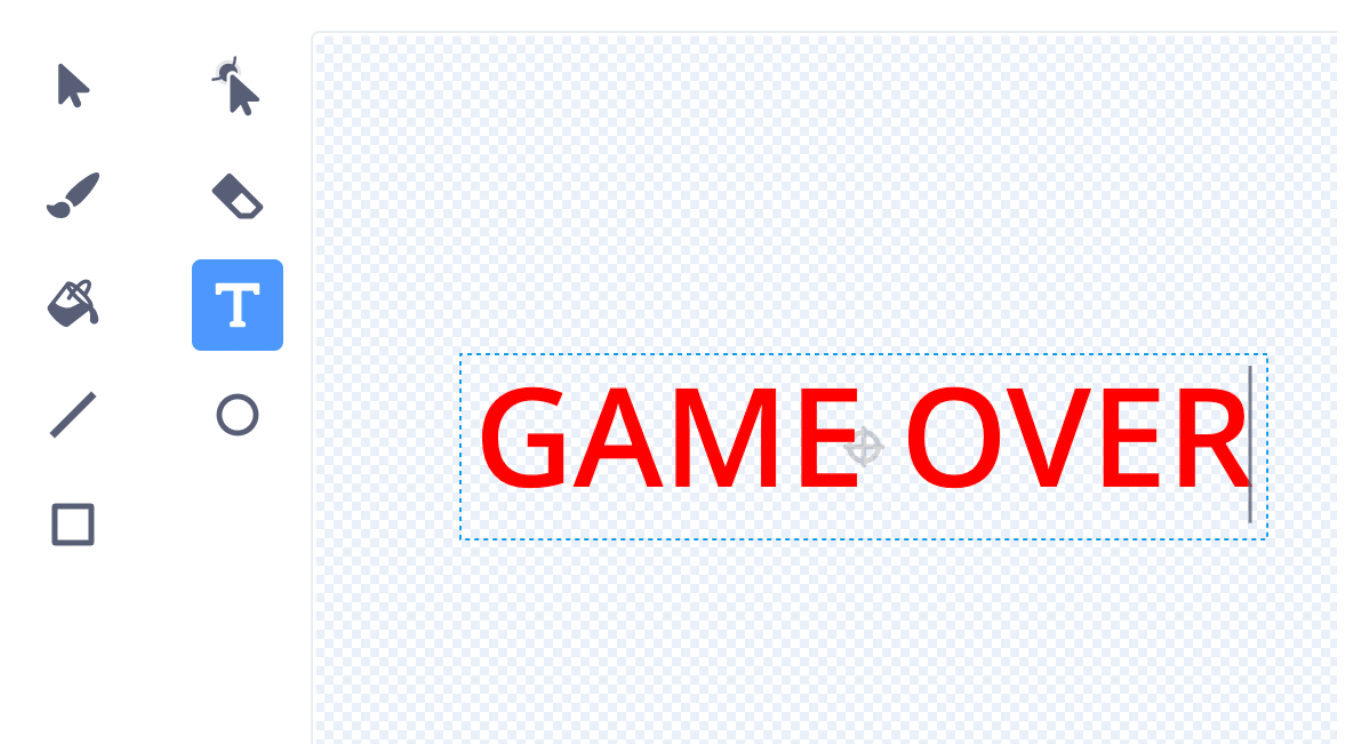
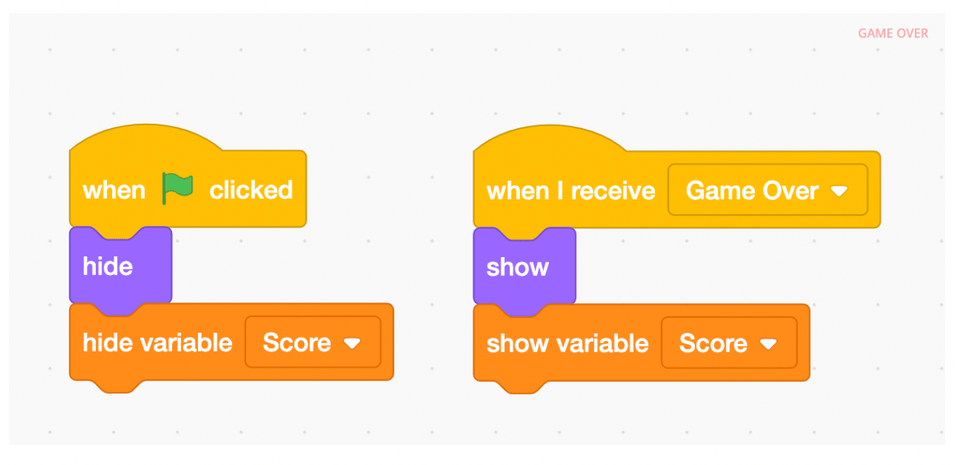
As a final 'cherry on top, let's create a 'Game Over' sprite, so the player knows that they've indeed lost. This is a great time to display their score as well. Create this sprite by selecting 'paint' in the choose a sprite menu, and using the 'text' tool. Let's code the new sprite to hide itself and the score when the green flag is clicked, and show itself and the score when it receives the 'Game Over' message.
Ideas to Make a Run and Jump Game in Scratch Yourself
Congratulations on building an amazing game with animations, sounds and a score!. Can you make it even better? Let's think about some ways you can take this great game and make it truly legendary.
1. Add More Backdrops
An appealing aspect of jumping games that we didn't include in ours is the prospect of discovering new zones or levels. If you've ever played the popular jumping game, 'Jelly Jump,' you might recall that that background isn't always the same color. Perhaps you can incorporate that concept into this game as well. Maybe you choose a new backdrop every time the game starts, or, better yet, change the backdrop as the score goes up, and the player makes it farther than they did before!
2. Power-Ups!
Jumping is fun and all, but what if we could fly, or maybe make all of our platforms long ones, if not but for a fleeting moment? Power-Ups can add a lot of fun to any game and even create new strategies for the most competitive of players. We remember playing the game Doodle Jump in school with our friends (not during class, of course...). Our friends were concerned with simply staying on the platforms, but we always knew, as we're sure you do as well, that the true secret to success was aiming for those Power-Ups! What sort of Power-Up sprites could you add to this game?
3. Vertical Jumping? How about Horizontal?
We've made a game in which platforms fall and we must stop from hitting the bottom of the screen. That's cool. But another cool version of a jumping game has obstacles coming at you horizontally, and the goal is to avoid them hitting you! If you've ever played something like Temple Run for example, you know what we mean. How could we modify this game to flip is on its side, and make the goal avoiding platforms, instead of aiming for them?
You can also try following this YouTube tutorial to build a game where a character jumps over moving obstacles to score points!
Make a Jumping Game in Scratch
Today we built a simple, yet awesome jumping game in Scratch. We utilized X and Y locations of sprites to get everything moving (and jumping!). We created Clones, and had plenty of 'if-then' blocks to make our game work correctly. And we even used Variables to transform this game from a casual Sunday stroll into a white-knuckled Friday fracas. And to top it all off, we learned some great strategies that you can use to turn any of your Scratch projects from good to great to legendary!
Because you've completed this tutorial, you'll have a blast in our Scratch coding classes, where you'll not only hone the programming skills you already have, but learn more great strategies to make any game you can think of. Alright kids, great job today, and see you in the next one!
Written by Ian Kuzmik, a Create & Learn instructor with a Bachelor's Degree in English from Tulane University. He's been teaching grades K-8 since 2019, with a focus in the subjects of ESL and Computer Science.