Creating this simple game with Scratch coding starts with everyone’s favorite sprite: a ball. Whether on a beach or tennis court, in real life or the virtual one, pitching, catching, throwing, blocking, or rolling this round object, brings us joy. In this tutorial, we will show you several ways to make a ball bounce in Scratch and eventually make a fun Ball Bounce game in Scratch!
Want to learn Scratch with an experienced instructor? Join our award-winning free Scratch class for kids designed by professionals from Google, Stanford, and MIT.
How to Make a Ball Bounce in Scratch
It is so easy…anybody can do it. Seriously! All that’s needed is a connection to the Scratch website along with this tutorial and voila! – you’ve got yourself a custom ball bounce game. Let's get started.
1. Go to Scratch
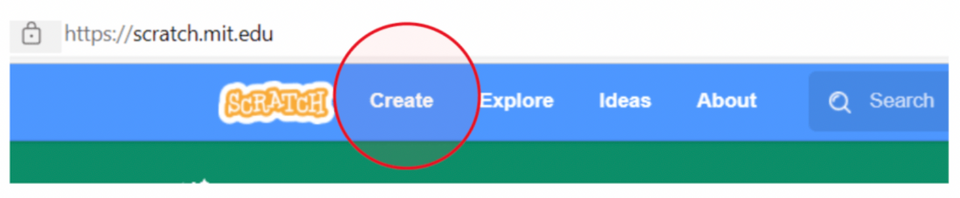
Don’t have a Scratch account? Don’t worry. You can still create the Ball Bounce game without one. Just click on Create tab at the top of the home page, and within seconds, you’ll be in the code builder where all the magic happens:
2. Remove Scratch Mascot/Add Ball Sprite
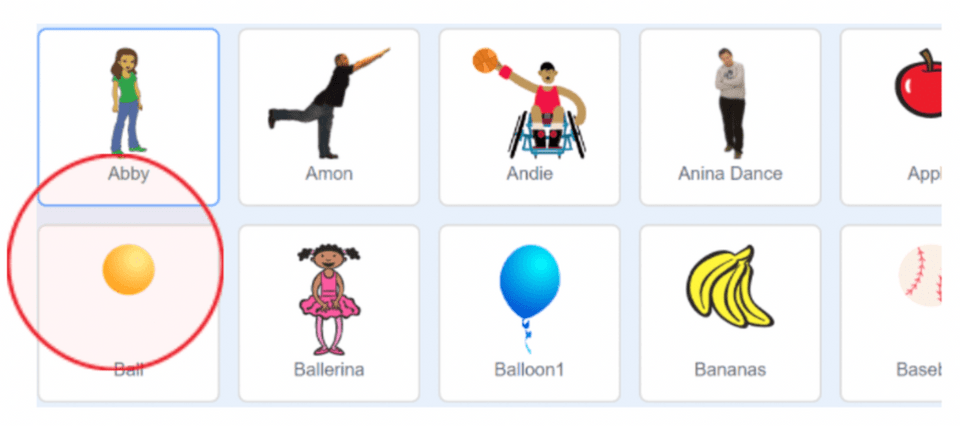
We won’t need the default Sprite so feel free to hit the trash-can icon to the right of the Sprite and below the canvas, to delete the cat. Instead, we’ll dip into the Library where we’ll select the first ball we see. You can find the library by clicking on the purple icon with a cat face and a plus sign in the bottom right corner of the screen.
3. Make the Ball Bounce
Just like with most games, we know there are many ways a ball can bounce. For example, when dropped to the ground, thrown against a wall, hit with a racket, slapped, kicked, etc. Apart from a bowling or a wrecking ball, we know that there are many ways to physically make the ball bounce. However, one question remains: at what point of the game do we want to see our ball bounce?
Same applies here. So, let’s use the “when this sprite clicked” block from the Events category to get things started, and then we’ll find the furthest point on the right/left, on the screen, and make the ball travel back and forth to depict a bounce:
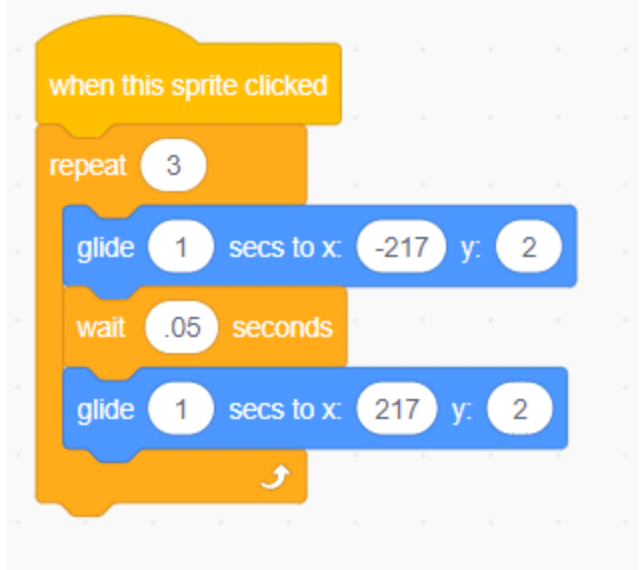
And just like that, our ball became a little more alive. All there’s left to do is explore a few more ways we can program our ball to bounce.
How to Make a Ball Bounce Randomly
So far, we have programmed our Ball Sprite to move from one end of the screen to the other. Although we made it appear like it’s bouncing, it is only doing it from left to right.
Customize the ball to make it bounce off all four “walls”
What if we wanted to see our ball bouncing off all possible ends of the canvas? Luckily, Scratch offers an easy solution for that, so all there’s left to do is apply logic. For example, Scratch already has a block that we can use to make it bounce. It is even spelt out for us “if on edge, bounce”.
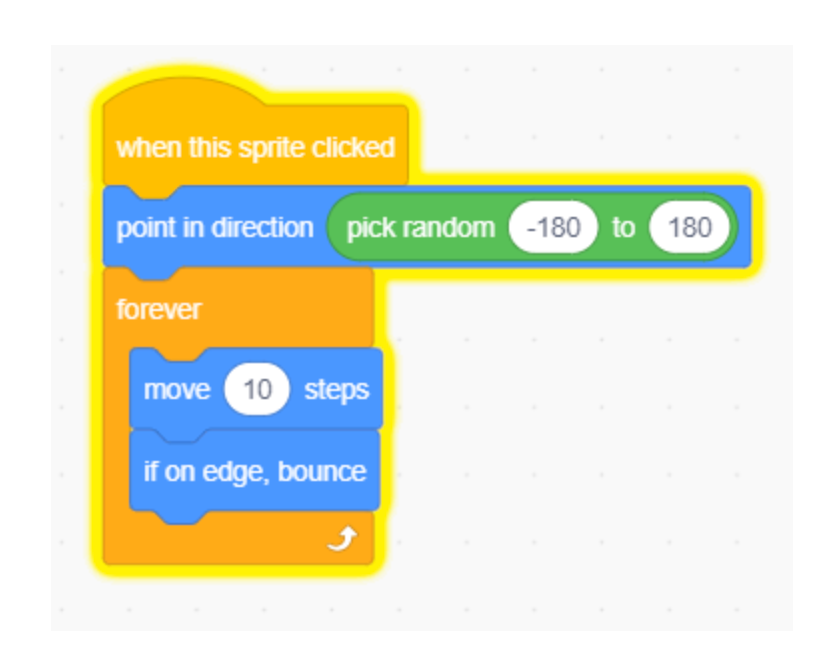
We are going to delete the code that we already have underneath our “when this sprite clicked” event block. Now you will add a “point in direction” block from the Motion category. Instead the ball always facing the same direction, we can use the “pick random” block from the Math category. To let the program choose any direction, type “pick random -180 to 180.
Then you need to make sure the ball will keep moving and bouncing for the duration of your game. You will use a forever loop to do this. The forever loop is in the Control category. Inside your forever loop, add a “move 10 steps” motion block and the “if on edge, bounce” block.
Now, your ball will bounce all over the screen! Test out your code a few times to make sure the pick random block is working correctly.
Customize the ball to make it bounce off another Sprite
In games, we don’t normally just have a ball bouncing around with nothing to do. What if we want our ball sprite to bounce off of another sprite? This is something we can easily code in Scratch.
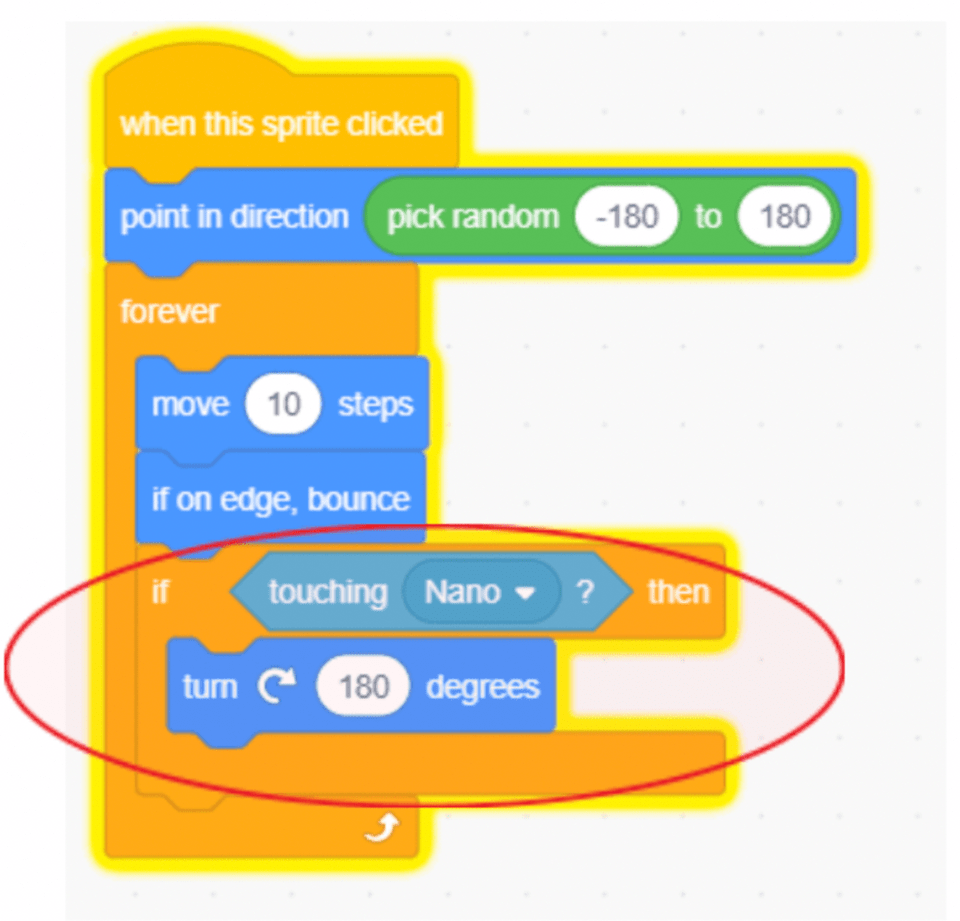
Let’s bring out a second sprite. Click on the add sprite button and select any sprite. You can even draw your own! In my case, I am using the sprite Nano as a stepping stone (or in our case, “bouncing stone”).
Now we have a sprite, but keep in mind that we would need to use some sort of a condition in order to make anything new happen. Let’s put it in words before we tackle the blocks: “If our ball collides with Nano, then do what?”. How about changing the path to the exact opposite direction from the Ball/Sprite collision? Hence the saying “A 180-degree change”:
Use another Sprite, such as Paddle, to control the bounce
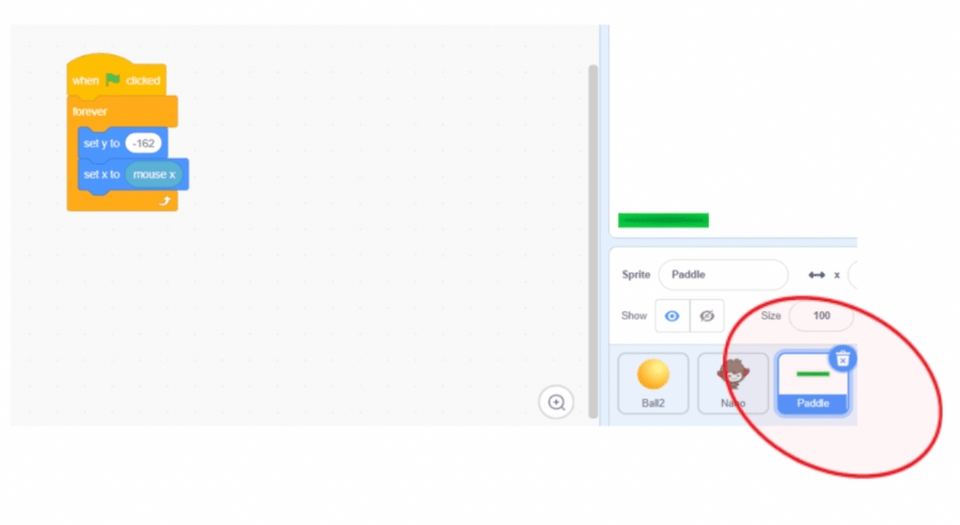
Perhaps we want our game to seem like we were playing ping-pong or tennis, where we can control the ball with a Sprite like Paddle, to prevent the ball from falling to the side lines.
Let’s first have a clear understanding of how and why the Paddle Sprite is used in this game: its indefinite position will be at the bottom of the screen so it will never go up or down. Since its main purpose is to prevent the ball from touching the bottom of the screen, the Paddle Sprite will only move left and right, as we anticipate its fall. This Paddle sprite will move back and forth using the mouse. This is why we use the mouse x position block from the Sensing category. The first image below shows the code needed for the Paddle Sprite itself.
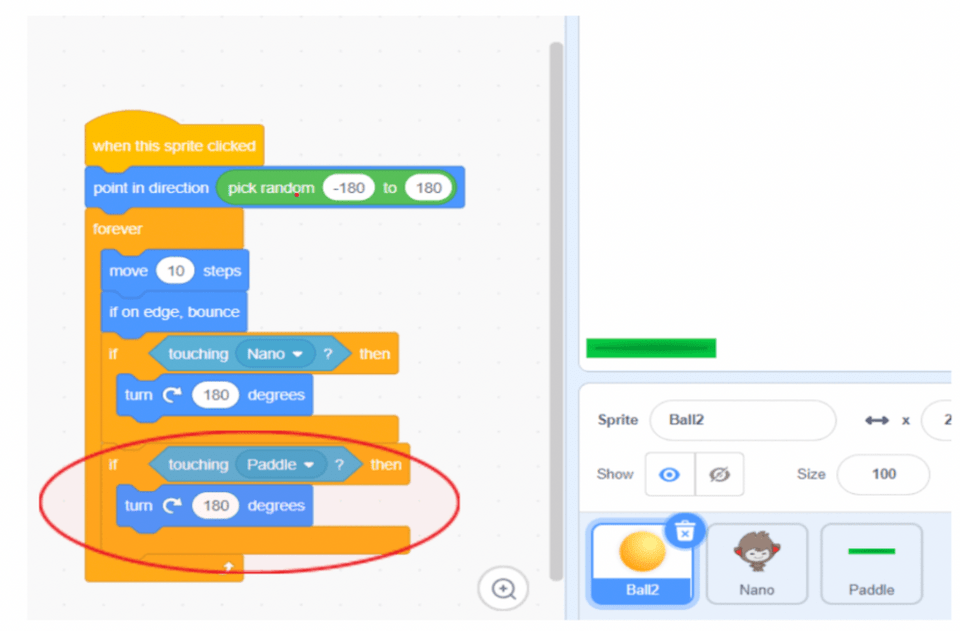
The other idea is to have the ball bounce off the Paddle Sprite. We will switch back to the ball sprite code and much like with Nano, we will add a conditional to check for a collision. The second image shows where to add the new “if/then” conditional block:
Need Help Troubleshooting? Common Issues and Bugs
Here are a few tips for troubleshooting your project. Test frequently as you make updates by running your game, and make incremental adjustments to understand how each change you're making impacts your game.
Ball Not Bouncing Off Edges Properly
- Issue: Your ball might get stuck on the edge or not bounce correctly.
- Solution: Ensure you use the "if on edge, bounce" block correctly. Make sure it is placed within a loop that continuously checks the ball’s position.
Ball Not Interacting with Sprites
- Issue: Your ball may not bounce off other sprites like the paddle or Nano.
- Solution: Use the "if touching [sprite]" block to detect collisions. Ensure you have conditionals set to change the ball’s direction upon collision.
Ball Moving Too Fast or Slow
- Issue: Your ball’s speed might not be ideal for the game.
- Solution: Adjust the number of steps in the "move [steps] steps" block. Experiment with different values until the speed feels right.
Ball Not Starting at the Correct Position
- Issue: The ball may not start where you want it to.
- Solution: Use the "go to x: [x position] y: [y position]" block to set the ball's initial position when the green flag is clicked.
Make a Ball Bounce in Scratch
In this tutorial, we have simplified the way a ball bounce game can be created in Scratch. Here's the whole project. We first showed you how to make the ball bounce off all four walls by using the “if on edge, bounce” block. Then we shared a hint on how the same logic can be applied, using control and motion blocks, to make the ball bounce off Sprites as well. To make our ball bounce game even more engaging, we added a touch of interactive logic to allow players to partake in controlling the ball.
This tutorial reveals that programming a ball bounce game doesn’t have to be complicated, in fact, you can now make one yourself!
And if you would like to learn more clever ways to build games like this, check out how to make a scrolling game on Scratch. Enroll in one of our Scratch coding for kids classes, and find out how to bring any idea and game to life in Scratch.
Key Programming Concepts in the Ball Bounce Tutorial
- Sprites: In Scratch, sprites are the characters or objects that perform actions. For this tutorial, we use a ball sprite that we can program to move and interact with the environment.
- Events: Events are triggers that start a sequence of actions. For example, using "when this sprite clicked" triggers the ball's movement.
- Motion: Motion blocks control the movement of sprites. By using blocks like "move 10 steps" and "if on edge, bounce," we can make the ball move and bounce.
- Conditionals: Conditionals check if certain conditions are true. For instance, "if on edge, bounce" checks if the ball hits the screen edge and then makes it bounce.
- Loops: Loops repeat a sequence of instructions. A forever loop can keep the ball moving indefinitely, bouncing whenever it hits the edges or other sprites.
- Sensing: Sensing blocks detect different conditions, such as touching a sprite or the edge of the screen. This is essential for making the ball bounce off the paddle or another sprite.
Written by Sandra Dizdarevic, a Create & Learn instructor with 6 years of experience teaching STEM to children in the 3rd through 11th grade. She has an Undergraduate as well as a Masters Degree in Management Information Systems from UNO.