

This guide will get you started on how to create conditional statements in Roblox Studio, using the key coding terms “if” and “then” in your scripting. Conditional statements can be used to make events happen when certain tasks occur during the game, and can add a deeper experience to any Roblox game.
For live expert guidance while making cool Roblox games, enroll your child in live online, small-group game development classes, designed by experts from Google, Stanford, and MIT. Most students start with Beginner Roblox Game Coding.
What is a Conditional Statement in Roblox Studio?
As you begin to make games for Roblox using Roblox Studio, you will find that the game is more fun to play when you have tasks happen to the players as certain game conditions are met. For example, when a player touches a certain item, they can gain points or earn badges, or perhaps the longer the player stays alive in the game, the more points they score to level up. Each of these examples use a simple script that tells the game “if” a certain thing happens, “then” do the related action. This is known as a Conditional Statement.
Each conditional statement starts with the code “if” in lower case. When the game sees this code, it looks for what to do when the statement is triggered. Your “if” can be as simple as a math equation (if 2 + 2 == 5), or as complex as touching a certain color or part, or reaching a certain point score.
How to Write an If Statement in Roblox Studio
To start along with this tutorial, open up one of your projects in Roblox Studio that has parts already placed (for a tutorial on how to place some parts into a game, be sure to see our guide on how to make a game). For this first example, we will have one part provide a powerup to a player when they touch that part in the game. In this case, the powerup will temporarily increase the walking speed of the player when they touch the part.
1. Pick and name your part
Select the part you want to make into a powerup. It might be a good idea to also make the part a bright, shiny color, that would invite the player to want to touch that part in the game. For now, right click on the chosen part, select “rename,” and let’s call your part PowerUp. Now the script will know to apply the speed boost to this particular part in your game.
2. Add a script to your Roblox part
Next, click on the + symbol next to your part and add a script, called PowerUpScript. Delete the default print(“Hello World”) code in your script when it opens.
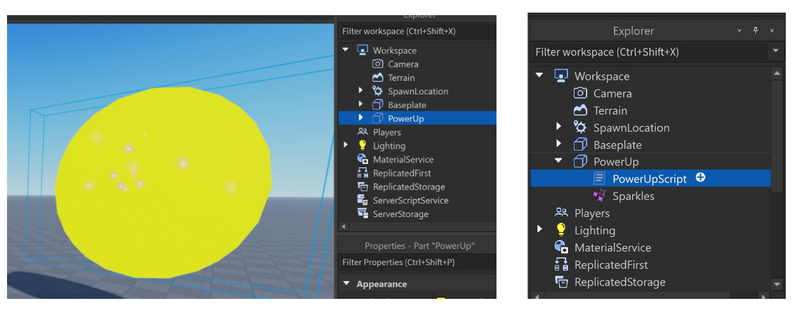
3. Attach the script
Now we will attach the script to this part by telling the script that PowerUp is the parent part:

4. Create a function in Roblox
Next we create a function to tell the game that every time we touch this part, see what is inside the function and run it:
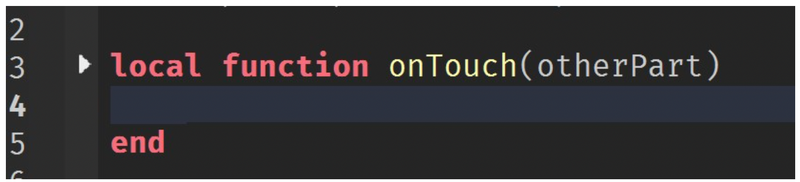
Notice that this function also has an “end” statement, and usually Roblox Studio adds the “end” line as soon as you press enter at the end of the “local function” line. If it does not, be sure to add “end” or your function will never stop and your Studio session will crash.
5. Look out for the player
Since our PowerUp part now knows to watch for something touching it, let’s tell it that we want that “something” to be a player. We add two lines inside the function now: where to look for the character (otherPart) and what type of part to look for (“Humanoid”).

Be sure to INDENT these two lines, and any other lines that are part of the function so the game can understand the script.
6. Add your "If - then" statement
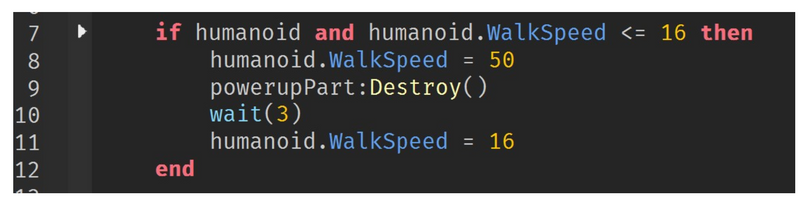
Since the game is now watching for a humanoid to touch the PowerUp part, we need to begin our conditional statement that checks to be sure the player is currently walking at a normal speed. This is where our “If - then” statement is placed. We are telling the game IF the player is walking at a speed equal to or less than 16 (normal speed), THEN boost their speed to 50 instead:

This conditional statement goes inside the function, right below the previous Humanoid line. Notice also that the “if” statement has its own “end” line as well, because the code will continue to run unless we tell it to stop after applying the change!
7. Remove the part
Now that the player has touched the part, we want to remove the part from view so it looks like the player absorbed the speed boost. We do this by “destroying” the part (add line 9):

8. Return to normal speed
Of course, we don’t want the speed boost to last forever, so we need to let the game know that after three seconds, it is time to return the player back to a normal walking speed, which has a value of 16 (add lines 10-11):
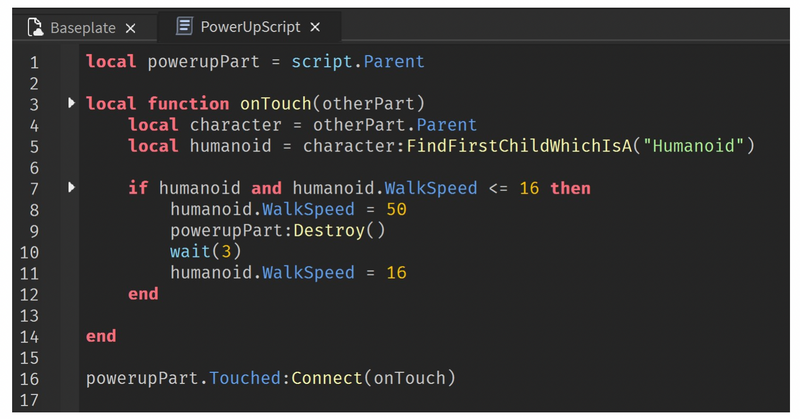
9. Call your function
If you were to run your game now, nothing would happen! This is because we have set up the function and the conditional statement. But we didn’t tell the game to start using the function. This is known as “calling” the function. Be sure to add this last line to your script, after the closing “end” of the function:

Your entire script should now look like this:
10. Test it!
Save your game, and give it a try! Your player now speeds up for three seconds after it touches the PowerUp part. If you were to duplicate this item and your player touches another PowerUp part while already walking at speed 50, the “if” statement would not be started since the walking speed is already greater than 16. Once the player returns to the speed set at 16 after three seconds, the next PowerUp part they touch will again result in a speed boost.
Roblox Studio Conditional Statements
Conditional statements are a great way to add more excitement to your Roblox games. Not only can you make parts perform certain actions, but you can also keep score, award levels, start and end game sessions, and even change player avatars just by using these statements in your scripting! The possibilities are endless for ways to tell Roblox “if… then…” and make cool things happen in your game.
For more scripting tips, check out this Roblox scripting tutorial, or to learn more about conditional statements, functions, and all kinds of scripts, try out our free Roblox class led live by an expert! Join along as an instructor guides you through building your own games with scripting using Roblox Studio in small, live group sessions.
Written by Kari Tonkin, a Create & Learn instructor. Kari has been teaching a wide variety of courses and ages for more than twenty-six years. Some of her favorite subjects to teach include computer science, graphic design, mathematics, and coding languages. She received a Master’s Degree in Curriculum Design with Technology Integration from Black Hills State University in 2016 and has used this knowledge to stay current on new technology trends in education. When she is not working, Kari enjoys playing video games with her family, including Roblox and Minecraft, hiking and camping, and traveling around the United States.

