Are you excited for a fun Python animation tutorial for kids? We hope so. Because today we’re going to walk you and your child through building their first animation in Python - a stick figure!
Python is a great language for young coders to learn. It is designed to be human friendly, allowing students to develop coding skills without some of the frustrations of more cumbersome languages. Python also has a huge number of use cases: data science, software, art, Artificial Intelligence, and more.
Your child doesn't need to have any previous Python experience to work through this tutorial. But we recommend your child has some experience with Scratch coding or another language. For help learning Python from a live expert and a curriculum designed by professionals from Google and MIT, join our free Python coding class.
Fun Python Animation Tutorial for Kids
To start this project, you and your student will be using a template in Trinket.io. Trinket.io is an interactive development environment, or IDE for short. We use IDEs to code in Python (and other languages), and Trinket.io is especially useful in that we can use it to easily share code online.
If you would like to save your work, you’ll need a Trinket.io account. Once you’ve created one, you can save by clicking "remix." All your work will be saved in your Trinket.io library.
Take a look at your IDE. You’ll notice that the lines are numbered on the left side of the screen. This is especially useful when communicating where you are in your code - this tutorial will use line numbers in the reference code we show you. Additionally, notice that the starter code, displayed on the left side of the screen, has lots of different colors of text. This is a nice feature of IDEs that helps to visually show what different pieces of your code do.
Finally, if you make any changes in your code, they won’t show up on the right side of your screen (your output console) until you run your code. You run your code by clicking the “play” button.

Step 1. Choose a background
Our first step is to choose a background for our project. To help you, we’ve chosen four different options, shown on lines 5, 6, 7, and 8.
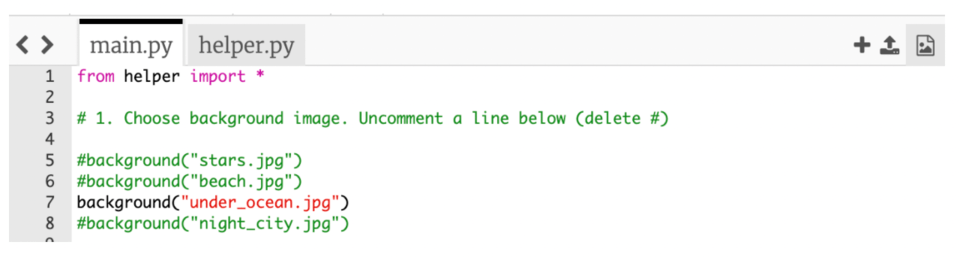
You’ll notice that these backgrounds are currently green, and have a # sign in front of them. This is called a comment. Comments are lines of code that the computer will ignore when it runs your code. To choose a background, you need to delete a # before the line with the background you like:
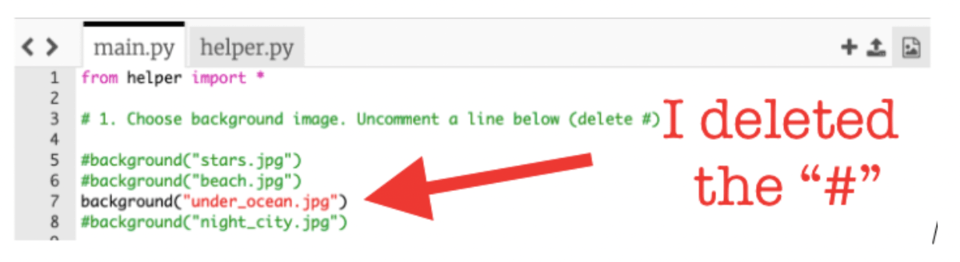
Now, the computer will read it!
Step 2: Choose a character
When you run your code (press the play sign!) you will now see your background. You will also see a turtle. The turtle is your drawing “pen” and will be the device we use to draw. We are not stuck with a turtle, however, and you can choose a different character, or what you might also know as a “sprite” from Scratch.
To do this, we’re going to look at Trinket.io’s image library. To find the library, click on the image button.

Find a character you like! Once you’ve chosen, highlight the entire name (including the file extension, .png) and copy it.
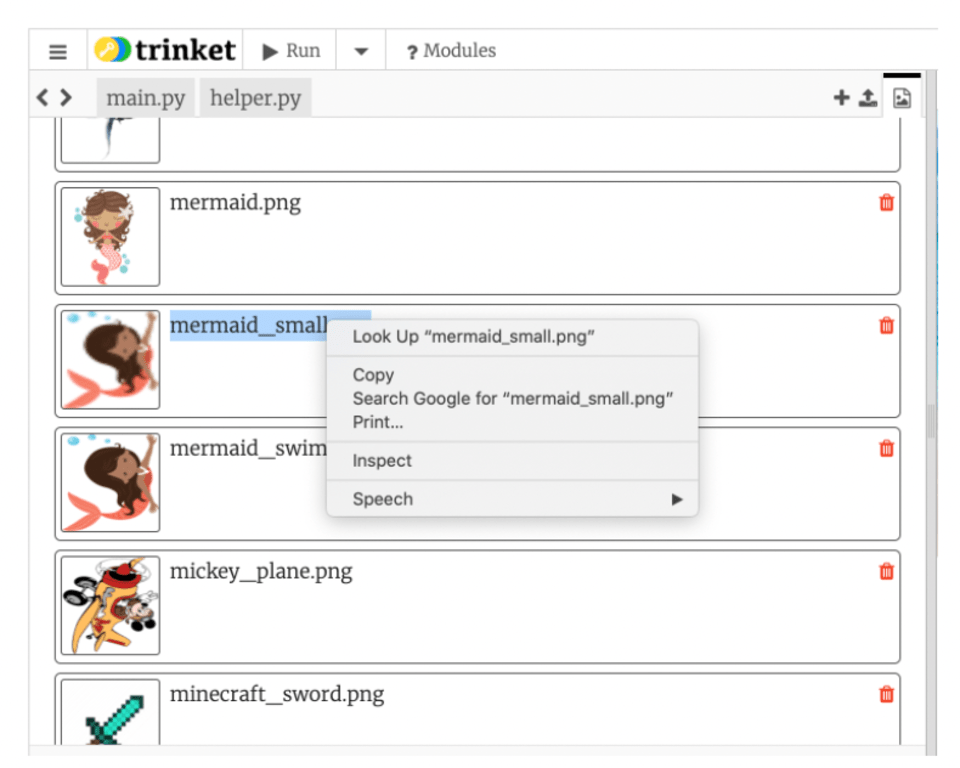
Click on main.py to get back to your code window. Then, paste the file name between the two sets of quotation marks on line 12. If you run your code now, you’ll see your chosen character appear!

Step 3. Start drawing
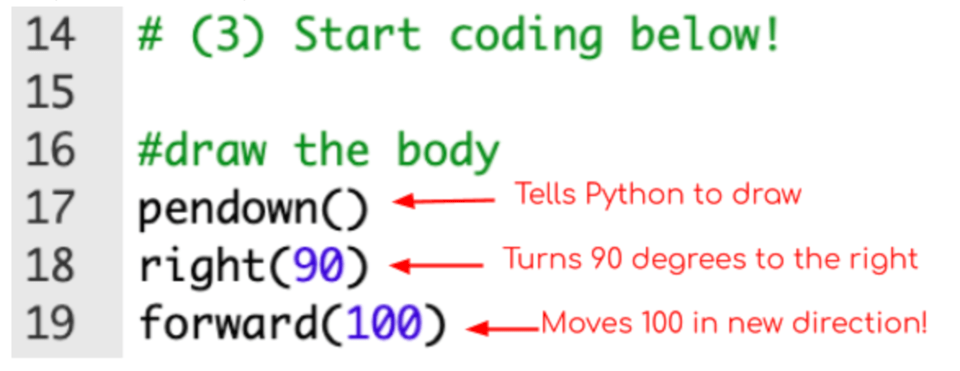
We’re all ready to start drawing our stick figure! To start, we will draw the body. To draw in Python, we use functions from the Turtle library, which has lots of tools that allow you to be as creative and innovative in your art as you would like.
Two of the most important drawing functions we’ll learn today are pendown() and penup(). Call:
- pendown() when you want to put your virtual pen on the canvas and leave a mark, and
- penup() when you want to move around the canvas without drawing.
Drawing in Python involves moving in straight lines and turning. You’ll accomplish these moves using the following commands:
- forward(100)
- backward(200)
- right(90)
- left(180)
The commands forward(100) and backward(200) move your character forward or backward the number of steps listed in between the parentheses - so in this case, 100 steps forward, 200 steps backward. You can change these numbers to whatever you want.
The commands right(90) and left(180) turn your character the number of degrees listed in between the parentheses - so in this case, 90 degrees to the right, or 180 degrees to the left. You can change these numbers as well.
Draw the body
We’ll use a combination of all these functions to draw the body. Try typing the following code into your IDE and run your code to see what happens!
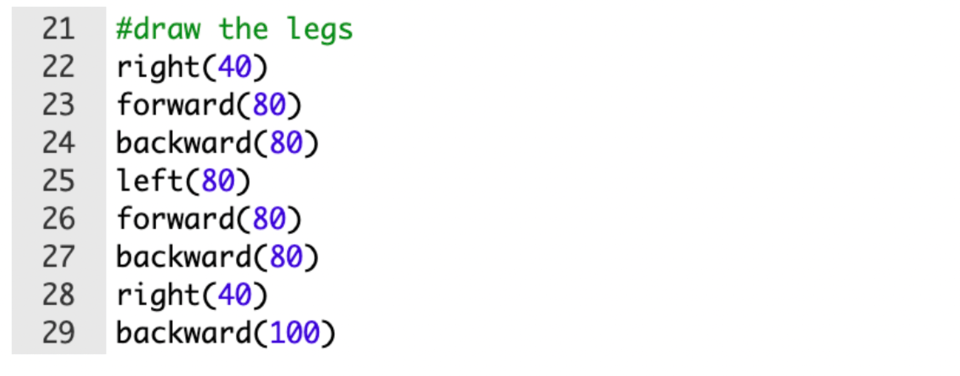
Draw the legs
Let’s give our stick figure some legs. We’ll use the same commands we’ve learned already, but change up the angles and the distances. Notice that after we draw the legs, we’re going to move up to the top of the body. What line makes this happen?
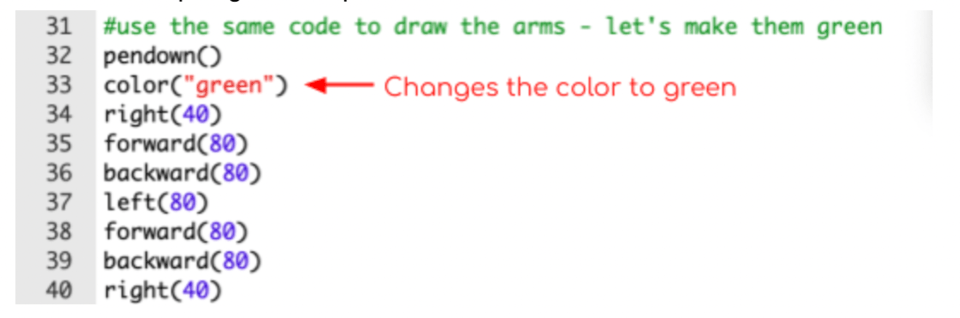
Draw the arms
We can reuse the code we’ve used for the legs to draw the arms. But let’s switch it up a bit and change the color of our pen. Right now, we’re using the default color, black. To change the color to something else, we’ll use the command color(“green”). Trinket.io has a lot of color options.
Notice that we put “green” in quotation marks.
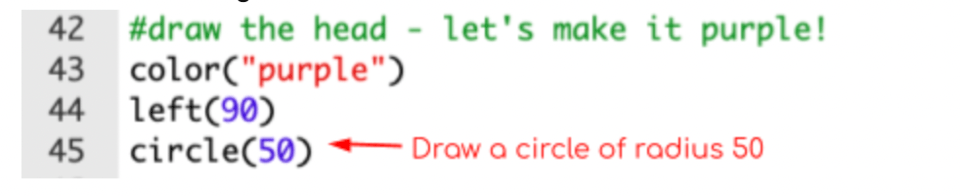
Draw the head
To draw a head, we’re going to introduce a new function: circle(50). This function lets us draw a circle of radius 50 - or whatever radius you want. Before you draw your circle, try changing the color to something new.
Draw a smile
Our final step today is to give our stick figure a smile. We can do this using circle again - all we have to do is add another input. circle() can take two inputs (also called arguments) - the radius, and the extent, or the number of degrees around the circle that you want to move.
Examine line 56 in the code below to see how we add a second argument, 180, which instructs Python to draw 180 degrees of a circle.
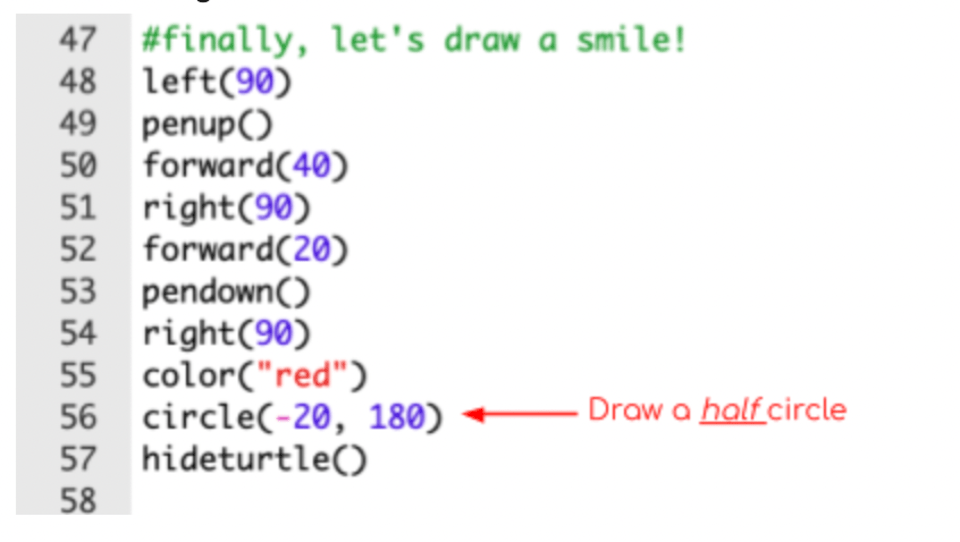
Note that on line 57, we call the command hideturtle(). This command hides our character so it doesn’t sit on top of my drawing.
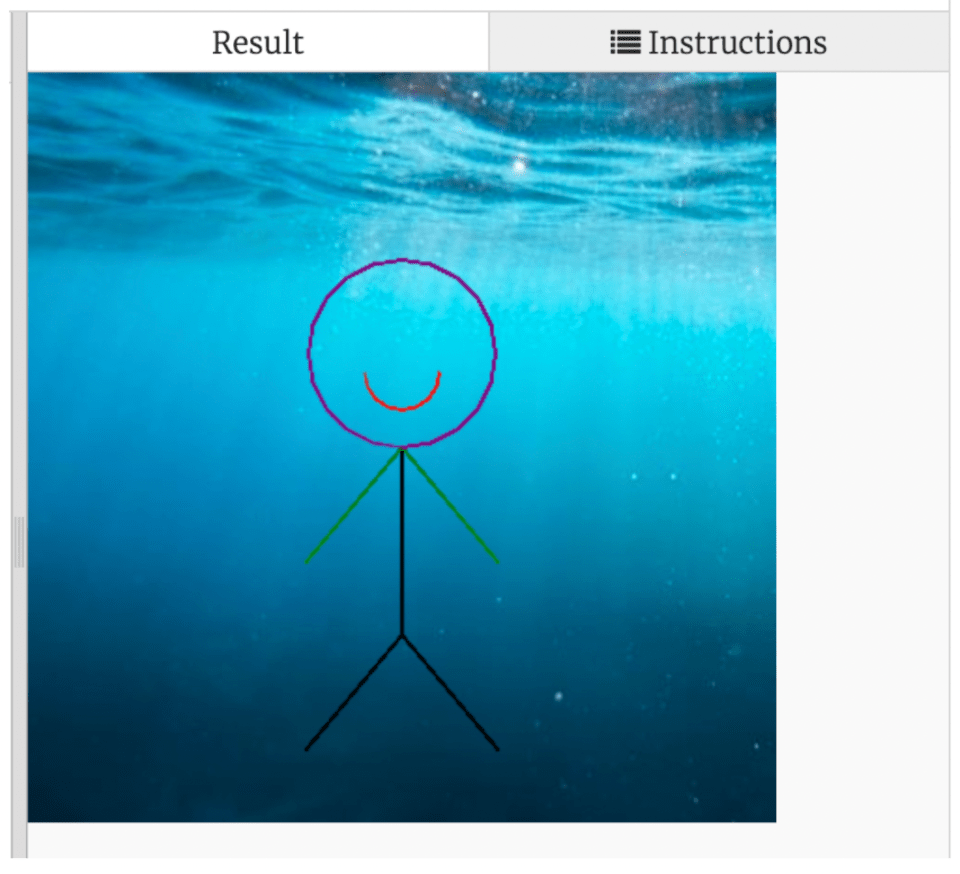
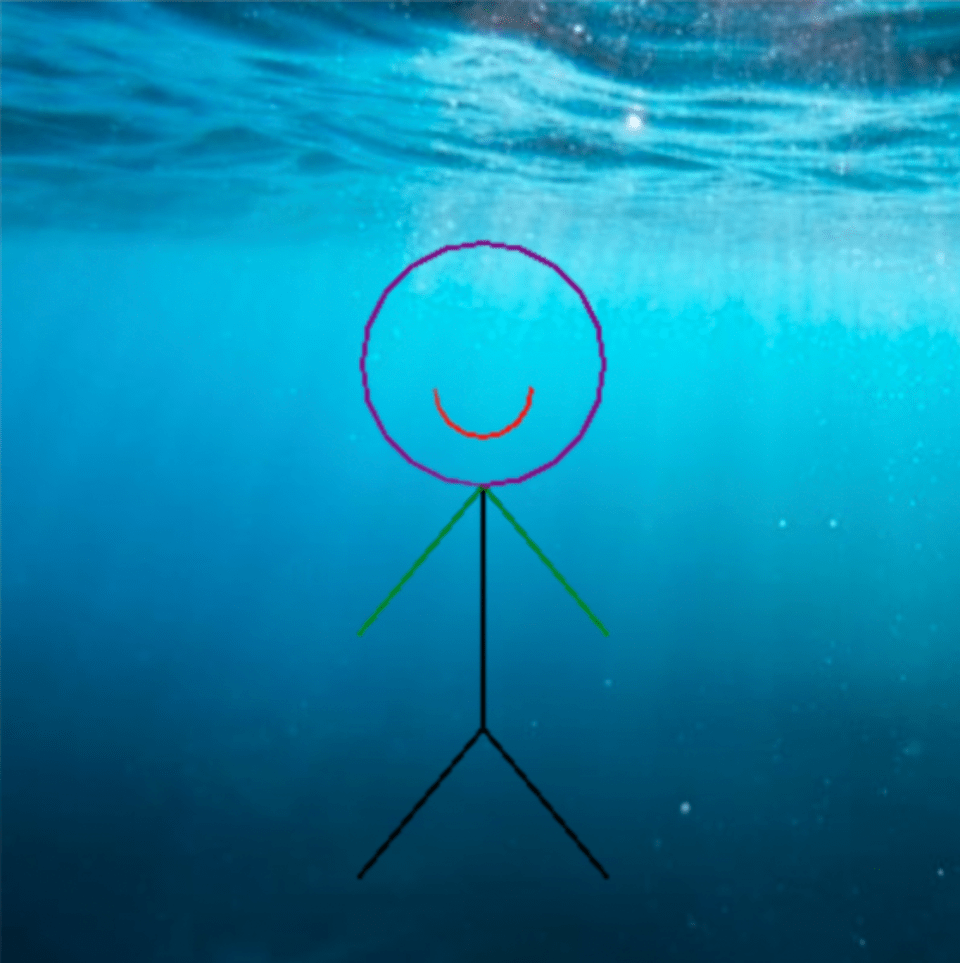
Your final drawing should look something like this:
Step 4: Challenges
Congratulations! You’ve just drawn your first animation in Python!
There are other commands you can use to enhance your drawing toolkit, but you’ve learned many of the key drawing tools for Python coding today. Some things you can add to your stick figure:
- Eyes
- Try typing dot(30) and seeing what it does :)
- Hair
- Clothing, a hat, or some shoes
What else can you think of to add? What do you want to create?
Python Animation Tutorial for Kids
Want to create new animations, games, quizzes, and more? Keep learning Python with our award-winning live online Python classes: Python for AI. Enjoy live expert guidance as you build more animations, and further master this real-world programming language used by companies from Spotify to Netflix.
Up next, learn how to make animal art with Python.
You might also like making a Halloween animation with Python.
Written by Sarah Rappaport, who graduated from Northwestern University with undergraduate and graduate degrees in engineering and music. She's now working on a masters in data with Georgia Institute of Technology. She taught math and computer science with Teach for America for two years, and now works as a Systems Engineer.