

Today we'll guide you and your child through a fun MIT App Inventor tutorial. MIT App Inventor is an Internet-based platform where beginners can get an excellent introduction to Android app development. It allows you to customize your app with many features you may be familiar with such as buttons, toggles and images. We’ll provide an overview of MIT App Inventor and the resources available. Keep reading for instructions on how to build your own game!
Learn how to build mobile apps with live online guidance in our award-winning class designed by experts from Google, Stanford, and MIT:
Check out upcoming free computer science events for teens led by tech experts: past events have featured guests from Pixar, NASA, Intel, and more.
MIT App Inventor for Kids
MIT App Inventor is a great tool to introduce beginners to Android app programming. It's a web-based application development environment that allows users to create software applications for Android devices. Developed by the Massachusetts Institute of Technology (MIT), this free platform provides a user-friendly, block-based coding interface that simplifies the process of app creation. It’s designed to make coding accessible to everyone, including kids and beginners, by using visual programming blocks instead of complex text-based code.
- User-Friendly Interface:
- Visual Learning: MIT App Inventor uses a drag-and-drop interface where kids can visually assemble blocks that represent different coding functions. This approach makes it easier for young learners to understand programming concepts without getting bogged down by syntax errors common in traditional coding languages.
- Immediate Feedback: Kids can see the results of their work instantly on their connected Android devices, making the learning process interactive and engaging. It also clearly has features of Android programming in Java which makes the transition to written code for Android easier.
- Encourages Creativity and Problem-Solving:
- Creative Projects: With MIT App Inventor, kids can create a wide variety of apps, from simple games to more complex applications. This flexibility allows them to bring their ideas to life and explore their creativity.
- Logical Thinking: Building apps requires kids to think logically and solve problems as they design their app’s functionality. This helps develop critical thinking skills that are valuable in many areas of life.
- Real-World Applications:
- Practical Skills: Learning to create apps with MIT App Inventor gives kids practical skills that are directly applicable in today’s tech-driven world. They can create useful tools, games, and educational apps that can be shared with others.
- Foundation for Future Learning: MIT App Inventor provides a strong foundation for understanding more advanced programming concepts and languages. It serves as a stepping stone for kids who may want to further explore computer science and software development in the future.
MIT App Inventor Login
You can use this link to login. It provides the option to login with Google.
Let's Make a Simple Game on MIT App Inventor
We’re going to show you how to make a Mole Mash game. A small mole will randomly jump around the screen, and the score increases whenever you tap it.
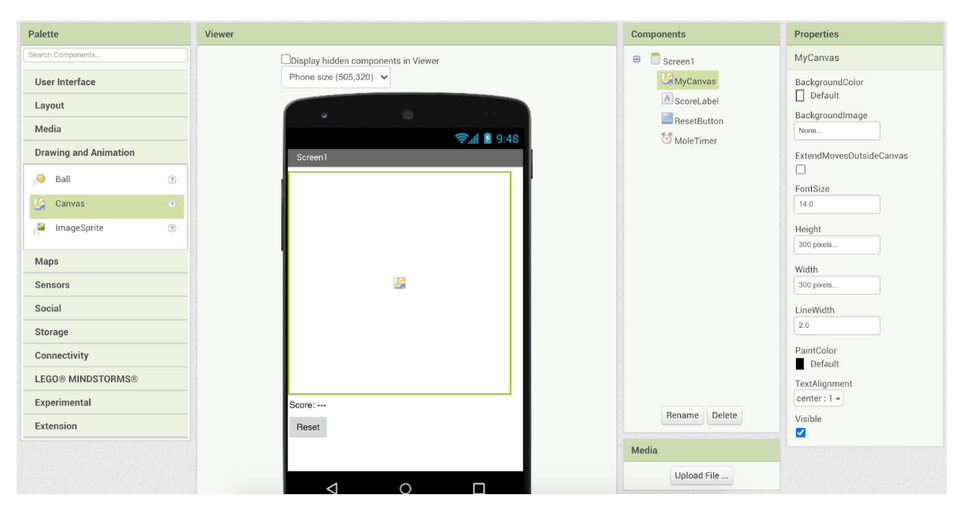
1. Open a blank project
Open a blank project. Drag a Canvas element from the Drawing and Animation section. Rename it to “MyCanvas” and set its dimensions to 300x300. Drag a Label element from User Interface. Call it “ScoreLabel” and set its text to “Score: ---”.
Also from User Interface drag a Button and call it “ResetButton”. Make its text “Reset”. From Sensors drag a Clock element so you can control the interval that the mole jumps around the screen. Call it “MoleTimer”, select “Timer Enabled” and set the TimerInterval to 500.
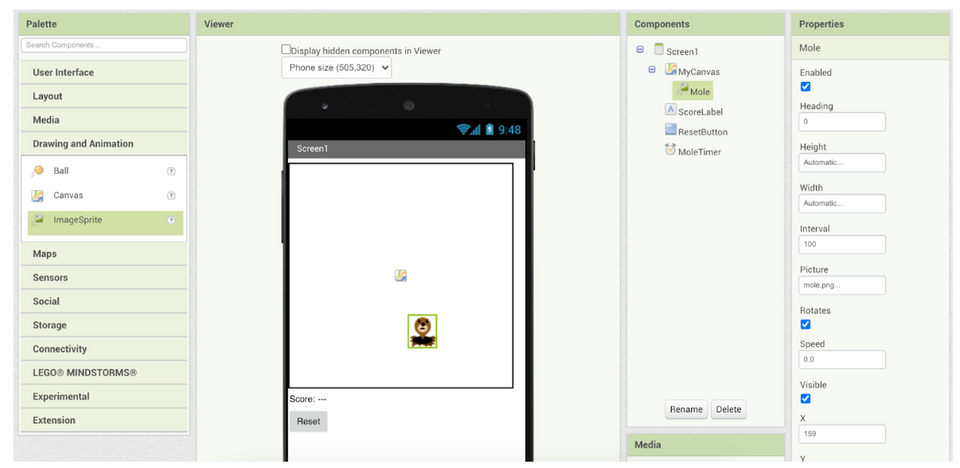
2. Add an ImageSprite
The next thing we need to do is add an ImageSprite from Drawing and Animation to our Canvas. Make sure the image is on the canvas: it will appear nested under MyCanvas in the Components tab. Download the mole image here. The “Enabled” and “Visible” options should be checked, “Width” and “Height” should be “automatic”, and “Speed” should be 0.0.
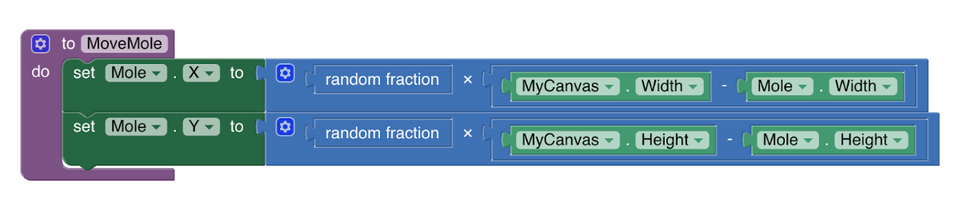
3. Move the mole
Now let’s switch to the “Blocks” screen so we can add some functionality. We’re going to start with a snippet of code to move the mole. In Procedure, select the block with where you can fill the name and has a “do” action. Change the name to “MoveMole”. The “do” section is where we want to put the blocks for this procedure.
Click on Mole and get the “set mole x” block. This locks to a multiplication block from Math. The first factor is the random fraction block, also from Math. This gives a random number between 0 and 1. The first thing we want on the right factor is a subtraction block from Math. The left hand of the subtraction is the “width” block from MyCanvas. The right side is the “width” block from Mole. We’ll repeat this procedure for the y-element of the Mole. In this case, the width should be changed to height.
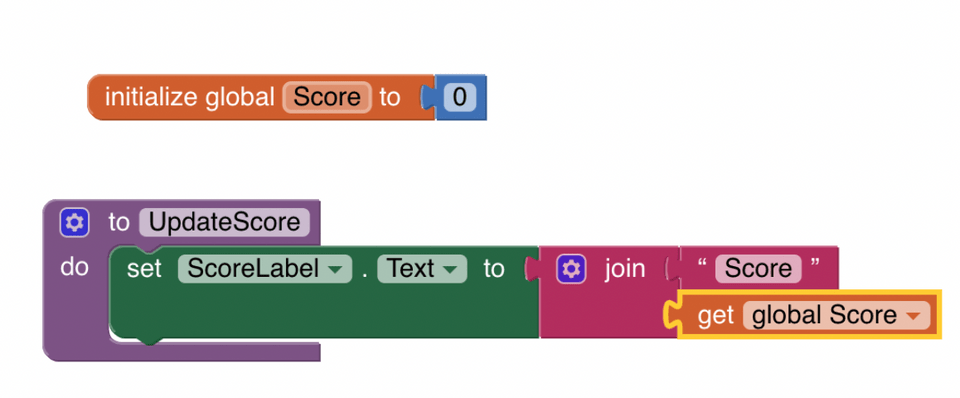
4. Make another Procedure
We’re going to make another Procedure called “UpdateScore”. Before we create the procedure, we need to make a variable for the score. In the Variables tab, we want an “initialize global” block. We want to attach this to a Math number block with the value 0. In this procedure, we want to set the text of ScoreLabel. From Text, we want a “join” block. The top block is a blank Text block where we can fill in “Score”. Underneath, we want “get” from Variables and change the dropdown to “global score”.
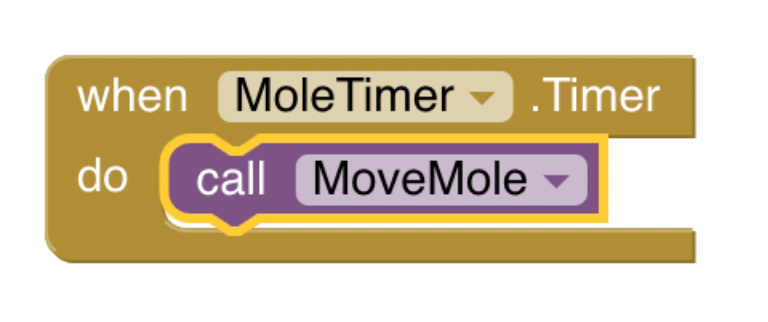
5. Line it up with the timer
To make the MoveMole procedure happen with the timer, we need the “when MoleTimer Timer do” block from MoleTimer. Then inside that we use the “call MoveMole” block from Procedures.

6. Update the score
Now we need the score to update when we tap on the mole. We start with the “when Mole touched x y do” block from Mole. Then we increment the score. First we need the “set” block from Variables and select “global Score” from the dropdown. We attach this to an addition block in Math. We want to add a “get global Score” block from Variables and a number block from Math with the value set at 1. Then we call the UpdateScore and MoveMole procedures.
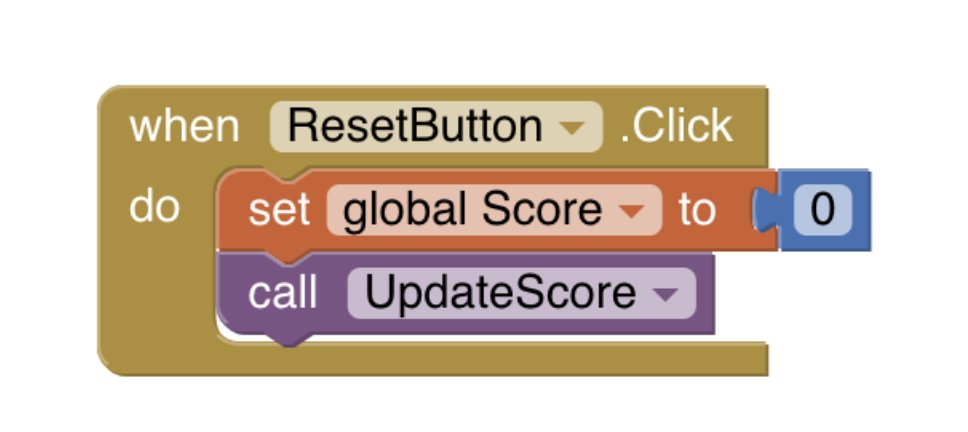
7. Make the button work
Finally we need to implement the functionality of the button. In ResetButton, get the “when ResetButton click do” block. From Variables, get the “set global Score” and connect it to a Math block with value 0. After that we “call UpdateScore” from Procedure.
Advanced Tips and Enhancements
Taking your Mole Mash game to the next level can be both fun and rewarding. Here are some advanced tips and enhancements to make your game even more exciting:
1. Save the Game State
Saving the game state allows players to resume their progress the next time they play. This is particularly useful for tracking high scores or other persistent game data.
- How to Do It: Use TinyDB, a database component in MIT App Inventor, to save and retrieve the score.
2. Add Sound Effects and Music
Sound effects and music make the game more immersive and engaging.
- How to Do It: Use the Sound component in MIT App Inventor to add sound effects and background music.
3. Create Interactive Elements
Interactive elements make the game more interactive and fun to play.
- How to Do It: Add buttons or interactive objects that players can click to perform actions, such as starting a new game, pausing, or accessing a help menu.
4. Implement Power-Ups and Bonuses
Power-ups and bonuses add an extra layer of strategy and excitement to the game.
- How to Do It: Create additional ImageSprites for power-ups and use conditional statements to check if the player has collected a power-up and apply its effects.
Common Issues and Bugs in the Mole Mash Game Tutorial and How to Solve Them
Creating a Mole Mash game in MIT App Inventor can be fun, but you might encounter some common issues along the way. Here are solutions to help you troubleshoot:
1. Canvas Not Displaying Properly
- Issue: The Canvas element or the ImageSprite does not appear on the screen as expected.
- Solution: Ensure that the Canvas element's dimensions are set correctly to 300x300. Check that the ImageSprite is nested under MyCanvas in the Components tab. Verify that the "Visible" property of both the Canvas and the ImageSprite is checked.
2. Mole Not Moving
- Issue: The mole does not move around the screen when the game starts.
- Solution: Check the "Timer Enabled" property of the MoleTimer is checked and that the "TimerInterval" is set to 500. Ensure that the MoveMole procedure is correctly defined and that the "call MoveMole" block is placed inside the "when MoleTimer.Timer" event block.
3. Score Not Updating
- Issue: The score does not update when the mole is tapped.
- Solution: Verify that the "when Mole.Touched" block is set up correctly. Ensure that the "set global Score" block is properly connected to the addition block and that the addition block is correctly adding 1 to the current score. Check that the "call UpdateScore" block is placed after the score increment logic in the "when Mole.Touched" event block.
4. Reset Button Not Working
- Issue: The reset button does not reset the score to 0.
- Solution: Confirm that the "when ResetButton.Click" block is correctly set up. Ensure that the "set global Score" block is connected to a Math block with the value set to 0. Verify that the "call UpdateScore" block is placed after resetting the score in the "when ResetButton.Click" event block.
5. Random Placement of Mole Off-Screen
- Issue: The mole occasionally moves off the screen and cannot be tapped.
- Solution: Ensure that the random fraction block and the multiplication block in the MoveMole procedure are set up correctly. Verify that the subtraction block correctly subtracts the Mole's width from the Canvas's width for the x-coordinate and the Mole's height from the Canvas's height for the y-coordinate. This prevents the mole from moving beyond the visible area of the Canvas.
6. ImageSprite Not Displaying the Correct Image
- Issue: The mole image does not display or shows an incorrect image.
- Solution: Check that the ImageSprite's "Picture" property is correctly set to the downloaded mole image. Ensure that the mole image file is correctly uploaded and accessible in the project resources.
Key Programming Concepts in the Mole Mash Game Tutorial
1. Components
- What Are They?: Components are the building blocks in MIT App Inventor that you use to create your app's user interface and functionality. Examples include Buttons, Labels, Canvases, and ImageSprites.
- Usage in the Tutorial: Components like the Canvas, ImageSprite, Label, Button, and Clock are used to create the game's interface and control the mole's movement and scoring.
2. Properties
- What Are They?: Properties are attributes of components that define their appearance and behavior. You can set and modify properties such as size, color, visibility, and position.
- Usage in the Tutorial: Properties like the Canvas size, ImageSprite position, Label text, and Timer interval are set to control the game's layout and functionality.
3. Events
- What Are They?: Events are actions that trigger specific blocks of code to run. They can be user actions (like clicking a button) or system actions (like a timer ticking).
- Usage in the Tutorial: Events like "when Mole.Touched" and "when MoleTimer.Timer" are used to detect when the mole is tapped and when the timer ticks, triggering the corresponding code blocks.
4. Procedures
- What Are They?: Procedures are reusable blocks of code that perform specific tasks. You define a procedure once and can call it whenever needed.
- Usage in the Tutorial: Procedures like MoveMole and UpdateScore are created to handle the mole's movement and updating the score. These procedures are called whenever the mole moves or the score needs to be updated.
5. Variables
- What Are They?: Variables are used to store data that your app can use and modify. They can hold numbers, text, or other types of data.
- Usage in the Tutorial: A variable named "score" is used to keep track of the player's score. This variable is incremented whenever the mole is tapped.
6. Random Numbers
- What Are They?: Random numbers are values generated within a specified range, used to create unpredictable behavior in your app.
- Usage in the Tutorial: Random numbers are used to determine the new position of the mole on the Canvas, making the game challenging and fun.
7. Control Blocks
- What Are They?: Control blocks manage the flow of your app's logic. Examples include conditional statements (if-then), loops (repeat), and event handlers.
- Usage in the Tutorial: Control blocks are used to execute actions based on events, such as moving the mole when the timer ticks or updating the score when the mole is tapped.
8. Math Blocks
- What Are They?: Math blocks perform arithmetic operations like addition, subtraction, multiplication, and division.
- Usage in the Tutorial: Math blocks are used to calculate the new position of the mole and to update the score by adding points.
More App Inventor Tutorials for Beginners
Check out a few more fun projects to try.
1. Hello Codi
This is an excellent tutorial for beginners. It offers step by step instructions to show how to add and customize different elements. For example, it shows you how to position buttons and labels and add images and sounds to your app.
2. Ball Bounce
This tutorial creates a simple app where you can control a ball to bounce around the screen. It also provides extension ideas such as changing the speed or color of the ball or adding a barrier.
3. PaintPot
This is a tutorial to introduce the Canvas and graphics concepts. When you’re done, you can use your finger to draw with different colors, use a button to clear the screen, and upload an image for the background.
MIT App Inventor Tutorial for Beginners
Now you know how to get started with the MIT App Inventor platform, and how to build a quick MoleMash game. For even more fun, check out our mobile coding for apps and games class or enjoy a creative Thunkable mobile games tutorial.
Written by Sophie Andrews, a Create & Learn instructor. Sophie Andrews is a student at Stanford University studying Math andComputational Sciences. She loves teaching and is a teaching assistant for Stanford's introductory computer science classes. Her work focuses on data science. Last year she built the online National Vote Trackers for The Cook Political Report, and she currently leads the Data Team at The Stanford Daily. She's also interned with the FCC and the National Renewable Energy Lab.

