

Thunkable coding is a great way for kids to code mobile games. That makes it a perfect fit for a child who spends a lot of time playing mobile games. Or for a child that wants to build their own mobile game but doesn't know where to start.
Today, we're going to reveal what Thunkable is. And show you how it works. Including how your child can design the user interface for a mobile game. And then program what the app will do. We'll create an entertaining riddle app in the process. So what are we waiting for — let’s get started!
Learn how to build your own mobile games with live expert instruction in our award-winning online classes designed by experts from Airbnb, Apple, and MIT.
How to Make a Mobile Game with Thunkable
Thunkable is a free platform to build iOS, Android, and web apps without code. Before developing Thunkable, the founders developed App Inventor as part of the MIT Media Lab. Then improved it to create Thunkable. If the MIT Media Lab sounds familiar, they are the same folks who developed Scratch. Today, more than 50,000 users are already putting Thunkable to work building apps.
Here's How Thunkable Works
When using Thunkable, creators can design their user interface and how their apps look by moving design features called “components” around a simulated phone screen. Examples of components include buttons, text boxes, images, and graphics. The possibilities are endless!
Instead of typing computer instructions, Thunkable creators drag blocks to program what the app should do when the user interacts with the app. For example, a creator could move Thunkable blocks to change some text on the screen when the user presses a button. Executing code once an action is performed is called “event-driven programming,” a key concept in mobile app development.
Executing code once an action is performed is called “event-driven programming,” a key concept in mobile app development.
How to Create a Free Thunkable Account
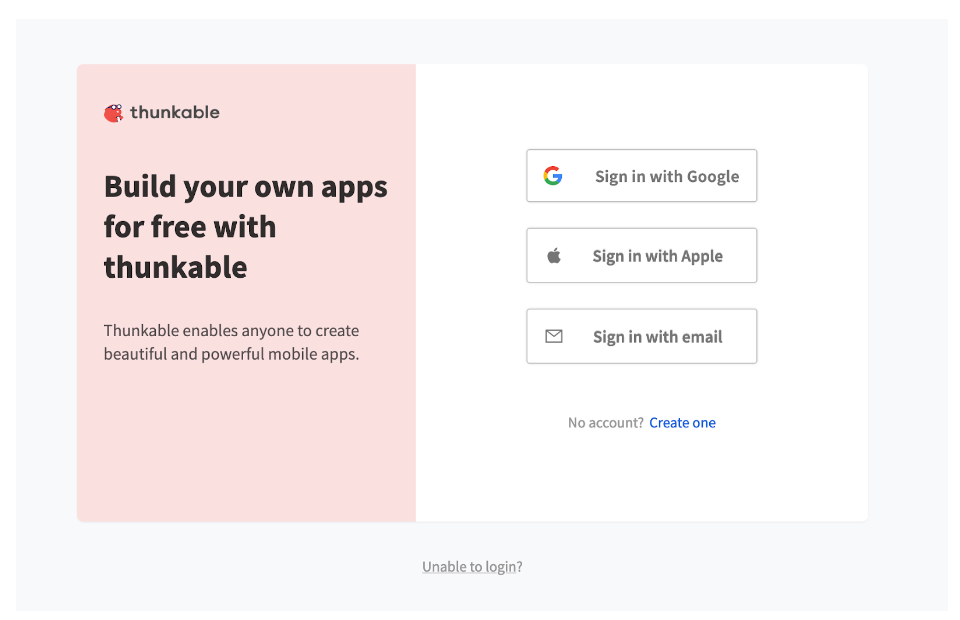
Getting started with Thunkable is very easy. It is 100% free and only requires a Google account.
- Visit Thunkable's sign up page.
- Click “Sign Up With Google” if you have a Gmail account. You can also sign up with an Apple ID or any other type of email address. If you sign up with an email address, you must click the sign up link emailed to that address.
3. Once Thunkable asks you about what type of user you are, say you are a “student who wants to boost your learning.”

4. Click on “Start Building”
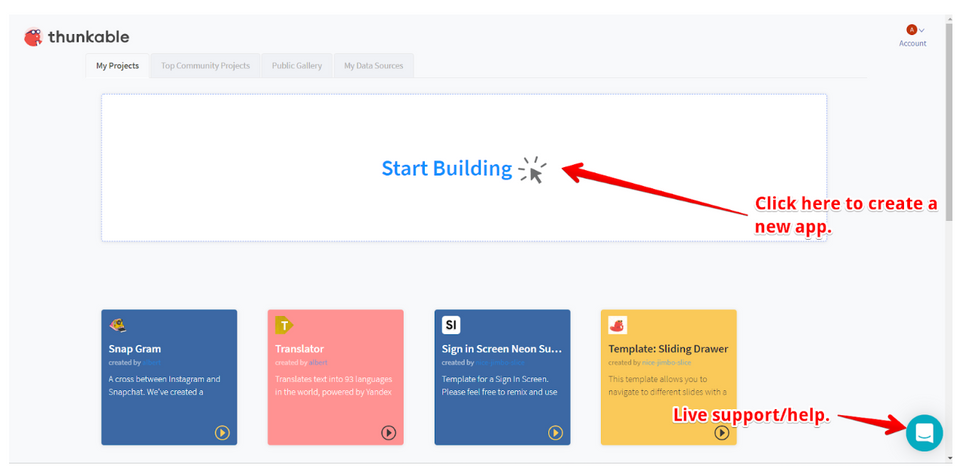
5. Call your app “riddleApp” and click “Create”
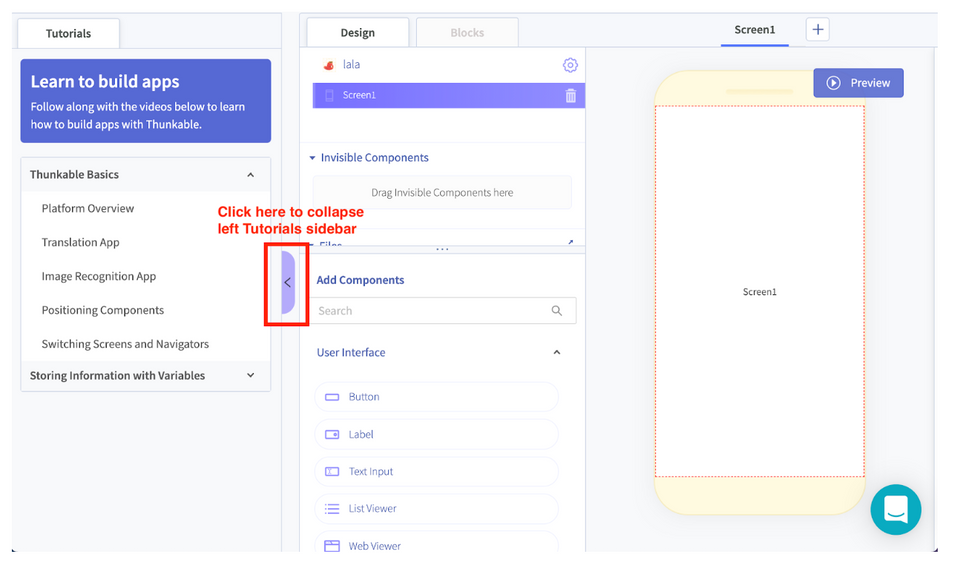
6. Click the small left arrow to collapse the Tutorials sidebar
Code a Beginner Mobile Game: Create a Riddle App
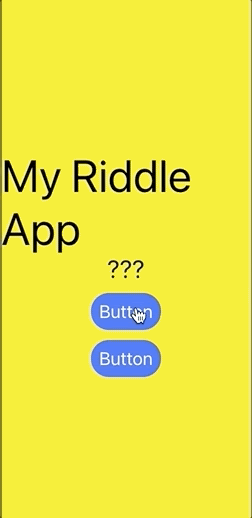
Now that you’ve created a Thunkable account for your child to use, we are going to create a very simple riddle app. While this app is not the next Fruit Ninja, it is your first step into mobile app development! This app has two buttons, each button representing a riddle. When the user presses one of the buttons, the question to a riddle appears. After a few seconds, the answer to the riddle appears!
Don’t have any riddles in mind? Check out this list of child friendly riddles!
How to Design the User Interface for a Mobile Game
Before they start coding, your child will need to design how their app looks. The app should be designed in the “Designer View”:
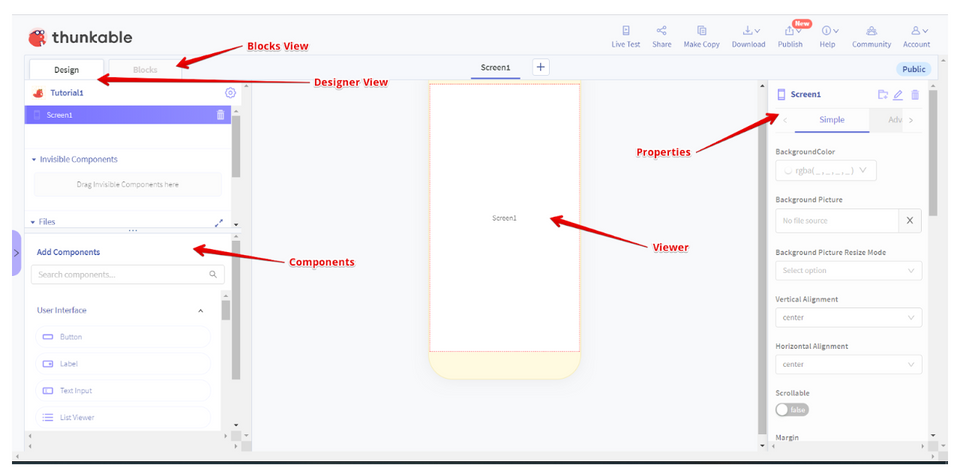
In the middle of the Designer View is a simulated phone screen. When your child starts, the app will have nothing on the screen. Your child can add components by dragging a component from the “Add Components” menu onto the screen.
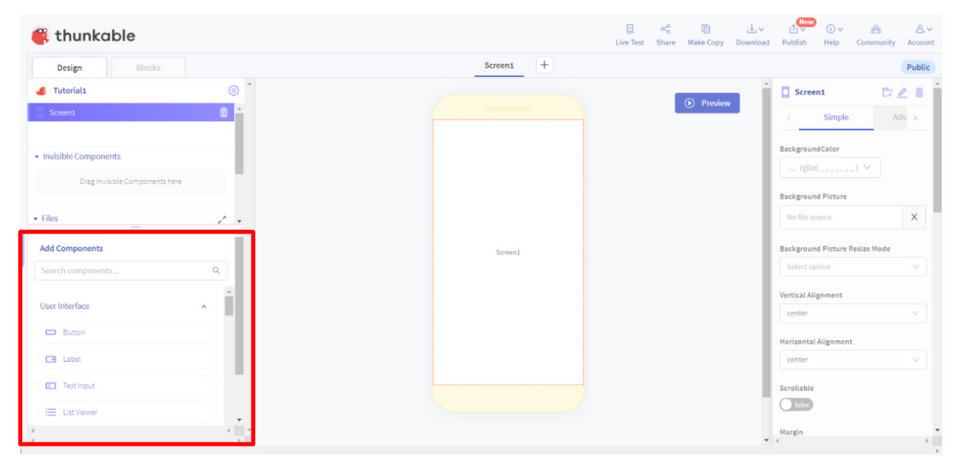
Encourage your child to scroll around in the “Add Components” menu and find many interesting components, such as an Image Recognizer, Gyroscope, Map and more. As your child gains more experience with Thunkable, they can experiment with these components. We use some of these components in more advanced Thunkable courses.
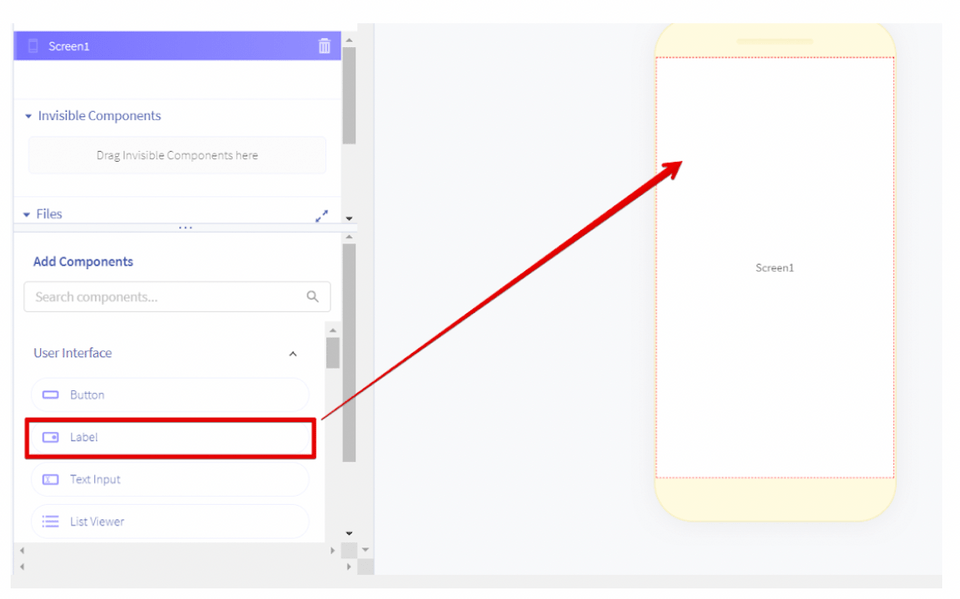
Step 1: Let’s add our first component to our app. First, have your child drag a “Label” onto the screen. A label is a user interface component that displays text.
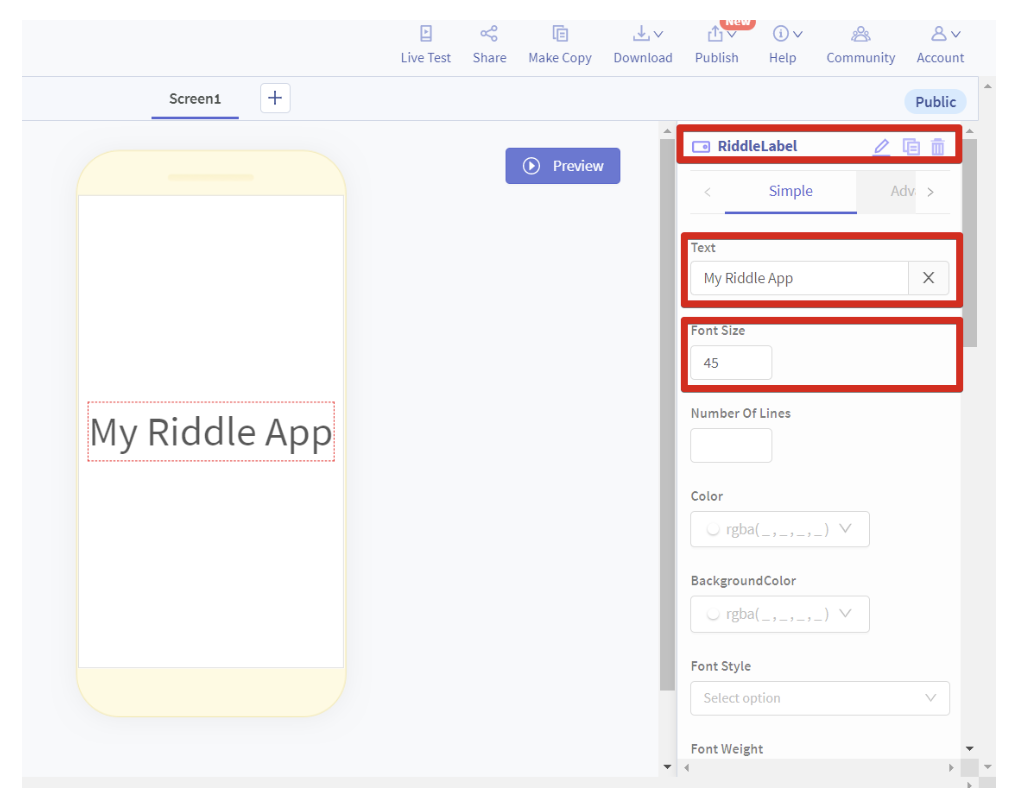
Step 2: Now it’s time to customize the label! We do this by changing its properties. On the right sidebar of the screen, you will see some properties such as text, font size, color, and more. Let’s change the following properties:
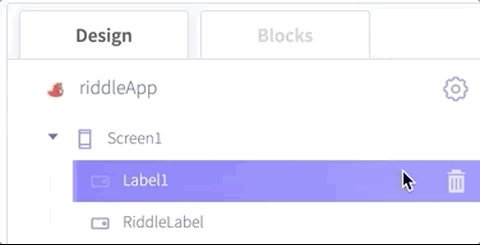
1. First, at the top of the right sidebar click the pencil and rename the label from “Label1” to “RiddleLabel.”
2. Change the text to say “My Riddle App”
3. Change the font size to 45
Step 3: Now that there is the bigger label that will ask the riddle’s question, we need another label that will show the riddle’s answer! Next, drag a second label onto the screen.

Step 4: Uh oh! We want the smaller label below the bigger label! We can change the order of the components by changing the order of the components in the top right panel:
While still having the new label selected, change the following properties:
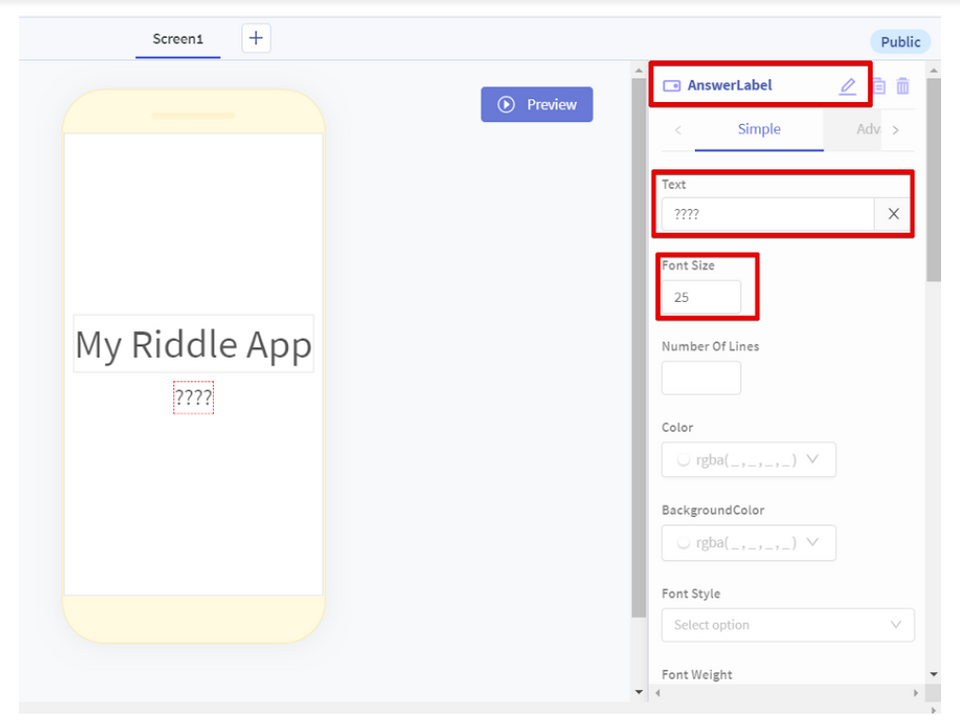
- At the top of the right sidebar click the pencil and rename the label from “Label1” to “AnswerLabel.”
- Change the text to “????”
- Change the Font Size to 25
Step 5: What else is missing from the app? We still need to add buttons!
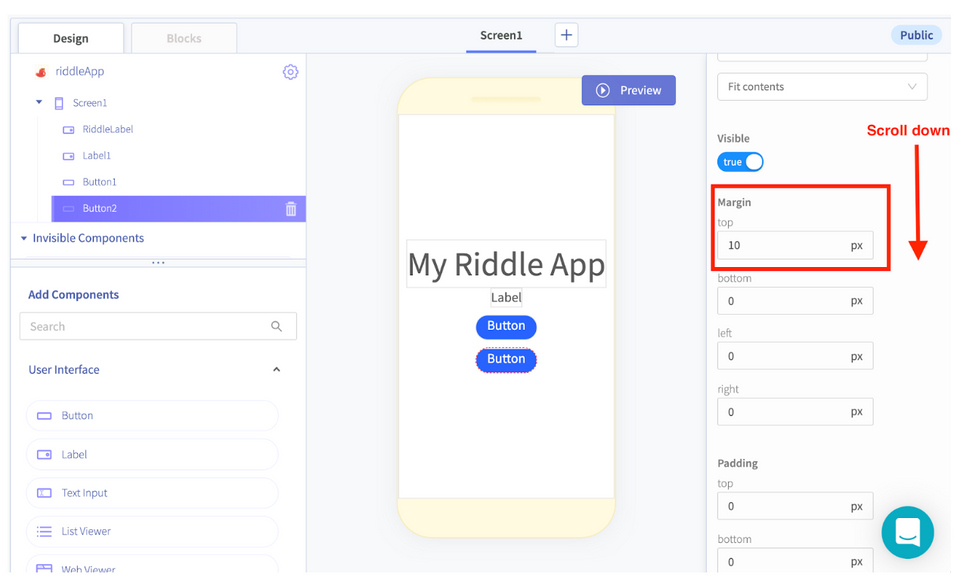
- Drag two buttons onto the screen
- Reorder the buttons such that both buttons are under the labels
- OPTIONAL: To add space between the buttons, scroll down on the right side panel change the top margin to 10 px
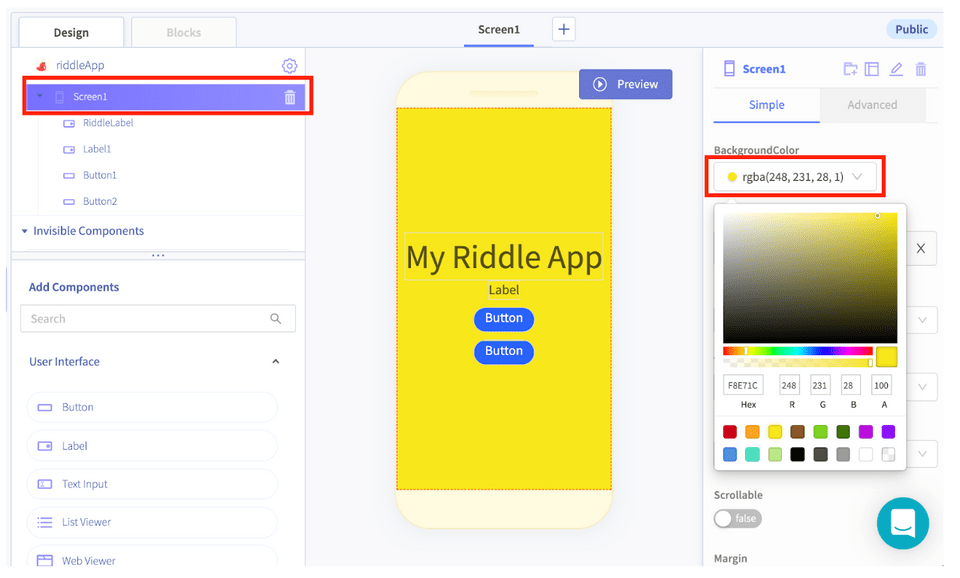
Step 6: Your child can also customize the app by changing the background color:
Thunkable Coding Basics: How Will Your App Work?
Now that your child has designed how their app looks, it’s time to program what the app will do. What steps should happen when the user presses a button? Here’s the algorithm, the detailed instructions our program will execute:
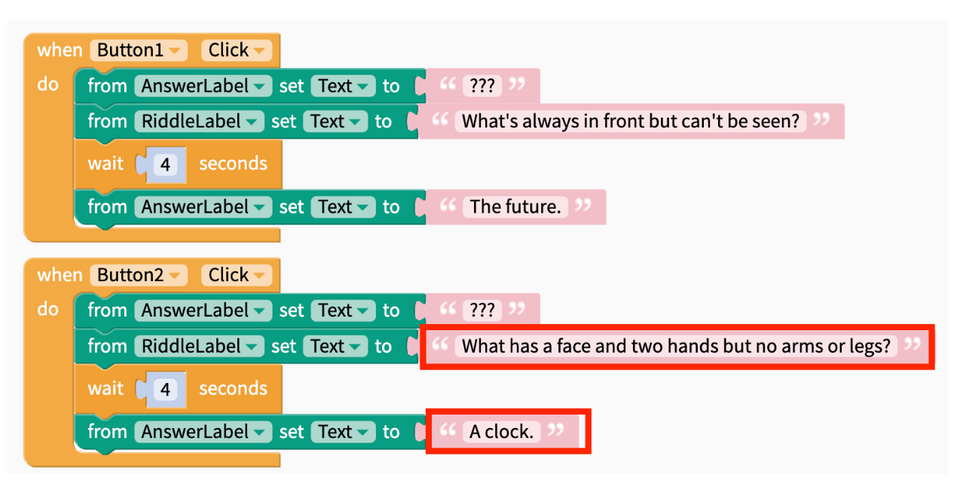
When the user presses a button:
- Reset the AnswerLabel text to “????”
- Show a new riddle in the RiddleLabel text
- Wait 4 seconds
- Show the answer to the riddle in the AnswerLabel
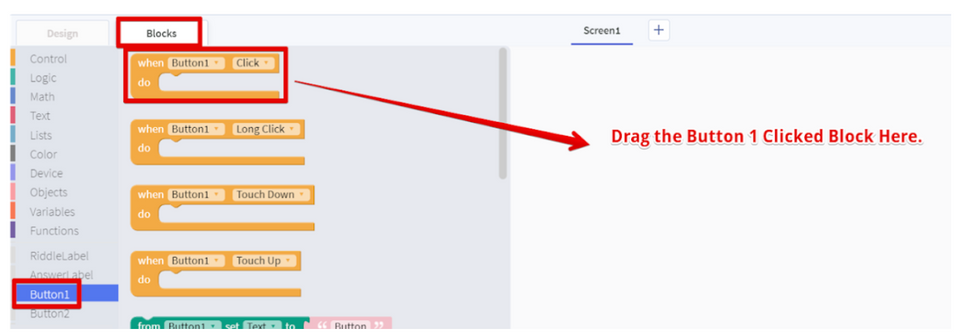
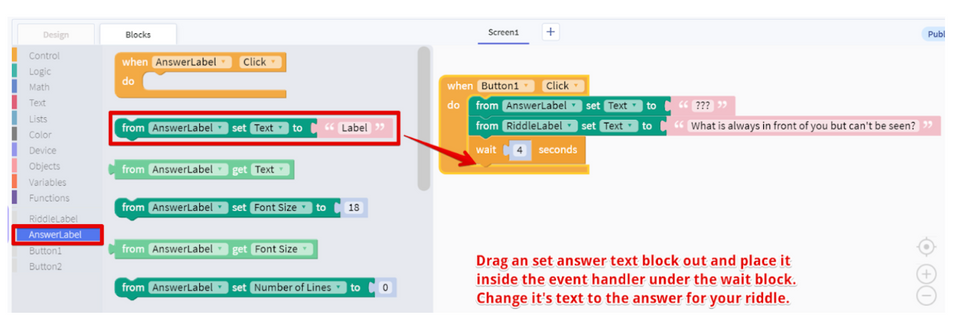
Step 1: Let’s start by dragging a “When Button1 clicked” block. This block waits for the user to press Button1. The blocks that wait for user interaction are called “event handlers”:
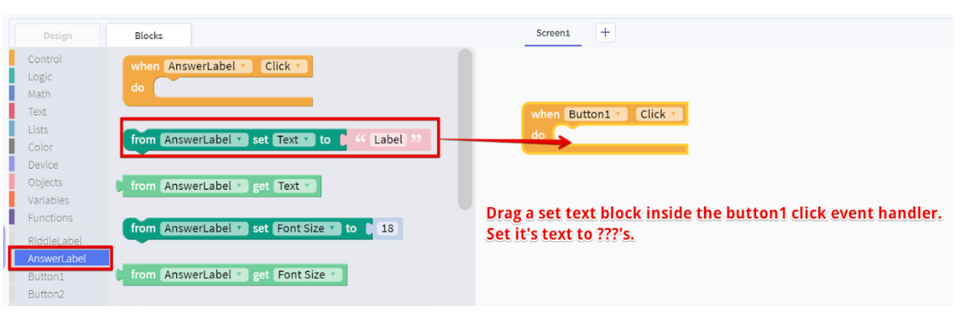
Step 2: Inside of the “When Button1 click” block, drag a block to set the AnswerLabel text to “???”
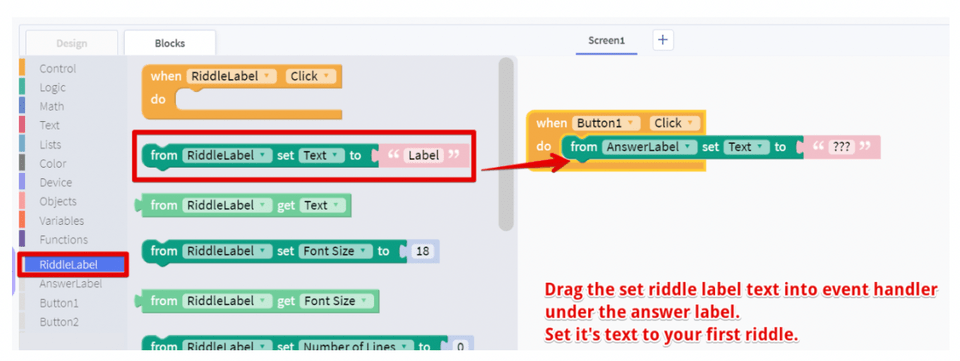
Step 3: Under the “from AnswerLabel set Text to ???” block, add a block to set the RiddleLabel text to your first riddle. As a reminder, if your child needs support to come up with riddles, they can consult this list of child-friendly riddles.
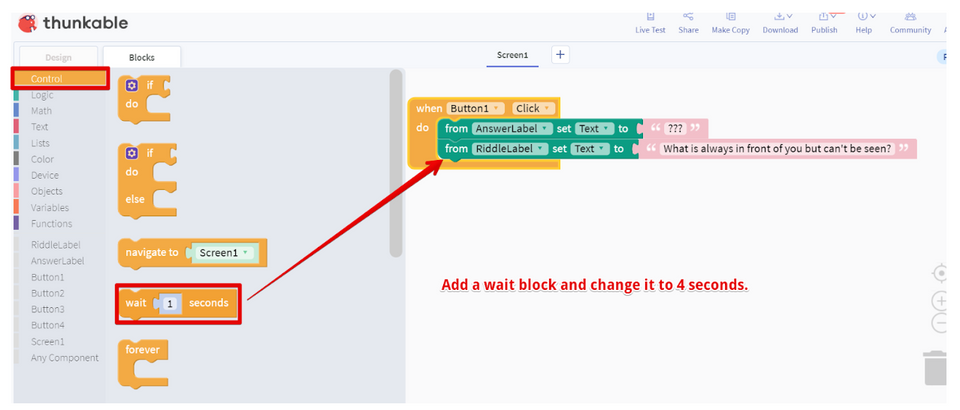
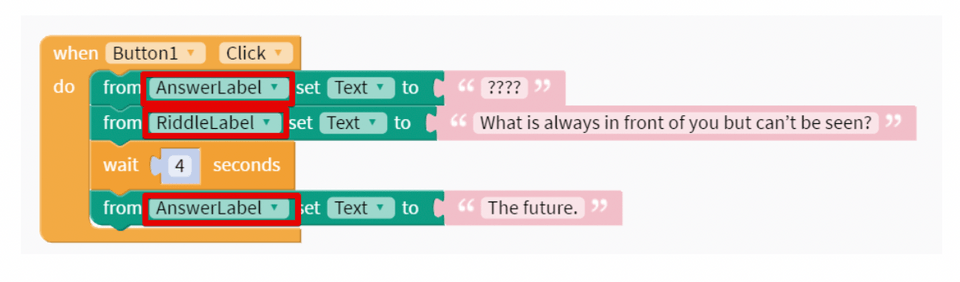
Step 4: Now, let’s add a block to wait 4 seconds before showing the riddle’s answer. In the “Control” blocks, find the “wait 1 second” block but change the number of seconds from 1 to 4.
Step 5: Finally, set the RiddleLabel text to the answer to the riddle.
Here is how your code should look. The names of the labels are boxed in red to remind you to double check the label names:
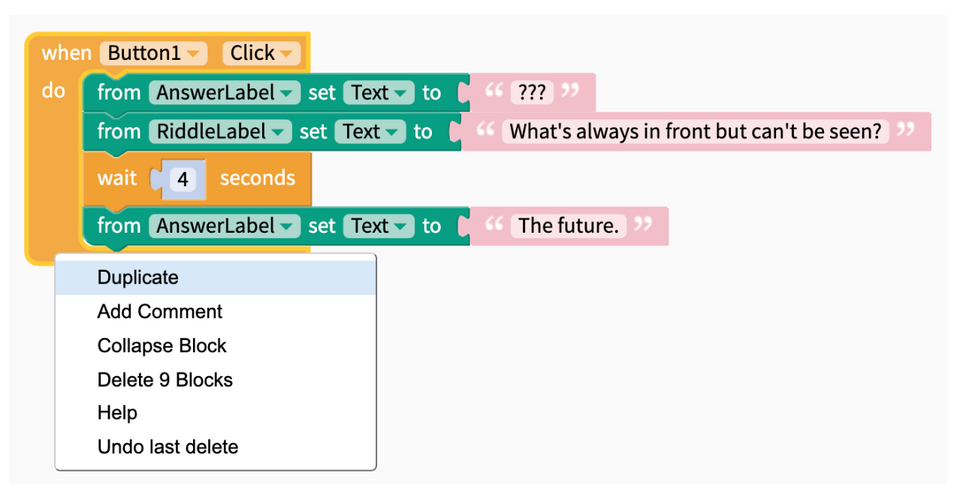
Step 6: Is the algorithm for Button1 different from the algorithm for Button2? It doesn’t look like it! To make things easy, let’s duplicate the code we just wrote by right clicking on the “when Button1 click” block, then clicking “Duplicate.” If your computer does not have right click, try holding down the Ctrl key and clicking.
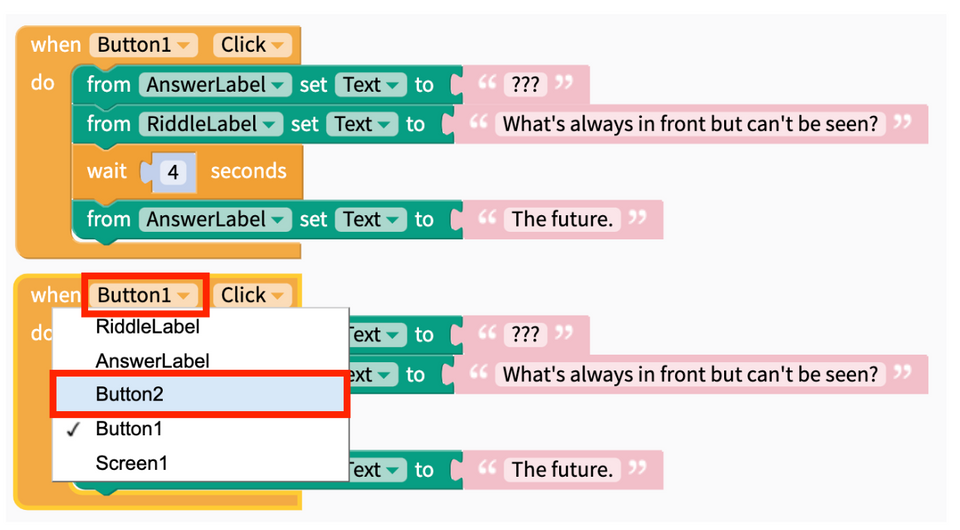
Step 7: Now that you duplicated the blocks, change the event handler from “when Button1 click” to “when Button2 click”. You can change this by using the drop down menu that displays after clicking “Button1”:
Step 8: Also, don’t forget to change the riddles for Button2!
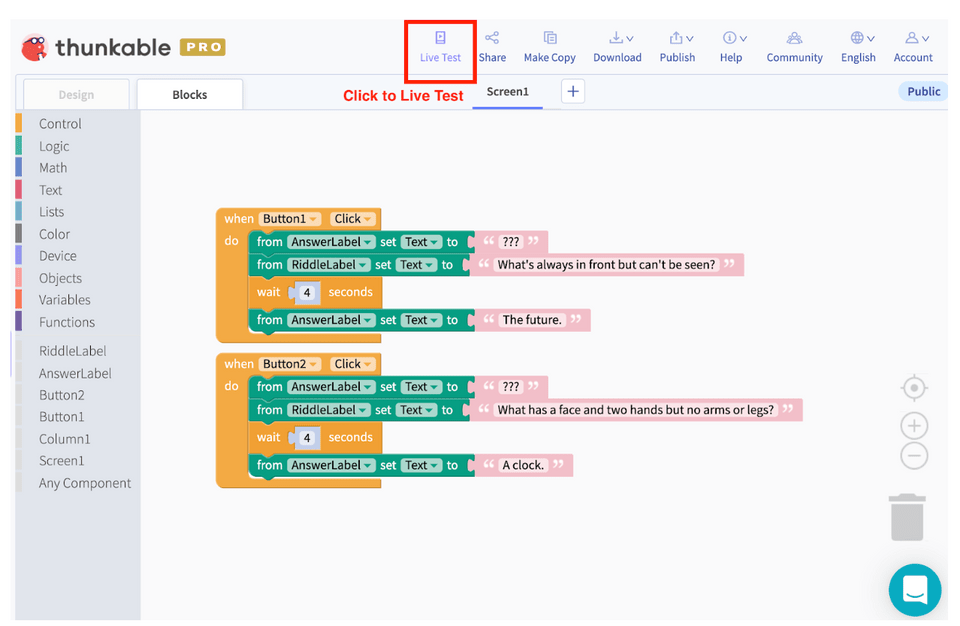
Play with your project on your phone: Live testing the app
Testing the app is easy and does not require a mobile phone. To test the app on your computer, click the “Live Test” button on the top toolbar. After, you should be able to test the app you just created!
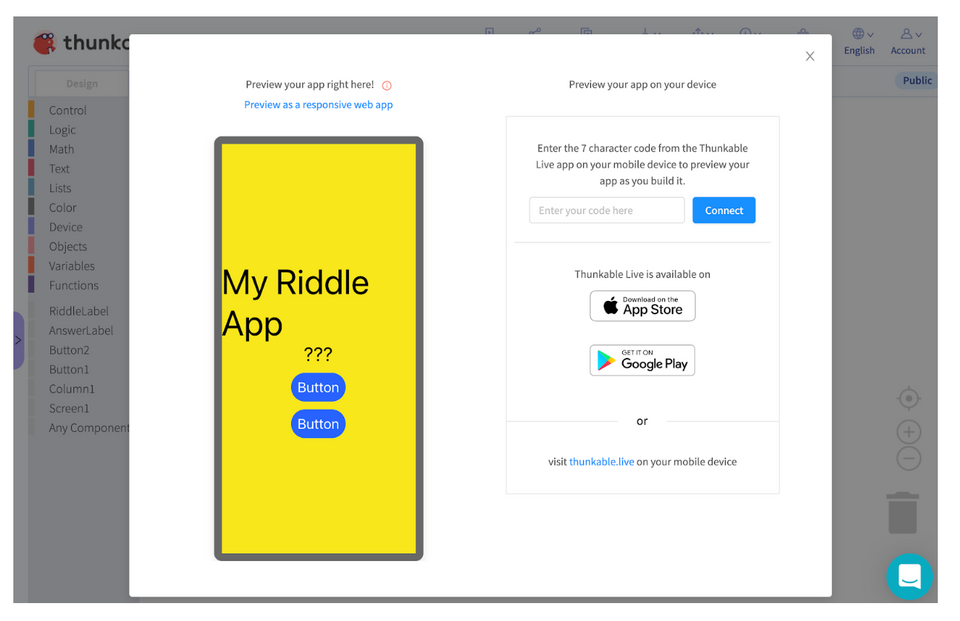
If you want to test your app on a mobile device, download the Thunkable Live app on the Apple App Store on iOS devices or the Google Play store for Android devices. Once you download the app on your mobile device, open the app, login to your Thunkable account, and select the app you just created.
Advanced Thunkable Coding for Kids
That’s all folks! How did your child enjoy building their first mobile app? Want to learn more? In My First Mobile Apps Parts 1, 2, and 3, we continue to dive into the world of mobile development. By the end of Part 1, you will be able to create fun graphic games like a Fruit Ninja clone! Along the way, we cover key computer science concepts.
In Part 2, we continue to build graphical games and even start to build apps that utilize the internet. By the end of Part 3, we will create a multiplayer game! Sign up for My First Mobile Apps Part 1, where in the first lesson you will create an app that can take a picture and then use computer vision to recognize what you took a picture of!
Check out upcoming free computer science events for kids led by tech experts: past events have featured guests from Pixar, NASA, Intel, and more.
Brought to you by Brandon Lim, Instructor at Create & Learn

