

Have you ever wanted to make your own video game, but you weren’t sure where to start? Scratch is just what you need! It’s a fantastic free tool for creating your own games and animations using “block code,” which is a simplified version of text-based coding. Once you learn the basics of block, there are many different kinds of games you can make. As an example, you can follow this tutorial to learn how to make a catch game in Scratch.
To learn coding led live by an expert instructor, enroll your child in award-winning coding classes. Most students begin with Scratch Junior (grades K-2) and Scratch Ninja (grades 2-5), designed by professionals from Google, Stanford, and MIT.
Learn How to Make a Catch Game in Scratch
Below are the steps for creating a Catch Game game in Scratch. If you get lost, visit this project link to see the completed game.
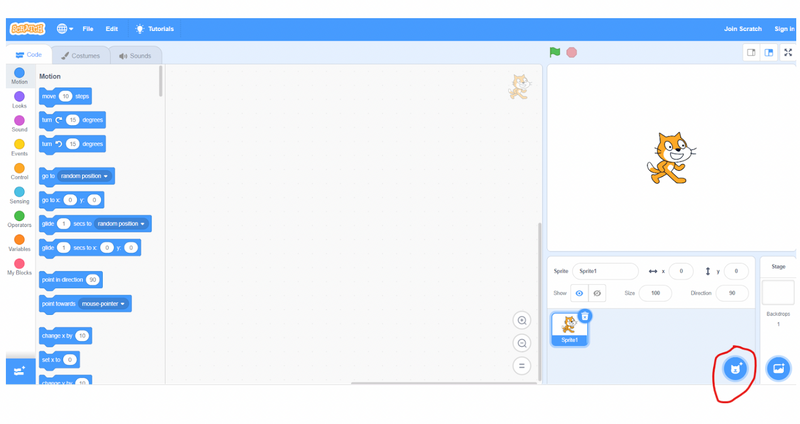
1. Choose your catcher
First of all, you need to decide what character you want to have catching your falling items! Choose your sprite by clicking the blue circle in the bottom right with the cat image on it (the button circled in red in the image), and then select a sprite from the Scratch sprite library.
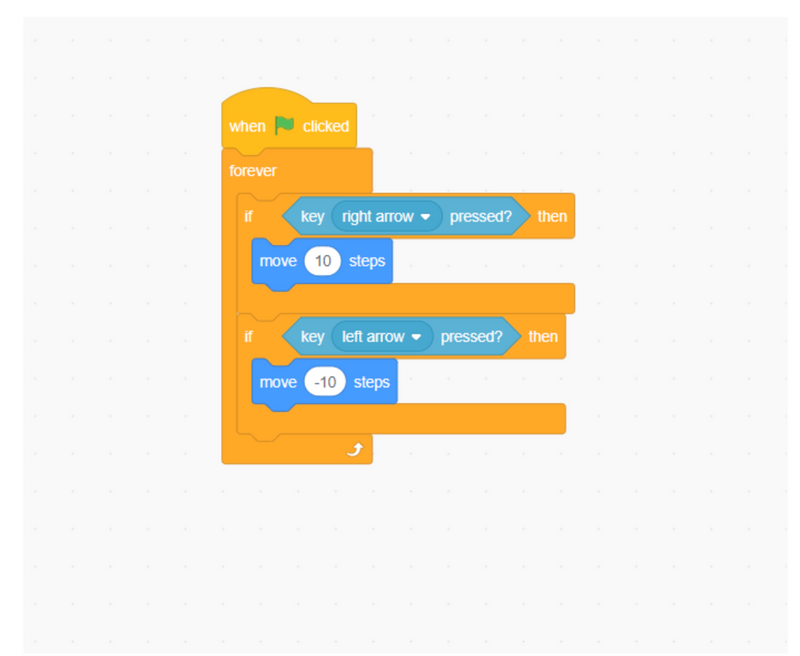
2. Move your catcher
In order to catch the objects, your sprite needs to move left and right.To do that, you’ll need need to first drag in a yellow “On green flag clicked” block, then an orange “forever” loop. Now, if you think about it, you want your character to move right by an amount if you are pressing the right arrow key, and left when pressing the left arrow key. Which block do we use to check “if” a condition is true? Check the image below for the answer!
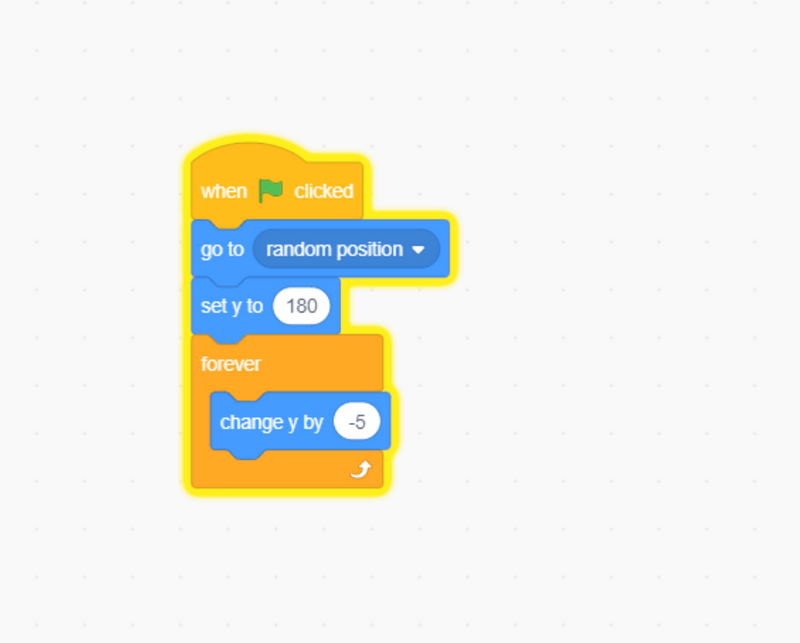
3. Position item at top of screen
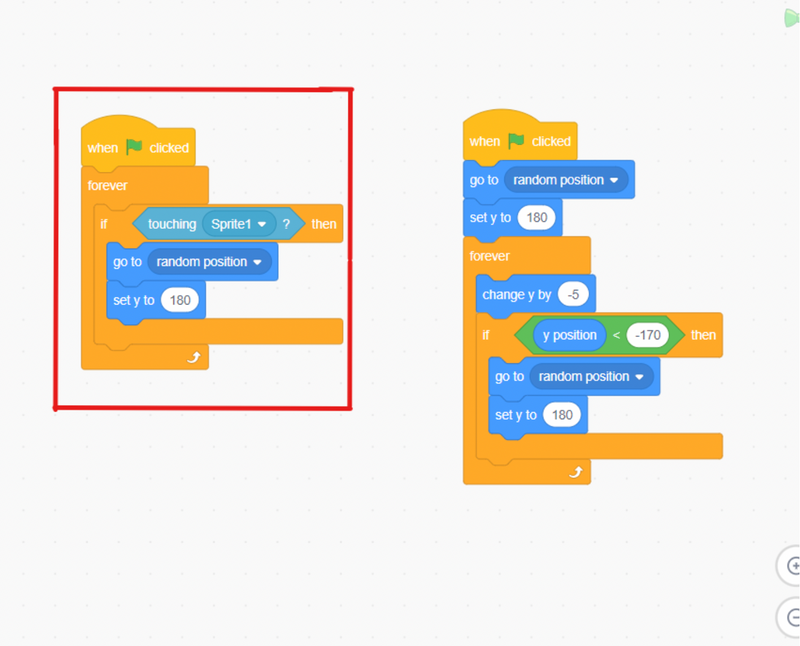
You will now need to add a second sprite to the game, once again clicking the blue circle in the bottom right corner to select the sprite from the sprite library. When our game starts, we want it to go to a random position at the top of the screen. The two blocks we will use for that are the blue “go to random position” block and blue “set y to” block. In this case, we will set the y to 180.
Note: make sure that you select the sprite you want to have falling before you add your code! You can check which sprite is selected in the top right corner of your coding workspace.

4. Make the item fall
In Scratch, the y position represents how high or low an item is on the screen. If we want an item to go down, what do you think we should do to the y position? If you guessed subtract (or change by a negative), you’re right! We will also use a forever loop to make sure that the sprite continues to fall until it reaches the bottom of the screen. Add the following code to your falling sprite to make it move down the screen.
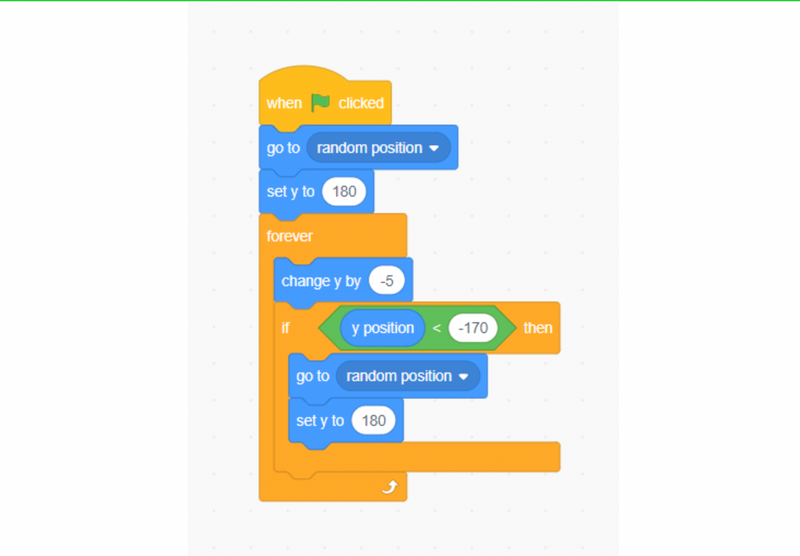
5. Make item reset to top of screen
Right now, our item falls one time and then gets stuck at the bottom of the screen, but we want our item to keep jumping back to the top to fall again. In other words, 'if' the item’s y position is below a certain point on the screen, then jump to a random position at the top. That word “if” is a keyword. If you hear that, you should be thinking about using a conditional. We will use an “if-then” conditional to make this happen. In this case, our condition will be if the y position is less than -170 then we will reset the position of the sprite, just like we did at the beginning of the game! You will find the less than block under the math operators category. Make sure your code matches what you see below.
If you are curious how the code works, try changing the -170 to 0, when will the item reset to the top of the screen? It is always fun to try new numbers in your code to understand what is happening! Don’t forget to test your code often and reset numbers you have changed before moving to the next step.
6. Catch item
When the catcher sprite touches the falling item, the item should jump up to the top of the screen since the player “caught” it. So, “if” the player touches the falling item, then set the falling item position to the top of the screen. I hope that the word “if” made you think of that vocabulary word, conditional! For this situation, you will need to use the “if touching mouse-pointer” block from the sensing category, but you will need to click on it to open the dropdown menu to select the name of your other sprite (for instance, “cat” if you picked the cat sprite).
Hint: the code highlighted in red is the new code added in this step.
When we run code side by side like this, it is called parallelism. Running code in parallel helps us prevent bugs (glitches/mistakes in our code). This concept is not unique to Scratch and can be done in other programming languages as well. It is a very useful way to write code. In this case, it will keep the falling item from pausing or glitching while being caught!
7. Score points!
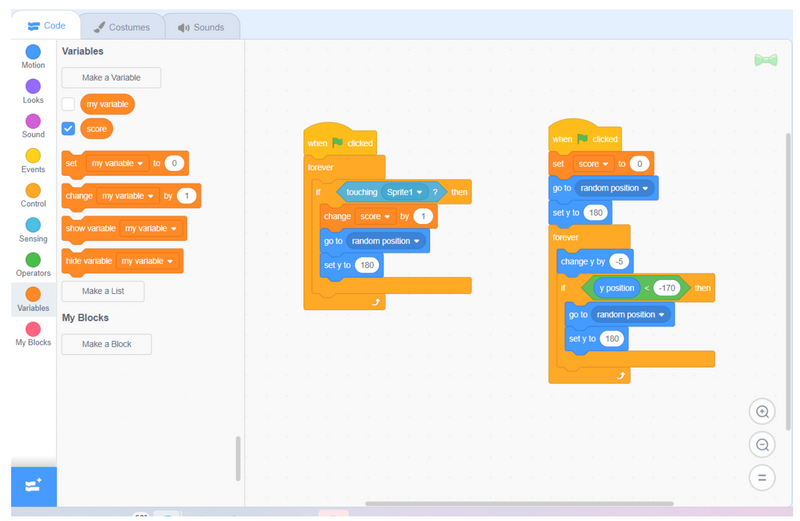
To keep track of the score, you will need to create a score “variable.” If you haven’t used them before, variables allow you to keep track of a number while your game runs. Go to the dark orange variables category and click on “make a variable.” Give the variable the name “score” and select okay when finished. Make sure to check the box next to your new variable so the score is visible on the screen. This makes it so the player can see the score! We can make it so that any time the sprite touches our falling sprite, the score is increased by 1. Don’t forget to set the score to 0 at the beginning of the game. This way you can play the game again and again! Once you’ve added these blocks, you’ll have a complete game!
Review Key Programming Concepts We Used Today
- Sprites and Costumes:
- Sprites: These are the characters or objects in the game. Each sprite can have multiple costume.
- Events:
- When Green Flag Clicked: This block starts the program when the green flag is clicked. You can use it to initialize the game.
- Motion and Positioning:
- Move Steps: This block moves the sprite a specified number of steps in the direction it is facing, to control the movement of the characters in the game.
- Go to X: Y: This block places the sprite at a specific coordinate location on the stage.
- Control Structures:
- Forever Loop: This loop runs the enclosed blocks continuously until the program stops. Use it to keep certain actions, like checking for collisions or controlling sprites with keyboard buttons.
- If Then: This conditional statement runs the blocks inside it only if the specified condition is true. It’s crucial for decision-making, like checking if a sprite has reached a certain position.
- Variables:
- Variables: These are used to store information that can change, such as the player's score or the level number. Variables are essential for keeping track of game states and updating them as needed.
Make A Cool Catch Game In Scratch
And there you have it: your very own Scratch catching game. For an added challenge, see if you can add sound effects to your game and/or add extra falling items. You might even want to add an item that subtracts from the score instead of adding to it that the player has to avoid. Next, your child might also enjoy building these awesome Scratch projects.
If your child had a fun time making this catch game, enroll them in a free Scratch introduction course. They'll get to work with an instructor, live online, who will teach them how to make their own awesome animations and games in Scratch. Or, if they have a previous Scratch coding experience, consider trying the free Roblox Coding intro course. Whichever way you choose, they're sure to build their coding skills while having a great time!
Written by Create & Learn instructor Dominic Occhietti. Dominic is a graduate of Michigan State University, where he studied music performance and computer science. He thoroughly enjoys teaching, whether that be coding classes, French horn lessons, or even downhill skiing lessons!

