Do you love games? Do you dream of making them? Make your first game with this Unity tutorial for beginners! Unity is an amazing game development system that used to be only for small and indie games, but now is used by all kinds of developers, from students to professionals. So read on to start making games with Unity!
Or jump right into our award-winning live expert-led, online class, designed by professionals from Google, Stanford, and MIT, to learn Unity and build fun 2D and 3D games.
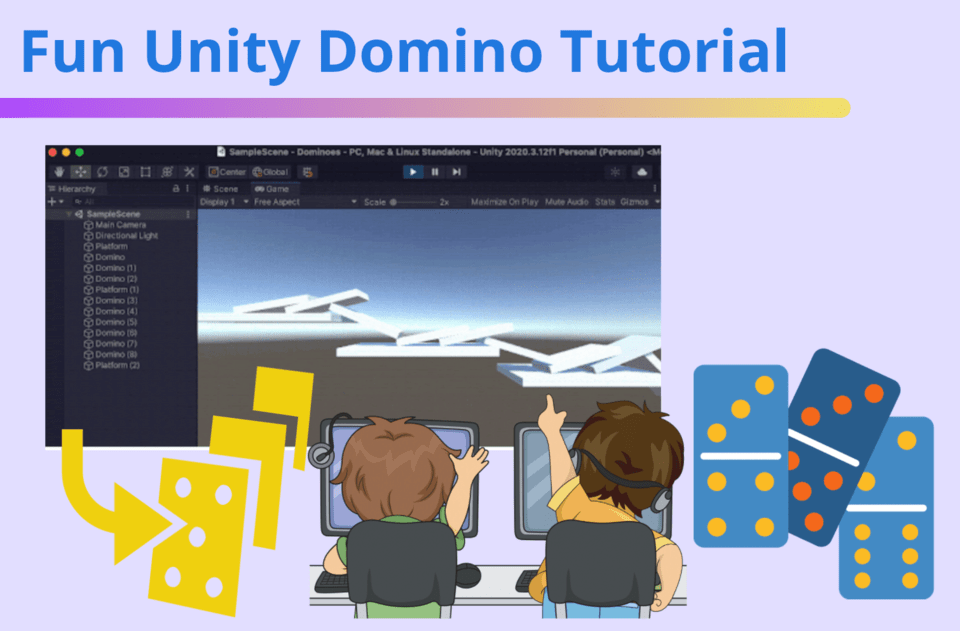
Follow this Unity tutorial for beginners to make a Domino game
Today you will learn how to make a Domino simulator game! You will learn how to create objects in the Unity editor, size and position them, and add components to your objects to give them realistic physics. Watch the video tutorial here if you prefer!
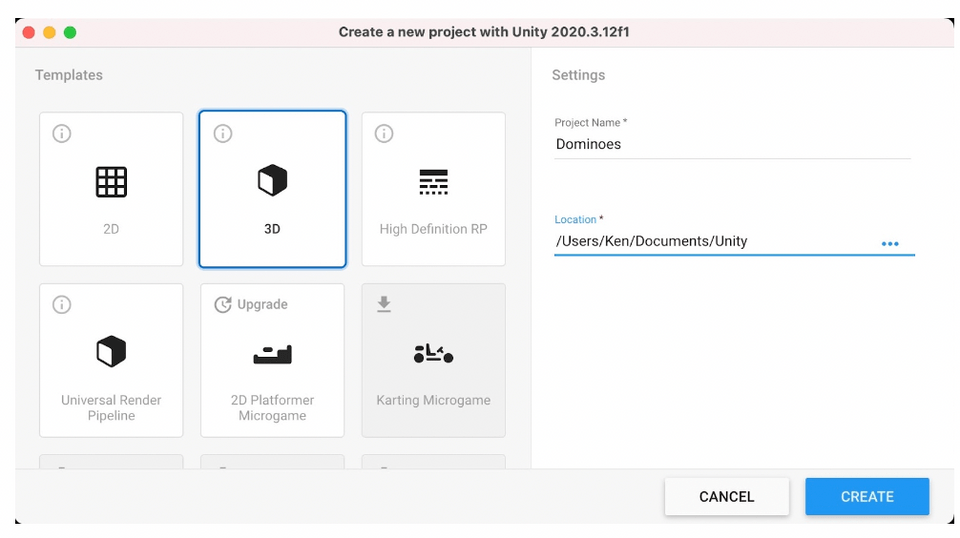
1. Create a New Project
Run Unity Hub. Click on the “Projects” tab on the left, and then click the “NEW” button. Type a name for your project, such as “Dominoes”, and click “CREATE”. This will create a project for your Dominoes simulator and automatically launch you into the Unity editor.
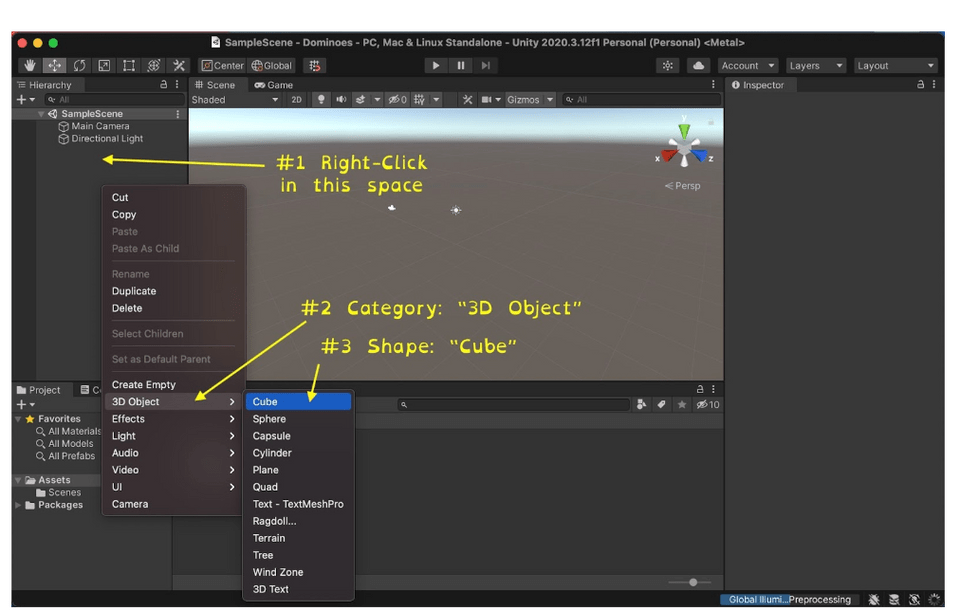
2. Create a Platform
Now that you are in the editor, it’s time to start creating objects! We will start by creating a horizontal platform for the Dominoes to stand on. In Unity, many basic shapes can be created directly from the right-click menu. Since our platform will have a nice, flat shape, we can base it on a Cube. Right-click in the background of the Hierarchy panel and choose “3D Object” and then “Cube” from the pop-up menu that appears.
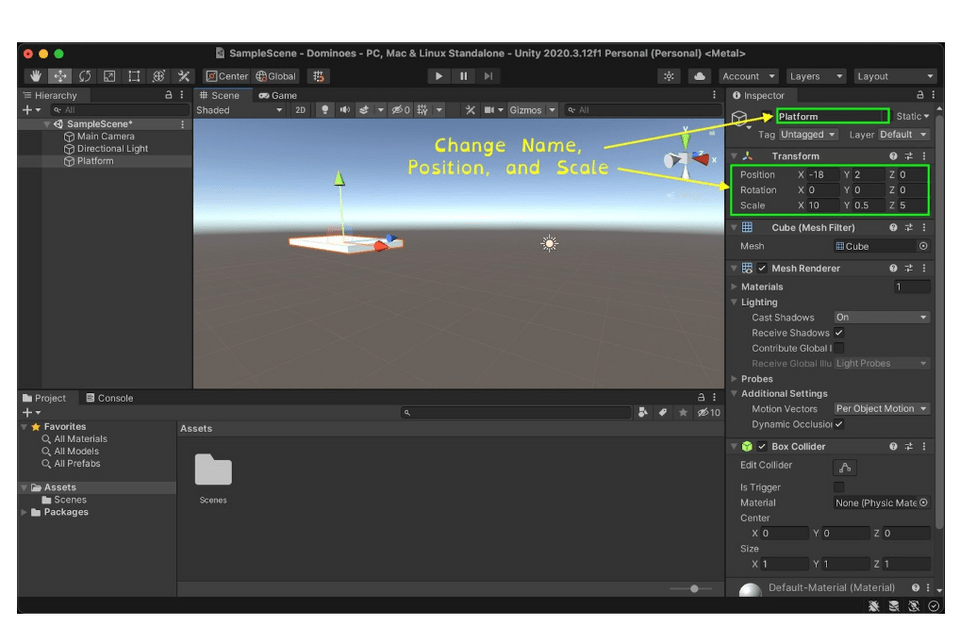
3. Convert the simple Cube into a Domino Platform!
The Inspector Panel on the right side of the screen contains all of the information about whatever item you have selected. We can not only SEE the properties of a GameObject in the Inspector Panel, we can also CHANGE the properties! Make sure your Cube is selected, and then click into the Inspector Panel to change the name of your object to “Platform” and change the Position and Scale as you see in the following screenshot:
4. Create the first Domino based on a Cube
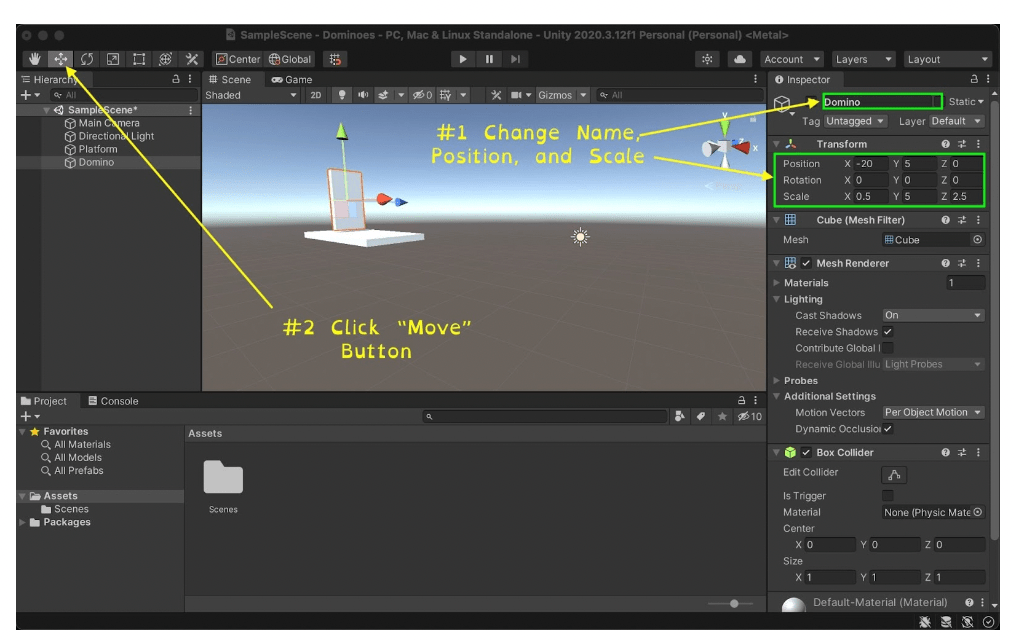
Now let’s practice what you learned before. Create another cube to be the basis for a Domino. (If you need a reminder, look back at Step 2!) The Domino will look similar to the Platform, except it will be tall and thin instead of short and wide. Make sure your new Cube is selected, and then click into the Inspector Panel to change the name of your object to “Domino” and change the Position and Scale as you see in the following screenshot. When you are finished, click the “Move” Tool button to prepare for next steps.
5. Give your Domino realistic physics!
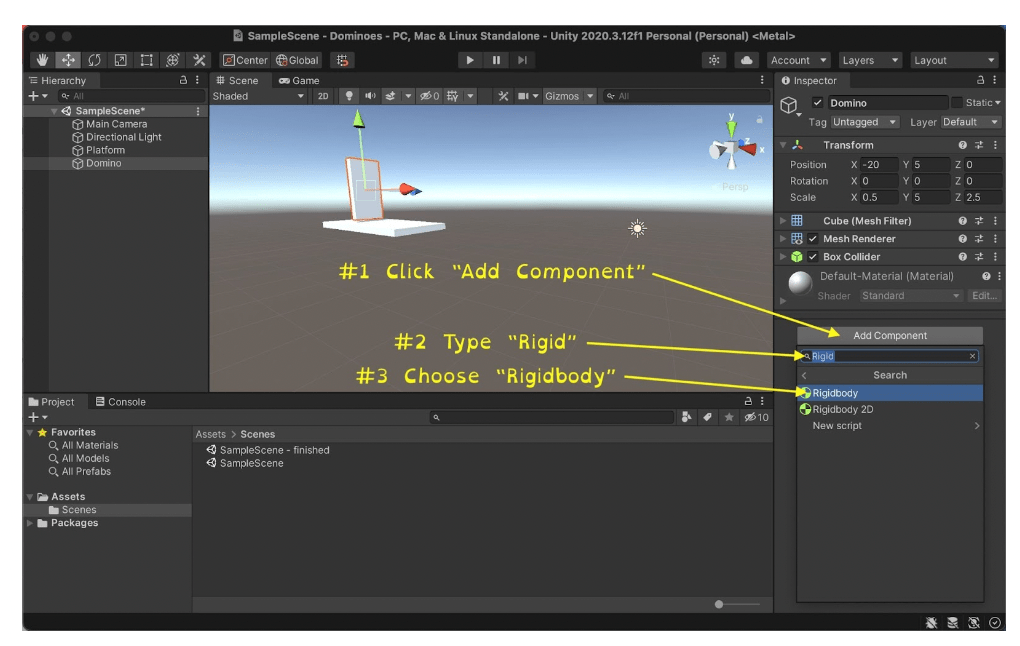
Unity is built on an “Entity-Component” architecture. This means that all objects (“entities”) start the same, but by adding “Components” to them, they gain identity and functionality. For example, by adding a “Renderer” component, the object will now be rendered, or drawn, to the screen. By adding a “Collider” component, the object will now be solid and collide with other objects. We want our Domino to fall with gravity and to obey the basic laws of physics. We can accomplish all of that just by adding the “Rigidbody” component to our Domino!
6. Switch to 2D view and create our second Domino
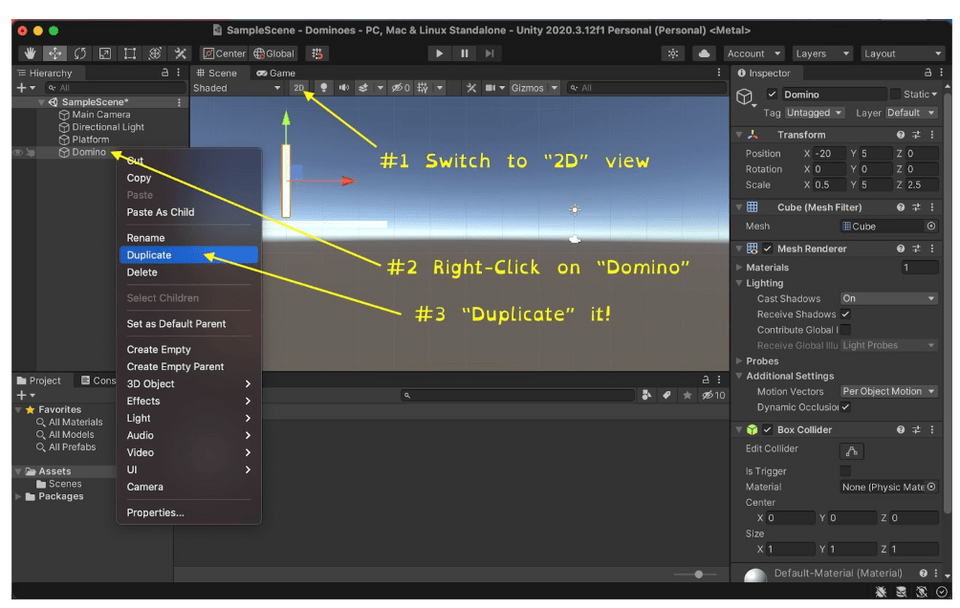
Games often have many copies of the same or similar objects. In our Domino simulator, for example, all of the Dominoes will be exactly the same except for their position. Fortunately, Unity offers a convenient “Duplicate” option, so that we don’t have to recreate each Domino from scratch. To access it, right click on the original Domino, and then choose “Duplicate” from the pop-up menu. Let’s also switch to 2D view, so that it will be easier to position our new Domino next to the first one.
7. Move the Second Domino
When we Duplicated our first Domino, the copy was added to the world in exactly the same position as the original. Let’s move it so that it is in a good position to be knocked over when the first domino falls. We already clicked the Move Tool in Step 4. When the Move Tool is active, the selected game object will have Red, Green, and Blue arrows drawn on top of it. These arrows are called “Move Handles”. By (clicking and) dragging any of these arrows, we can move the game object along the X, Y, and Z axes, respectively.

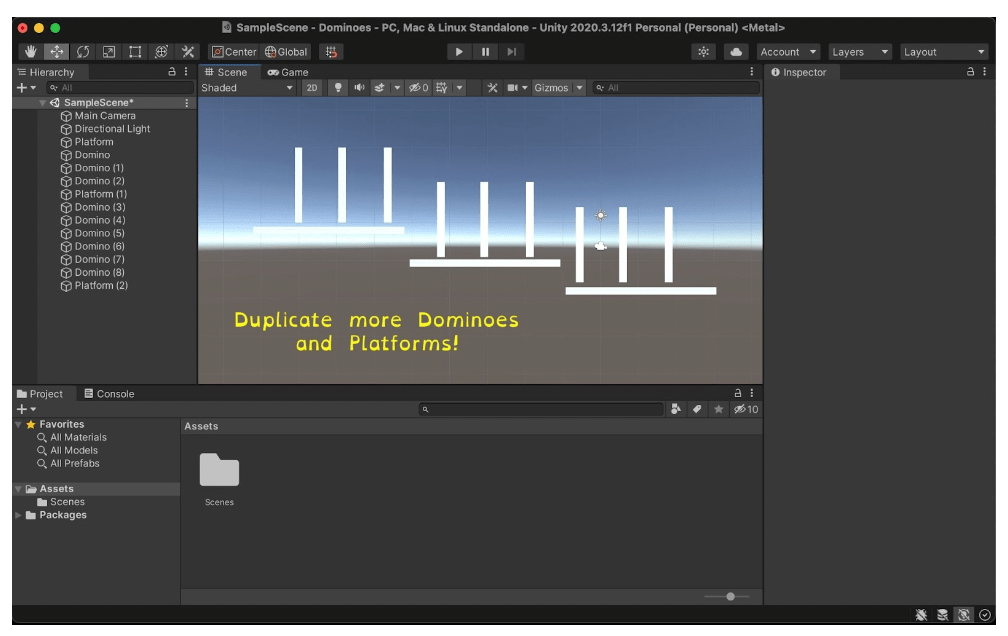
8. Create a Domino chain!
Now it’s your turn to be creative! Using the Duplicate and Move skills that we have already learned, create a chain of Dominoes to tumble. You might choose to keep it simple, or you might choose to have many platforms and many dominoes. For an extra challenge, you can even add “Dominoes” that are different shapes, like spheres.
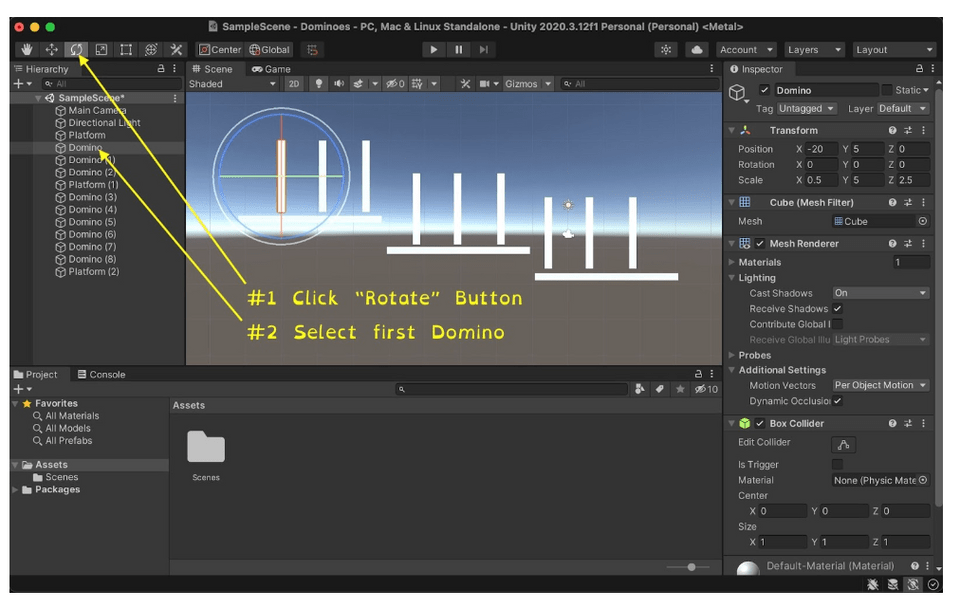
9. Get ready to tip the first Domino
It’s almost Go Time! If we press Play right now, we would see all of our dominoes standing, but not falling. Just like real life, we have to start our chain reaction by tipping the first Domino. To do this, we first switch to the Rotate Tool and select the first Domino.
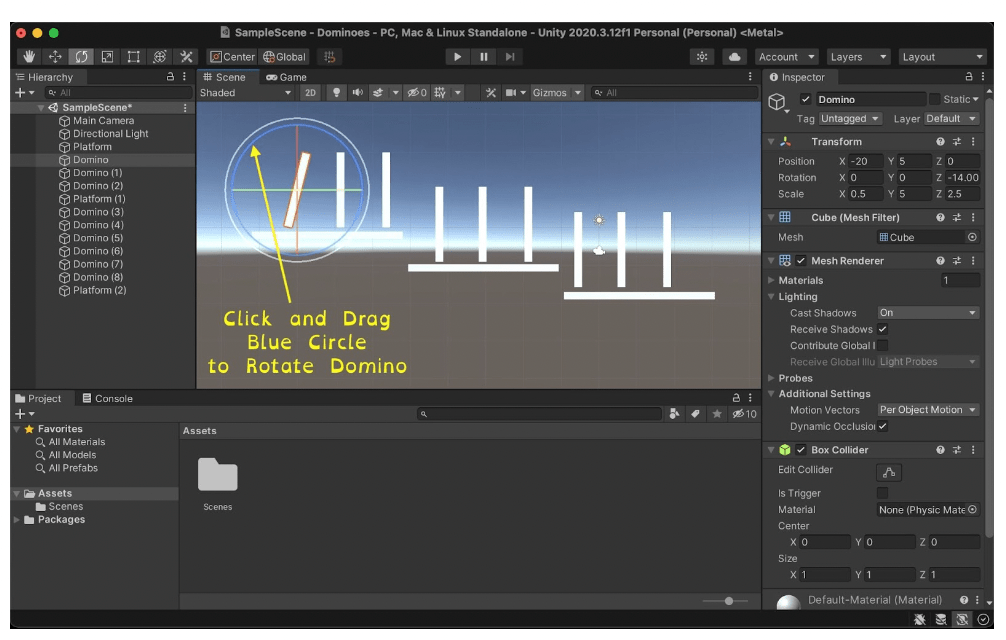
10. Tip it!
The Rotate Tool works very similarly to the Move Tool, except that instead of drawing arrows, it draws Red, Green, and Blue circles. To rotate around the X, Y, or Z axis, we click on the circle and drag it. To tip our first Domino, we will click on the Blue circle and drag it until the Domino is tipped about 15 degrees.
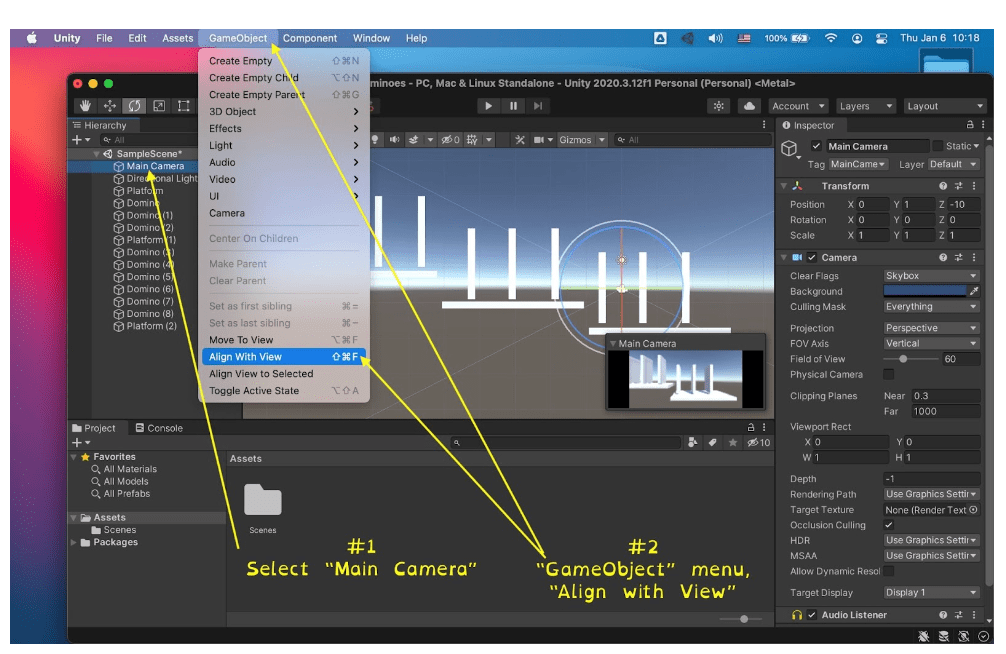
11. Last step! Position the Camera to frame our Domino Chain
The view that the game shows when we press Play is determined by the Position and Rotation of the “Main Camera” object. This is not necessarily the same as the view that we see when we are editing the world. Fortunately, Unity once again has made it easy to sync up the Main Camera with the view that we have been using. We just need to select the Main Camera object in the Hierarchy Panel, and then use the “GameObject” Menu Item “Align With View”.
12. Press PLAY!
The Play button looks just like the Play button of a music player. It is located at the middle of the top of the screen. Click it, and see how your domino chain falls! Congratulations!
Explore Unity tutorials 2D
There are many Unity 2D tutorials available online of varying quality. Here are the 2D tutorials that we recommend:
1. Thomas Brush: “How to Make a 2D Game”
This tutorial is a fantastic place to start. In it, Thomas Brush covers a wide range of topics including how to structure a 2D game, how to organize your Unity editor, and how to manage asset creation. As an added bonus, Thomas introduces the user to clever camera tricks that can make your game really shine!
2. Jason Weimann’s “How to Make a Game - Unity Beginner Tutorial - 2021 Version!”
This YouTube tutorial is long, and it goes through the entire process of creating an “Angry Birds” style game in Unity. This tutorial covers a *lot* of topics, and is best suited for people who are new to Unity but who have done other coding or made other kinds of games before. If that sounds like you, you will learn a tremendous amount from this amazing tutorial!
Discover Unity tutorials 3D
Here are some great online tutorials that you can follow to develop your 3D Unity development skills:
1. Jonas Tyroller’s “How to make your first game today”
Jonas Tyroller’s YouTube tutorial is the perfect follow up to the tutorial you completed here today. It will review and reinforce what you have learned, and then take things to the next level. By the end of this video tutorial, you will have created a playable game!
2. Brackeyes’ “MAKING YOUR FIRST FPS in Unity with FPS Microgame!”
This tutorial shows you how to work through one of Unity’s Microgames, which are made to help new developers learn Unity while working on exciting projects. In this Microgame, you will customize an FPS to make it your own. In the process, you will learn a lot about how Unity works and how you can make Unity work for you!
Discover the best way to learn Unity
One of the best ways to learn Unity is with Create & Learn’s award-winning live online class: Unity Game Development, because you will be building games from the ground up and with the guidance and coaching of teacher experts. You’ll learn how to create, place, and manipulate objects in both 2D and 3D. You’ll learn about the component system and how to add realistic physics to your game. And you’ll find out how to write your own, custom Unity scripts in C#, just like the professionals! Best of all: You will learn these skills while making real games led live by an expert, so you can get any questions answered.
Popular games made with Unity
Believe it or not Unity is behind some of the most popular games such as:
- Angry Birds
- Fall Guys
- Untitled Goose Game
- Mario Kart Tour
- Ori and the Blind Forest
- Super Monkey Ball Banana Mania
You’ve completed a Unity tutorial for beginners
Today you became comfortable with the Unity editor interface. You learned how to create new objects, how to edit their properties, and how to add components such as the Rigidbody which creates realistic physics simulations. You put all of these skills into practice by creating a Domino Simulator Game of your own design. Congratulations!
But of course, this is just the tip of the iceberg of what you can do in Unity. This is just the first step. You have built the foundation upon which you can to grow your skills more and more using blogs, vlogs, tutorials like the ones mentioned above, and of course with expert guided classes from Create & Learn, where we will coach you and help you every step of the way as you advance in your game-making abilities. The best class to start with is Create & Learn’s Unity Game Development 1. See you there!
Written by Ken Patel, who started coding at age 10. Following his passion for video games, when he entered university he enrolled to study Computer Science. After graduation, he embarked on a career as a professional video game developer. Ken is excited to be sharing his passion, knowledge, and experience with the next generation of game makers through his role as a teacher here at Create & Learn.