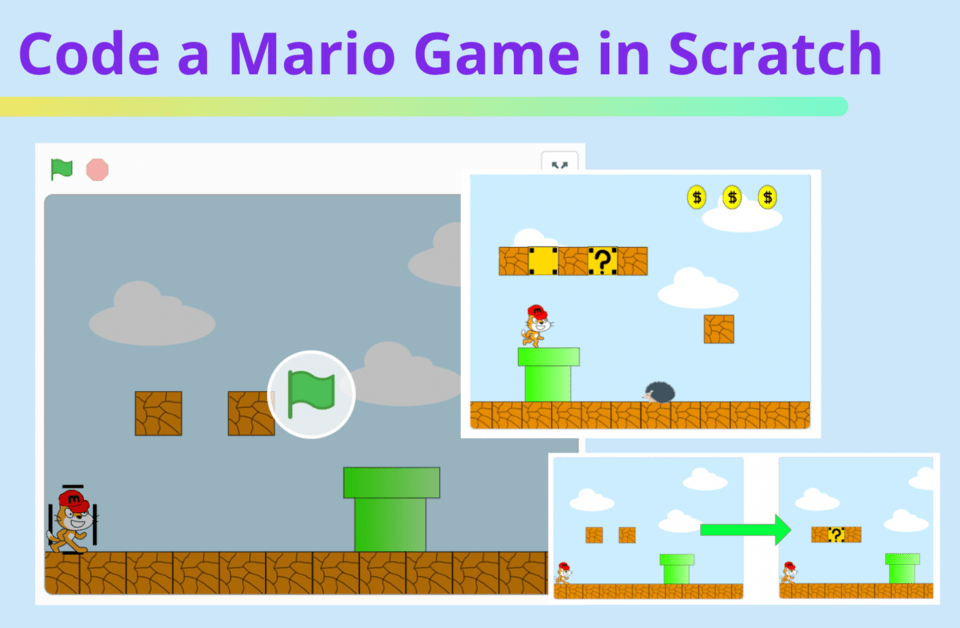
In this tutorial, we're going to learn how to make a Mario game in Scratch. Super Mario Bros, released in 1985, is arguably one of the most popular video games of all time, and the poster child of not only the entire Mario franchise, but, to a degree, Nintendo as a whole. Super Mario Bros belongs to an extremely popular genre of arcade games: the Side-Scrolling Platformer.
'Platformer' refers to the way a player must navigate obstacles in any given level of the game, often by literally jumping on platforms. And a true 'Side-Scroller' is defined by the way the player continuously reveals new parts of a level by moving their character towards the right side of the screen.
Another common version of a Side-Scroller is one in which a level (or 'world,' to use Mario terminology), is broken up into parts, and to get to a new part, you must reach the end of the previous part. This is the type of Side-Scroller we'll be building today!
We'll also focus on building a game that will be easy to expand on. When game developers build a game, they often first build a game 'engine'. The engine is sort of like the bare bones of the game; it determines graphics, and how sprites move and interact.
Super Marios Bros 2 was released in 1988, just three years after the original. Nintendo didn't build a whole new game from scratch, they simply expanded on the first game. They added new sprites and levels, some new features as well, but the gameplay was very similar. With a good game engine, you can build countless games that will all be fun and easy to build! We'll look at some strategies in this tutorial to make our Scratch coding game easy to build on.
To create even more cool games, join our award-winning Scratch classes (Scratch Ninja for Grades 2-5 and Accelerated Scratch for Grades 5-9). There's no risk in trying with our free intro Scratch class.
More advanced coders will enjoy building their Pokémon games and customizing them in all sorts of creative ways, in our live online Pokémon Game Building Class.
Check out upcoming free computer science events for kids led by tech experts: past events have featured guests from Pixar, NASA, Intel, and more.
How to make a Mario game on Scratch step by step
To create our Mario game today, we'll be using a lot of broadcasting and messaging, and a lot of X and Y positions. We'll also learn some advanced techniques for creating platformers, and focus on keeping our game easy to edit and add to. Here's the Finished Project.
You can absolutely follow along with this tutorial by creating your own Scratch project, but if this is your first platformer, we recommend remixing our Starter Project, which has all of the Sprites and Costumes already put together and sized correctly. We'll still need to write all the code though! (Note: if you create your own project, then the X and Y positions you use in your code will likely need to be different than the ones used in this tutorial)
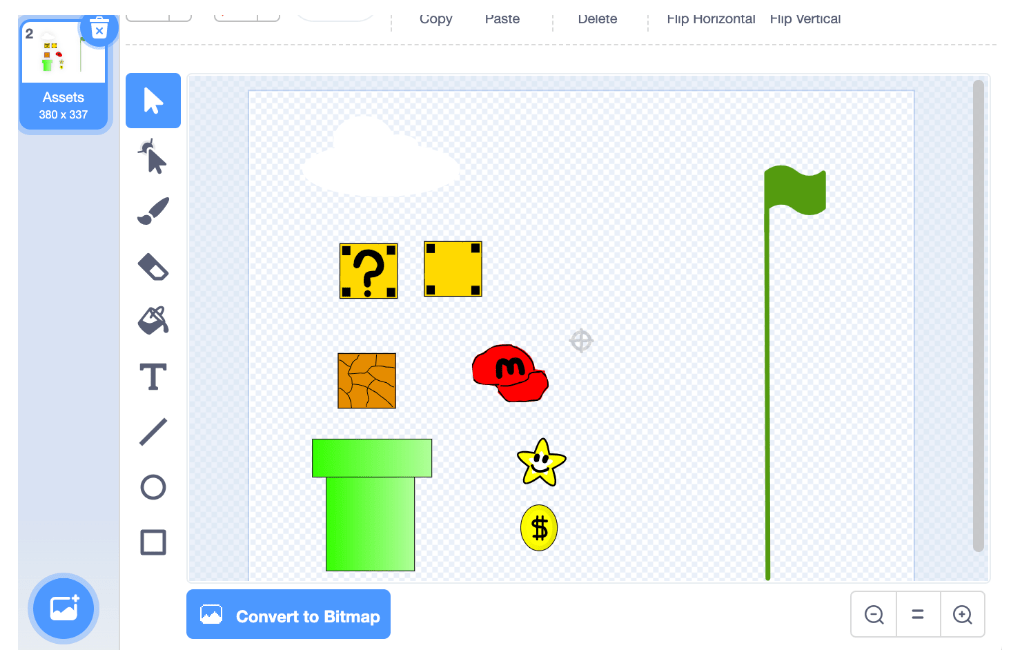
1. Set up assets
We're going to start building this game by getting our images and backgrounds in order. Let's create a new backdrop called 'Assets'. We won't actually use this backdrop, but it will contain all of our custom drawings we'll use for sprites and creating backgrounds. It will be easier to build our game if we have everything in one place. Games that are built on the same game engine will often use either the same assets, or very similar ones.
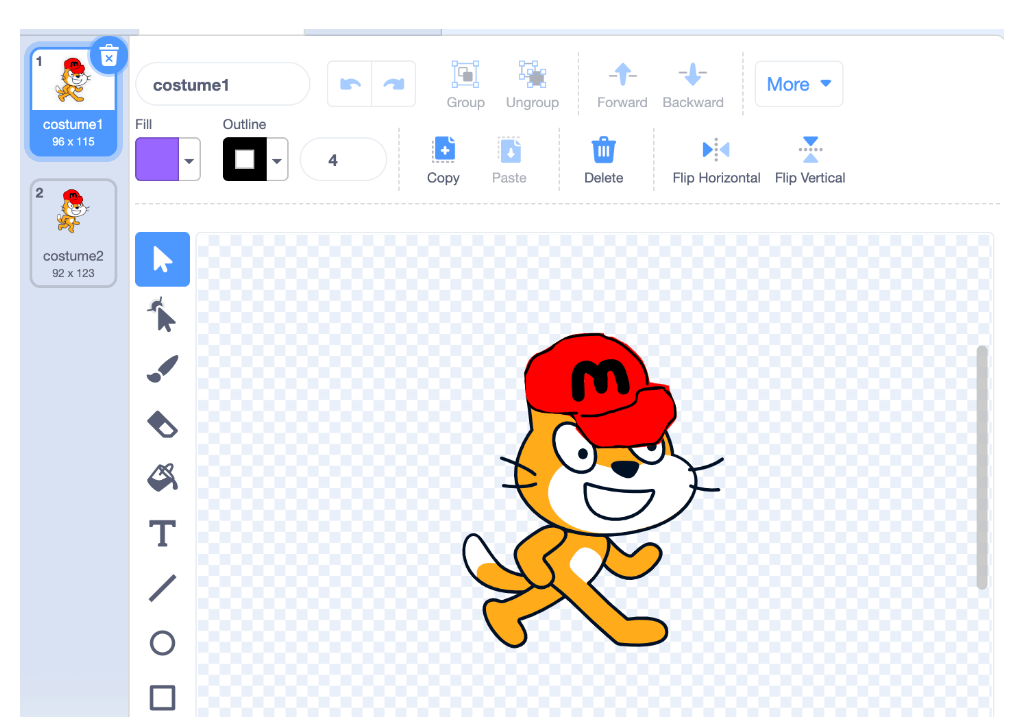
Once we have everything drawn, let's copy the hat, and put it on a Cat sprite; this will be our Mario. And we can copy the cloud and put a few on a Blue Sky backdrop for our background scenery.
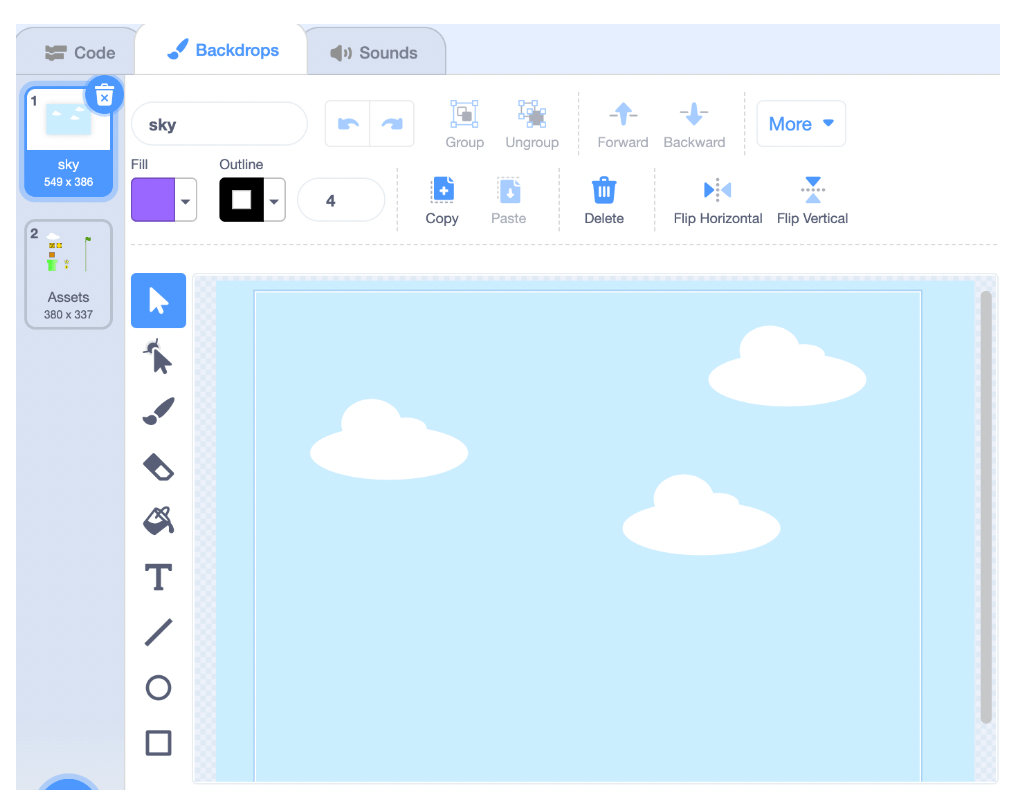
2. Build the levels
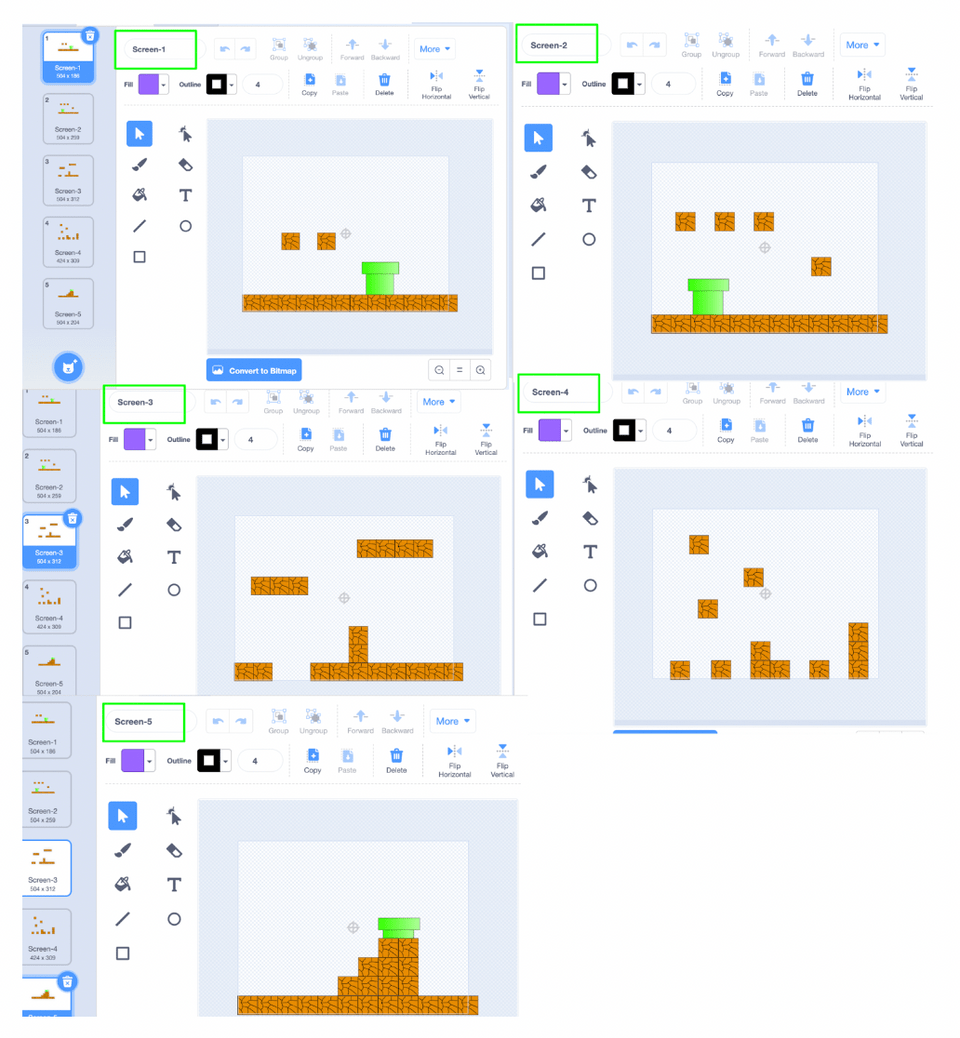
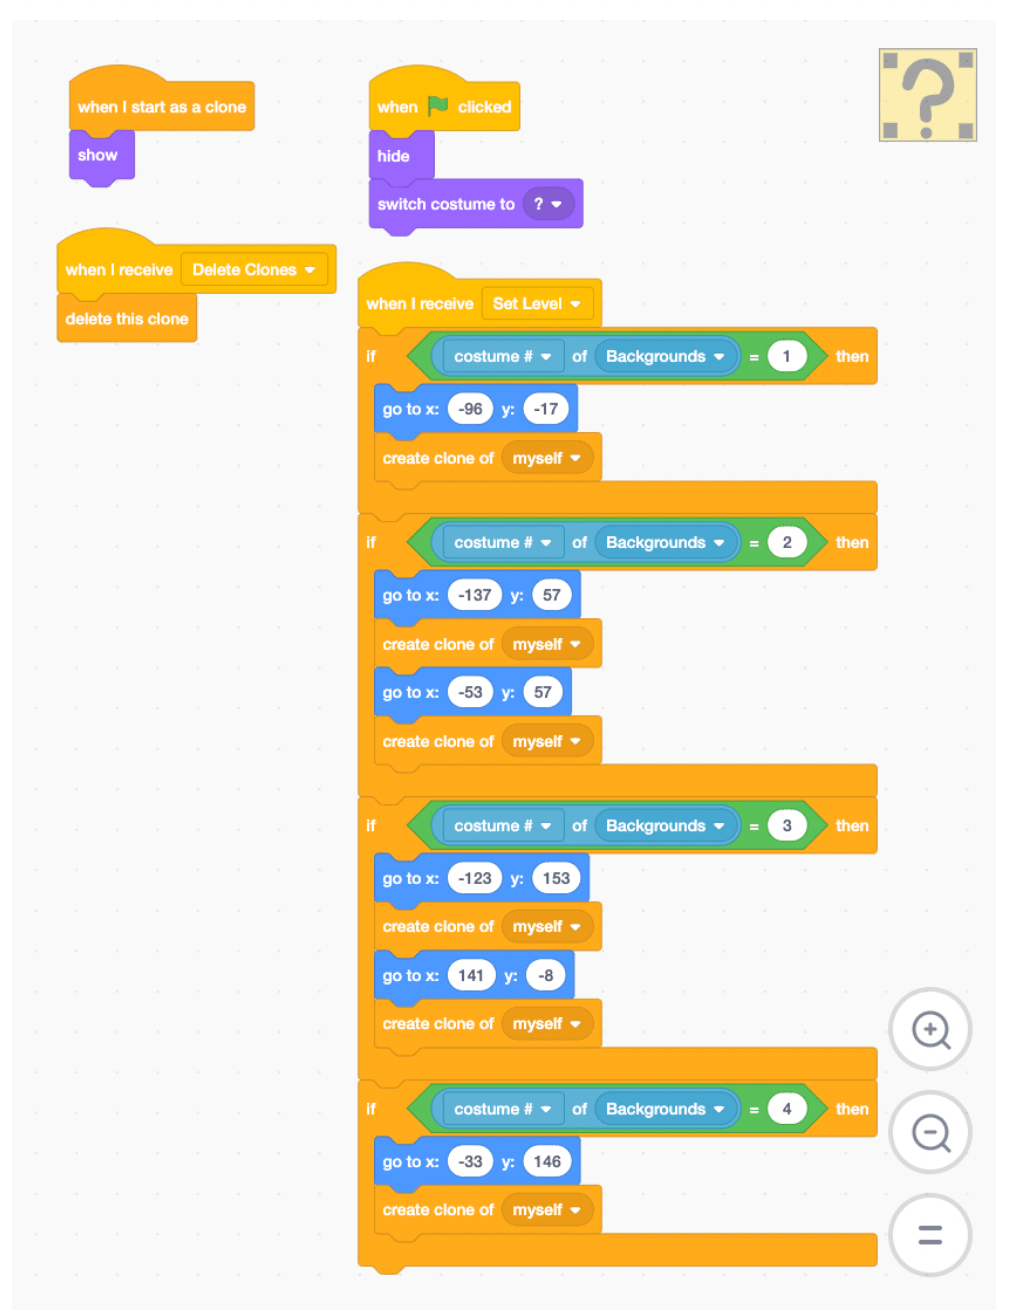
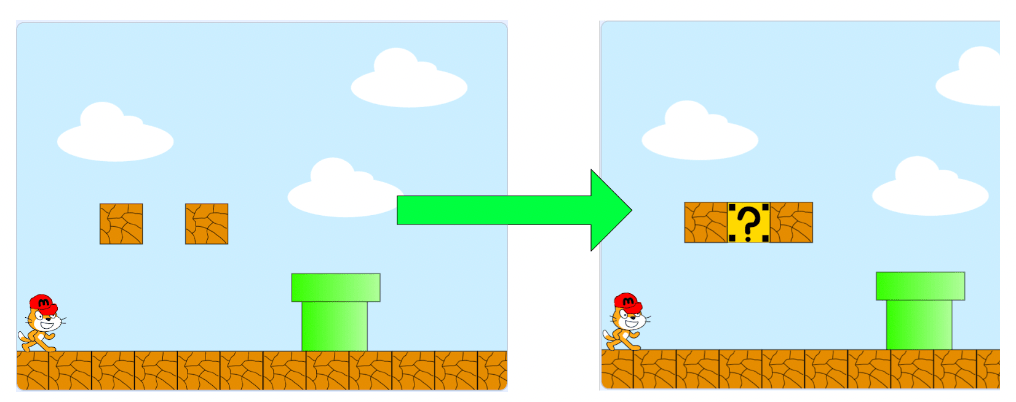
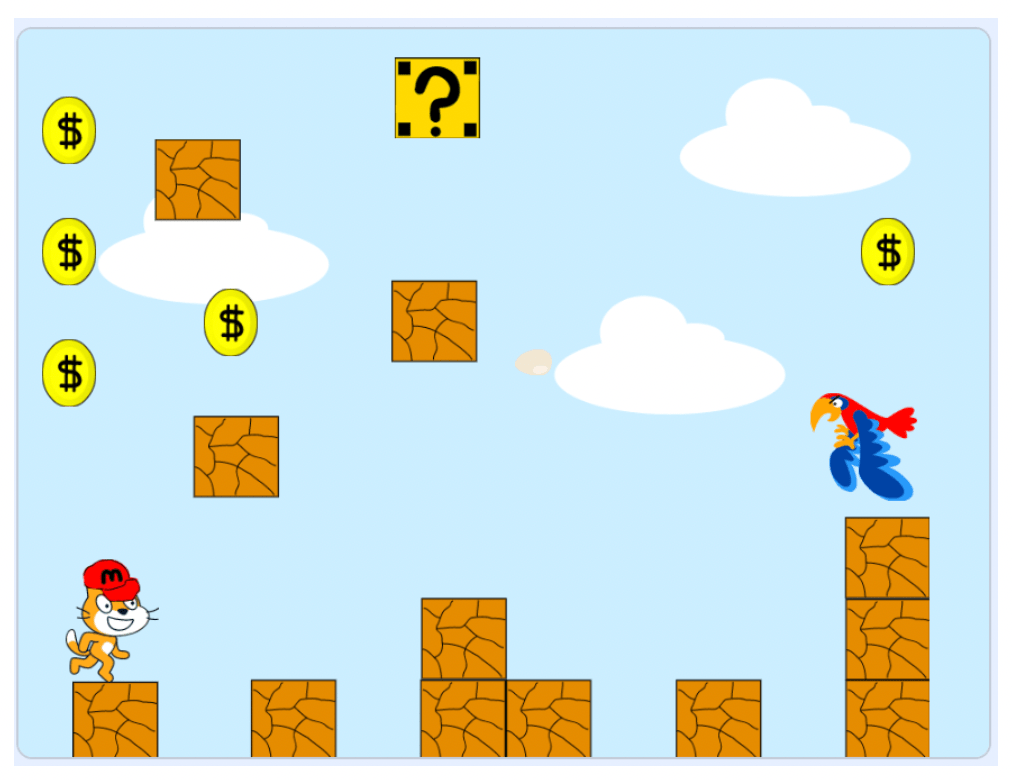
Let's create a new sprite called 'Backgrounds'. Each costume will be another level of our world, and we can create each level by copying and pasting pieces from our Assets backdrop. This is how to make a world in Mario Scratch games: get the building blocks put together in your assets section, and copy and rearrange them to build each level. You can build as many levels as you want, but we're using five for this tutorial.
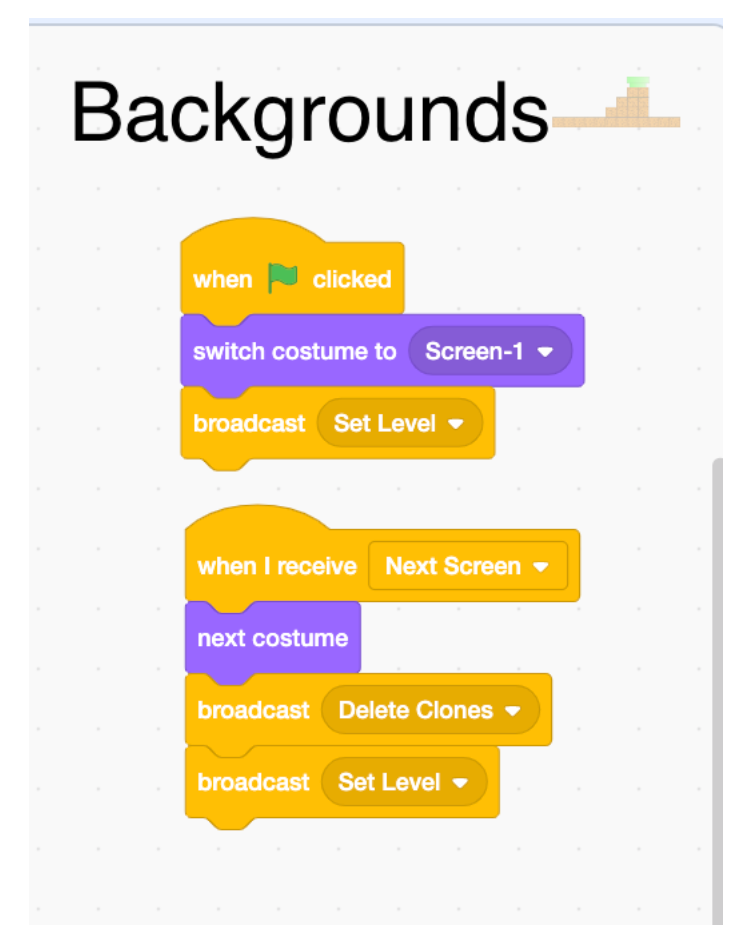
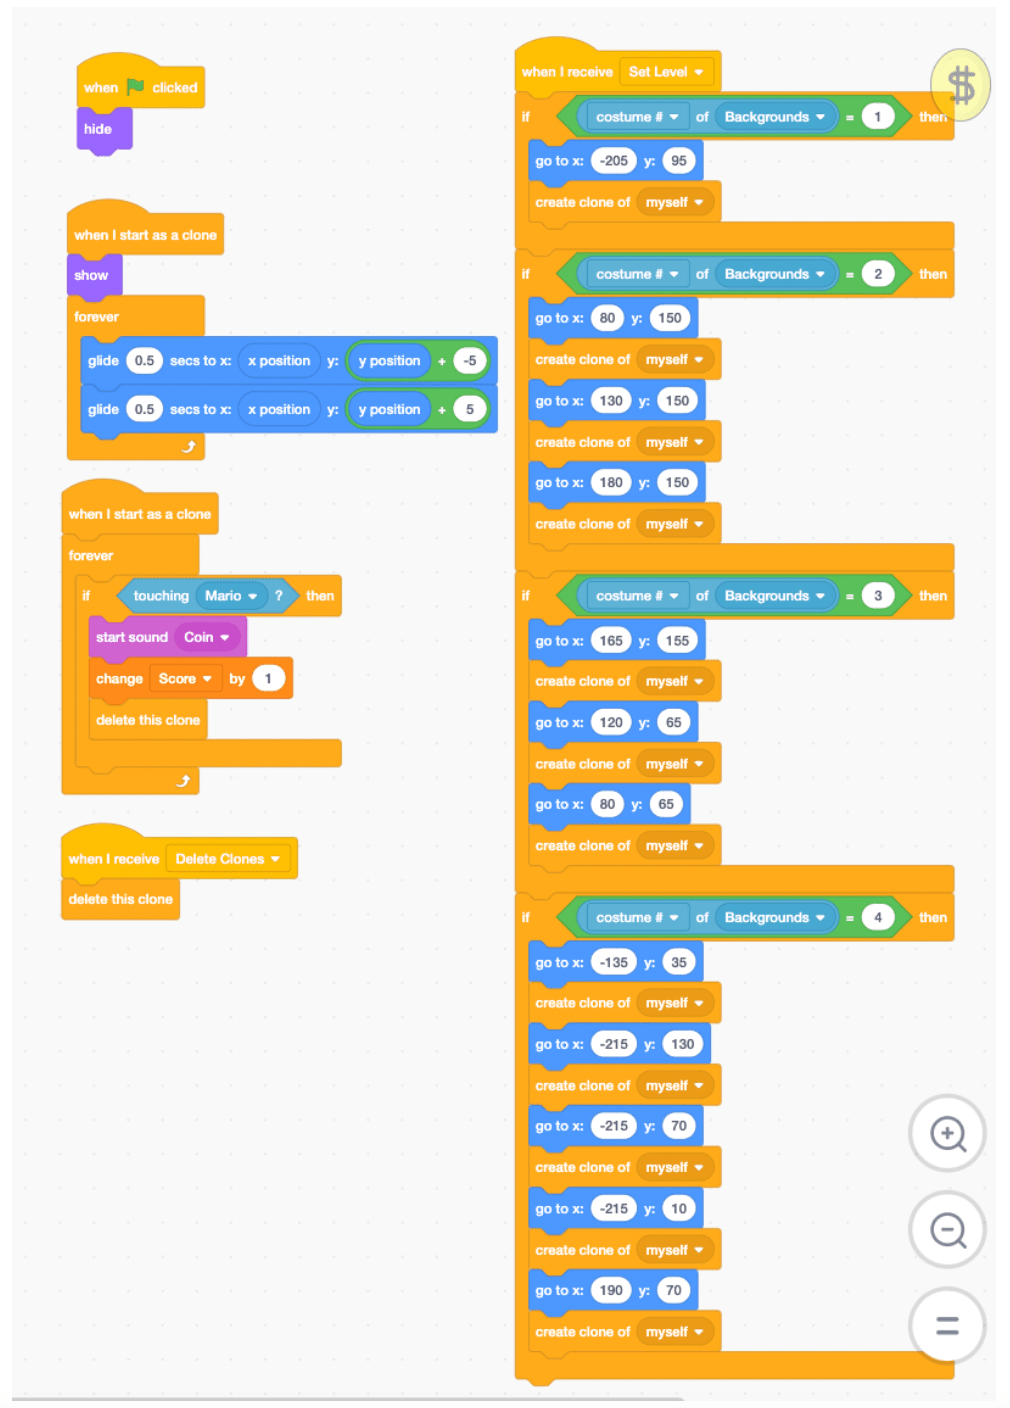
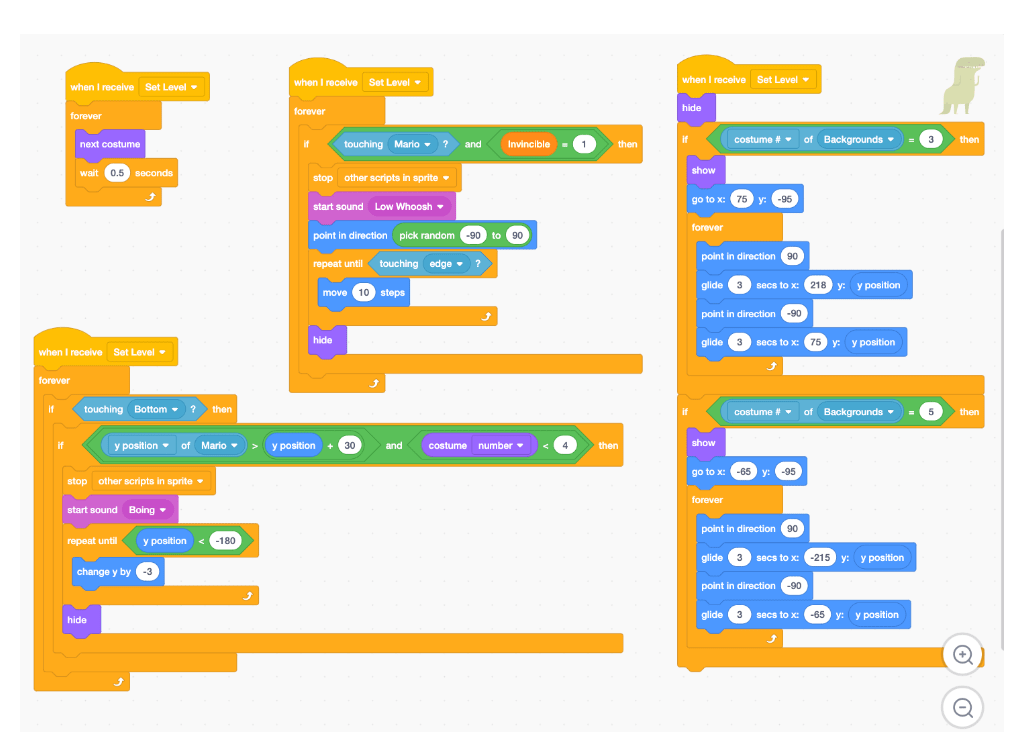
Our Backgrounds sprite will be responsible for moving us through the world, and also telling our other sprites when they need to get in place for each level. Each level will have its own ? Blocks, Coins, and Enemies. We'll broadcast Delete Clones and Set Level to make sure everything resets correctly between levels. This will happen when the green flag is clicked, and also when we go to the next Backgrounds costume.
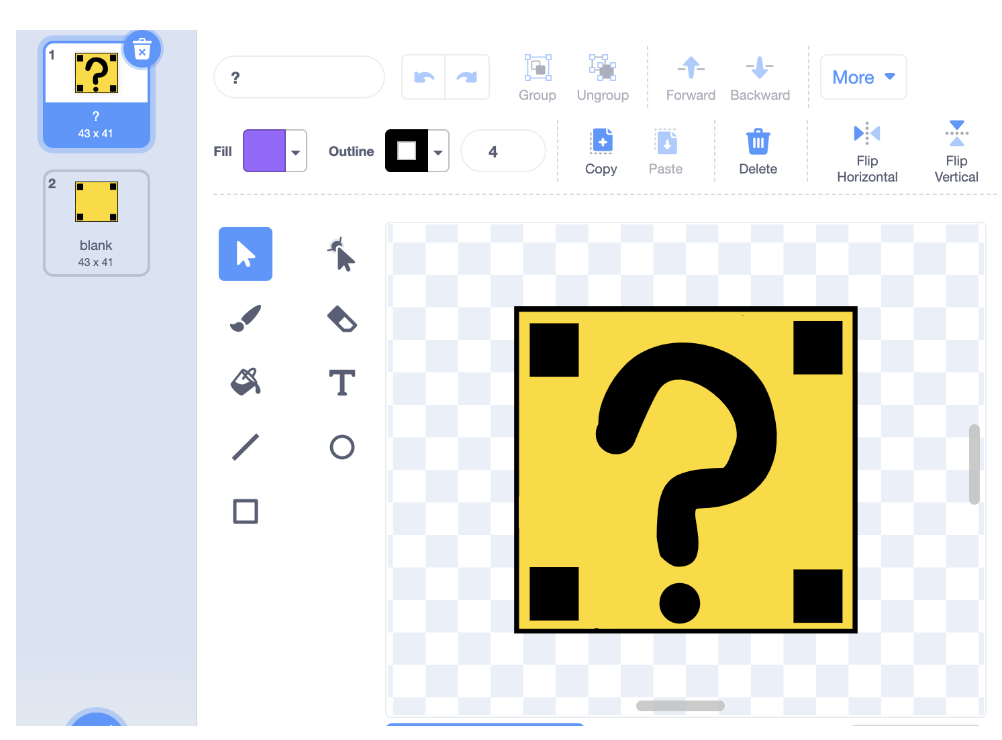
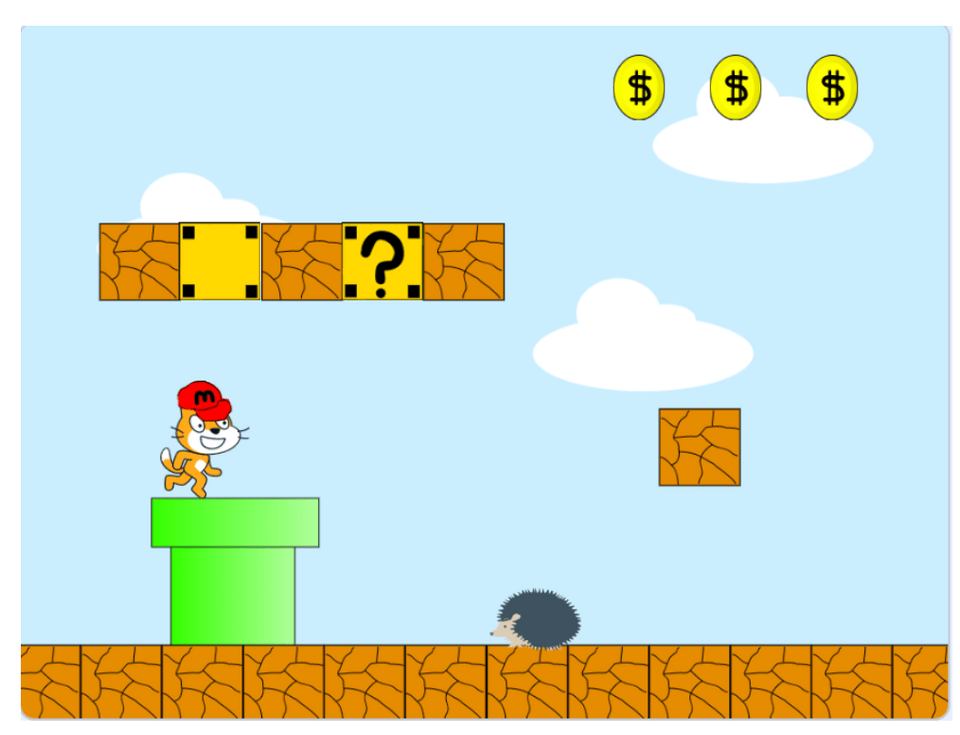
3. Add ? blocks
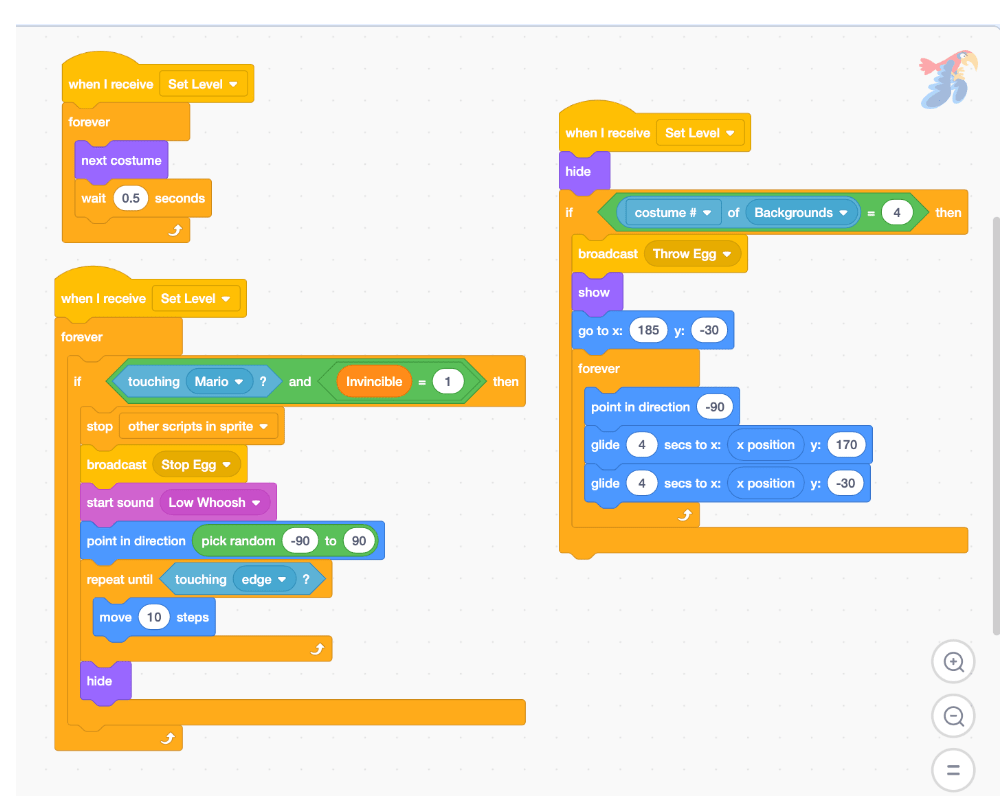
You may have noticed we left some space in between blocks when we created our levels. We're going to fill some of those in with ? Blocks. These blocks behave differently than normal background blocks, so they need to be their own sprite. When we set a level, we're going to move our ? block sprite everywhere we want one, and clone it. Where we move it depends on what level we're on.
In your project, for each level, drag your ? Block sprite where you want it, and take note of its X and Y position. That's the position we'll tell it to go to on that level, and clone itself. We'll use a strategy like this to place our Coins and Enemies later as well.
4. Add detection sprites
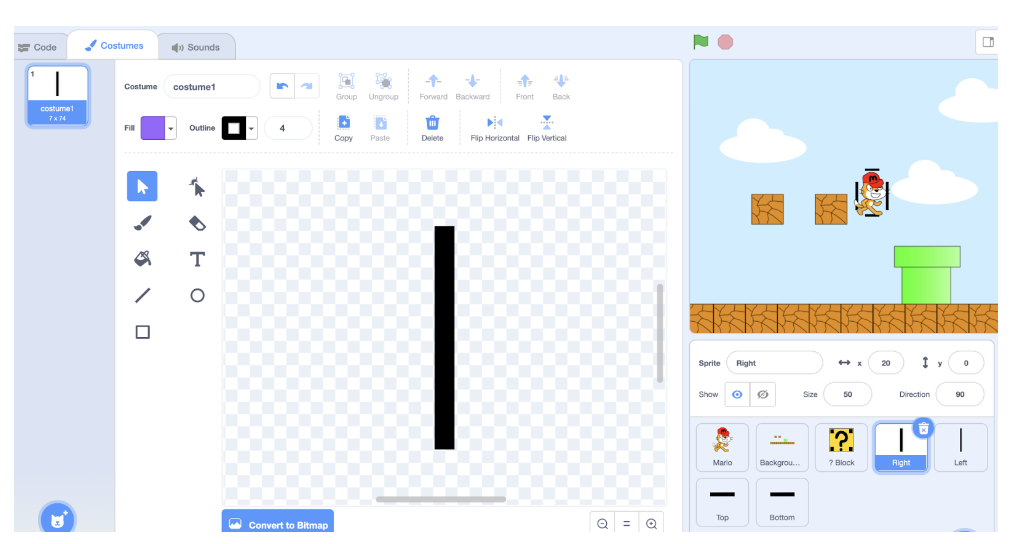
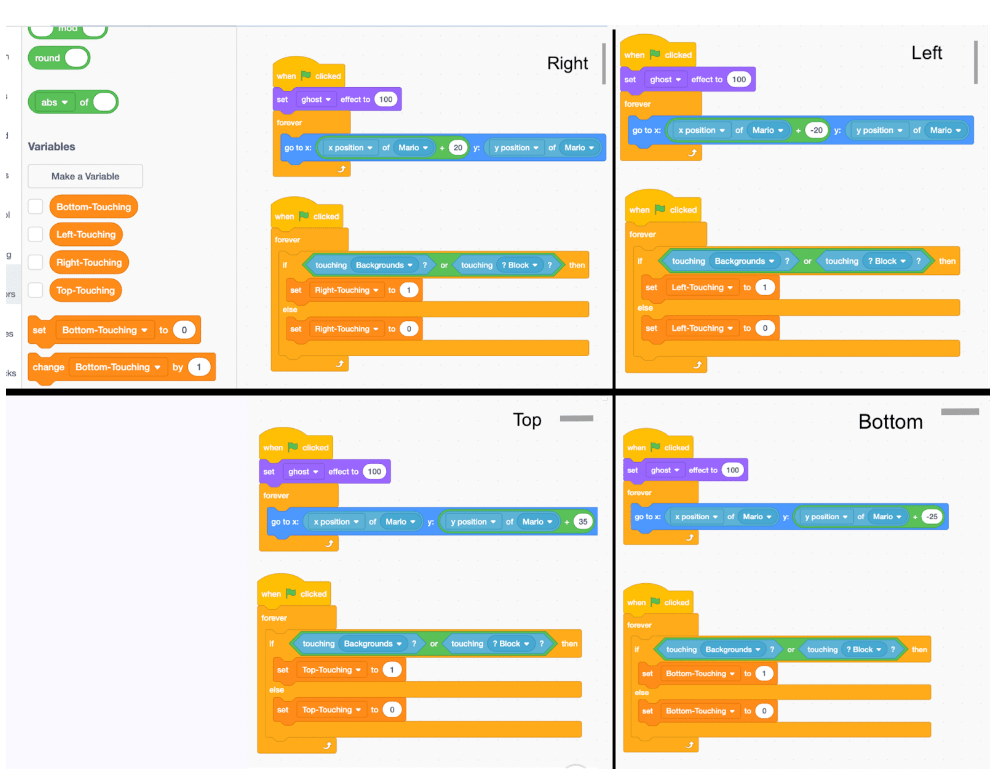
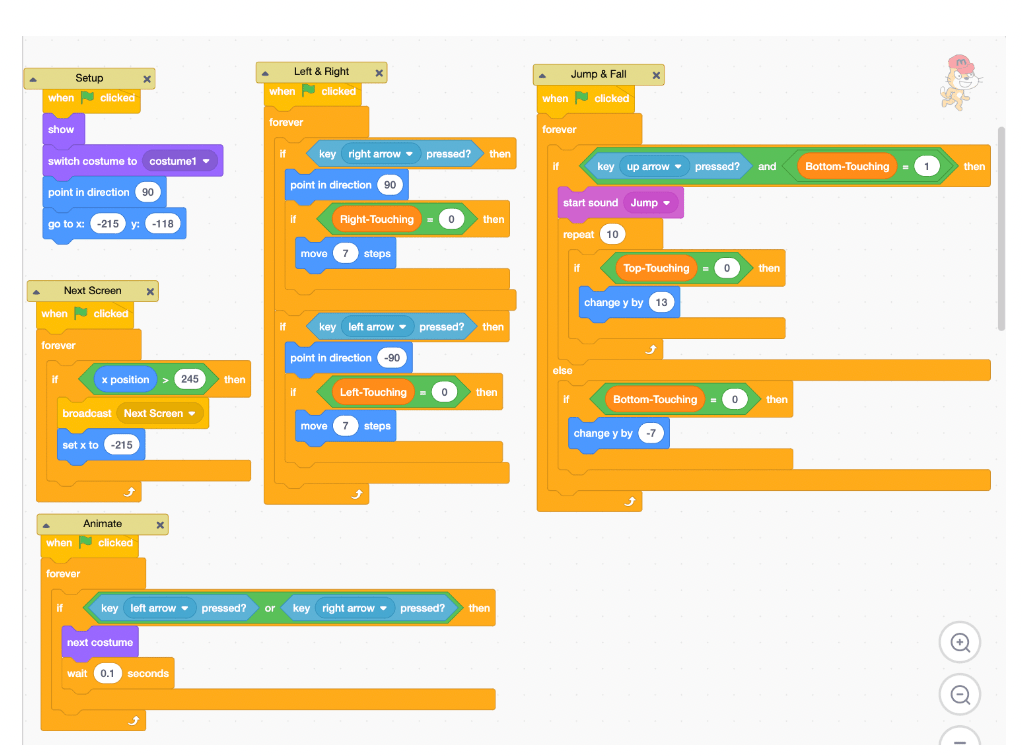
In order to move Mario around our level, he needs to be able to detect walls, floors, and ceilings. We shouldn't be able to go forwards if there's a pipe in front of us, or jump through a block. We can't just say, 'if touching Background, don't move'; if the front of Mario is touching a wall, he can't move forwards, but he can still move backwards, and jump up.
We'll create four sprites, thin lines that follow Mario's location, and these sprites will let us know information about Mario's surroundings. Those sprites will set variables that can tell us if he's able to move right, left, up, or down. For example, if the 'Right' sprite is touching the 'Background' sprite, then we'll set 'Right-Touching' to 1, and we'll know Mario has something in front of him. If 'Right-Touching' is 0, then Mario has nothing in front of him.
5. Move Mario with arrow keys
Mario should move Left and Right, be able to Jump when he's standing on something, and fall down when there's nothing below him. We'll use our detection variables to help us out here. We also want Mario to be animated when he moves, and make sure he starts Level 1 standing in the right spot, facing the right direction.
If you're wondering how to make a scrolling platformer on Scratch, one method is to move to the next level whenever the player sprite gets to the end of the previous one. We do this by forever checking the X position of our sprite, and broadcasting the 'Next Screen' message when they touch the right edge. Another method would be to make the entire 'world' one big costume in the Backgrounds sprite, and move the X position of that sprite to the left as our player moves forward. The latter method creates a cool effect, but makes editing your game and adding to it much more complicated.
There's a lot of code here, and more to add later, so it's a good idea to use comments to help keep us organized. You can add a comment to any code block by right clicking on it. Comments are extremely important when you have a lot of code, especially if it's complex. Comments should be short and descriptive. Fixing bugs in code will go a lot quicker if you can quickly see what chunk of code is responsible for what.
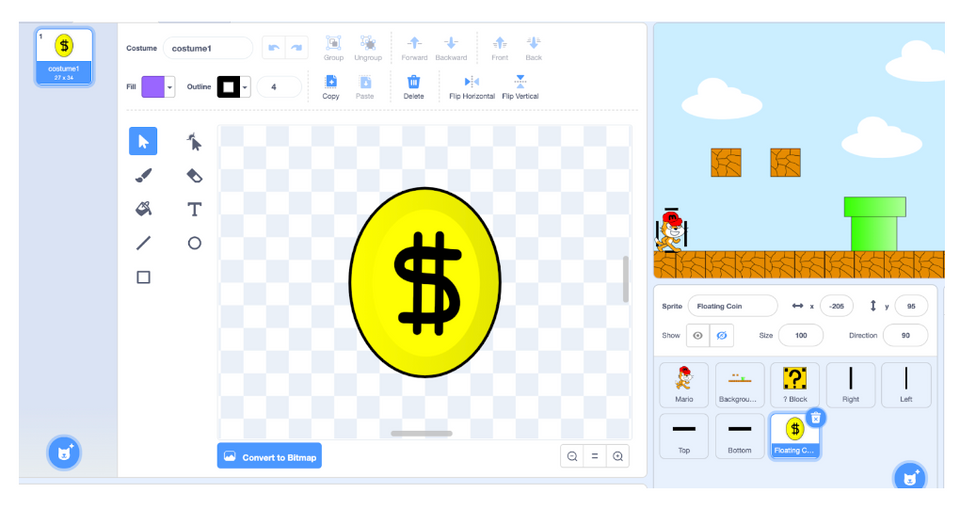
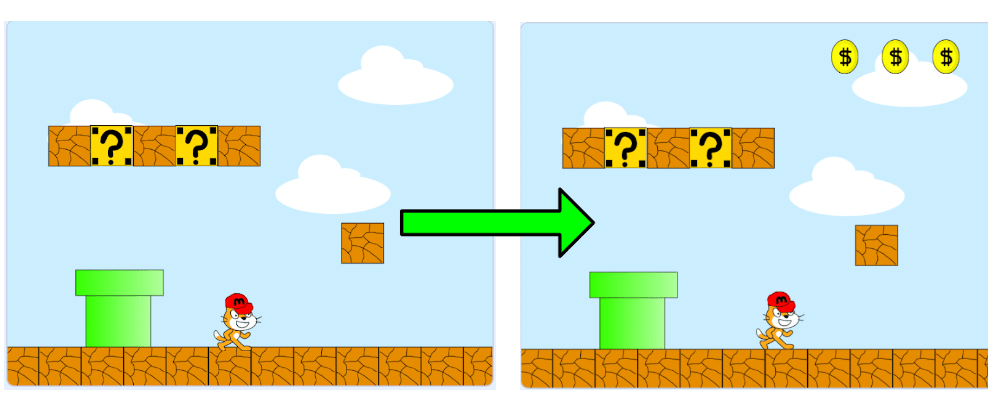
6. Add floating coins
We'll introduce a score variable now. In each level, let's add some floating coins, much in the same way we added the ? Blocks. Paint a new sprite and create its costume by copying the Coin from our Assets backdrop. We'll move the sprite where it should be in that level, and create a clone of it. When that clone is created, we'll forever check and see if Mario touches it, and if he does, we can add a point to the score. Having them glide just a little bit up and down will create a nice floating animation.
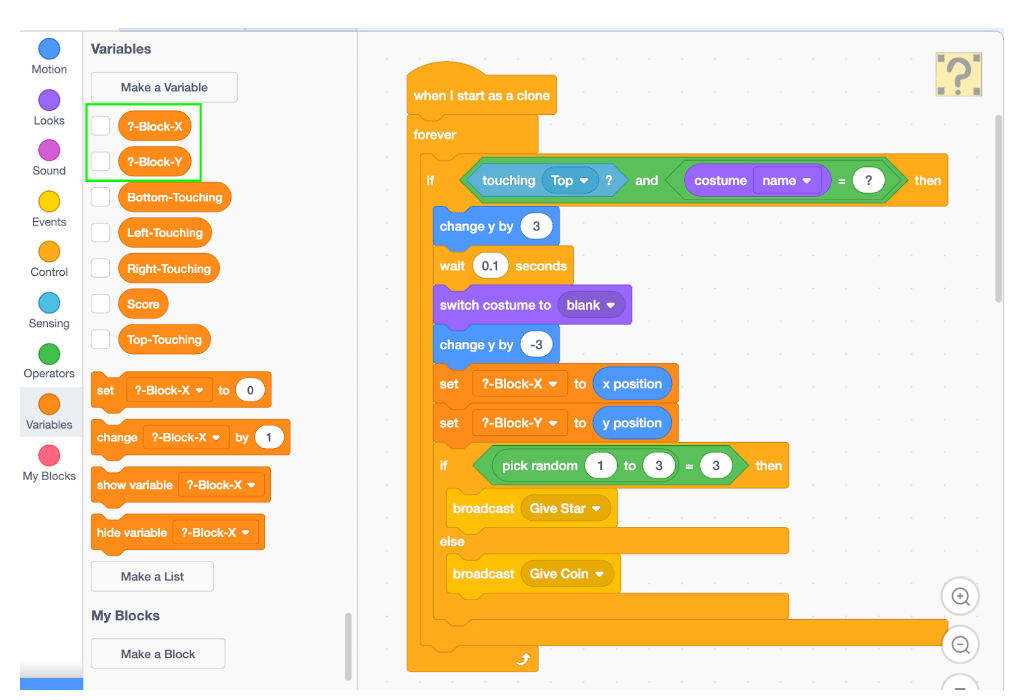
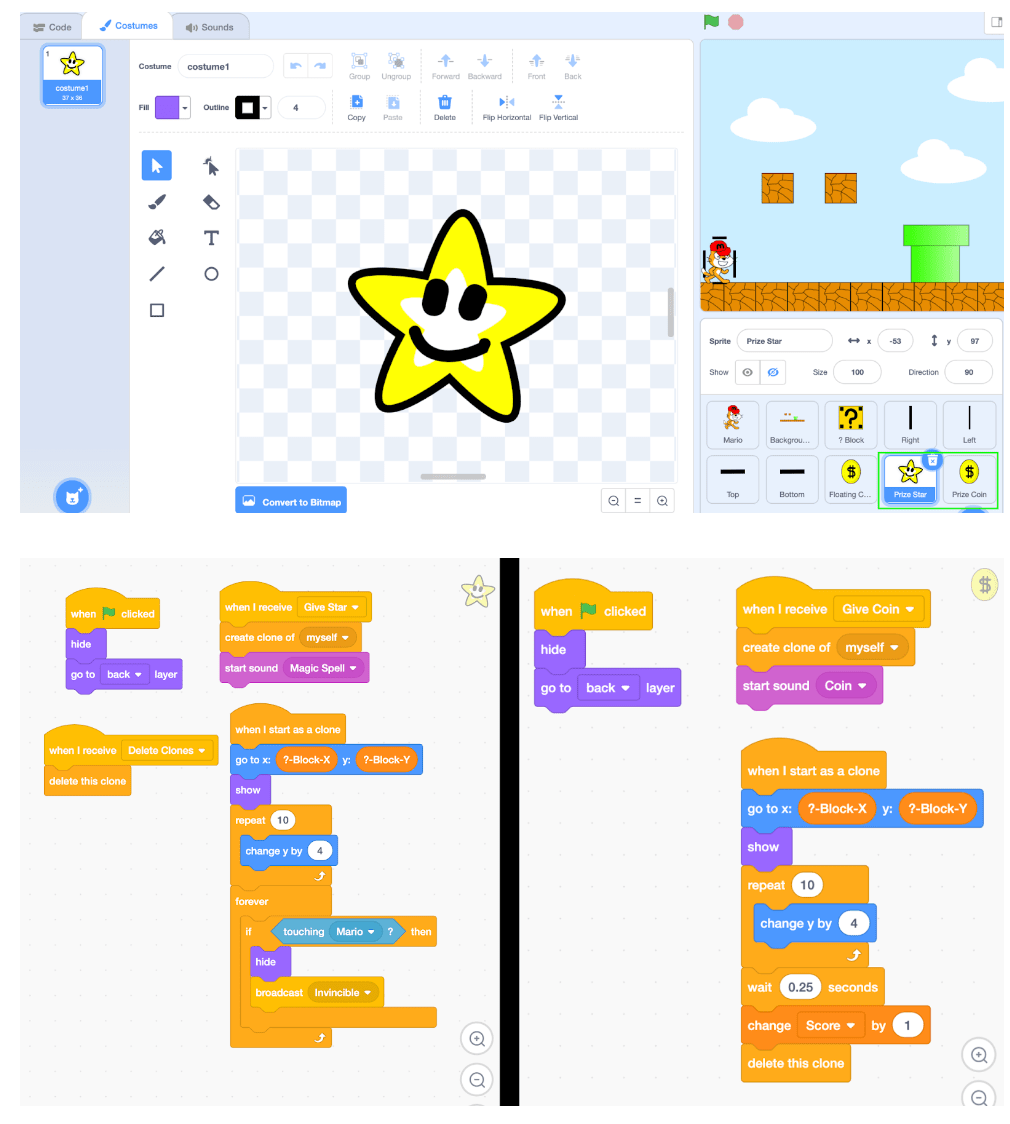
7. Add ? block prizes
In the original Super Mario Bros, hitting a ? Block could give you either a coin or a power-up. We'll do something similar for our game. Most of the time, a ? Block will have a coin that will add to our score, but sometimes, it will have a star that we can pick up and get temporary invincibility from. Invincibility will protect us from the Enemies we'll add later, and we'll code that part in the next step.
Let's add code to our ? Block first. When Mario jumps into it, we'll switch its costume, move it up and down a little, choose which prize to give, and save the position of the block. The ?-Block-X and ?-Block-Y variables will be responsible for telling our new Prize Star and Prize Coin sprites where to go.
Now we can create the Prize Star Sprite and Prize Coin Sprite. When these sprites receive a message, they'll go to the ? Block that was just hit and appear. If it's a coin, it will disappear and add to the score. If it's a star, it will wait for Mario to pick it up, and broadcast 'Invincible' when he does.
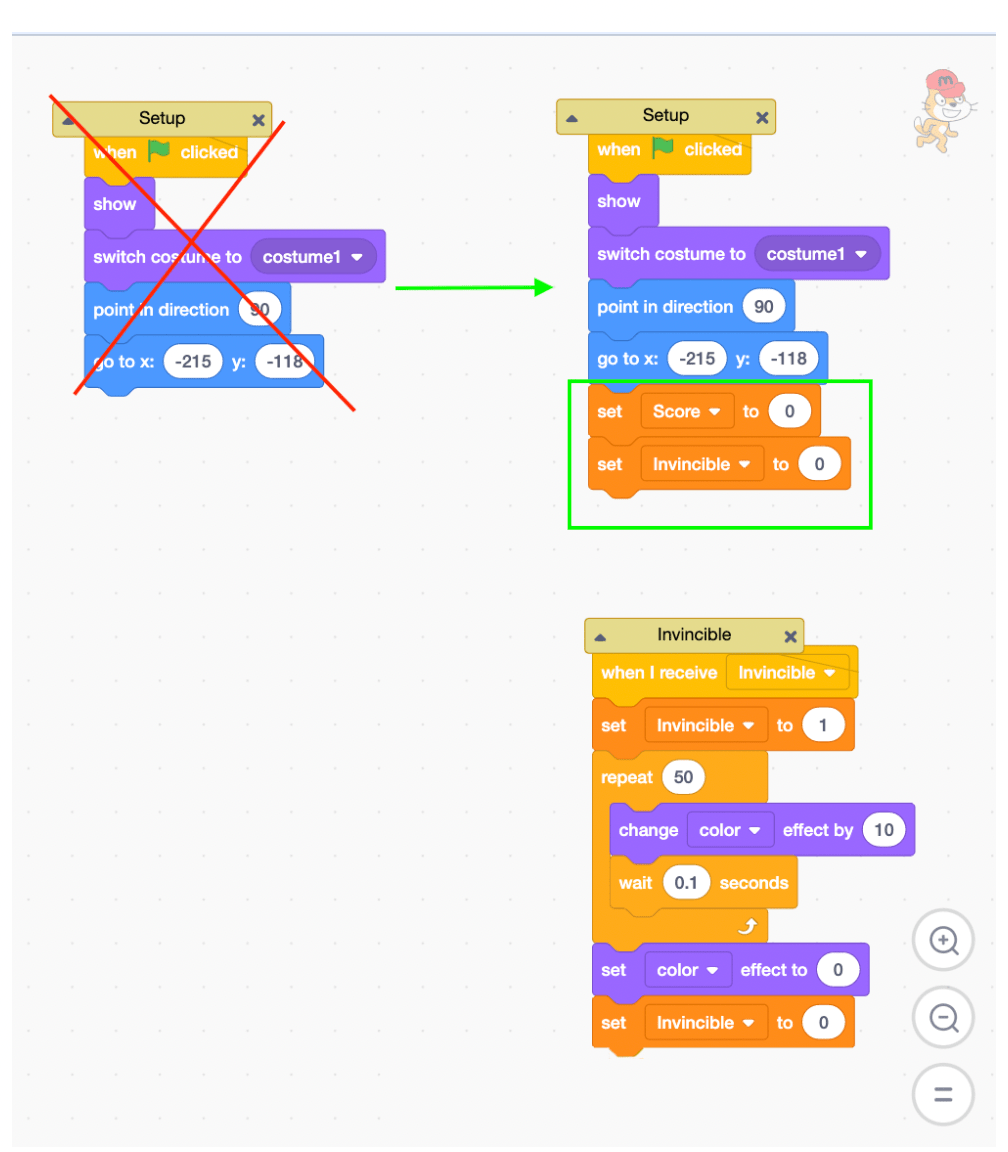
8. Add invincibility
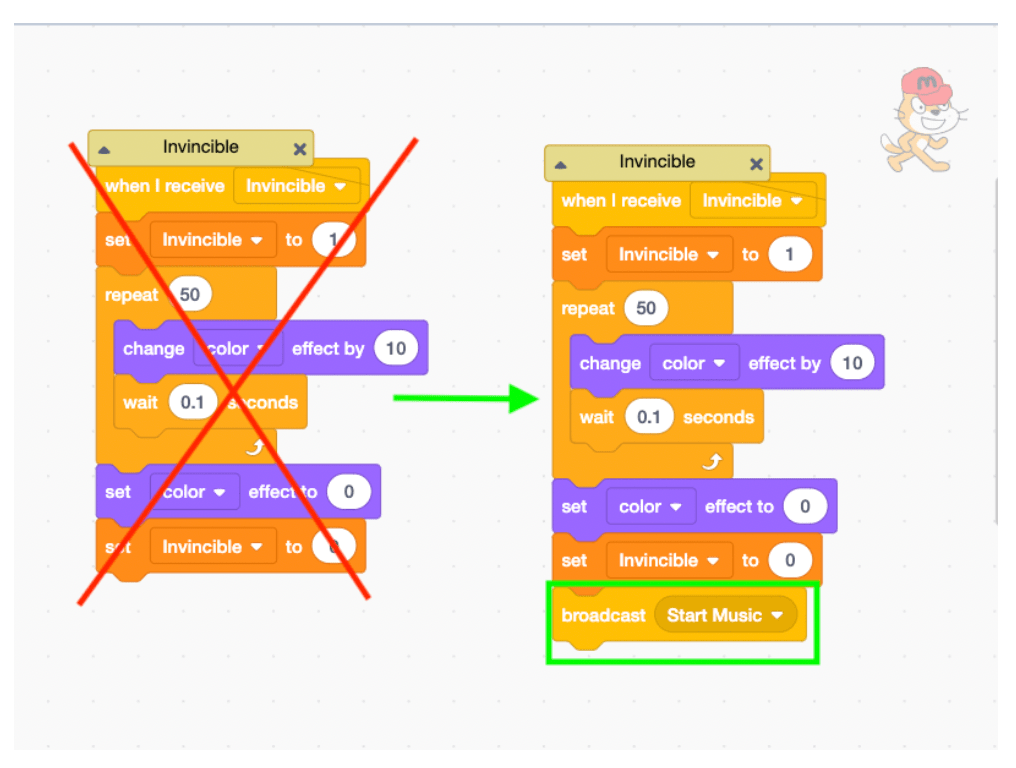
We're broadcasting an 'Invincible' message whenever the Prize Star touches Mario. Let's have Mario respond to that message now. The main thing we want to do is set the 'Invincible' variable. We'll also have Mario change color to indicate that he's invulnerable from enemies. This will last for five seconds, and then we'll set the 'Invincible' variable back to 0. We'll also make sure to set 'Invincible' to 0 when we click the green flag. (Note: we're also setting 'Score' to 0 here).
Now it's time to add the enemies! We'll have three in total for this tutorial, and they'll each behave a little differently, so we'll create a new sprite for each, and add them one at a time. Feel free to draw your own Enemies (add them to the Assets backdrop!), but we'll use regular Scratch sprites for this tutorial.
We'll add our enemies to each level just like we've added ? Blocks, and Floating Coins, but since no level will have more than one of each type of enemy, we won't need to use clones. Whenever we place an enemy, we'll also give it a path, or two spots it should glide back and forth to. Each enemy will also check to see if Mario is invincible when they touch him; if he is, we'll send them flying off the screen. If he's not invincible, then Mario might lose when he touches an Enemy, but we'll put that code in Mario's sprite later.
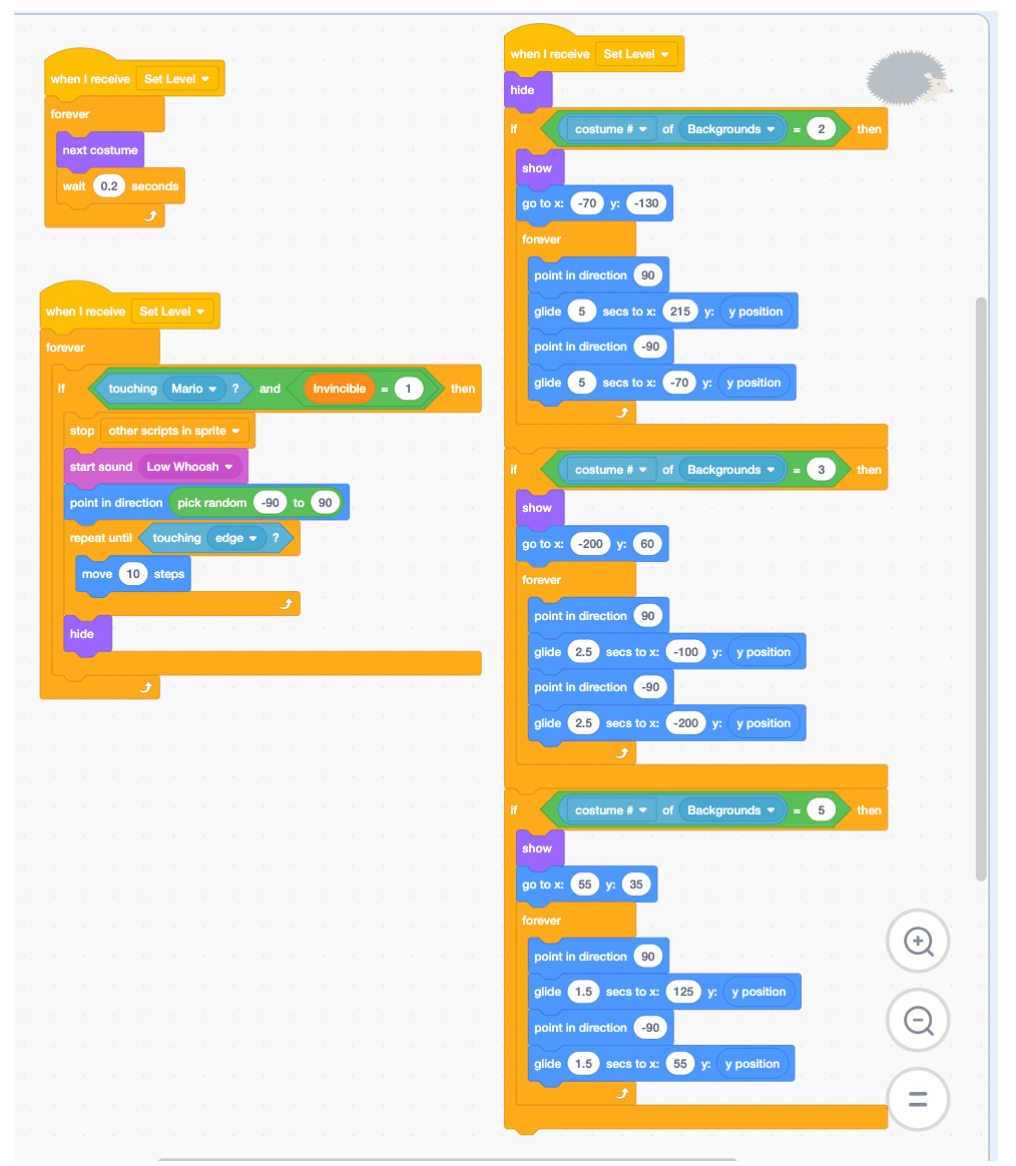
9. Add first enemy (Hedgehog)
The Hedgehog enemy is small, but certainly to be avoided. We'll add a Hedgehog to Levels 2, 3, and 5. If Mario ever touches a Hedgehog when not invincible, it's game over.
10. Add second enemy (Dinosaur)
The Dinosaur is much larger than the Hedgehog, but also a bit clumsier. Mario will actually be able to defeat this enemy by jumping on its head, even if he's not invincible, but only if the Dinosaur isn't baring its jaws. We'll check this by seeing if the Bottom detection sprite is touching, if Mario is above the Dinosaur, and if the Dinosaur's Costume Number is less than 4. The Dinosaur enemy will be present in Levels 3 and 5.
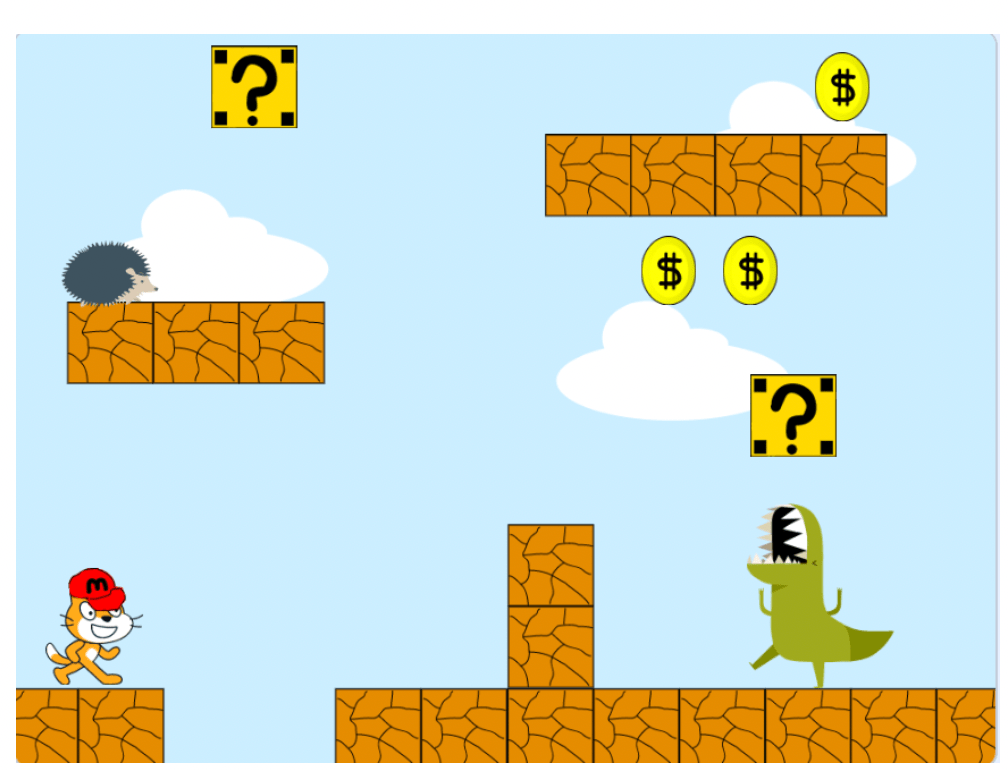
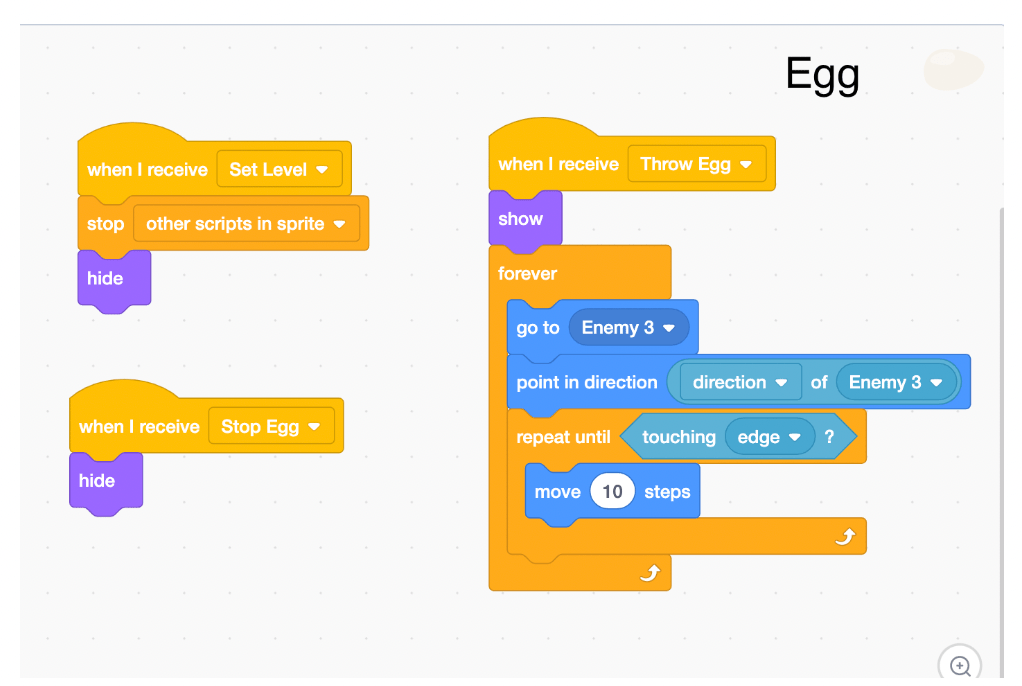
11. Add Third Enemy (Parrot)
The Parrot is arguably the most dangerous enemy; it will actually throw eggs at Mario as he navigates the level! The Egg will be a separate sprite, and when the Parrot sends the message, 'Throw Egg', it will repeatedly go to the Parrot and glide across the screen. The Parrot will only be present on level 4 of our game.
12. Check for lose
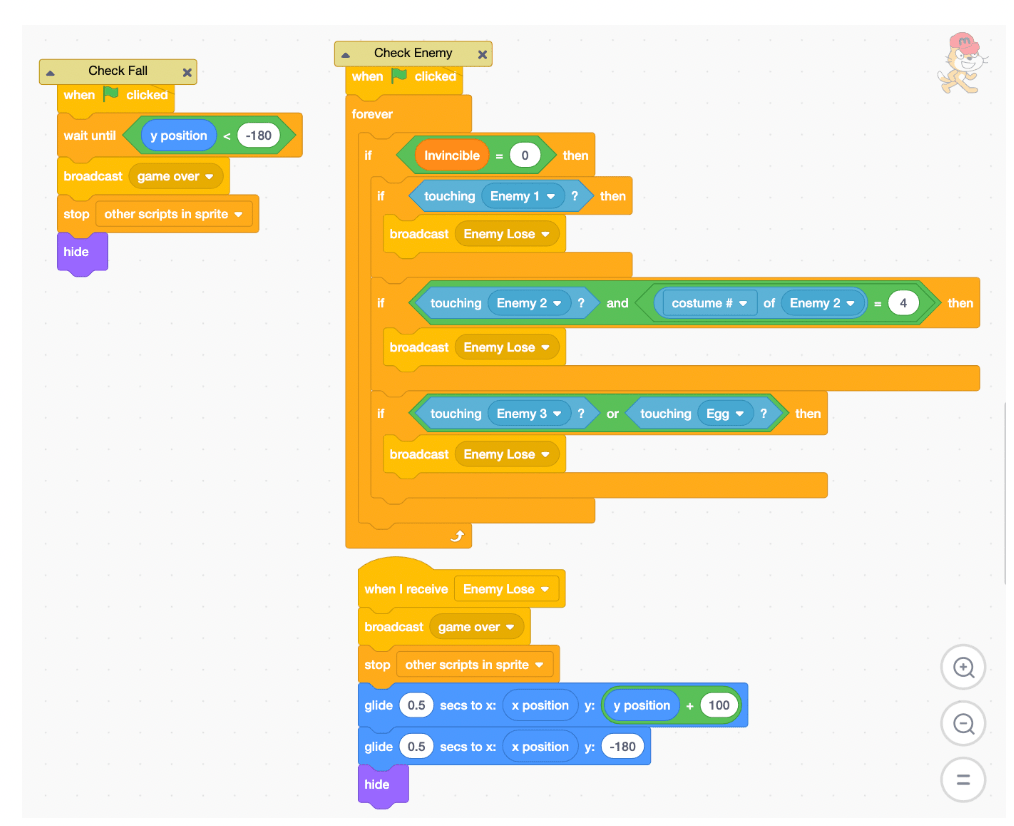
Now that we have all of our Enemies coded, we need to write code that checks to see if Mario is touching them (when he's not invincible). If he touches Enemy 1, or Enemy 2 while its costume equals 4, or Enemy 3 or the Egg, we'll broadcast a 'game over' message, stop the code in Mario's sprite, and hide Mario. You might notice that we're doing the same thing in all three of our If-Then blocks. Why not just do one really big If-Then block? Sometimes it's better to write more code if it makes the code easier to read and easier to change. There's no point in having less code in our project if that code is harder to deal with!
Another way of losing is if Mario falls off the bottom of the screen, so we can check for that as well. We'll do the same thing we did if Mario touches an enemy, minus the glide blocks.
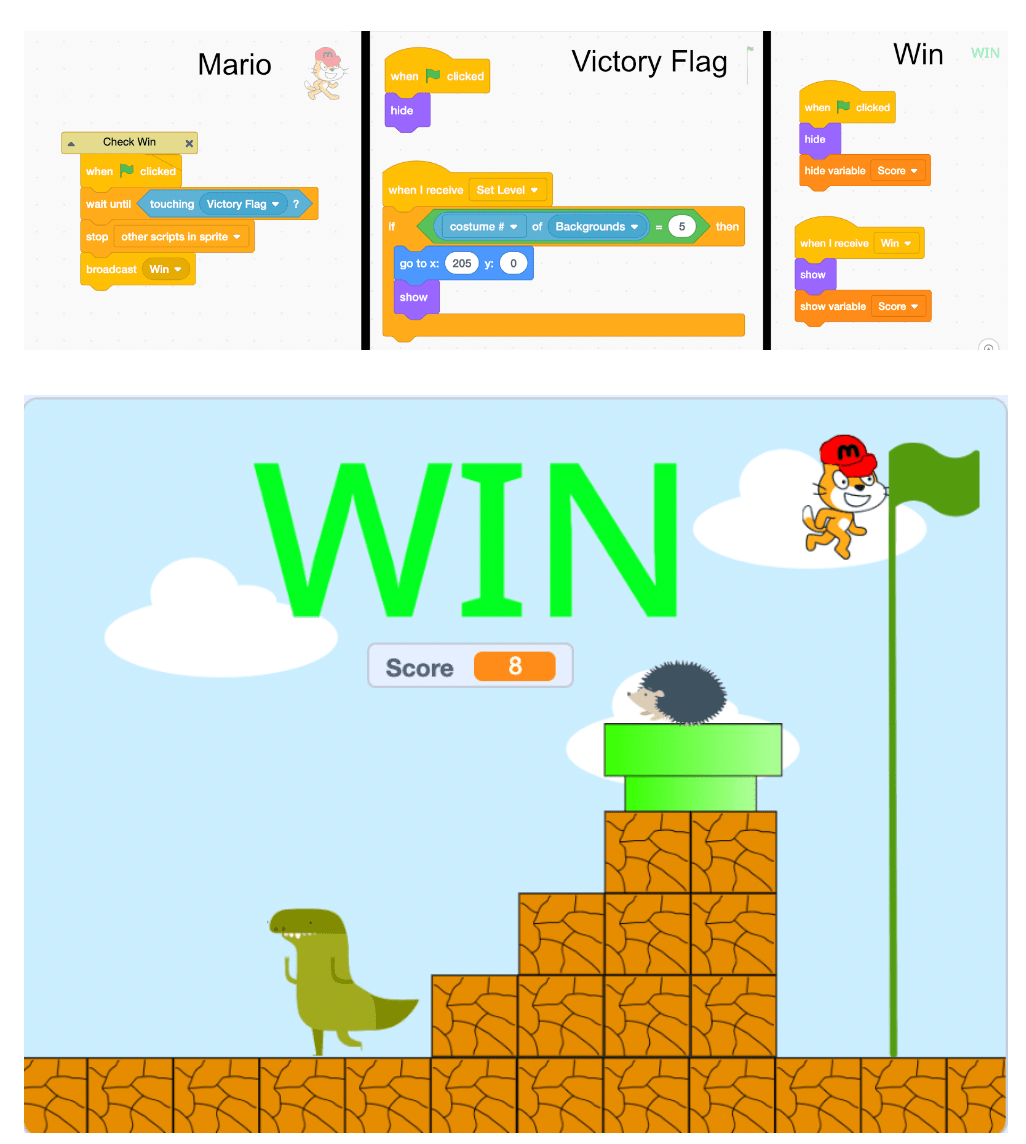
13. Check for win
Let's create two new sprites, a Victory Flag sprite, and a Win sprite. The Victory Flag will sit at the end of Level 5, and we'll place it there just like we did the Enemies, with the 'Set Level' message and a 'Go To X,Y' block. When Mario touches this flag, we'll broadcast the 'Win' message, and show the Win sprite, along with the score.
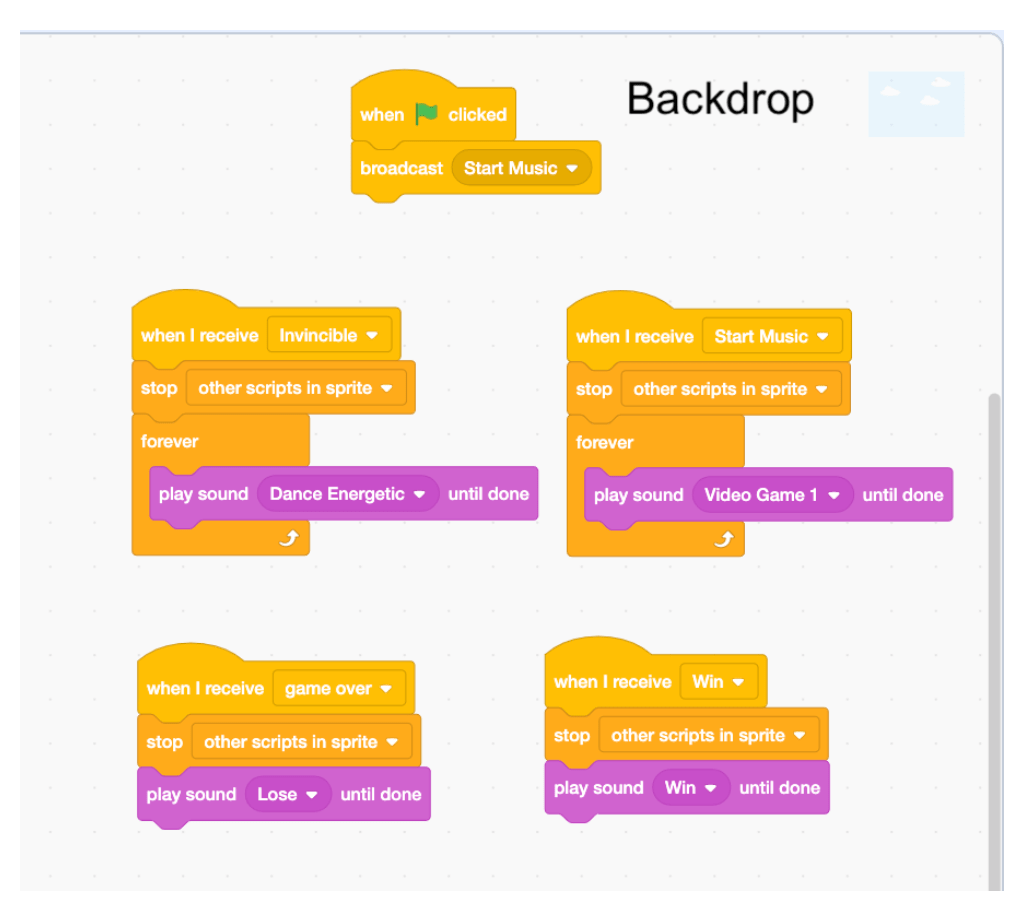
14. Add background music
Now it's time to add music in Scratch! Our game is almost complete; the last finishing touch will be some more sounds. For a classic feel, you can upload a Super Mario Bros sound file for the background music, but we'll just use a built-in Scratch sound for this tutorial, Video Game 1. We'll also need background music for Mario's Invincibility, and a sound effect for losing and winning. Whenever we play a new sound, we want to stop the other sound that's already playing with a 'Stop Other Scripts in this Sprite' block. We'll add another broadcast to Mario's code to start the regular music again when his invincibility is over.
Get started creating a Mario Game on Scratch
And there we have it, our very own Mario Game in Scratch! More importantly, we have the beginnings of a useful game engine to make any sort of platformer in Scratch. Don't forget to upload and show off your project here once you're done!
We can easily build levels and worlds by taking pieces from our Assets backdrop and making new costumes in our Backgrounds sprite. We can add Enemies, and other interactive sprites to each level by hooking into the ‘Set Level’ message, and placing those sprites with the ‘Go To X,Y’ block. What other things could we add to this game? New enemies, new worlds?
If you liked building this game today, check out how to make a memory matching game in Scratch for an advanced tutorial using Lists and Define Blocks.
If you just love building games - our Scratch coding courses (Scratch Ninja for Grades 2-5 and Accelerated Scratch for Grades 5-9) - will walk you through some of the most essential techniques to building any sort of game you can think of! Or jump right into our Game Building class:
Written by Ian Kuzmik, a Create & Learn instructor with a Bachelor's Degree in English from Tulane University. He's been teaching grades K-8 since 2019, with a focus in the subjects of ESL and Computer Science.