Playing geometry dash is super exciting! So today we're going to share how to make a geometry dash game on Scratch. In the geometry dash game, players control the movement of one character and navigate while avoiding obstacles such as spikes or collisions with blocks that instantly destroy the character. By the end of our article, you will have your very own geometry dash game made with Scratch coding.
To create even more cool games, join our award-winning, expert-led, live online Scratch classes (Scratch Ninja for Grades 2-5 and Accelerated Scratch for Grades 5-9), designed by professionals from Google, Stanford, and MIT. There's no risk in trying with our free Scratch intro class.
You might also enjoy building your Pokémon games and customizing them in all sorts of creative ways, in our live online Pokémon Game Building Class.
What is a geometry dash game on Scratch?
The geometry dash game is a 2D game that involves escaping geometric-shaped obstacles via different levels that you can complete.
Playing geometry dash is pretty easy. The game can be played with a touchscreen, keyboard, mouse, or controller depending upon the platform.
The objective of the game is to complete a level by reaching its end. Press the space key to make their player jump in order to avoid obstacles. If the player crashes into an obstacle, the game will restart.
See how to code a geometry dash game on Scratch
Typically a geometry dash game will have multiple levels. But today, to keep it simple, we're not going to add levels. Let's get started! Head on over to the MIT Scratch website and login.
1. Choose or design a backdrop
The first thing we need to do is to create your backdrop, because by default there is a blank backdrop. To choose/design your own backdrop, click on the round mountain icon on the right side of the screen that allows you to choose your backdrop.
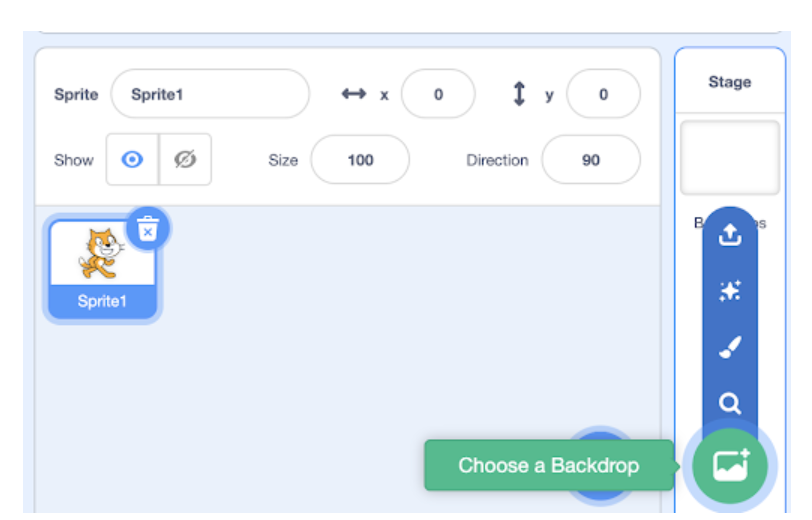
Go ahead and choose a backdrop. Or if you want to design your own backdrop then click on the paintbrush.
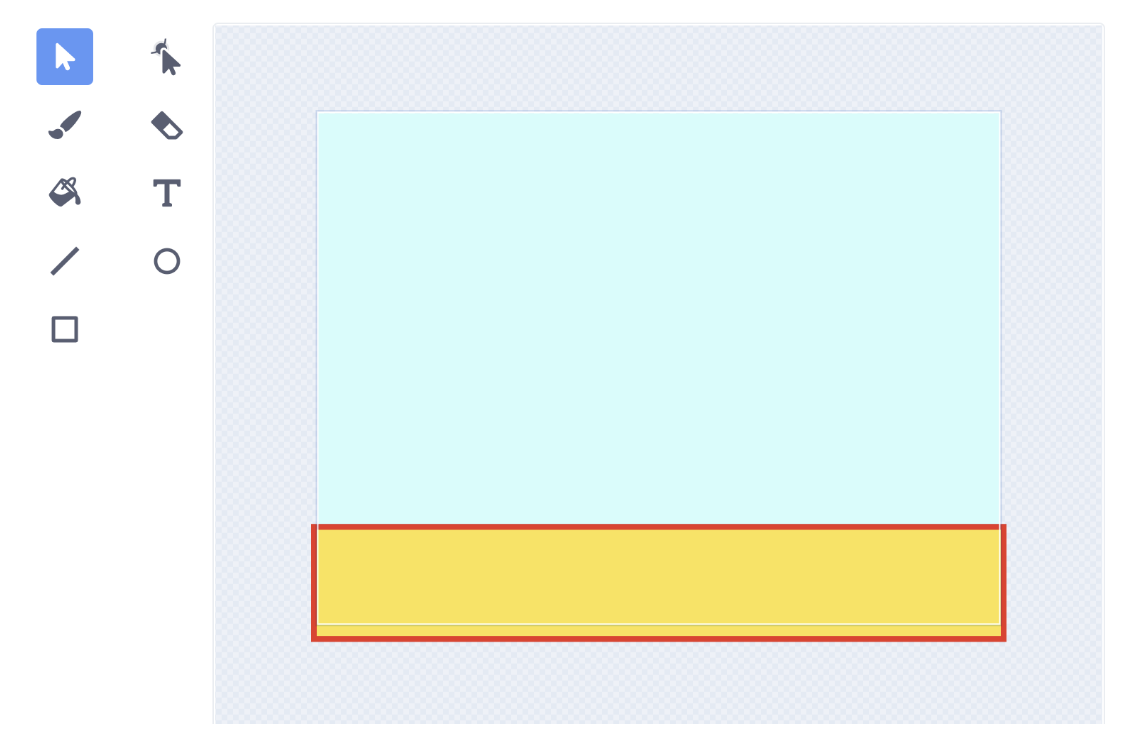
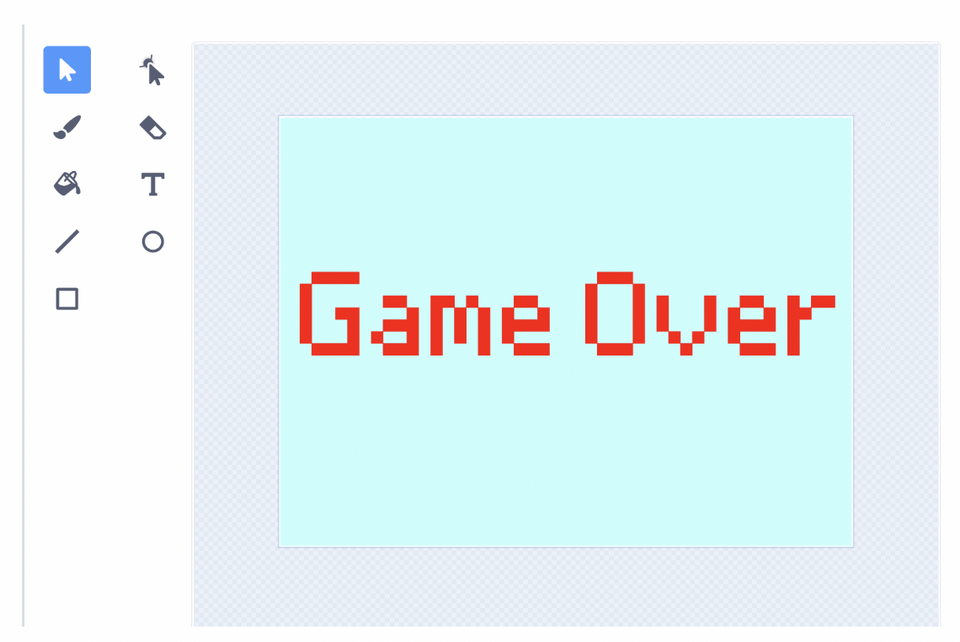
Here we have designed two backdrops. One is a plain colored backdrop with a yellow colored pathway on it. The second one is for the Game Over state.
2. Design your sprite
Now that you have your backdrops ready, we need to draw our sprites. The round blue color cat icon on the right bottom corner allows you to draw a new sprite. Go ahead and select the paintbrush option to draw your sprites.
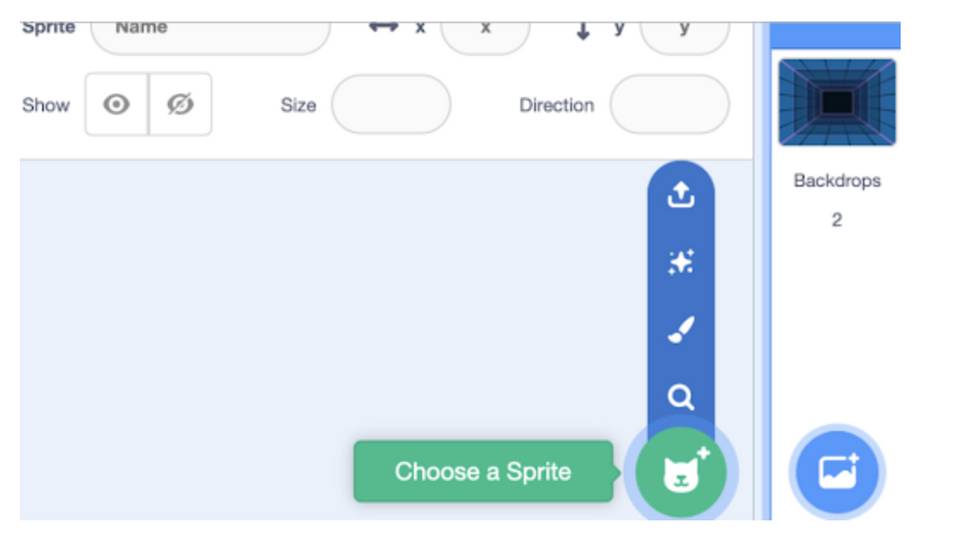
For this game, we are drawing 2 sprites.
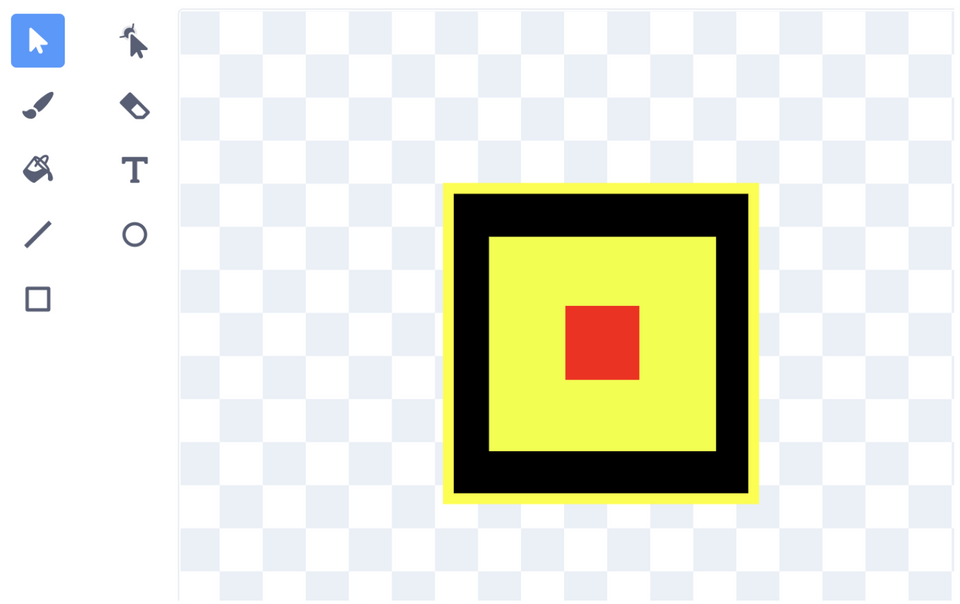
- The first sprite is a square shaped player. You can use your creativity and design your own player.
- The second sprite is triangle spikes/hurdles.
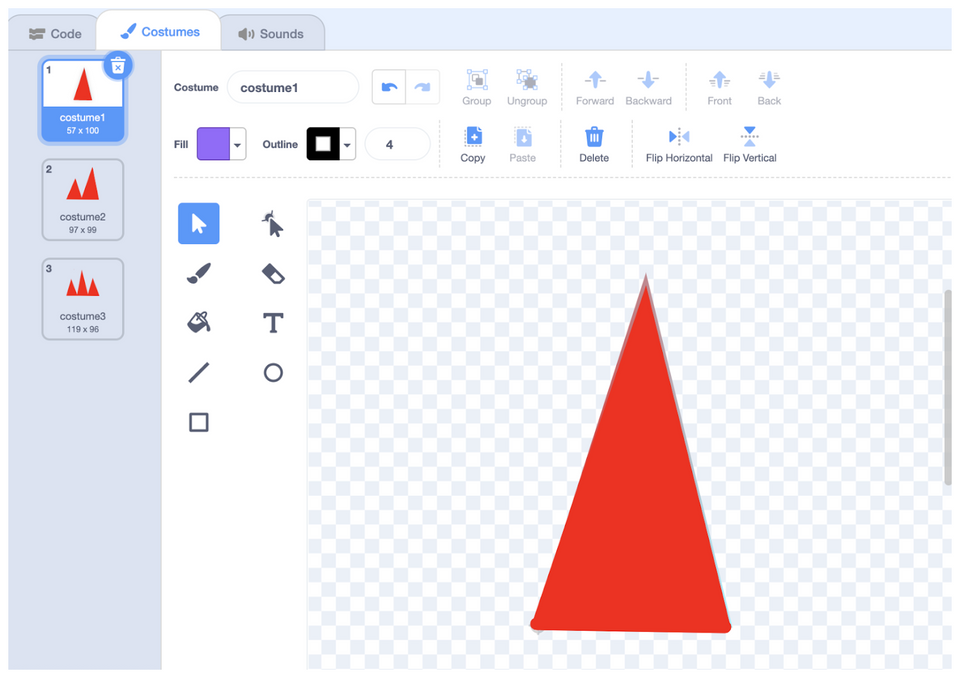
Draw 3-4 costumes for spikes as shown in the above image.
3. Make a variable to score the points
Go to Variable blocks and create one variable named score, to save the scores.
4. Set the player position and make the player jump
Now that we have everything ready, let's begin to code! We will fix the player (sprite) position at the beginning. And then when we press the space key the player should jump in order to avoid the spikes.
Select your player sprite and let’s start our code with the When flag clicked block from Event blocks and then pull out the Show block from Looks blocks. Underneath, get the Point in direction 90 block and goto x: -152 and y: -104 block from Motion blocks.
To make your player jump every time when you press the space key, add a Forever block, and inside forever place the IF block from Control blocks. Inside the IF condition, place the key space pressed block from Sensing blocks.
Inside the IF block, place two Repeat 10 blocks one after another from Control blocks. In the first Repeat block, place the turn clockwise 10 degrees block and the change y by 10 block from Motion blocks. In the second Repeat block, add the turn clockwise 10 degrees block and change y by -10 block from Motion blocks.
After the Repeat blocks add one point in direction 90 block from Motion blocks.

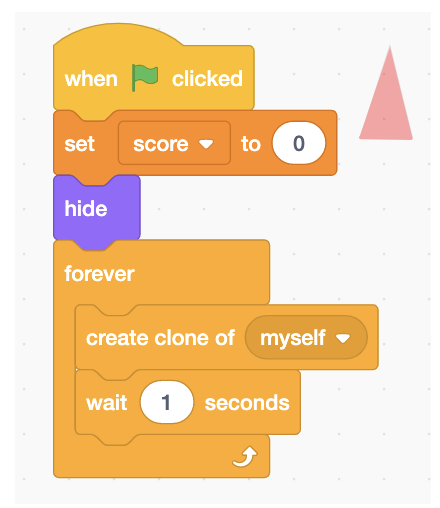
5. Reset the score and start making multiple spikes
To initiate the score, we need to set the score variable to 0 and start creating clones of the spikes sprite every second.
In order to do this, click on your spike sprite, and start your code stack with the When flag clicked block from Event blocks. Then, add the set score to 0 block from Variable blocks. Underneath add a hide block from Looks blocks to hide the original sprite.
Now, add a Forever block. Inside Forever add create clone of myself block and wait 1 seconds block from Control blocks.
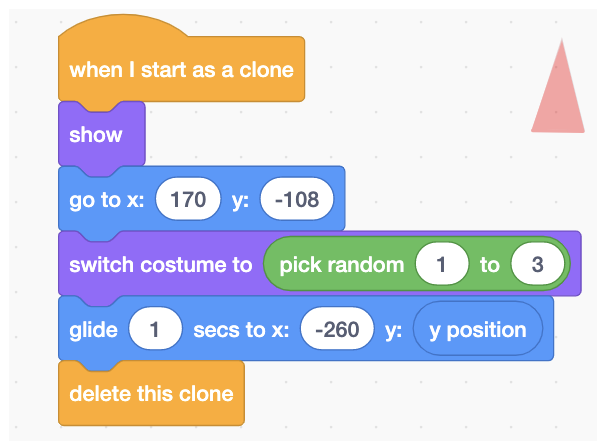
6. Make the spikes move on the pathway
To move the spikes on the pathway, start your code with the When I start as a clone block from Control blocks and add a Show block from Looks blocks. Underneath add the go to x: 170 y: -108 block from Motion blocks to fix the starting position of the spikes. Now add the switch costumes to costume 1 block from Looks blocks. In place of costume1, add a pick random 1 to 3 block from the Operator blocks. To glide our spikes from left to right we will add glide 1 sec to x:-280 y:y position block from Motion blocks.
Once it reaches its designated position, the sprite clone should disappear. To delete the clones, add delete the clone block from Control blocks at the end of the stack.
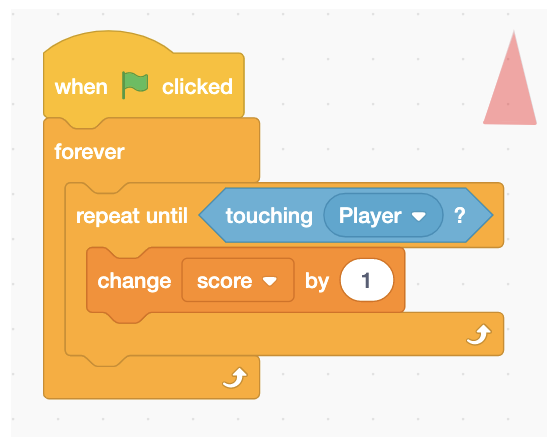
7. Score the points
As soon as the game starts, players will start scoring points. The player will get points until the player touches the spikes.
So for our code, we will start the stack with the When flag clicked block from Event blocks. Underneath add a Forever block and Repeat until block from Control blocks. In the repeat until condition, we will add a Touching players block from Sensing blocks.
Inside the repeat until block just add a change score by 1 block from Variable blocks.
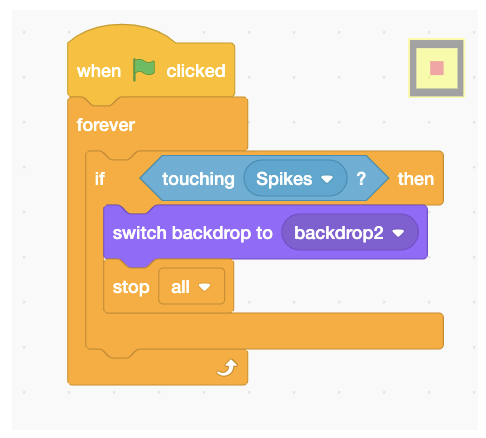
8. When the player touches the spikes and the game ends
The game ends when the player touches the spikes. But before that, we need to switch the backdrop and stop all the scripts.
Click on the player sprite and start your code stack with the When flag clicked block from Event blocks. A add a forever and If block from Control blocks. Inside the if condition add a touching spikes block from Sensing blocks.
Inside if, add switch backdrop to backdrop2/game over block from Looks blocks and a stop all block from Control blocks.
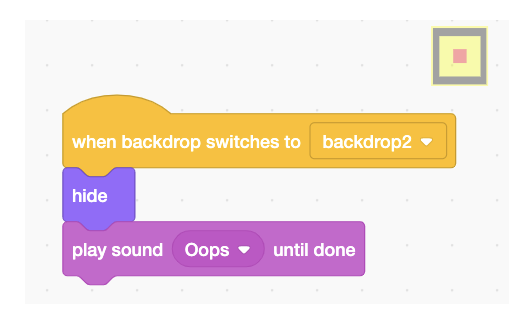
9. Hide the sprite when the game ends
When the game ends we need to hide our player sprite. For that, we need to start our stack with the When backdrop switches to backdrop 2 block from Event blocks. Underneath that, add a hide block from Looks blocks and a play sound ____ until done block from Sound blocks.
10. Fun additional tasks
The geometry dash game we've made here is very basic. Generally, these games are never ending games - including tons of levels to play. To make your game more interesting you can add:
- Different levels
- Timely power boosters
- More upgrades based on the score
- Different kind of hurdles
- Increase the frequency of appearing spikes/hurdles
- Different world backgrounds
Make a geometry dash game on Scratch
Now you've created a fun geometry dash game from Scratch! Play your game and see how far you can get. In this tutorial, you learned to use basic blocks to create amazing things. There is so much you can create using Scratch! Up next, see how to make a clicker game on Scratch.
To keep creating amazing games, check out our award-winning Scratch coding for kids classes and our Game Building class - all led live by an expert and designed by professionals from Google, Stanford, and MIT. There's no risk in trying with our free intro session!
Written by Apoorva Rastogi, a Create & Learn instructor who has worked as a coding instructor for more than 6 years. Apoorva has a Bachelor's Degree in Mathematics and a Master's Degree in Computer Applications.